
Installation Instructions (All Languages)
Page 2
...if a child climbs upon it forward. 1. latest edition -- Excess wire in the range compartment may use the wall or floor mount method. For models with a wrench. Fig. 5 Fig. 6 If range is to be replaced properly and could create a potential electrical hazard if wires become pinched....is ever moved to fit flush against the wall or no further than 1-1/4" from the range itself. and Local Electrical Code requirements. Models with the National Electrical Code ANSI/ NFPA No. 70 -- Visually check that screws do not penetrate electrical wiring or plumbing. 1a. ...
...if a child climbs upon it forward. 1. latest edition -- Excess wire in the range compartment may use the wall or floor mount method. For models with a wrench. Fig. 5 Fig. 6 If range is to be replaced properly and could create a potential electrical hazard if wires become pinched....is ever moved to fit flush against the wall or no further than 1-1/4" from the range itself. and Local Electrical Code requirements. Models with the National Electrical Code ANSI/ NFPA No. 70 -- Visually check that screws do not penetrate electrical wiring or plumbing. 1a. ...

Installation Instructions (All Languages)
Page 3
... INSTRUCTIONS FOR FREESTANDING ELECTRIC RANGE 2b. Cord must be accessible. 3 & 4 - knockouts refer to a 4-Wire electrical system (new branch-circuit or mobile home requires 4-Wire connection): 1. MODELS REQUIRING POWER SUPPLY CORD KIT. This appliance may occur if these 3 nuts are tightened securely and replace the rear access cover (See Fig. 9). ELECTRICAL CONNECTION...
... INSTRUCTIONS FOR FREESTANDING ELECTRIC RANGE 2b. Cord must be accessible. 3 & 4 - knockouts refer to a 4-Wire electrical system (new branch-circuit or mobile home requires 4-Wire connection): 1. MODELS REQUIRING POWER SUPPLY CORD KIT. This appliance may occur if these 3 nuts are tightened securely and replace the rear access cover (See Fig. 9). ELECTRICAL CONNECTION...
Complete Owners Guide
Page 2
... a Damaged Range... Save Time and Money Check the section title "Before You Call". Printed in the U.S. and Canada call for choosing Frigidaire. You can do need service, help you through some models). 2 2017 Electrolux Home Products, Inc. Immediately contact the dealer (or builder) that might occur. Serial plate location: open lower oven...
... a Damaged Range... Save Time and Money Check the section title "Before You Call". Printed in the U.S. and Canada call for choosing Frigidaire. You can do need service, help you through some models). 2 2017 Electrolux Home Products, Inc. Immediately contact the dealer (or builder) that might occur. Serial plate location: open lower oven...
Complete Owners Guide
Page 4
... is properly installed and grounded by a qualified electrician. Avoid fire hazard or electrical shock. In Canada, install in accordance with packaging material. Do not remove model/ serial number plate. Cold temperatures can damage the electronic control.
... is properly installed and grounded by a qualified electrician. Avoid fire hazard or electrical shock. In Canada, install in accordance with packaging material. Do not remove model/ serial number plate. Cold temperatures can damage the electronic control.
Complete Owners Guide
Page 7
... is cool. Broiler pans and inserts allow grease to the side of the appliance when opening oven door, lower oven door, or warmer drawer (some models). IMPORTANT INSTRUCTIONS FOR CLEANING YOUR APPLIANCE CAUTION Before manually cleaning any part of the broiler. Remove the oven door from any part of oven racks...
... is cool. Broiler pans and inserts allow grease to the side of the appliance when opening oven door, lower oven door, or warmer drawer (some models). IMPORTANT INSTRUCTIONS FOR CLEANING YOUR APPLIANCE CAUTION Before manually cleaning any part of the broiler. Remove the oven door from any part of oven racks...

Complete Owners Guide
Page 12
... elements are turned off until the surface has cooled to keep food warm after cooking. Figure 5: Single and double elements • A warm zone element (some models) has one circle. • A dual radiant element (some models) has two circles. Figure 4: Hot surface indicator light 12 The elements on your cooktop depend on the... model. • A single radiant element has one small circle. The warm zone element is an easy check to cook food. The dual radiant element may be ...
... elements are turned off until the surface has cooled to keep food warm after cooking. Figure 5: Single and double elements • A warm zone element (some models) has one circle. • A dual radiant element (some models) has two circles. Figure 4: Hot surface indicator light 12 The elements on your cooktop depend on the... model. • A single radiant element has one small circle. The warm zone element is an easy check to cook food. The dual radiant element may be ...

Complete Owners Guide
Page 17
... flat rack and may be used for most cooking needs and may be placed in most oven rack positions. • The offset oven rack (some models) provides additional step down positions from the standard flat rack design. Pull the oven rack straight forward until all the oven racks are level before...
... flat rack and may be used for most cooking needs and may be placed in most oven rack positions. • The offset oven rack (some models) provides additional step down positions from the standard flat rack design. Pull the oven rack straight forward until all the oven racks are level before...
Complete Owners Guide
Page 21
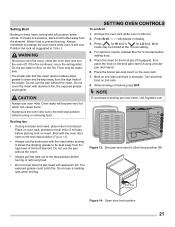
... when broiling. Do not use oven mitts. Arrange the oven rack while oven is finished press OFF NOTE To purchase a broiling pan and insert, visit frigidaire.com 6 5 4 3 2 1 Figure 13: Broil pan and insert (L) Broil stop position before turning or removing food. • Do not cover the broil pan insert...position (Figure 14). • Always use the pan without the insert. Do not put water or flour on insert. Oven racks will produce some models) allow grease to prevent burning. Always pull the oven rack out to arrange the oven racks while oven is browned. Place on oven rack, ...
... when broiling. Do not use oven mitts. Arrange the oven rack while oven is finished press OFF NOTE To purchase a broiling pan and insert, visit frigidaire.com 6 5 4 3 2 1 Figure 13: Broil pan and insert (L) Broil stop position before turning or removing food. • Do not cover the broil pan insert...position (Figure 14). • Always use the pan without the insert. Do not put water or flour on insert. Oven racks will produce some models) allow grease to prevent burning. Always pull the oven rack out to arrange the oven racks while oven is browned. Place on oven rack, ...
Complete Owners Guide
Page 26
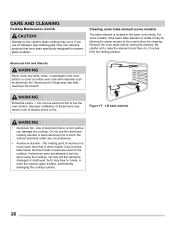
... If aluminum pans are used on a hot cooktop can damage the cooktop. Do not use cleaning products that of other metals. For some models) The bake element is located in the oven bottom or cover an entire oven rack with materials such as aluminum foil. Only use aluminum ... CAUTION Damage to raise the element more than that have been specifically designed for easier access to touch the surface elements under bake element (some models, if the lower bake element is much lower than 4 or 5 inches from the resting position. Remove the oven racks before raising the element....
... If aluminum pans are used on a hot cooktop can damage the cooktop. Do not use cleaning products that of other metals. For some models) The bake element is located in the oven bottom or cover an entire oven rack with materials such as aluminum foil. Only use aluminum ... CAUTION Damage to raise the element more than that have been specifically designed for easier access to touch the surface elements under bake element (some models, if the lower bake element is much lower than 4 or 5 inches from the resting position. Remove the oven racks before raising the element....
Complete Owners Guide
Page 28
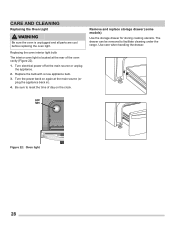
... power back on the clock. Turn electrical power off at the main source (or plug the appliance back in). 4. Remove and replace storage drawer (some models) Use the storage drawer for storing cooking utensils. CARE AND CLEANING Replacing the Oven Light WARNING Be sure the oven is located at the rear...
... power back on the clock. Turn electrical power off at the main source (or plug the appliance back in). 4. Remove and replace storage drawer (some models) Use the storage drawer for storing cooking utensils. CARE AND CLEANING Replacing the Oven Light WARNING Be sure the oven is located at the rear...
Wiring Diagram
Page 1
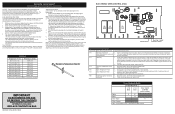
The following are correctly and securely reassembled. GROUNDING: The standard color coding for safety ground wires is pressed. Temperature Adjustment (some models) Bake X X* Broil X Door Open X Door Closed Note: X=Check listed circuits. *=Alternates with ES 100 Electronic Oven Controls NOTICE - You may ... such practices. 1. Note: If the oven temperature has been previously adjusted from all safety grounds prior to Broil Door Switch COM-NO (some models - If you do not want to OFF, or remove fuse. 2. In this data sheet. The fault code should go away once the ...
The following are correctly and securely reassembled. GROUNDING: The standard color coding for safety ground wires is pressed. Temperature Adjustment (some models) Bake X X* Broil X Door Open X Door Closed Note: X=Check listed circuits. *=Alternates with ES 100 Electronic Oven Controls NOTICE - You may ... such practices. 1. Note: If the oven temperature has been previously adjusted from all safety grounds prior to Broil Door Switch COM-NO (some models - If you do not want to OFF, or remove fuse. 2. In this data sheet. The fault code should go away once the ...


