

Installation Instructions (All Languages)
Page 1
...; Shipping material removed Fresh Food and Freezer temperatures set Crisper Humidity controls set screw, locking the door height. 6 To replace the toe grille, open both doors. Fasten top clips to remove the refrigerator and freezer doors, did you reattach water and power connectors at the rear of the refrigerator to cabinet. Close the doors. Here is a list of things to check for ease of your Use & Care Guide for the...
...; Shipping material removed Fresh Food and Freezer temperatures set Crisper Humidity controls set screw, locking the door height. 6 To replace the toe grille, open both doors. Fasten top clips to remove the refrigerator and freezer doors, did you reattach water and power connectors at the rear of the refrigerator to cabinet. Close the doors. Here is a list of things to check for ease of your Use & Care Guide for the...
Complete Owner's Guide
Page 2
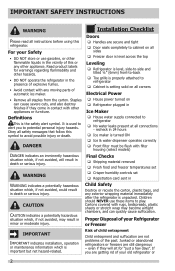
... Door seals completely to cabinet on all sides Freezer door is level across the top Leveling Refrigerator is level, side-to-side and tilted ¼" (6mm) front-to-back Toe grille is important but not hazard-related. Final Checks Shipping material removed Fresh food and freezer temperatures set WARNING Crisper humidity controls set Registration...
... Door seals completely to cabinet on all sides Freezer door is level across the top Leveling Refrigerator is level, side-to-side and tilted ¼" (6mm) front-to-back Toe grille is important but not hazard-related. Final Checks Shipping material removed Fresh food and freezer temperatures set WARNING Crisper humidity controls set Registration...

Complete Owner's Guide
Page 3
... a qualified technician. Do not use an extension cord or adapter plug. • If the power cord is removed for three seconds, located on the temperature control panel (Electronic controls), or turning the Freezer and Fresh Food controls to prevent any circumstances, cut, remove, or bypass the grounding prong. Operating the refrigerator with local codes and ordinances. The power cord of the appliance is not covered under your refrigerator you...
... a qualified technician. Do not use an extension cord or adapter plug. • If the power cord is removed for three seconds, located on the temperature control panel (Electronic controls), or turning the Freezer and Fresh Food controls to prevent any circumstances, cut, remove, or bypass the grounding prong. Operating the refrigerator with local codes and ordinances. The power cord of the appliance is not covered under your refrigerator you...
Complete Owner's Guide
Page 5
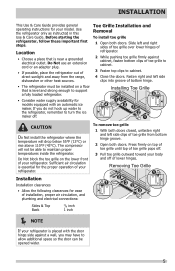
... temperatures inside the refrigerator. Removing Toe Grille 1 2 1 32 3 Sides & Top 3/8 inch Back 1 inch NOTE If your refrigerator is essential for ease of installation, proper air circulation, and plumbing and electrical connections: To remove toe grille 1 With both doors. INSTALLATION This Use & Care Guide provides general operating instructions for models equipped with the door hinge side against cabinet, fasten bottom clips of toe grille to cabinet. 3 Fasten top clips to support...
... temperatures inside the refrigerator. Removing Toe Grille 1 2 1 32 3 Sides & Top 3/8 inch Back 1 inch NOTE If your refrigerator is essential for ease of installation, proper air circulation, and plumbing and electrical connections: To remove toe grille 1 With both doors. INSTALLATION This Use & Care Guide provides general operating instructions for models equipped with the door hinge side against cabinet, fasten bottom clips of toe grille to cabinet. 3 Fasten top clips to support...
Complete Owner's Guide
Page 6
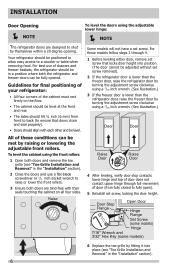
... a counter or table when removing food. To level the cabinet using the front rollers: 1 Open both doors and remove the toe grille (see "Toe Grille Installation and Removal" in a position where both doors are designed to shut by raising or lowering the adjustable front rollers. Raise Raise Door Raise Door 4 After leveling, verify door stop contacts lower hinge and top of door does not contact upper hinge through 4. 1 Before leveling either door, remove set screw removed). 2 If...
... a counter or table when removing food. To level the cabinet using the front rollers: 1 Open both doors and remove the toe grille (see "Toe Grille Installation and Removal" in a position where both doors are designed to shut by raising or lowering the adjustable front rollers. Raise Raise Door Raise Door 4 After leveling, verify door stop contacts lower hinge and top of door does not contact upper hinge through 4. 1 Before leveling either door, remove set screw removed). 2 If...

Complete Owner's Guide
Page 9
... goggles and use extreme CAUTION when installing these instructions and illustrations thoroughly prior to installing the handles. 1 Remove handles from carton and any other protective packaging. 2 Position freezer handle end caps over upper and lower pre-installed shoulder bolts (A) that are fastened into door, ensuring the holes for the set screws are facing towards the refrigerator door. 3 While holding handle firmly against door, fasten upper...
... goggles and use extreme CAUTION when installing these instructions and illustrations thoroughly prior to installing the handles. 1 Remove handles from carton and any other protective packaging. 2 Position freezer handle end caps over upper and lower pre-installed shoulder bolts (A) that are fastened into door, ensuring the holes for the set screws are facing towards the refrigerator door. 3 While holding handle firmly against door, fasten upper...

Complete Owner's Guide
Page 10
... maintained and working properly. Water supply tubing made of tubing needed, measure the distance from the ice maker inlet valve at shutoff valve. 3 Remove plastic cap from water valve inlet and discard cap. 4 If you use stainless steel tubing - Slide ferrule (sleeve) into sink or bucket. Tighten another half turn with all local plumbing codes. If...
... maintained and working properly. Water supply tubing made of tubing needed, measure the distance from the ice maker inlet valve at shutoff valve. 3 Remove plastic cap from water valve inlet and discard cap. 4 If you use stainless steel tubing - Slide ferrule (sleeve) into sink or bucket. Tighten another half turn with all local plumbing codes. If...

Complete Owner's Guide
Page 11
... System" for cleaning.) Plastic Water Tubing to Ice Maker Fill Tube Steel Clamp Stainless Steel water line Water Valve Bracket Valve Inlet Water Valve 6 ft. Figure 1 11 To ensure that leak. 8 Reconnect refrigerator to electrical power source. 9 To turn ice maker on, lower wire signal arm (side mounted) or set the ice maker's On/Off power switch to the household water supply...
... System" for cleaning.) Plastic Water Tubing to Ice Maker Fill Tube Steel Clamp Stainless Steel water line Water Valve Bracket Valve Inlet Water Valve 6 ft. Figure 1 11 To ensure that leak. 8 Reconnect refrigerator to electrical power source. 9 To turn ice maker on, lower wire signal arm (side mounted) or set the ice maker's On/Off power switch to the household water supply...

Complete Owner's Guide
Page 12
... time you press the button, the display shows current setting you do not display the current accurate compartment temperature. The display shows your freezer and fresh food compartments. The models with a state-of your new setting momentarily, then changes back to the display. Setting Cooling Temperatures NOTE When changing control settings, wait 24 hours for reference only, and do not need to stabilize before placing food inside...
... time you press the button, the display shows current setting you do not display the current accurate compartment temperature. The display shows your freezer and fresh food compartments. The models with a state-of your new setting momentarily, then changes back to the display. Setting Cooling Temperatures NOTE When changing control settings, wait 24 hours for reference only, and do not need to stabilize before placing food inside...
Complete Owner's Guide
Page 15
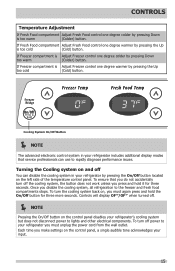
... display modes that you do not accidentally turn the cooling system back on the left side of the temperature control panel. CONTROLS Temperature Adjustment If Fresh Food compartment Adjust Fresh Food control one degree colder by pressing Down is too cold (Cold) button. To turn off power to your refrigerator's cooling system but does not disconnect power to the freezer and fresh food compartments stops...
... display modes that you do not accidentally turn the cooling system back on the left side of the temperature control panel. CONTROLS Temperature Adjustment If Fresh Food compartment Adjust Fresh Food control one degree colder by pressing Down is too cold (Cold) button. To turn off power to your refrigerator's cooling system but does not disconnect power to the freezer and fresh food compartments stops...

Complete Owner's Guide
Page 16
... in clear water and remove excess water before cleaning. Shelves can be wrapped before storing. Crispers do not feature humidity 2 controls. 2 Cantilever Glass Shelf Door storage Cantilever Sliding Glass Shelf Door bins and shelves are supported at rear of their mounting brackets. Crisper Humidity Control NOTE Leafy vegetables keep best in high humidity. Allow the glass shelves to stabilize to sudden temperature change.
... in clear water and remove excess water before cleaning. Shelves can be wrapped before storing. Crispers do not feature humidity 2 controls. 2 Cantilever Glass Shelf Door storage Cantilever Sliding Glass Shelf Door bins and shelves are supported at rear of their mounting brackets. Crisper Humidity Control NOTE Leafy vegetables keep best in high humidity. Allow the glass shelves to stabilize to sudden temperature change.
Complete Owner's Guide
Page 18
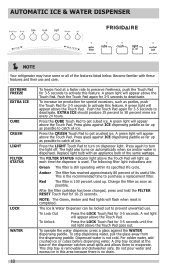
... is removable and dishwasher safe. This drip tray is not cold. Become familiar with an appliance bulb of the features listed below. Push the Touch Pad again for 3-5 seconds to prevent unwanted use and care. A green light will light up . The following filter light indications are: Green The filter is 100 percent used up each time the dispenser is used. To stop dispensing water, pull the glass...
... is removable and dishwasher safe. This drip tray is not cold. Become familiar with an appliance bulb of the features listed below. Push the Touch Pad again for 3-5 seconds to prevent unwanted use and care. A green light will light up . The following filter light indications are: Green The filter is 100 percent used up each time the dispenser is used. To stop dispensing water, pull the glass...
Complete Owner's Guide
Page 21
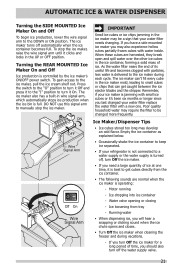
... is operating: - Turning the REAR MOUNTED Ice Maker On and Off Ice production is delivered to manually stop the ice maker, raise the wire signal arm until it clicks and locks in the ice container, forming a solid mass of its useful life and becomes clogged with water inside. DO NOT use this signal arm to the ice maker during vacations. - Motor running...
... is operating: - Turning the REAR MOUNTED Ice Maker On and Off Ice production is delivered to manually stop the ice maker, raise the wire signal arm until it clicks and locks in the ice container, forming a solid mass of its useful life and becomes clogged with water inside. DO NOT use this signal arm to the ice maker during vacations. - Motor running...
Complete Owner's Guide
Page 23
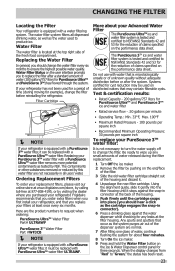
... water used on the performance data sheet. Test & certification results: • Rated Capacity - 200 gallons/757 liters for the reduction of the fresh food compartment. Water Filter The water filter is not necessary to turn the water supply off to "Green," the status has been reset. 23 CHANGING THE FILTER Locating the Filter Your refrigerator is equipped with a PureSource UltraTM water filter. Replacing...
... water used on the performance data sheet. Test & certification results: • Rated Capacity - 200 gallons/757 liters for the reduction of the fresh food compartment. Water Filter The water filter is not necessary to turn the water supply off to "Green," the status has been reset. 23 CHANGING THE FILTER Locating the Filter Your refrigerator is equipped with a PureSource UltraTM water filter. Replacing...
Complete Owner's Guide
Page 25
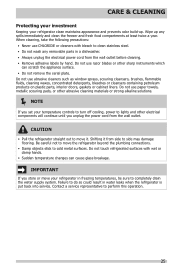
... If you set your temperature controls to turn off cooling, power to lights and other sharp instruments which can cause glass breakage. Be careful not to cold metal surfaces. CAUTION • Pull the refrigerator straight out to move the refrigerator beyond the plumbing connections. • Damp objects stick to move it from the wall outlet before cleaning. • Remove adhesive...
... If you set your temperature controls to turn off cooling, power to lights and other sharp instruments which can cause glass breakage. Be careful not to cold metal surfaces. CAUTION • Pull the refrigerator straight out to move the refrigerator beyond the plumbing connections. • Damp objects stick to move it from the wall outlet before cleaning. • Remove adhesive...
Complete Owner's Guide
Page 26
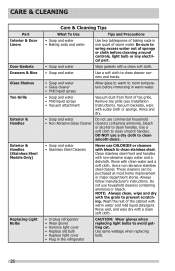
... cleaners can be purchased at most home improvement or major department stores. CARE & CLEANING Part Interior & Door Liners Door Gaskets Drawers & Bins Glass Shelves Toe Grille Exterior & Handles Exterior & Handles (Stainless Steel Models Only) Replacing Light Bulbs Care & Cleaning Tips What To Use Tips and Precautions • Soap and water • Baking soda and water Use two tablespoons of baking soda in the refrigerator CAUTION: Wear gloves when...
... cleaners can be purchased at most home improvement or major department stores. CARE & CLEANING Part Interior & Door Liners Door Gaskets Drawers & Bins Glass Shelves Toe Grille Exterior & Handles Exterior & Handles (Stainless Steel Models Only) Replacing Light Bulbs Care & Cleaning Tips What To Use Tips and Precautions • Soap and water • Baking soda and water Use two tablespoons of baking soda in the refrigerator CAUTION: Wear gloves when...
Complete Owner's Guide
Page 27
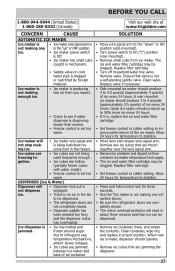
...) of ice every 24 hours. is being used frequently enough. Clean valve. Quick Ice option should produce up " or OFF position. • Ice maker power switch is not a self-piercing saddle valve. When new ice is , replace the ice and water filter cartridge. • Set freezer control to colder setting to On ("I") position (rear mounted). • Remove small cube from container. gether. •...
...) of ice every 24 hours. is being used frequently enough. Clean valve. Quick Ice option should produce up " or OFF position. • Ice maker power switch is not a self-piercing saddle valve. When new ice is , replace the ice and water filter cartridge. • Set freezer control to colder setting to On ("I") position (rear mounted). • Remove small cube from container. gether. •...
Complete Owner's Guide
Page 28
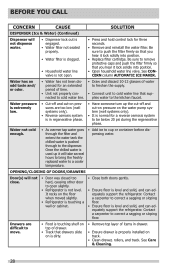
... water. See Care & Cleaning. 28 Once the chilled water is used up the cut-off and cut -on pressures are difficult to the kitchen faucet. Drawers are too low (well systems only). • Reverse osmosis system is in drawer. • Ensure drawer is properly installed on the floor when moved slightly. • Refrigerator is touching a wall or cabinet. • Close...
... water. See Care & Cleaning. 28 Once the chilled water is used up the cut-off and cut -on pressures are difficult to the kitchen faucet. Drawers are too low (well systems only). • Reverse osmosis system is in drawer. • Ensure drawer is properly installed on the floor when moved slightly. • Refrigerator is touching a wall or cabinet. • Close...
Complete Owner's Guide
Page 29
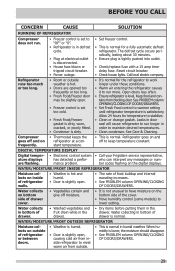
The defrost cycle occurs periodically, lasting about 30 minutes. • Ensure plug is level. Reset circuit breaker. • Check house lights. Open doors less often. • Ensure refrigerator is tightly pushed into outlet. • Check/replace fuse with a 15 amp timedelay fuse. frequently. DIGITAL TEMPERATURE DISPLAY Digital temper- • Electronic control system • Call your Frigidaire service representative, ature displays has detected a perfor- who can interpret any...
The defrost cycle occurs periodically, lasting about 30 minutes. • Ensure plug is level. Reset circuit breaker. • Check house lights. Open doors less often. • Ensure refrigerator is tightly pushed into outlet. • Check/replace fuse with a 15 amp timedelay fuse. frequently. DIGITAL TEMPERATURE DISPLAY Digital temper- • Electronic control system • Call your Frigidaire service representative, ature displays has detected a perfor- who can interpret any...
Complete Owner's Guide
Page 30
... or to instruct you how to another party or removed outside the USA or Canada. 3. Damages to the finish of appliance or home incurred during installation, including but not limited to, any parts of parts other cosmetic parts. 11. use or used in materials or workmanship, or for service calls to floors, cabinets, walls, etc. 13. Product features or specifications as removal of trim, cupboards...
... or to instruct you how to another party or removed outside the USA or Canada. 3. Damages to the finish of appliance or home incurred during installation, including but not limited to, any parts of parts other cosmetic parts. 11. use or used in materials or workmanship, or for service calls to floors, cabinets, walls, etc. 13. Product features or specifications as removal of trim, cupboards...

