Complete Owner's Guide (English)
Page 2
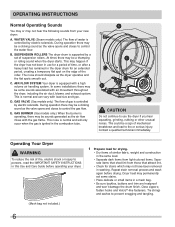
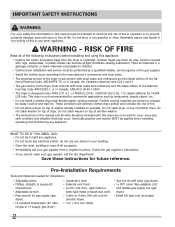
... a qualified installer, service agency or the gas supplier. It is important but not hazard-related. WARNING WARNING indicates a potentially hazardous situation which , if not avoided, may not have every feature included. CAUTION CAUTION indicates a potentially hazardous situation which , if not avoided, could result in this dryer. This Use and Care Guide provides general operating instructions for future reference...
... a qualified installer, service agency or the gas supplier. It is important but not hazard-related. WARNING WARNING indicates a potentially hazardous situation which , if not avoided, may not have every feature included. CAUTION CAUTION indicates a potentially hazardous situation which , if not avoided, could result in this dryer. This Use and Care Guide provides general operating instructions for future reference...
Complete Owner's Guide (English)
Page 3
... use the dryer is blocked, damaged or missing. Do not stack or place laundry or throw rugs against the front or back of the dryer. • Do not spray any type of aerosol into, on electric dryers (not provided with the basic warnings listed below. IMPORTANT SAFETY INSTRUCTIONS 240 v Electric Dryer 120 v Gas Dryer 10-30R 3-wire (fused 30 amp) 14-30R 4-wire UL-approved service cord must be cleaned...
... use the dryer is blocked, damaged or missing. Do not stack or place laundry or throw rugs against the front or back of the dryer. • Do not spray any type of aerosol into, on electric dryers (not provided with the basic warnings listed below. IMPORTANT SAFETY INSTRUCTIONS 240 v Electric Dryer 120 v Gas Dryer 10-30R 3-wire (fused 30 amp) 14-30R 4-wire UL-approved service cord must be cleaned...
Complete Owner's Guide (English)
Page 4
... installing, operating and maintaining any type spray cleanser when cleaning dryer interior. Close supervision of this product. Í NOTE The instructions appearing in this Owner's Guide. PREVENT INJURY • To prevent shock hazard and assure stability during operation, the dryer must replace the thermal limiter switch after the dryer is moved to a new location, have it will be exposed to the dryer, the electrical power cord of a gas dryer must be plugged...
... installing, operating and maintaining any type spray cleanser when cleaning dryer interior. Close supervision of this product. Í NOTE The instructions appearing in this Owner's Guide. PREVENT INJURY • To prevent shock hazard and assure stability during operation, the dryer must replace the thermal limiter switch after the dryer is moved to a new location, have it will be exposed to the dryer, the electrical power cord of a gas dryer must be plugged...
Complete Owner's Guide (English)
Page 6
..., electric shock or injury to use for an extended period, creating a temporary flat spots smooth out. Dryer heat may permanently set of suspension rollers. SUSPENSION ROLLERS The dryer drum is normal and can vary with air movement throughout the dryer, including the air duct, blower, and exhaust system. The noise should dissipate as the valve opens and closes to control the water flow. In some installations...
..., electric shock or injury to use for an extended period, creating a temporary flat spots smooth out. Dryer heat may permanently set of suspension rollers. SUSPENSION ROLLERS The dryer drum is normal and can vary with air movement throughout the dryer, including the air duct, blower, and exhaust system. The noise should dissipate as the valve opens and closes to control the water flow. In some installations...
Complete Owner's Guide (English)
Page 7
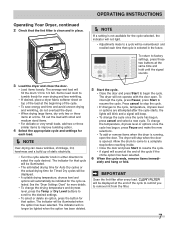
... actual drying time for each time that cycle is running, open . Operating Your Dryer, continued 2 Check that the lint filter is opened. Fill out the load with the door open the door. ately and hang or fold. IMPORTANT Clean the lint filter after the cycle starts, the lights will blink and a signal will fill the drum 1/3 to improve tumbling action. 4 Select the appropriate cycle and settings for Timed Dry cycles will be displayed at a time. CLEAN FILTER...
... actual drying time for each time that cycle is running, open . Operating Your Dryer, continued 2 Check that the lint filter is opened. Fill out the load with the door open the door. ately and hang or fold. IMPORTANT Clean the lint filter after the cycle starts, the lights will blink and a signal will fill the drum 1/3 to improve tumbling action. 4 Select the appropriate cycle and settings for Timed Dry cycles will be displayed at a time. CLEAN FILTER...
Complete Owner's Guide (English)
Page 9
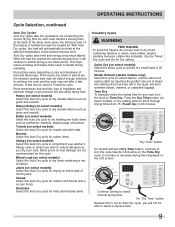
... mats. Steam Refresh (steam models only) Select this cycle to heat damage are not recommended for this Auto Dry cycle for drying an entire load of denim jeans. allergy normal mixed load casual towels quick dry bulky delicates heavy time dry ultra capacity sanitize high normal low air dry max high normal low damp wrinkle release line dry delay start shrink guard anti static control lock "Dry Time" button On models without a Dry Time button, continue to turn the knob...
... mats. Steam Refresh (steam models only) Select this cycle to heat damage are not recommended for this Auto Dry cycle for drying an entire load of denim jeans. allergy normal mixed load casual towels quick dry bulky delicates heavy time dry ultra capacity sanitize high normal low air dry max high normal low damp wrinkle release line dry delay start shrink guard anti static control lock "Dry Time" button On models without a Dry Time button, continue to turn the knob...
Complete Owner's Guide (English)
Page 14
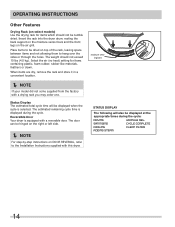
... be tumble dried. Select the air (no heat) setting for items which should not exceed 10 lbs (4.5 kg). The estimated remaining cycle time is selected. SANITIZING CYCLE COMPLETE COOLING CLEAN FILTER ADDING STEAM 14 OPERATING INSTRUCTIONS Other Features Drying Rack (on select models) Use the drying rack for items containing plastic, foam rubber, rubber-like materials, feathers or down. The weight should not be hinged on the right or left...
... be tumble dried. Select the air (no heat) setting for items which should not exceed 10 lbs (4.5 kg). The estimated remaining cycle time is selected. SANITIZING CYCLE COMPLETE COOLING CLEAN FILTER ADDING STEAM 14 OPERATING INSTRUCTIONS Other Features Drying Rack (on select models) Use the drying rack for items containing plastic, foam rubber, rubber-like materials, feathers or down. The weight should not be hinged on the right or left...
Complete Owner's Guide (English)
Page 20
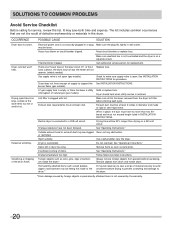
...;ll or replace tank. Drying time will not operate. (electric models) Gas supply valve is open (gas models). Drying procedures have not been met. Use a dehumidifier near the dryer. Items left in the dryer circuit. Reset circuit breaker or replace fuse. Call authorized service person for service, review this dryer. If 1 of the drum finish. Make sure all lint has been removed from drum and restart dryer. High humidity. Electrical power cord is connected to a 208 volt circuit. Exhaust duct must not exceed length listed in...
...;ll or replace tank. Drying time will not operate. (electric models) Gas supply valve is open (gas models). Drying procedures have not been met. Use a dehumidifier near the dryer. Items left in the dryer circuit. Reset circuit breaker or replace fuse. Call authorized service person for service, review this dryer. If 1 of the drum finish. Make sure all lint has been removed from drum and restart dryer. High humidity. Electrical power cord is connected to a 208 volt circuit. Exhaust duct must not exceed length listed in...

Complete Owner's Guide (English)
Page 21
... Electrolux at the addresses or phone numbers below. Food loss due to repair or replace appliance light bulbs, air filters, water filters, other consumables, or knobs, handles, or other than genuine Electrolux parts or parts obtained from its original owner to floors, cabinets, walls, etc. 13. Service calls to change without notice. This warranty only applies in accordance with original serial numbers that prove to remote areas...
... Electrolux at the addresses or phone numbers below. Food loss due to repair or replace appliance light bulbs, air filters, water filters, other consumables, or knobs, handles, or other than genuine Electrolux parts or parts obtained from its original owner to floors, cabinets, walls, etc. 13. Service calls to change without notice. This warranty only applies in accordance with original serial numbers that prove to remote areas...
Installation Instructions (All Languages)
Page 2
... not stack washer on top of another washer. • The instructions in this manual and all occupants. • Immediately call the fire department. ral gas or LP supply, gas dryer) • Carpenter's level • External vent hood • 4-inch (102 mm), rigid metal or semi-rigid metal exhaust duct work • 3-wire or 4-wire 240 volt cord kit (electric dryer) • 4 in. (10.2 cm) clamp • Gas line shutoff valve (gas dryer...
... not stack washer on top of another washer. • The instructions in this manual and all occupants. • Immediately call the fire department. ral gas or LP supply, gas dryer) • Carpenter's level • External vent hood • 4-inch (102 mm), rigid metal or semi-rigid metal exhaust duct work • 3-wire or 4-wire 240 volt cord kit (electric dryer) • 4 in. (10.2 cm) clamp • Gas line shutoff valve (gas dryer...
Installation Instructions (All Languages)
Page 3
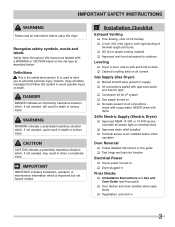
... with all instructions before initial operation Door Reversal ‰ Follow detailed instructions in this symbol to potential personal injury hazards. IMPORTANT IMPORTANT indicates installation, operation or maintenance information which , if not avoided, will result in supply ‰ All connections sealed with approved sealer and wrench tight ‰ Conversion kit for function Electrical Power ‰ House power turned on ‰ Dryer plugged in Final Checks ‰ Installation Instructions and Use and Care Guide read...
... with all instructions before initial operation Door Reversal ‰ Follow detailed instructions in this symbol to potential personal injury hazards. IMPORTANT IMPORTANT indicates installation, operation or maintenance information which , if not avoided, will result in supply ‰ All connections sealed with approved sealer and wrench tight ‰ Conversion kit for function Electrical Power ‰ House power turned on ‰ Dryer plugged in Final Checks ‰ Installation Instructions and Use and Care Guide read...
Installation Instructions (All Languages)
Page 4
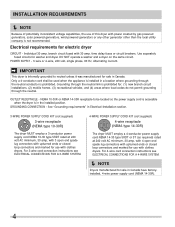
... 3 open end spade lug connectors with upturned ends or closed loop connectors and marked for use with clothes dryers. INSTALLATION REQUIREMENTS Í NOTE Because of potentially inconsistent voltage capabilities, the use of this dryer with power created by gas powered generators, solar powered generators, wind powered generators or any other generator other than the local utility company is prohibited. branch circuit fused with clothes dryers. DO NOT operate a washer and a dryer on...
... 3 open end spade lug connectors with upturned ends or closed loop connectors and marked for use with clothes dryers. INSTALLATION REQUIREMENTS Í NOTE Because of potentially inconsistent voltage capabilities, the use of this dryer with power created by gas powered generators, solar powered generators, wind powered generators or any other generator other than the local utility company is prohibited. branch circuit fused with clothes dryers. DO NOT operate a washer and a dryer on...
Installation Instructions (All Languages)
Page 5
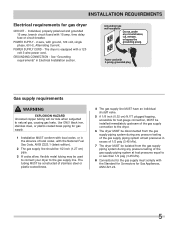
...) N.P.T. plugged tapping, accessible for Gas Appliances, ANSI Z21.24. 5 Grounding type wall receptacle Do not, under any pressure testing of 1/2 psig (3.45 kPa). 7 The dryer MUST be used to connect your dryer to the gas supply line. INSTALLATION REQUIREMENTS Electrical requirements for gas supply. 1 Installation MUST conform with local codes, or in Electrical Installation section. Individual, properly polarized and grounded 15 amp. time delay fuse or circuit breaker. POWER SUPPLY - 2-wire, with the National Fuel Gas Code, ANSI...
...) N.P.T. plugged tapping, accessible for Gas Appliances, ANSI Z21.24. 5 Grounding type wall receptacle Do not, under any pressure testing of 1/2 psig (3.45 kPa). 7 The dryer MUST be used to connect your dryer to the gas supply line. INSTALLATION REQUIREMENTS Electrical requirements for gas supply. 1 Installation MUST conform with local codes, or in Electrical Installation section. Individual, properly polarized and grounded 15 amp. time delay fuse or circuit breaker. POWER SUPPLY - 2-wire, with the National Fuel Gas Code, ANSI...
Installation Instructions (All Languages)
Page 7
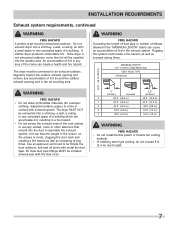
... be connected to terminate the duct outdoors, and seal all joints with exhaust system. MAXIMUM LENGTH of 4" (102mm) Rigid Metal Duct VENT HOOD TYPE (Preferred) Number of a building. All male duct pipe fittings MUST be installed downstream with the flow of lint in the screen, on the screws or rivets, clogging the duct work and creating a fire hazard as well as increase drying times.
... be connected to terminate the duct outdoors, and seal all joints with exhaust system. MAXIMUM LENGTH of 4" (102mm) Rigid Metal Duct VENT HOOD TYPE (Preferred) Number of a building. All male duct pipe fittings MUST be installed downstream with the flow of lint in the screen, on the screws or rivets, clogging the duct work and creating a fire hazard as well as increase drying times.
Installation Instructions (All Languages)
Page 8
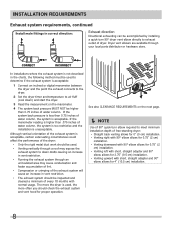
... exhaust connects to the dryer. 2 Set the dryer timer and temperature to exhaust outlet of dryer. INSTALLATION REQUIREMENTS Exhaust system requirements, continued Install male fittings in correct direction: Exhaust direction Directional exhausting can be accomplished by installing a quick-turn elbow required to down ) and start the dryer. 3 Read the measurement on the next page. Í NOTE Use of 90° quick-turn 90° dryer vent elbow directly to air fluff (cool down drafts causing an increase in vent restriction. • Running...
... exhaust connects to the dryer. 2 Set the dryer timer and temperature to exhaust outlet of dryer. INSTALLATION REQUIREMENTS Exhaust system requirements, continued Install male fittings in correct direction: Exhaust direction Directional exhausting can be accomplished by installing a quick-turn elbow required to down ) and start the dryer. 3 Read the measurement on the next page. Í NOTE Use of 90° quick-turn 90° dryer vent elbow directly to air fluff (cool down drafts causing an increase in vent restriction. • Running...

Installation Instructions (All Languages)
Page 17
... foil tape to seal all other joints. 2 Carefully slide the dryer to the exhaust vent system. Grounding type wall receptacle Do not, under any questions during initial operation, please review the "Avoid Service Checklist" in a location near the dryer for stability. INSTALLATION INSTRUCTIONS General installation 1 Connect the exhaust duct to check A for future reference. Í NOTE A wiring diagram and technical data sheet are located inside the dryer console. Adjust one or more of the...
... foil tape to seal all other joints. 2 Carefully slide the dryer to the exhaust vent system. Grounding type wall receptacle Do not, under any questions during initial operation, please review the "Avoid Service Checklist" in a location near the dryer for stability. INSTALLATION INSTRUCTIONS General installation 1 Connect the exhaust duct to check A for future reference. Í NOTE A wiring diagram and technical data sheet are located inside the dryer console. Adjust one or more of the...
Installation Instructions (All Languages)
Page 22
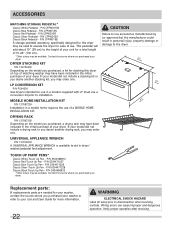
... include a drying rack or you desire another stacking kit, you purchased your washer or refer to your Use and Care Guide for use in a location supplied with LP must use . Replacement parts: If replacements parts are needed for your unit for ease of use a conversion kit prior to aid in the initial purchase of your washer, contact the source where you may be available. Wiring errors can cause improper and dangerous operation. P/N 5304471228...
... include a drying rack or you desire another stacking kit, you purchased your washer or refer to your Use and Care Guide for use in a location supplied with LP must use . Replacement parts: If replacements parts are needed for your unit for ease of use a conversion kit prior to aid in the initial purchase of your washer, contact the source where you may be available. Wiring errors can cause improper and dangerous operation. P/N 5304471228...
Wiring Diagram (All Languages)
Page 1
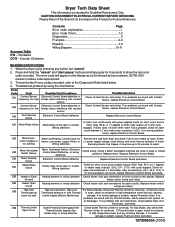
... Motor Sensing failure Motor Centripetal Switch, Electronic Control Board Defective, or wiring defective. E65 High Limit Thermostat trip High vent restriction, High Limit For Electric Model, check Inlet Thermal Limiter for 6 seconds to heater relay output(s) (J5-2, J7-1, J7-3) with Contact Sensor, replace Electronic Control Board. Counter Clockwise Contents Page Error code explanation 1 Error Code Chart 1-2 Diagnostics 3 Français 4-6 Español 7-9 Wiring Diagram 10-11 READING ERROR CODES 1. Troubleshoot problem by two numbers. Check motor...
... Motor Sensing failure Motor Centripetal Switch, Electronic Control Board Defective, or wiring defective. E65 High Limit Thermostat trip High vent restriction, High Limit For Electric Model, check Inlet Thermal Limiter for 6 seconds to heater relay output(s) (J5-2, J7-1, J7-3) with Contact Sensor, replace Electronic Control Board. Counter Clockwise Contents Page Error code explanation 1 Error Code Chart 1-2 Diagnostics 3 Français 4-6 Español 7-9 Wiring Diagram 10-11 READING ERROR CODES 1. Troubleshoot problem by two numbers. Check motor...

Wiring Diagram (All Languages)
Page 2
... wake up the control. 3. Check frequency of line voltage. Upon entering Diagnostic Mode, all lights should be between 4.9K Ohm and 6.2K Ohm at terminal block for 6 seconds. E71 Thermistor open circuit. Replace appropriate hardware. E93 Machine Wrong configuration data loaded, Check if correct Interface Board and console are protocol with "Temperature", "Dry Level" and "Dry Time" buttons, press and hold the "Temperature" and "Dry Level" buttons simultaneously for L1...
... wake up the control. 3. Check frequency of line voltage. Upon entering Diagnostic Mode, all lights should be between 4.9K Ohm and 6.2K Ohm at terminal block for 6 seconds. E71 Thermistor open circuit. Replace appropriate hardware. E93 Machine Wrong configuration data loaded, Check if correct Interface Board and console are protocol with "Temperature", "Dry Level" and "Dry Time" buttons, press and hold the "Temperature" and "Dry Level" buttons simultaneously for L1...
Product Specifications Sheet (English)
Page 2
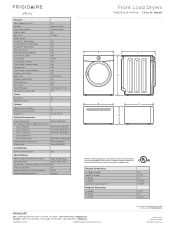
.... Printed in the U.S.A. Product Dimensions A - Height B - Dryers (E & G) Frigidaire Affinity (L models) Front Load Dryers FAQE7072L R / N / A / W 7.0 Cu. Ft.) Controls Dryer Drum Interior Interior Light Door Trim Ready Steam™ DrySense™ Technology Wrinkle Release Technology TimeWise™ Technology Moisture Sensor Time Remaining Indicator Cycle Status Lights Cycle Signal Cycle Signal "On/Off " Cycle Signal Volume Control Control Lock Start / Pause / Cancel Buttons Energy Saver Option Delay Start Tumble Speed (RPM) Reversible Door Lint Screen Sound Package Adjustable Leveling...
.... Printed in the U.S.A. Product Dimensions A - Height B - Dryers (E & G) Frigidaire Affinity (L models) Front Load Dryers FAQE7072L R / N / A / W 7.0 Cu. Ft.) Controls Dryer Drum Interior Interior Light Door Trim Ready Steam™ DrySense™ Technology Wrinkle Release Technology TimeWise™ Technology Moisture Sensor Time Remaining Indicator Cycle Status Lights Cycle Signal Cycle Signal "On/Off " Cycle Signal Volume Control Control Lock Start / Pause / Cancel Buttons Energy Saver Option Delay Start Tumble Speed (RPM) Reversible Door Lint Screen Sound Package Adjustable Leveling...


