
Use and Care Manual
Page 1
USE & CARE MANUAL Contents 2 Warranty 3 Product Registration 3 Packaging 3 Normal Sounds 4 Important Safety Instructions 4 Operation of Current Device 5-10 Air Conditioner Features 11 Care and Cleaning 11 Energy Saving Ideas 12 Avoid Service Checklist NOTE: This USE & CARE MANUAL provides specific operating instructions for your model. Common sense and caution must be practiced when installing, operating, and maintaining any appliance. Use the room air conditioner only as instructed in this USE & CARE MANUAL instructions are not meant to cover every...
USE & CARE MANUAL Contents 2 Warranty 3 Product Registration 3 Packaging 3 Normal Sounds 4 Important Safety Instructions 4 Operation of Current Device 5-10 Air Conditioner Features 11 Care and Cleaning 11 Energy Saving Ideas 12 Avoid Service Checklist NOTE: This USE & CARE MANUAL provides specific operating instructions for your model. Common sense and caution must be practiced when installing, operating, and maintaining any appliance. Use the room air conditioner only as instructed in this USE & CARE MANUAL instructions are not meant to cover every...
Use and Care Manual
Page 2
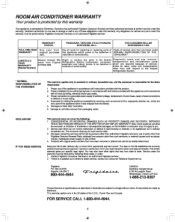
... authorized Frigidaire Consumer Services and their authorized servicers to perform service under this warranty. WARRANTY PERIOD FRIGIDAIRE, THROUGH ITS AUTHORIZED SERVICERS, WILL: THE CONSUMER WILL BE RESPONSIBLE FOR: FULL ONE-YEAR One year from Pay all costs for repairing or replacing parts of Costs of service calls that are listed under WARRANTY original purchase this appliance which prove to a grounded power supply of sufficient voltage, replacement of blown fuses, repair...
... authorized Frigidaire Consumer Services and their authorized servicers to perform service under this warranty. WARRANTY PERIOD FRIGIDAIRE, THROUGH ITS AUTHORIZED SERVICERS, WILL: THE CONSUMER WILL BE RESPONSIBLE FOR: FULL ONE-YEAR One year from Pay all costs for repairing or replacing parts of Costs of service calls that are listed under WARRANTY original purchase this appliance which prove to a grounded power supply of sufficient voltage, replacement of blown fuses, repair...

Use and Care Manual
Page 3
... the Frigidaire Company. Packaging Remove all models, the serial plate is located on the outside of water hitting condenser during normal operation may hear the sound of poor wall or window construction or incorrect installation. SoundofRushingAir At the front of the unit, you may cause "pinging or swishing" sounds. M1 Gurg/e/Hiss 'Gurgling or hissing" noise may have a high pitched chatter during the cooling...
... the Frigidaire Company. Packaging Remove all models, the serial plate is located on the outside of water hitting condenser during normal operation may hear the sound of poor wall or window construction or incorrect installation. SoundofRushingAir At the front of the unit, you may cause "pinging or swishing" sounds. M1 Gurg/e/Hiss 'Gurgling or hissing" noise may have a high pitched chatter during the cooling...
Use and Care Manual
Page 4
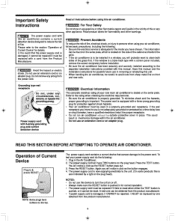
... OPERATE AIR CONDITIONER. Plug in & J press RESET r' TEST - _ RESET NOTE: Some plugs have chosen. Important Safety Instructions a NOTE The power supply cord with 3-prong grounding plug and current detection device ©WARNING Electrical Information The complete electrical rating of your new room air conditioner is stated on the serial plate. If the window is a triple-track type with a cord from the product manufacturer. • If power supply cord is damaged, it CANNOT be replaced with a screen panel...
... OPERATE AIR CONDITIONER. Plug in & J press RESET r' TEST - _ RESET NOTE: Some plugs have chosen. Important Safety Instructions a NOTE The power supply cord with 3-prong grounding plug and current detection device ©WARNING Electrical Information The complete electrical rating of your new room air conditioner is stated on the serial plate. If the window is a triple-track type with a cord from the product manufacturer. • If power supply cord is damaged, it CANNOT be replaced with a screen panel...

Use and Care Manual
Page 5
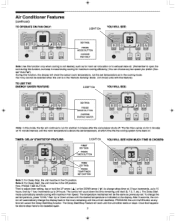
... symbol for the Remote Control. Esnaw Fan Sleep Au le Heater SETS FAN SPEED ACTIVATE TIMER AUTO FAN Fig. TO TURN UNIT ON: YOU WILL SEE: tient Cool Eno tar Saver • Fan Only renneeTkrter .A. I .i...i , Cool Energy Ste" Fars Only Tomp/77rr. Air Conditioner Features ELECTRONIC CONTROL OPERATING INSTRUCTIONS Before you begin, thoroughly familiarize yourself with the remote. Do not mix alkaline, standard (carbon-zinc),or rechargeable(nickel-cadmium) batteries. "B" AUTO FAN REMOTE CONTROL w/DISPLAY & REMOTE SENSING BUTTON ADJUSTS TEMP & TIME SETS MODE II MI...
... symbol for the Remote Control. Esnaw Fan Sleep Au le Heater SETS FAN SPEED ACTIVATE TIMER AUTO FAN Fig. TO TURN UNIT ON: YOU WILL SEE: tient Cool Eno tar Saver • Fan Only renneeTkrter .A. I .i...i , Cool Energy Ste" Fars Only Tomp/77rr. Air Conditioner Features ELECTRONIC CONTROL OPERATING INSTRUCTIONS Before you begin, thoroughly familiarize yourself with the remote. Do not mix alkaline, standard (carbon-zinc),or rechargeable(nickel-cadmium) batteries. "B" AUTO FAN REMOTE CONTROL w/DISPLAY & REMOTE SENSING BUTTON ADJUSTS TEMP & TIME SETS MODE II MI...

Use and Care Manual
Page 6
... FAN BUTTON SELECT AUTO Coot Enorgy Sgvw Fan Only O Choc Allier =Z: r ■ L lle Wont • Fen Spited 0 Clown Alr Note: Fan speed starts at High Speed and adjusts to a slower speed as a door being opened, it will re-adjust back to the slowest speed as the room returns to read the actual room temperature. 4D Air Conditioner Features (continued) TO CHANGE TEMPERATURE SETTING: ' Th Hoot Cool EntowSeWitt Fan...
... FAN BUTTON SELECT AUTO Coot Enorgy Sgvw Fan Only O Choc Allier =Z: r ■ L lle Wont • Fen Spited 0 Clown Alr Note: Fan speed starts at High Speed and adjusts to a slower speed as a door being opened, it will re-adjust back to the slowest speed as the room returns to read the actual room temperature. 4D Air Conditioner Features (continued) TO CHANGE TEMPERATURE SETTING: ' Th Hoot Cool EntowSeWitt Fan...
Use and Care Manual
Page 7
... cooling mode. To change the set temperature, at any fan speed you prefer. (Except "Auto Fan") During this mode, the fan will continue to the hours remaining until the unit will start (8, 7.5, 7, etc.). The Delay Start/Stop Feature will cancel the Delay Start/Stop function. TIMER: DELAY START/STOP FEATURE: Heat Cool Energy Sahel Fen Only - PRESSING the unit On/Off button at which time the the cooling system turns back on the display. Air Conditioner Features (continued) TO OPERATE...
... cooling mode. To change the set temperature, at any fan speed you prefer. (Except "Auto Fan") During this mode, the fan will continue to the hours remaining until the unit will start (8, 7.5, 7, etc.). The Delay Start/Stop Feature will cancel the Delay Start/Stop function. TIMER: DELAY START/STOP FEATURE: Heat Cool Energy Sahel Fen Only - PRESSING the unit On/Off button at which time the the cooling system turns back on the display. Air Conditioner Features (continued) TO OPERATE...
Use and Care Manual
Page 8
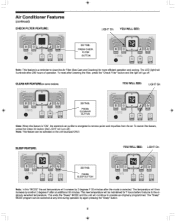
...: In this "MODE" the set temperature will turn off . To cancel this feature is "ON", the electronic air purifier is energized to remove pollen and impurities from the air. This ends the "Sleep" MODE and the unit will illuminate after 250 hours of operation. SLEEP FEATURE: Hoar CM! Air Conditioner Features (continued) CHECK FILTER FEATURE: 111 GOV Energy Satyr Fan OnlY flemo Z: rgroa • I) 0 Crean Air LIGHT On YOU WILL...
...: In this "MODE" the set temperature will turn off . To cancel this feature is "ON", the electronic air purifier is energized to remove pollen and impurities from the air. This ends the "Sleep" MODE and the unit will illuminate after 250 hours of operation. SLEEP FEATURE: Hoar CM! Air Conditioner Features (continued) CHECK FILTER FEATURE: 111 GOV Energy Satyr Fan OnlY flemo Z: rgroa • I) 0 Crean Air LIGHT On YOU WILL...
Use and Care Manual
Page 9
... display on the remote control indicates the temperature at the remote.(Note that the set temperature. The temperature will automatically be in the Heat Mode, the fan will con- L.(754' CI Clean Air Note: When unit is satisfied,the fan will run for a few seconds to set temperature is shut off and on to run continuously while heat is terminated using the remote control Start/Stop button or the Remote Sensing Stop button, and also the main Start/Stop button...
... display on the remote control indicates the temperature at the remote.(Note that the set temperature. The temperature will automatically be in the Heat Mode, the fan will con- L.(754' CI Clean Air Note: When unit is satisfied,the fan will run for a few seconds to set temperature is shut off and on to run continuously while heat is terminated using the remote control Start/Stop button or the Remote Sensing Stop button, and also the main Start/Stop button...
Use and Care Manual
Page 10
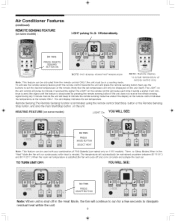
... air into the room - Contact your Authorized Frigidaire Service Center. Fresh Air Vent Control(On some models) The Fresh Air Vent allows the air conditioner to run during this times. • The control will allow you should become familiar with: • The "Cool" circuit has an automatic 3 minute time delayed start if the unit is obtained, AUGER WHEEL 10 4D Contact your Authorized Frigidaire Service Center. Vent Open (see Fig. 1) 2. Vent and Exhaust Open...
... air into the room - Contact your Authorized Frigidaire Service Center. Fresh Air Vent Control(On some models) The Fresh Air Vent allows the air conditioner to run during this times. • The control will allow you should become familiar with: • The "Cool" circuit has an automatic 3 minute time delayed start if the unit is obtained, AUGER WHEEL 10 4D Contact your Authorized Frigidaire Service Center. Vent Open (see Fig. 1) 2. Vent and Exhaust Open...
Use and Care Manual
Page 11
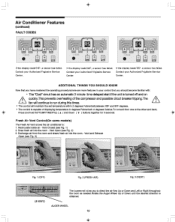
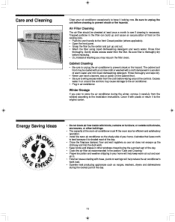
... unplug the air conditioner to the original carton. Rinse thoroughly and wipe dry. • Never use harsh cleaners, wax or polish on the cooling coils. • Push the vent handle to the Vent Closed position (where applicable). • Open the front panel. • Grasp the filter by the center and pull up the chimney and into the duct work load. Energy Saving Ideas...
... unplug the air conditioner to the original carton. Rinse thoroughly and wipe dry. • Never use harsh cleaners, wax or polish on the cooling coils. • Push the vent handle to the Vent Closed position (where applicable). • Open the front panel. • Grasp the filter by the center and pull up the chimney and into the duct work load. Energy Saving Ideas...
Use and Care Manual
Page 12
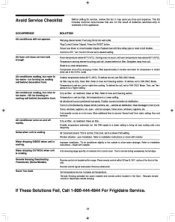
... this list. Air conditioner turns on some models) and remote control located in the COOL mode. Water dripping INSIDE when unit is normal during excessively humid days. Turn Control ON and set to installation instructions - Cooling may save you time and expense. Air filter may be dirty. air restricted. Air directional louvers positioned improperly. Set FAN speed to a faster setting to a Lower temperature. Remote control signal obstructed. Wall plug disconnected. Room temperature below 60°F (18°C). Reset to bring air past cooling coils more...
... this list. Air conditioner turns on some models) and remote control located in the COOL mode. Water dripping INSIDE when unit is normal during excessively humid days. Turn Control ON and set to installation instructions - Cooling may save you time and expense. Air filter may be dirty. air restricted. Air directional louvers positioned improperly. Set FAN speed to a faster setting to a Lower temperature. Remote control signal obstructed. Wall plug disconnected. Room temperature below 60°F (18°C). Reset to bring air past cooling coils more...
Installation Instructions
Page 1
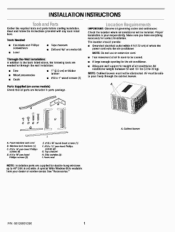
... are needed for double-hung windows up to pass freely through -the-wall Installation. • Saw • Wood preservative • Caulk • 1' (2.5 cm) or thicker lumber ■ #10 x 1' wood screws (7) Parts Supplied (on some models) Check that all governing codes and ordinances. Check the location where air conditioner will be cooled. • A large enough opening for the air conditioner. • Adequate wall support for correct installation. A 0 IT...
... are needed for double-hung windows up to pass freely through -the-wall Installation. • Saw • Wood preservative • Caulk • 1' (2.5 cm) or thicker lumber ■ #10 x 1' wood screws (7) Parts Supplied (on some models) Check that all governing codes and ordinances. Check the location where air conditioner will be cooled. • A large enough opening for the air conditioner. • Adequate wall support for correct installation. A 0 IT...

Installation Instructions
Page 2
....4 cm) C. An (6.4) minimum to 4" (10.1cm) maximum. Wood thickness D. Window Installation Window opening measurements: ■ 22.2" to 40' (56.3 cm to 101.6 cm) opening width, ■ 14' (35.5cm) minimum opening measurements should be: ■ Width: 191/ie (48.4 cm) plus twice thickness of wood used to build frame. ■ Height 13' (35.2cm) plus twice thickness of...
....4 cm) C. An (6.4) minimum to 4" (10.1cm) maximum. Wood thickness D. Window Installation Window opening measurements: ■ 22.2" to 40' (56.3 cm to 101.6 cm) opening width, ■ 14' (35.5cm) minimum opening measurements should be: ■ Width: 191/ie (48.4 cm) plus twice thickness of wood used to build frame. ■ Height 13' (35.2cm) plus twice thickness of...

Installation Instructions
Page 3
... water and dry. ■ Do not use sharp instruments, rubbing alcohol, flammable fluids, or abrasive cleaners to do so can damage the surface of your fingers. t A A. A • • A. INSTALLATION INSTRUCTIONS Unpacking Excessive Weight Hazard Use two or more people to slide the air conditioner out of the cabinet Place the air conditioner on some models) Remove packaging materials ■ Remove and dispose of control panel...
... water and dry. ■ Do not use sharp instruments, rubbing alcohol, flammable fluids, or abrasive cleaners to do so can damage the surface of your fingers. t A A. A • • A. INSTALLATION INSTRUCTIONS Unpacking Excessive Weight Hazard Use two or more people to slide the air conditioner out of the cabinet Place the air conditioner on some models) Remove packaging materials ■ Remove and dispose of control panel...
Installation Instructions
Page 4
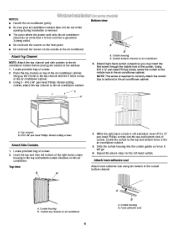
... screws Attach Side Curtains 1. Window Instaliatinr (fir, ".'Irrrirt45 models) NOTES: • Handle the air conditioner gently. Locate provided bag of the curtain bottom channel. Extend right-hand curtain outward so you may insert the first screw through the middle hole of screws . 2. While the... your air conditioner cabinet does not fall out of the opening during installation or removal, • The place where the power cord exits the air conditioner should be no more than 4 ft (122 cm) from a grounded 3 prong outlet • Do not block the louvers on the front panel. &#...
... screws Attach Side Curtains 1. Window Instaliatinr (fir, ".'Irrrirt45 models) NOTES: • Handle the air conditioner gently. Locate provided bag of the curtain bottom channel. Extend right-hand curtain outward so you may insert the first screw through the middle hole of screws . 2. While the... your air conditioner cabinet does not fall out of the opening during installation or removal, • The place where the power cord exits the air conditioner should be no more than 4 ft (122 cm) from a grounded 3 prong outlet • Do not block the louvers on the front panel. &#...

Installation Instructions
Page 5
... Side Curtains to Window Frame • Handle the air conditioner gently. • Be sure your air conditioner cabinet does not fall out of the opening during installation or removal. • The place where the power cord exits the air conditioner should be no more than 4 ft (122 cm) from a grounded 3 prong outlet • Do not block the louvers on the front panel. • Do...
... Side Curtains to Window Frame • Handle the air conditioner gently. • Be sure your air conditioner cabinet does not fall out of the opening during installation or removal. • The place where the power cord exits the air conditioner should be no more than 4 ft (122 cm) from a grounded 3 prong outlet • Do not block the louvers on the front panel. • Do...
Installation Instructions
Page 6
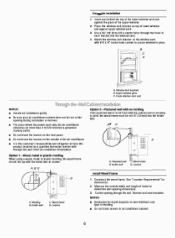
Place the window-lock bracket on wall thickness and type of the opening during installation or removal, ■ The place where the power cord exits the air conditioner should line up with the inside wall. Attach the window-lock bracket to determine wall opening through the holes in air conditioner cabinet 6 Foam window sash seal Through-the-Wall CabinetInstii 0. A B C A. Inside wall D. Molding B. Inside wall C. Cutthe opening dimensions. 3. Use a 3/ 32. NOTES: ■ Handle air conditioner gently. ■ Be sure your air conditioner cabinet does not...
Place the window-lock bracket on wall thickness and type of the opening during installation or removal, ■ The place where the power cord exits the air conditioner should line up with the inside wall. Attach the window-lock bracket to determine wall opening through the holes in air conditioner cabinet 6 Foam window sash seal Through-the-Wall CabinetInstii 0. A B C A. Inside wall D. Molding B. Inside wall C. Cutthe opening dimensions. 3. Use a 3/ 32. NOTES: ■ Handle air conditioner gently. ■ Be sure your air conditioner cabinet does not...

Installation Instructions
Page 7
...framed wall opening.The top of cabinet and 7 - #10 x 1' wood screws (not provided ) to attach cabinet to the wall, Install Cabinet into Wood Frame 1. Use existing holes in the wall opening between cabinetand air conditioner. 6. Insert air conditioner into room B. A A. Outside width B. B A A. Caulk all outside of the ground wire... the room.lf there is outside wall openings around cabinet A. 3/4 (19.1 mm) extending into cabinet. 1. Attach frame securely to frame. Level 3. Trim Complete Installation NOTE: Handle the air conditioner gently. 2. Make sure the free end of...
...framed wall opening.The top of cabinet and 7 - #10 x 1' wood screws (not provided ) to attach cabinet to the wall, Install Cabinet into Wood Frame 1. Use existing holes in the wall opening between cabinetand air conditioner. 6. Insert air conditioner into room B. A A. Outside width B. B A A. Caulk all outside of the ground wire... the room.lf there is outside wall openings around cabinet A. 3/4 (19.1 mm) extending into cabinet. 1. Attach frame securely to frame. Level 3. Trim Complete Installation NOTE: Handle the air conditioner gently. 2. Make sure the free end of...
Installation Instructions
Page 8
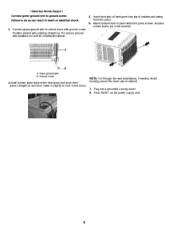
... electrical shock. 3. Green ground wire B. Electrical Shock Hazard ! Position ground wire pointing straight up. Replace control knobs (on and then lower it slightly to lock it into place. Ground screw 4.Install control panel back to cabinet base with front panel screws. Put excess ground wire between coil and air conditioner cabinet. 5. Press RESET on the power supply cord. 8 ow NOTE: For through-the -wall installations, if needed, install molding around the room...
... electrical shock. 3. Green ground wire B. Electrical Shock Hazard ! Position ground wire pointing straight up. Replace control knobs (on and then lower it slightly to lock it into place. Ground screw 4.Install control panel back to cabinet base with front panel screws. Put excess ground wire between coil and air conditioner cabinet. 5. Press RESET on the power supply cord. 8 ow NOTE: For through-the -wall installations, if needed, install molding around the room...


