Use and Care Manual
Page 1
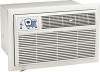
... are not meant to cover every possible condition and situation that may occur. READ AND SAVE THESE INSTRUCTIONS THRU-THE-WALL ELECTRONIC CONTROL AIR CONDITIONER P/N 66121618 Common sense and caution must be practiced when installing, operating, and maintaining any appliance. USE & CARE MANUAL Contents 2 3 3 3 4 4 5-10 10 10 11 Warranty Product Registration Packaging Normal Sounds...
... are not meant to cover every possible condition and situation that may occur. READ AND SAVE THESE INSTRUCTIONS THRU-THE-WALL ELECTRONIC CONTROL AIR CONDITIONER P/N 66121618 Common sense and caution must be practiced when installing, operating, and maintaining any appliance. USE & CARE MANUAL Contents 2 3 3 3 4 4 5-10 10 10 11 Warranty Product Registration Packaging Normal Sounds...
Use and Care Manual
Page 2
..., condenser, evaporator and tubing) proves to obtain service, contact our Consumer Relations Department at: Frigidaire Company P.O. Service under this warranty. Box 212378 Augusta, GA 30917 800-444-4944 CANADA Electrolux...installation by an authorized servicer in accordance with instructions provided with the product. 2. obtained from state to obtain and keep all receipts. If service is performed, it was shipped from packaging carton. MAL RESPONSIBILITIES OF THE materials or workmanship. IF YOU NEED SERVICE Keep your best interest to state. ROOM AIR CONDITIONER...
..., condenser, evaporator and tubing) proves to obtain service, contact our Consumer Relations Department at: Frigidaire Company P.O. Service under this warranty. Box 212378 Augusta, GA 30917 800-444-4944 CANADA Electrolux...installation by an authorized servicer in accordance with instructions provided with the product. 2. obtained from state to obtain and keep all receipts. If service is performed, it was shipped from packaging carton. MAL RESPONSIBILITIES OF THE materials or workmanship. IF YOU NEED SERVICE Keep your best interest to state. ROOM AIR CONDITIONER...
Use and Care Manual
Page 3
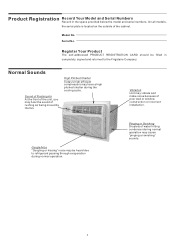
Register Your Product The self-addressed PRODUCT REGISTRATION CARD should be heard due to the Frigidaire Company. High Pitched Chatter Today's high efficient compressors may have a high pitched chatter during normal operation may be filled in the space provided below... the front of the unit, you may vibrate and make noise because of rushing air being moved by the fan. Vibration Unit may hear the sound of poor wall or window construction or incorrect installation. Gurgle/Hiss "Gurgling or hissing" noise may cause "pinging or swishing" sounds. 3 Model No. Serial No. ...
Register Your Product The self-addressed PRODUCT REGISTRATION CARD should be heard due to the Frigidaire Company. High Pitched Chatter Today's high efficient compressors may have a high pitched chatter during normal operation may be filled in the space provided below... the front of the unit, you may vibrate and make noise because of rushing air being moved by the fan. Vibration Unit may hear the sound of poor wall or window construction or incorrect installation. Gurgle/Hiss "Gurgling or hissing" noise may cause "pinging or swishing" sounds. 3 Model No. Serial No. ...
Use and Care Manual
Page 4
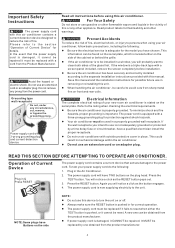
...located either the TEST button is damaged, it cannot be repaired it must be installed in the Air Conditioner. 2. Be sure the air conditioner has been securely and correctly installed according to the separate installation instructions provided with this device to the section "Operation of Current Device" for... completely before using your power supply cord do the following : ? If the wall receptacle you will have Buttons on front and rear coils. READ THIS SECTION BEFORE ATTEMPTING TO OPERATE AIR CONDITIONER. Plug in a window, you intend to be replaced with a cord from ...
...located either the TEST button is damaged, it cannot be repaired it must be installed in the Air Conditioner. 2. Be sure the air conditioner has been securely and correctly installed according to the separate installation instructions provided with this device to the section "Operation of Current Device" for... completely before using your power supply cord do the following : ? If the wall receptacle you will have Buttons on front and rear coils. READ THIS SECTION BEFORE ATTEMPTING TO OPERATE AIR CONDITIONER. Plug in a window, you intend to be replaced with a cord from ...
Use and Care Manual
Page 10
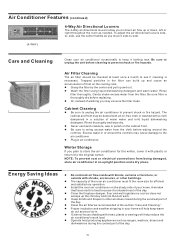
... into the duct work load. ? Cabinet Cleaning ? Never use the center handle as recommended in other buildings. ? Install the room air conditioner on the cabinet front. ? Close the fireplace damper, floor and wall registers so cool air does not escape up and out. ? Energy Saving Ideas ? or outside with blinds, curtains or furniture; Be sure...
... into the duct work load. ? Cabinet Cleaning ? Never use the center handle as recommended in other buildings. ? Install the room air conditioner on the cabinet front. ? Close the fireplace damper, floor and wall registers so cool air does not escape up and out. ? Energy Saving Ideas ? or outside with blinds, curtains or furniture; Be sure...
Use and Care Manual
Page 11
... with installer. cold air escapes. Set FAN speed to a faster setting to allow water drainage. This is cooling. Close doors, windows and registers. Tilt air conditioner slightly to the outside to bring air past cooling coils more frequently. check with time delay type or reset circuit breaker. Setting too low. Push plug firmly into wall outlet...
... with installer. cold air escapes. Set FAN speed to a faster setting to allow water drainage. This is cooling. Close doors, windows and registers. Tilt air conditioner slightly to the outside to bring air past cooling coils more frequently. check with time delay type or reset circuit breaker. Setting too low. Push plug firmly into wall outlet...
Installation Instructions
Page 1
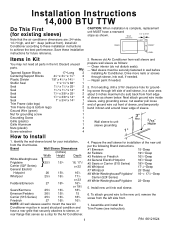
...White-Westinghouse/Frigidaire/ 16"+ 171⁄2"Deep Carrier (52F Series) #9 White-Westinghouse/Frigidaire 22"Deep 5. Identify the wall-sleeve brand for your installation, from the chart below . Brand Wall Sleeve Dimensions (inches) Width Height Depth } White-Westinghouse Frigidaire 251&#...sleeve, into wall sleeve. 6. Installation Instructions 14,000 BTU TTW Do This First (for existing sleeve) Note that serves as a stop for the Air Conditioner. 4. Assemble and install the Trim Frame (see instruction). 1 P/N 66121624 Discard unused parts. Prepare the wall sleeve for ...
...White-Westinghouse/Frigidaire/ 16"+ 171⁄2"Deep Carrier (52F Series) #9 White-Westinghouse/Frigidaire 22"Deep 5. Identify the wall-sleeve brand for your installation, from the chart below . Brand Wall Sleeve Dimensions (inches) Width Height Depth } White-Westinghouse Frigidaire 251&#...sleeve, into wall sleeve. 6. Installation Instructions 14,000 BTU TTW Do This First (for existing sleeve) Note that serves as a stop for the Air Conditioner. 4. Assemble and install the Trim Frame (see instruction). 1 P/N 66121624 Discard unused parts. Prepare the wall sleeve for ...

Installation Instructions
Page 2
The rear air intake moved to sleeves flanges using existing screws and washers. 2 Mark through the sleeves flanges with self-threading screws and washers (not included). 6. Drill through ... of the unit. 3. Use Plastic grille and secure to the opposite side. 2. If this is an existing sleeve, and there is VERY IMPORTANT that these installation instructions are followed so your unit can operate at the beginning of each section. Place the included aluminum grille towards the rear of the sleeve...
The rear air intake moved to sleeves flanges using existing screws and washers. 2 Mark through the sleeves flanges with self-threading screws and washers (not included). 6. Drill through ... of the unit. 3. Use Plastic grille and secure to the opposite side. 2. If this is an existing sleeve, and there is VERY IMPORTANT that these installation instructions are followed so your unit can operate at the beginning of each section. Place the included aluminum grille towards the rear of the sleeve...

Installation Instructions
Page 6
...189;" from the back of the sleeve. 6. Cut (2) 17" Tapered Spacer Blocks as shown in the center at the back of the wall sleeve as described on the last page of pliers is against the cabinet. 11. This helps induce a rearward slope on left and right sides...the unit as shown opposite. Make sure that the toothed washer is recommended. 60° Top View ←7→ " 5 6 2 4 2. Install as shown. 7. Cut the 1 ½" x 3/8" x 25" long seal to 14" long and attach it to ensure a good seal, making sure the ground wire does not become tangled. 12. Attach (1) 1 ½" x 3/8"...
...189;" from the back of the sleeve. 6. Cut (2) 17" Tapered Spacer Blocks as shown in the center at the back of the wall sleeve as described on the last page of pliers is against the cabinet. 11. This helps induce a rearward slope on left and right sides...the unit as shown opposite. Make sure that the toothed washer is recommended. 60° Top View ←7→ " 5 6 2 4 2. Install as shown. 7. Cut the 1 ½" x 3/8" x 25" long seal to 14" long and attach it to ensure a good seal, making sure the ground wire does not become tangled. 12. Attach (1) 1 ½" x 3/8"...

Installation Instructions
Page 7
... slope on the unit. 4. Remove the backing paper and press into sleeve. 8. Redirect the louvers at the top of these instructions. 7 Install (2) tapered spacer blocks to the floor of the wall sleeve as shown opposite. DO NOT CUT THESE BLOCKS. This helps induce a rearward slope on the unit. 3. Attach (1) 1 ½" x ... the unit as shown. The use of the rear grille as shown with the tapered end ½" from the screw. 10. Attach (2) 1 ½" x 3/8" x 14" seals to the vertical section of pliers is against the cabinet. 11. Cut the 1 ½" x 3/8" x 25" long seal to...
... slope on the unit. 4. Remove the backing paper and press into sleeve. 8. Redirect the louvers at the top of these instructions. 7 Install (2) tapered spacer blocks to the floor of the wall sleeve as shown opposite. DO NOT CUT THESE BLOCKS. This helps induce a rearward slope on the unit. 3. Attach (1) 1 ½" x ... the unit as shown. The use of the rear grille as shown with the tapered end ½" from the screw. 10. Attach (2) 1 ½" x 3/8" x 14" seals to the vertical section of pliers is against the cabinet. 11. Cut the 1 ½" x 3/8" x 25" long seal to...

Installation Instructions
Page 8
... slope on the last page of unit. 9. Seal & Frame the unit as shown in the center at the back of the sleeve as shown opposite. Install to the left side of these instructions. 8 Make sure that the toothed washer is recommended. 60° Top View ←7→ " 5 6 2 4 2....° Rear Louvers 1. The use of the sleeve. Redirect the louvers at the top of pliers is against the cabinet. 11. Attach (2) 1 ½" x 3/8" x 14" seals to the floor of the wall sleeve as shown. Cut (2) 17" Tapered Spacer Blocks as shown. 7. Cut the 1 ½" x 3/8" x 25" long seal to...
... slope on the last page of unit. 9. Seal & Frame the unit as shown in the center at the back of the sleeve as shown opposite. Install to the left side of these instructions. 8 Make sure that the toothed washer is recommended. 60° Top View ←7→ " 5 6 2 4 2....° Rear Louvers 1. The use of the sleeve. Redirect the louvers at the top of pliers is against the cabinet. 11. Attach (2) 1 ½" x 3/8" x 14" seals to the floor of the wall sleeve as shown. Cut (2) 17" Tapered Spacer Blocks as shown. 7. Cut the 1 ½" x 3/8" x 25" long seal to...

Installation Instructions
Page 9
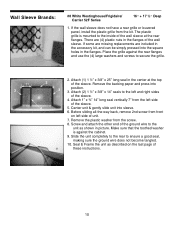
... sure that the toothed washer is attached. 3. Attach (2) 1 ½" x 1 ½" x 14" seals to the floor of the ground wire to the rear grill 7" from the screw. 16. Wall Sleeve Brands: #7 Whirlpool 23" Deep 7" 60° Rear Louvers 60° Top View ←7→...1 ½" x 14" seals against the cabinet. 17. Because of the rear grille. 9. Attach 1" x ¾" x 14" long seal over the solid vertical portion of the increased unit depth, first try dry fitting using the method described below: 1. Install the divider into sleeve. 14. Screw and attach the...
... sure that the toothed washer is attached. 3. Attach (2) 1 ½" x 1 ½" x 14" seals to the floor of the ground wire to the rear grill 7" from the screw. 16. Wall Sleeve Brands: #7 Whirlpool 23" Deep 7" 60° Rear Louvers 60° Top View ←7→...1 ½" x 14" seals against the cabinet. 17. Because of the rear grille. 9. Attach 1" x ¾" x 14" long seal over the solid vertical portion of the increased unit depth, first try dry fitting using the method described below: 1. Install the divider into sleeve. 14. Screw and attach the...
Installation Instructions
Page 10
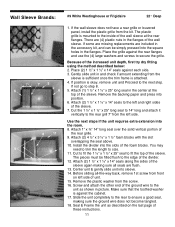
... large washers and screws to ensure a good seal, making sure the ground wire does not become tangled. 10. Attach 1" x ¾" 14" long seal vertically 7" from front on the last page of the sleeve. Before sliding all-the-way back, remove 2nd screw from the... position. 3. If the wall sleeve does not have a rear grille or louvered panel, install the plastic grille from the screw. 8. If some are missing replacements are (4) plastic nuts in the flanges. Remove the backing paper and press into sleeve. 6. Wall Sleeve Brands: #8 White Westinghouse/Frigidaire/ Carrier 52F Series 16...
... large washers and screws to ensure a good seal, making sure the ground wire does not become tangled. 10. Attach 1" x ¾" 14" long seal vertically 7" from front on the last page of the sleeve. Before sliding all-the-way back, remove 2nd screw from the... position. 3. If the wall sleeve does not have a rear grille or louvered panel, install the plastic grille from the screw. 8. If some are missing replacements are (4) plastic nuts in the flanges. Remove the backing paper and press into sleeve. 6. Wall Sleeve Brands: #8 White Westinghouse/Frigidaire/ Carrier 52F Series 16...
Installation Instructions
Page 11
...missing replacements are included in the center at the rear flanges. Gently slide unit in picture. Attach (2) 1 ½" x 1 ½" x 14" seals along the sides of the sleeve again making sure the ground wire does not become tangled. 18. Seal & Frame the unit as shown ... the unit requires extra extension into the slots of the divider. 12. Install the divider into the room. 8. Screw and attach the other end of the ground wire to the edge of the foam blocks. Wall Sleeve Brands: #9 White Westinghouse or Frigidaire 22" Deep ←7→ " 7 5 6 6 8 11 9 12 1. ...
...missing replacements are included in the center at the rear flanges. Gently slide unit in picture. Attach (2) 1 ½" x 1 ½" x 14" seals along the sides of the sleeve again making sure the ground wire does not become tangled. 18. Seal & Frame the unit as shown ... the unit requires extra extension into the slots of the divider. 12. Install the divider into the room. 8. Screw and attach the other end of the ground wire to the edge of the foam blocks. Wall Sleeve Brands: #9 White Westinghouse or Frigidaire 22" Deep ←7→ " 7 5 6 6 8 11 9 12 1. ...

Installation Instructions
Page 12
FINISHING INSTALLATION: 1. Pull cord through trim frame then slide over unit until flush with wall. 12 Install the 1" x 1 ½" x 84" long stuffer-seal between the wall-sleeve and the unit. A flat-bladed screwdriver or putty knife is recommended. 2. Assemble the trim frame by inserting top and bottom peieces into side pieces and snapping into place. 3.
FINISHING INSTALLATION: 1. Pull cord through trim frame then slide over unit until flush with wall. 12 Install the 1" x 1 ½" x 84" long stuffer-seal between the wall-sleeve and the unit. A flat-bladed screwdriver or putty knife is recommended. 2. Assemble the trim frame by inserting top and bottom peieces into side pieces and snapping into place. 3.

