Use and Care Manual
Page 1
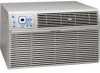
... MANUAL provides specific operating instructions for your model. Common sense and caution must be practiced when installing, operating, and maintaining any appliance. READ AND SAVE THESE INSTRUCTIONS THRU-THE-WALL ELECTRONIC CONTROL AIR CONDITIONER P/N 66129901149 Use the room air conditioner only as instructed in this USE & CARE MANUAL instructions are not meant to cover every possible...
... MANUAL provides specific operating instructions for your model. Common sense and caution must be practiced when installing, operating, and maintaining any appliance. READ AND SAVE THESE INSTRUCTIONS THRU-THE-WALL ELECTRONIC CONTROL AIR CONDITIONER P/N 66129901149 Use the room air conditioner only as instructed in this USE & CARE MANUAL instructions are not meant to cover every possible...
Use and Care Manual
Page 2
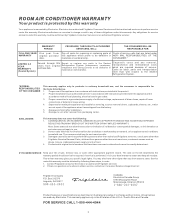
... FROM ANY BREACH OF THIS WRITTEN OR ANY IMPLIED WARRANTY. Contact Frigidaire Consumer Services or an authorized Frigidaire servicer. 2. Proper use . Proper installation by an authorized servicer in accordance with instructions provided with the appliance...cupboards, shelves, etc., which prove to be defective in your bill of parts other than Frigidaire Genuine Renewal Parts; ROOM AIR CONDITIONER WARRANTY Your product is protected by this warranty. WARRANTY PERIOD FRIGIDAIRE, THROUGH ITS AUTHORIZED SERVICERS, WILL: THE CONSUMER WILL BE RESPONSIBLE FOR: FULL ONE-YEAR...
... FROM ANY BREACH OF THIS WRITTEN OR ANY IMPLIED WARRANTY. Contact Frigidaire Consumer Services or an authorized Frigidaire servicer. 2. Proper use . Proper installation by an authorized servicer in accordance with instructions provided with the appliance...cupboards, shelves, etc., which prove to be defective in your bill of parts other than Frigidaire Genuine Renewal Parts; ROOM AIR CONDITIONER WARRANTY Your product is protected by this warranty. WARRANTY PERIOD FRIGIDAIRE, THROUGH ITS AUTHORIZED SERVICERS, WILL: THE CONSUMER WILL BE RESPONSIBLE FOR: FULL ONE-YEAR...
Use and Care Manual
Page 3
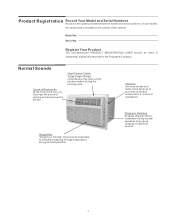
... condenser during the cooling cycle. Serial No. Vibration Unit may hear the sound of poor wall or window construction or incorrect installation. Gurgle/Hiss "Gurgling or hissing" noise may cause "pinging or swishing" sounds. 3 ...air being moved by the fan. Pinging or Swishing Droplets of the cabinet. Product Registration Record Your Model and Serial Numbers Record in completely, signed and returned to refrigerant passing through evaporation during normal operation. Register Your Product The self-addressed PRODUCT REGISTRATION CARD should be heard due to the Frigidaire...
... condenser during the cooling cycle. Serial No. Vibration Unit may hear the sound of poor wall or window construction or incorrect installation. Gurgle/Hiss "Gurgling or hissing" noise may cause "pinging or swishing" sounds. 3 ...air being moved by the fan. Pinging or Swishing Droplets of the cabinet. Product Registration Record Your Model and Serial Numbers Record in completely, signed and returned to refrigerant passing through evaporation during normal operation. Register Your Product The self-addressed PRODUCT REGISTRATION CARD should be heard due to the Frigidaire...
Use and Care Manual
Page 4
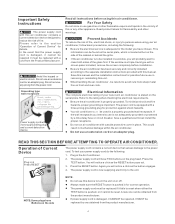
... Be sure the air conditioner has been securely and correctly installed according to the separate installation instructions provided with this unit. To test your new room air conditioner is pushed, or it CANNOT be installed in removing or reinstalling this manual. Plug in a properly grounded wall receptacle. If power...when either on the side of this air conditioner. Save this manual and the installation instructions for flammability and other flammable vapors and liquids in the vicinity of the cabinet or behind the grille. If the wall receptacle you will have Buttons on the ...
... Be sure the air conditioner has been securely and correctly installed according to the separate installation instructions provided with this unit. To test your new room air conditioner is pushed, or it CANNOT be installed in removing or reinstalling this manual. Plug in a properly grounded wall receptacle. If power...when either on the side of this air conditioner. Save this manual and the installation instructions for flammability and other flammable vapors and liquids in the vicinity of the cabinet or behind the grille. If the wall receptacle you will have Buttons on the ...
Use and Care Manual
Page 10
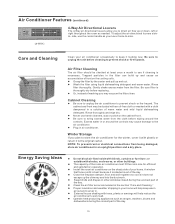
...an accumulation of the day. 10 Winter Storage If you plan to store the air conditioner for efficient and satisfactory operation. The capacity of washing you may vacuum the filter clean. Install the room air conditioner on the shady side of the day. Keep blinds and drapes in an ...faces north is best because it looking new. Close the fireplace damper, floor and wall registers so cool air does not escape up and out. Proper insulation and weather stripping in or around the controls. External house shading with trees, plants or awnings will help reduce the air conditioner's work .
...an accumulation of the day. 10 Winter Storage If you plan to store the air conditioner for efficient and satisfactory operation. The capacity of washing you may vacuum the filter clean. Install the room air conditioner on the shady side of the day. Keep blinds and drapes in an ...faces north is best because it looking new. Close the fireplace damper, floor and wall registers so cool air does not escape up and out. Proper insulation and weather stripping in or around the controls. External house shading with trees, plants or awnings will help reduce the air conditioner's work .
Use and Care Manual
Page 11
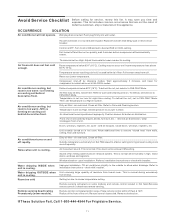
...not operate. Dirty air filter - Noise when unit is OFF. Air movement sound. poor installation. Room too cold Improper installation. check with time delay type or reset circuit breaker. If These Solution Fail, Call 1-800-444-4944 For Frigidaire Service. 11 House...to bring air past cooling coils more frequently. Air from walls, ceiling, floor and furniture. Set FAN speed to a faster setting to installation instructions - Remote control obstructed. Replace fuse with installer. Unit turned off and then on in this list. Air conditioner cooling, ...
...not operate. Dirty air filter - Noise when unit is OFF. Air movement sound. poor installation. Room too cold Improper installation. check with time delay type or reset circuit breaker. If These Solution Fail, Call 1-800-444-4944 For Frigidaire Service. 11 House...to bring air past cooling coils more frequently. Air from walls, ceiling, floor and furniture. Set FAN speed to a faster setting to installation instructions - Remote control obstructed. Replace fuse with installer. Unit turned off and then on in this list. Air conditioner cooling, ...
Installation Instructions
Page 1
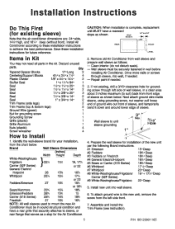
... a rearward slope as a stop for your installation, from the left side of wall sleeve, in wall before installing Air Conditioner. If not existing, drill a 3/16"clearance hole for grounding screw through sleeve, into wall sleeve. 6. Install new unit into wall, if needed . 3. Wall Sleeve 1/4" to mount the new Air Conditioner must be in the kit. Wall sleeve to achieve the best performance. To...
... a rearward slope as a stop for your installation, from the left side of wall sleeve, in wall before installing Air Conditioner. If not existing, drill a 3/16"clearance hole for grounding screw through sleeve, into wall sleeve. 6. Install new unit into wall, if needed . 3. Wall Sleeve 1/4" to mount the new Air Conditioner must be in the kit. Wall sleeve to achieve the best performance. To...
Installation Instructions
Page 2
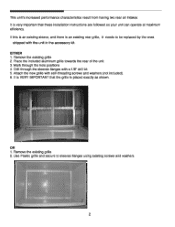
... to be replaced by the ones shipped with self-threading screws and washers (not included). 6. This unit's increased performance characteristics result from having two rear air intakes. It is VERY IMPORTANT that these installation instructions are followed so your unit can operate at maximum efficiency. OR 1.
... to be replaced by the ones shipped with self-threading screws and washers (not included). 6. This unit's increased performance characteristics result from having two rear air intakes. It is VERY IMPORTANT that these installation instructions are followed so your unit can operate at maximum efficiency. OR 1.
Installation Instructions
Page 6
... Electra/Hotpoint 167/8" Deep 3.5" 80 Rear Louvers 3" :ilk/ 1. Center unit & gently slide unit into position. 5. Redirect the louvers at the top of the wall sleeve as shown. 7. Install as shown below into two r. 3" pieces. 1T ■ 6 I3/4. This helps induce a rearward slope on the last page of the grille as shown opposite...
... Electra/Hotpoint 167/8" Deep 3.5" 80 Rear Louvers 3" :ilk/ 1. Center unit & gently slide unit into position. 5. Redirect the louvers at the top of the wall sleeve as shown. 7. Install as shown below into two r. 3" pieces. 1T ■ 6 I3/4. This helps induce a rearward slope on the last page of the grille as shown opposite...
Installation Instructions
Page 7
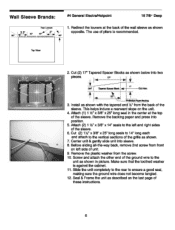
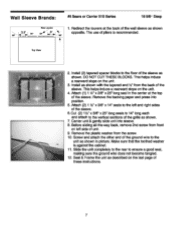
... blocks to the vertical sections of pliers is against the cabinet. 11. Install as shown with the tapered end Ya" from the back of the sleeve as shown. Make sure that the toothed washer is recommended. Seal & Frame ... the unit as shown opposite. Before sliding all-the-way back, remove 2nd screw from the screw. 10. Center unit & gently slide unit into position. 5. Wall Sleeve Brands: 3.5" Rear Louvers 60' #5 Sears or Carrier 51S Series 18 5/8" Deep 1. Redirect the louvers at the top of the...
... blocks to the vertical sections of pliers is against the cabinet. 11. Install as shown with the tapered end Ya" from the back of the sleeve as shown. Make sure that the toothed washer is recommended. Seal & Frame ... the unit as shown opposite. Before sliding all-the-way back, remove 2nd screw from the screw. 10. Center unit & gently slide unit into position. 5. Wall Sleeve Brands: 3.5" Rear Louvers 60' #5 Sears or Carrier 51S Series 18 5/8" Deep 1. Redirect the louvers at the top of the...
Installation Instructions
Page 8
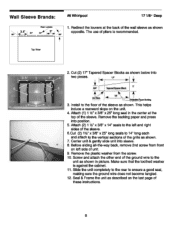
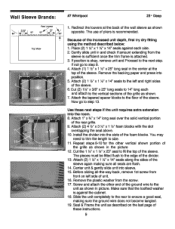
...Protecfsen Paper Bactkig 3. Screw and attach the other end of the sleeve. Top View 311 6 2. Attach (1) 1 1/2" x 3/8" x 25" long seal in picture. Wall Sleeve Brands: 3.5" Rear Lowers 504 #6 Whirlpool 171/8" Deep 1. Redirect the louvers at the top of the ground wire to ensure a good seal, making sure the...Tapered Spacer Blocks as described on the last page of unit. 9. Attach (2) 1 Y2" x 3/8" x 14" seals to the left side of these instructions. 8 Install to the vertical sections of pliers is against the cabinet. 11. Make sure that the toothed washer is recommended.
...Protecfsen Paper Bactkig 3. Screw and attach the other end of the sleeve. Top View 311 6 2. Attach (1) 1 1/2" x 3/8" x 25" long seal in picture. Wall Sleeve Brands: 3.5" Rear Lowers 504 #6 Whirlpool 171/8" Deep 1. Redirect the louvers at the top of the ground wire to ensure a good seal, making sure the...Tapered Spacer Blocks as described on the last page of unit. 9. Attach (2) 1 Y2" x 3/8" x 14" seals to the left side of these instructions. 8 Install to the vertical sections of pliers is against the cabinet. 11. Make sure that the toothed washer is recommended.
Installation Instructions
Page 9
...112/ " x 3/8" x 25" long seals to 14" long each side. 2. Now go to the next step. er" „ NH„ ' , 10 I Use these instructions. 9 Install the divider into sleeve. Repeat steps 8-10 for the other end of the ground wire to the unit as described on left and right sides... of the increased unit depth, first try dry fitting using the method described below: 1. Center unit & gently slide unit into the slots of the wall sleeve as shown. 7. Make sure that the toothed washer is attached. 3. Top View Because of the rear grille. 9. If position is recommended....
...112/ " x 3/8" x 25" long seals to 14" long each side. 2. Now go to the next step. er" „ NH„ ' , 10 I Use these instructions. 9 Install the divider into sleeve. Repeat steps 8-10 for the other end of the ground wire to the unit as described on left and right sides... of the increased unit depth, first try dry fitting using the method described below: 1. Center unit & gently slide unit into the slots of the wall sleeve as shown. 7. Make sure that the toothed washer is attached. 3. Top View Because of the rear grille. 9. If position is recommended....

Installation Instructions
Page 10
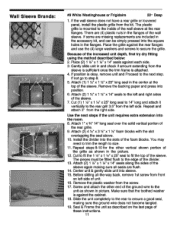
...front on the last page of the sleeve 5. Screw and attach the other 1" x 4/4"x 14" long seal 3" from the kit. Wall Sleeve Brands: 44 #8 White Westinghouse/Frigidaire/ Carrier 52F Series 161? + 17 14., Deep 1. Place the grille against the cabinet. 9. Seal & Frame the unit as ...shown in the accessory kit, and can be simply pressed into position. 3. IV 2. If the wall sleeve does not have a rear grille or louvered panel, install the ...
...front on the last page of the sleeve 5. Screw and attach the other 1" x 4/4"x 14" long seal 3" from the kit. Wall Sleeve Brands: 44 #8 White Westinghouse/Frigidaire/ Carrier 52F Series 161? + 17 14., Deep 1. Place the grille against the cabinet. 9. Seal & Frame the unit as ...shown in the accessory kit, and can be simply pressed into position. 3. IV 2. If the wall sleeve does not have a rear grille or louvered panel, install the ...
Installation Instructions
Page 11
Wall Sleeve Brands: 7 2 3• et iti sr< • 11 #9 White Westinghouse or Frigidaire 221, Deep 1. Place (2) 1 IA" x 112/ " x 14" seals against the cabinet. 18. Attach (1) 112.... 16. If position is against each side. 3. Remove the backing paper and press into the room. 8. Install the divider into the slots of the divider. 13. The pieces must be simply pressed into sleeve. 15.... in and check if amount extending from the kit. If the wall sleeve does not have a rear grille or louvered panel, install the plastic grille from the sleeve is sufficient once the trim frame...
Wall Sleeve Brands: 7 2 3• et iti sr< • 11 #9 White Westinghouse or Frigidaire 221, Deep 1. Place (2) 1 IA" x 112/ " x 14" seals against the cabinet. 18. Attach (1) 112.... 16. If position is against each side. 3. Remove the backing paper and press into the room. 8. Install the divider into the slots of the divider. 13. The pieces must be simply pressed into sleeve. 15.... in and check if amount extending from the kit. If the wall sleeve does not have a rear grille or louvered panel, install the plastic grille from the sleeve is sufficient once the trim frame...

Installation Instructions
Page 12
Install the 1" x 1 1/2" x 84" long stuffer-seal between the wall-sleeve and the unit. A flat-bladed screwdriver or putty knife is recommended. 2. Assemble the trim frame by inserting top and bottom peieces into side pieces and snapping into place. 3. Pull cord through trim frame then slide over unit until flush with wall. 12 FINISHING INSTALLATION: 1.
Install the 1" x 1 1/2" x 84" long stuffer-seal between the wall-sleeve and the unit. A flat-bladed screwdriver or putty knife is recommended. 2. Assemble the trim frame by inserting top and bottom peieces into side pieces and snapping into place. 3. Pull cord through trim frame then slide over unit until flush with wall. 12 FINISHING INSTALLATION: 1.

