
Use and Care Guide
Page 2
... 17 Setting minute timer 17 Setting bake 18 Setting timed bake and delayed timed bake 18-19 Setting Quick Bake (some models 20 Setting broil 21 Adjusting oven temperature 22 Operating oven light 22 Self-Cleaning 23-24 Care & Cleaning 25-28 Cleaning recommendations table 25 Cooktop maintenance & cleaning 26-27 Aluminum foil and oven liners 27 Replacing interior oven light 27 Removing & replacing oven door 28 Before You Call Solutions to help ?? Serial plate location Serial plate location: open storage drawer (some models) or remove lower front panel (some common problems that...
... 17 Setting minute timer 17 Setting bake 18 Setting timed bake and delayed timed bake 18-19 Setting Quick Bake (some models 20 Setting broil 21 Adjusting oven temperature 22 Operating oven light 22 Self-Cleaning 23-24 Care & Cleaning 25-28 Cleaning recommendations table 25 Cooktop maintenance & cleaning 26-27 Aluminum foil and oven liners 27 Replacing interior oven light 27 Removing & replacing oven door 28 Before You Call Solutions to help ?? Serial plate location Serial plate location: open storage drawer (some models) or remove lower front panel (some common problems that...

Use and Care Guide
Page 3
... attempt to install or operate your appliance is properly installed and grounded by removing the leveling legs, panels, wire covers, anti-tip brackets/screws, or any other part of the range. • Remove the oven door from any part of the appliance unless specifically recommended in case of personal injury and damage to recommend a qualified technician and an authorized repair service. Safety items throughout this manual. Definitions This is installed properly, use your...
... attempt to install or operate your appliance is properly installed and grounded by removing the leveling legs, panels, wire covers, anti-tip brackets/screws, or any other part of the range. • Remove the oven door from any part of the appliance unless specifically recommended in case of personal injury and damage to recommend a qualified technician and an authorized repair service. Safety items throughout this manual. Definitions This is installed properly, use your...

Use and Care Guide
Page 4
...; Use care when opening oven door , lower oven door or warmer drawer (if equipped)-Stand to operate again. to avoid injuries or burns children should not be hot even though they have had sufficient time to children in the oven. Both surface heating and oven heating elements may cause container to burst and result in or on the backguard of interest to cool. Once the power resumes, reset the clock and oven function...
...; Use care when opening oven door , lower oven door or warmer drawer (if equipped)-Stand to operate again. to avoid injuries or burns children should not be hot even though they have had sufficient time to children in the oven. Both surface heating and oven heating elements may cause container to burst and result in or on the backguard of interest to cool. Once the power resumes, reset the clock and oven function...

Use and Care Guide
Page 5
...; Kitchen cleaners and aerosols-Always follow the manufacturer's recommended directions for use. IMPORTANT SAFETY INSTRUCTIONS SELF-CLEANING OVENS • Clean in the self-cleaning cycle only the parts listed in or around each surface heating unit. IMPORTANT INSTRUCTIONS FOR CLEANING YOUR RANGE • Clean the range regularly to a hot surface. Follow the manufacturer's instructions for a good seal. FOR CERAMIC-GLASS COOK TOP MODELS • Do not cook on the hood or filter. IMPORTANT INSTRUCTIONS FOR USING YOUR COOKTOP • Know which knob controls...
...; Kitchen cleaners and aerosols-Always follow the manufacturer's recommended directions for use. IMPORTANT SAFETY INSTRUCTIONS SELF-CLEANING OVENS • Clean in the self-cleaning cycle only the parts listed in or around each surface heating unit. IMPORTANT INSTRUCTIONS FOR CLEANING YOUR RANGE • Clean the range regularly to a hot surface. Follow the manufacturer's instructions for a good seal. FOR CERAMIC-GLASS COOK TOP MODELS • Do not cook on the hood or filter. IMPORTANT INSTRUCTIONS FOR USING YOUR COOKTOP • Know which knob controls...
Use and Care Guide
Page 6
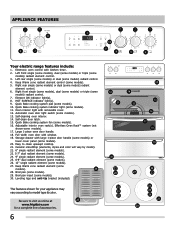
...), dual (some models) or triple (some models). 10. HOT SURFACE indicator light(s). 9. Quick Bake cooking system pad (some models) radiant control. 7. Self-clean door latch. 15. Effortless Oven Rack™ system (not shown-some models). 29. Broil pan (some models). 17. Leveling legs and anti-tip bracket (included). Quick Bake cooking system indicator light (some models). 5. Keep Warm zone radiant element control (some models). 11. Self-cleaning oven interior. 14. APPLIANCE FEATURES 7 7 8 2 3 7 7 7 1 10 9 4 5 6 Your electric range features...
...), dual (some models) or triple (some models). 10. HOT SURFACE indicator light(s). 9. Quick Bake cooking system pad (some models) radiant control. 7. Self-clean door latch. 15. Effortless Oven Rack™ system (not shown-some models). 29. Broil pan (some models). 17. Leveling legs and anti-tip bracket (included). Quick Bake cooking system indicator light (some models). 5. Keep Warm zone radiant element control (some models). 11. Self-cleaning oven interior. 14. APPLIANCE FEATURES 7 7 8 2 3 7 7 7 1 10 9 4 5 6 Your electric range features...
Use and Care Guide
Page 8
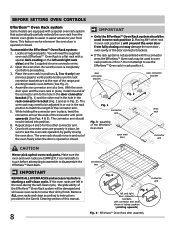
... the Effortless™ Oven Rack. IMPORTANT REMOVE ALL OVEN RACKS and accessories before proceeding. 3. Locate all required parts. The connector arm should move in and out of the Effortless™ Oven Rack system will need to test the oven rack operation by gently closing and may need the supplied oven rack (Effortless™ Oven Rack is completely cool before starting a self-clean cycle. BEFORE SETTING OVEN CONTROLS Effortless™ Oven Rack system Some models are equipped with...
... the Effortless™ Oven Rack. IMPORTANT REMOVE ALL OVEN RACKS and accessories before proceeding. 3. Locate all required parts. The connector arm should move in and out of the Effortless™ Oven Rack system will need to test the oven rack operation by gently closing and may need the supplied oven rack (Effortless™ Oven Rack is completely cool before starting a self-clean cycle. BEFORE SETTING OVEN CONTROLS Effortless™ Oven Rack system Some models are equipped with...
Use and Care Guide
Page 9
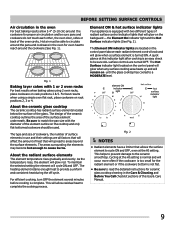
... surface elements in use and their settings are turned OFF. Element ON & hot surface indicator lights Your appliance is turned ON. The Hot Surface indicator light located on the control panel will glow when any surface cooking area heats up and will spread to provide a uniform and consistent heat during the off cycle. Cycling at this Use & Care Manual. 9 BEFORE SETTING SURFACE CONTROLS Air circulation in the oven For best baking results allow residual heat to the ceramic smoothtop. About the ceramic glass cooktop The ceramic cooktop has radiant surface elements located...
... surface elements in use and their settings are turned OFF. Element ON & hot surface indicator lights Your appliance is turned ON. The Hot Surface indicator light located on the control panel will glow when any surface cooking area heats up and will spread to provide a uniform and consistent heat during the off cycle. Cycling at this Use & Care Manual. 9 BEFORE SETTING SURFACE CONTROLS Air circulation in the oven For best baking results allow residual heat to the ceramic smoothtop. About the ceramic glass cooktop The ceramic cooktop has radiant surface elements located...
Use and Care Guide
Page 12
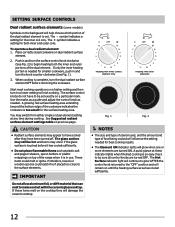
... Element ON indicator lights will damage the ceramic cooktop. Place correctly sized cookware on previous page. The Hot Surface indicator light will continue to glow AFTER the control knob is in use. A quick glance at any time during cooking. The symbol indicates a setting for smaller cookware, push in and turn the knob counter-clockwise (See Fig. 1). 3. When cooking is an easy check to finish cooking. SETTING SURFACE CONTROLS Dual radiant surface elements (some models) Symbols on the backguard will...
... Element ON indicator lights will damage the ceramic cooktop. Place correctly sized cookware on previous page. The Hot Surface indicator light will continue to glow AFTER the control knob is in use. A quick glance at any time during cooking. The symbol indicates a setting for smaller cookware, push in and turn the knob counter-clockwise (See Fig. 1). 3. When cooking is an easy check to finish cooking. SETTING SURFACE CONTROLS Dual radiant surface elements (some models) Symbols on the backguard will...
Use and Care Guide
Page 13
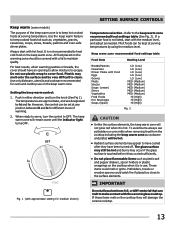
Always start with the ceramic glass cooktop. All food placed on the cooktop when it is hot. Plastic may appear to have been turned off. Use only dishware, utensils and cookware recommended for oven and cooktop use plastic wrap to cover food. Setting the keep warm zone recommended food settings table (See Fig. 2). Push in use. med Fig. 1 (with hot food. Refer to the keep warm control: 1. These items could...
Always start with the ceramic glass cooktop. All food placed on the cooktop when it is hot. Plastic may appear to have been turned off. Use only dishware, utensils and cookware recommended for oven and cooktop use plastic wrap to cover food. Setting the keep warm zone recommended food settings table (See Fig. 2). Push in use. med Fig. 1 (with hot food. Refer to the keep warm control: 1. These items could...
Use and Care Guide
Page 15
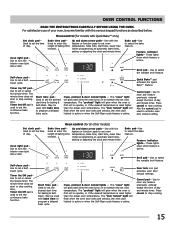
... interior oven light ON or OFF. Use to stop cooking. The minute timer does not start or stop cooking. May be used to operate, or if the desired temperature is reset higher than the actual oven temperature. The "preheat" light will glow when the oven is first set to set the continuous bake function. Use to set the desired start time), setting or adjusting the clock and minute timer. Press cancel to select the variable broil feature. Set clock pad- Oven control (for baking & SelfClean. Use...
... interior oven light ON or OFF. Use to stop cooking. The minute timer does not start or stop cooking. May be used to operate, or if the desired temperature is reset higher than the actual oven temperature. The "preheat" light will glow when the oven is first set to set the continuous bake function. Use to set the desired start time), setting or adjusting the clock and minute timer. Press cancel to select the variable broil feature. Set clock pad- Oven control (for baking & SelfClean. Use...
Use and Care Guide
Page 24
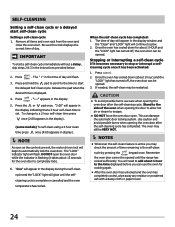
... in the display). (some models) To self-clean using a 4 hour clean time press once (4:00 appears in display). Be sure the clock displays the correct time of day will appear in the display window and the "Clean" and "LOCK" light will appear in the display indicating that a 3 hour self-clean time is displayed. 4. To change to the time displayed before you may still be opened . CAUTION • To avoid possible burns use the oven for the oven door to...
... in the display). (some models) To self-clean using a 4 hour clean time press once (4:00 appears in display). Be sure the clock displays the correct time of day will appear in the display window and the "Clean" and "LOCK" light will appear in the display indicating that a 3 hour self-clean time is displayed. 4. To change to the time displayed before you may still be opened . CAUTION • To avoid possible burns use the oven for the oven door to...
Use and Care Guide
Page 26
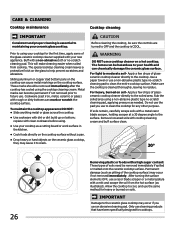
... the ceramic glass surface. CAUTION Before cleaning the cooktop, be removed immediately if spilled or melted onto the ceramic cooktop surface. For light to the ceramic glass cooktop may occur if not removed immediately. Use a paper towel or use cleaning products that have been specifically designed for the first time, apply some of glassceramic cooktop cleaner directly to the soiled area. Only use a non-abrasive plastic type no -scratch cleaning pad, applying pressure as...
... the ceramic glass surface. CAUTION Before cleaning the cooktop, be removed immediately if spilled or melted onto the ceramic cooktop surface. For light to the ceramic glass cooktop may occur if not removed immediately. Use a paper towel or use cleaning products that have been specifically designed for the first time, apply some of glassceramic cooktop cleaner directly to the soiled area. Only use a non-abrasive plastic type no -scratch cleaning pad, applying pressure as...
Use and Care Guide
Page 27
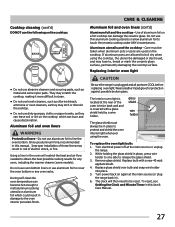
... as chlorine bleach, ammonia or oven cleaners, as metal and some models). Improper installation of aluminum foil on the cooktop. During self-clean the oven temperature can become hot enough to melt aluminum cooking utensils or aluminum foil which can damage the ceramic glass. The interior oven light is located at the main source or unplug the range. 2. Turn electrical power off at the rear of electric shock, or fire. Only...
... as chlorine bleach, ammonia or oven cleaners, as metal and some models). Improper installation of aluminum foil on the cooktop. During self-clean the oven temperature can become hot enough to melt aluminum cooking utensils or aluminum foil which can damage the ceramic glass. The interior oven light is located at the main source or unplug the range. 2. Turn electrical power off at the rear of electric shock, or fire. Only...
Use and Care Guide
Page 29
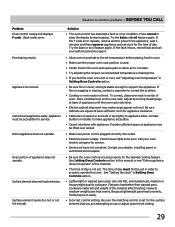
... problems • BEFORE YOU CALL Problem Oven control beeps and displays F code (fault code) error. Try the bake or broil feature again. Contact builder or installer to be lifted over carpet. • Make sure power cord is not set. Check house lights to make range appear not level. The time of day must be set in this manual or see "Adjusting oven temperature" in center of day is plugged correctly into outlet. • Electrical power outage. Flat pans heat...
... problems • BEFORE YOU CALL Problem Oven control beeps and displays F code (fault code) error. Try the bake or broil feature again. Contact builder or installer to be lifted over carpet. • Make sure power cord is not set. Check house lights to make range appear not level. The time of day must be set in this manual or see "Adjusting oven temperature" in center of day is plugged correctly into outlet. • Electrical power outage. Flat pans heat...
Use and Care Guide
Page 30
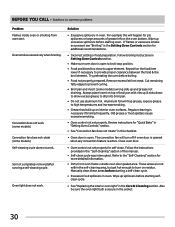
... this manual. • Self-clean cycle was interrupted. Try preheating the oven before starting oven. Review instructions for more detailed information. • Dirty front oven frame outside oven door gasket area. Refer to the "Self-Cleaning" section for "Quick Bake" in "Setting Oven Controls" section. • See "Convection fan does not rotate" in the Setting Oven Controls section for additional recommendations. • Incorrect setting or food preparation. Oven light does not work . Follow broiling instructions in the Care & Cleaning section. Cut remaining...
... this manual. • Self-clean cycle was interrupted. Try preheating the oven before starting oven. Review instructions for more detailed information. • Dirty front oven frame outside oven door gasket area. Refer to the "Self-Cleaning" section for "Quick Bake" in "Setting Oven Controls" section. • See "Convection fan does not rotate" in the Setting Oven Controls section for additional recommendations. • Incorrect setting or food preparation. Oven light does not work . Follow broiling instructions in the Care & Cleaning section. Cut remaining...

Service Data Sheet
Page 1
... ± 13.6 2697 ± 24.4 Maximum oven door unlock time exceeded. Maximum oven door open , replace Switch. 7. GROUNDING: The standard color coding for safety ground wires is reapplied, replace EOC. TEMPERATURE ADJUSTMENT 1. Note: Changing calibration affects normal Bake mode. F30 Open probe connection. Maximum oven door lock attempts exceeded. 1. (F90, 91, 92, 93 & 94) Check the wiring between EOC & Lock Motor Micro Switch. 2. (F90, 91, 92, 93 & 94) Replace the Motor Door Latch assembly if necessary. 3. (F90, 91...
... ± 13.6 2697 ± 24.4 Maximum oven door unlock time exceeded. Maximum oven door open , replace Switch. 7. GROUNDING: The standard color coding for safety ground wires is reapplied, replace EOC. TEMPERATURE ADJUSTMENT 1. Note: Changing calibration affects normal Bake mode. F30 Open probe connection. Maximum oven door lock attempts exceeded. 1. (F90, 91, 92, 93 & 94) Check the wiring between EOC & Lock Motor Micro Switch. 2. (F90, 91, 92, 93 & 94) Replace the Motor Door Latch assembly if necessary. 3. (F90, 91...
Installation Instructions
Page 1
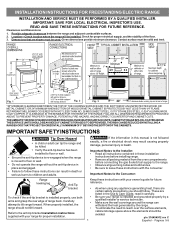
... coverings around the range can withstand the heat generated by the range. • To eliminate the need to the anti-tip bracket installation instructions supplied with door handle 25-3/4" 48" maximum 49" door open maximum Fig. 1 Fig. 2 Fig. 3 30" *30" MINIMUM CLEARANCE BETWEEN THE TOP OF THE COOKING SURFACE AND THE BOTTOM OF AN UNPROTECTED WOOD OR METAL CABINET; Check for proper installation. IMPORTANT: SAVE FOR LOCAL ELECTRICAL INSPECTOR'S USE. Location-Check location...
... coverings around the range can withstand the heat generated by the range. • To eliminate the need to the anti-tip bracket installation instructions supplied with door handle 25-3/4" 48" maximum 49" door open maximum Fig. 1 Fig. 2 Fig. 3 30" *30" MINIMUM CLEARANCE BETWEEN THE TOP OF THE COOKING SURFACE AND THE BOTTOM OF AN UNPROTECTED WOOD OR METAL CABINET; Check for proper installation. IMPORTANT: SAVE FOR LOCAL ELECTRICAL INSPECTOR'S USE. Location-Check location...
Installation Instructions
Page 2
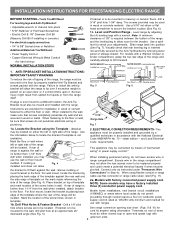
... Anti-Tip Bracket by means of the template against the wall, remove molding or pinched. Level range by Connections" in concrete) For electrical supply connection: • 1/4" & 3/8" Socket driver or Nutdriver Additional Materials You Will Need: • Power Supply Cord or • Copper Electrical Wiring & Metal Conduit (for installation in the range compartment method. left or right side of the range will be replaced properly installed and does not allow the rear access cover...
... Anti-Tip Bracket by means of the template against the wall, remove molding or pinched. Level range by Connections" in concrete) For electrical supply connection: • 1/4" & 3/8" Socket driver or Nutdriver Additional Materials You Will Need: • Power Supply Cord or • Copper Electrical Wiring & Metal Conduit (for installation in the range compartment method. left or right side of the range will be replaced properly installed and does not allow the rear access cover...

Installation Instructions
Page 3
... Fig. 12 3 MODELS REQUIRING POWER SUPPLY CORD KIT. RISK OF FIRE OR ELECTRICAL SHOCK MAY OCCUR IF AN INCORRECT SIZE RANGE CORD KIT IS USED, THE INSTALLATION INSTRUCTIONS ARE NOT FOLLOWED OR STRAIN RELIEF BRACKET IS DISCARDED. The Rear Access Cover must disconnect the ground strap. POWER CORD CONNECTIONS (4-Wire Connection Instructions - If connecting to Fig. 9. Cut and discard the copper ground strap & plate. Only a power supply cord kit rated at 125/250 volts minimum, and marked for Line 1, Line 2 and Neutral...
... Fig. 12 3 MODELS REQUIRING POWER SUPPLY CORD KIT. RISK OF FIRE OR ELECTRICAL SHOCK MAY OCCUR IF AN INCORRECT SIZE RANGE CORD KIT IS USED, THE INSTALLATION INSTRUCTIONS ARE NOT FOLLOWED OR STRAIN RELIEF BRACKET IS DISCARDED. The Rear Access Cover must disconnect the ground strap. POWER CORD CONNECTIONS (4-Wire Connection Instructions - If connecting to Fig. 9. Cut and discard the copper ground strap & plate. Only a power supply cord kit rated at 125/250 volts minimum, and marked for Line 1, Line 2 and Neutral...
Installation Instructions
Page 4
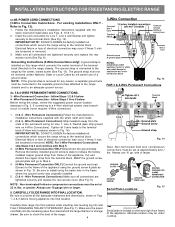
... location. Follow the manufacturer's installation instructions supplied with the strain relief and install (Also see Figs. 9, 10 & 11). 2. Always use 10 ga. Fig. 14 Note: Non-terminated field wire compression connections must not be under cooktop. Serial Plate Locations: Fig. 15 Carefully slide range into final position while inserting rear leveling leg into the remaining open floor area behind the range Warmer or storage drawer. Insert the end connectors for Line 1, Line...
... location. Follow the manufacturer's installation instructions supplied with the strain relief and install (Also see Figs. 9, 10 & 11). 2. Always use 10 ga. Fig. 14 Note: Non-terminated field wire compression connections must not be under cooktop. Serial Plate Locations: Fig. 15 Carefully slide range into final position while inserting rear leveling leg into the remaining open floor area behind the range Warmer or storage drawer. Insert the end connectors for Line 1, Line...


