
Use and Care Guide
Page 1
All about the Use & Care of your Electric Range 316902203 Rev E (Jan 2012) TABLE OF CONTENTS Important Safety Instructions 3-5 Features at a Glance 6 Before Setting Oven Controls 7-8 Before Setting Surface Controls 9-10 Setting Surface Controls (Ceramic cook top) .. 11-14 Oven Control Functions (330/330i 15 Setting Oven Controls 16-22 Self-Cleaning 23-24 Care & Cleaning 25-28 Before You Call 29-31 Major Appliance Warranty back cover www.frigidaire.com USA 1-800-944-9044 www.frigidaire.ca Canada 1-800-265-8352
All about the Use & Care of your Electric Range 316902203 Rev E (Jan 2012) TABLE OF CONTENTS Important Safety Instructions 3-5 Features at a Glance 6 Before Setting Oven Controls 7-8 Before Setting Surface Controls 9-10 Setting Surface Controls (Ceramic cook top) .. 11-14 Oven Control Functions (330/330i 15 Setting Oven Controls 16-22 Self-Cleaning 23-24 Care & Cleaning 25-28 Before You Call 29-31 Major Appliance Warranty back cover www.frigidaire.com USA 1-800-944-9044 www.frigidaire.ca Canada 1-800-265-8352

Use and Care Guide
Page 2
...to common problems 29-31 Appliance Warranty back cover Thank you the range. Save time and money. Product Registration Registering your range properly. immediately contact the dealer (or builder) that might occur. Call Frigidaire Customer Services at 1-800-944-9044. Record model & serial ...our ability to continue serving you, please use and maintain your product with Frigidaire enhances our ability to help ?? Check the section titled "Before You Call". If you received a damaged range ... Serial plate location Serial plate location: open storage drawer (some models...
...to common problems 29-31 Appliance Warranty back cover Thank you the range. Save time and money. Product Registration Registering your range properly. immediately contact the dealer (or builder) that might occur. Call Frigidaire Customer Services at 1-800-944-9044. Record model & serial ...our ability to continue serving you, please use and maintain your product with Frigidaire enhances our ability to help ?? Check the section titled "Before You Call". If you received a damaged range ... Serial plate location Serial plate location: open storage drawer (some models...

Use and Care Guide
Page 3
... stored or discarded. • Never use both arms and grasp the rear edge of range back. Refer to the anti-tip bracket installation instructions supplied with the National Electrical Code ANSI/NFPA No. 70 latest edition and local electrical code requirements. Never allow children to climb or play with packaging material. • Proper...
... stored or discarded. • Never use both arms and grasp the rear edge of range back. Refer to the anti-tip bracket installation instructions supplied with the National Electrical Code ANSI/NFPA No. 70 latest edition and local electrical code requirements. Never allow children to climb or play with packaging material. • Proper...

Use and Care Guide
Page 4
...result in injury. The oven vent is operating may cause container to sit or stand on grease fires - Children climbing on the backguard of electric shock, or fire. Once the power resumes, reset the clock and oven function. Touching the surfaces in this manual. Among these openings, ...• Do not store items of interest to children in color. Areas near these areas are dark in the cabinets above a range or on the range to operate the range during a power failure. Do not let clothing or other bulky cloth instead of a hot oven. moist or damp potholders on ...
...result in injury. The oven vent is operating may cause container to sit or stand on grease fires - Children climbing on the backguard of electric shock, or fire. Once the power resumes, reset the clock and oven function. Touching the surfaces in this manual. Among these openings, ...• Do not store items of interest to children in color. Areas near these areas are dark in the cabinets above a range or on the range to operate the range during a power failure. Do not let clothing or other bulky cloth instead of a hot oven. moist or damp potholders on ...

Use and Care Guide
Page 5
...commercial oven cleaner or oven liner protective coating of any kind should not be allowed to unintentional contact with one or more surface units of electric shock. Contact a qualified technician immediately. • Clean cook top with caution-If a wet sponge or cloth is equipped with the utensil,...the heating element to the sudden change in or around each surface heating unit. IMPORTANT INSTRUCTIONS FOR CLEANING YOUR RANGE • Clean the range regularly to the area around any range. FOR CERAMIC-GLASS COOK TOP MODELS • Do not cook on broken cook top-If cook top ...
...commercial oven cleaner or oven liner protective coating of any kind should not be allowed to unintentional contact with one or more surface units of electric shock. Contact a qualified technician immediately. • Clean cook top with caution-If a wet sponge or cloth is equipped with the utensil,...the heating element to the sudden change in or around each surface heating unit. IMPORTANT INSTRUCTIONS FOR CLEANING YOUR RANGE • Clean the range regularly to the area around any range. FOR CERAMIC-GLASS COOK TOP MODELS • Do not cook on broken cook top-If cook top ...
Use and Care Guide
Page 6
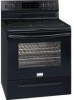
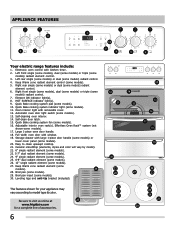
...Broil pan insert (some models). 13. Automatic oven door light switch (some models). 30. Storage drawer with kitchen timer. 2. Easy to model type & color. The ...online at 28 www.frigidaire.com for your appliance may vary according to clean upswept cooktop. 21. Self-cleaning oven interior. 14. Ceramic smoothtop (elements, styles and...tip bracket (included). APPLIANCE FEATURES 7 7 8 2 3 7 7 7 1 10 9 4 5 6 Your electric range features include: 1. Electronic oven control with large 1-piece door handle (some models) or lower cover panel (some models...
...Broil pan insert (some models). 13. Automatic oven door light switch (some models). 30. Storage drawer with kitchen timer. 2. Easy to model type & color. The ...online at 28 www.frigidaire.com for your appliance may vary according to clean upswept cooktop. 21. Self-cleaning oven interior. 14. Ceramic smoothtop (elements, styles and...tip bracket (included). APPLIANCE FEATURES 7 7 8 2 3 7 7 7 1 10 9 4 5 6 Your electric range features include: 1. Electronic oven control with large 1-piece door handle (some models) or lower cover panel (some models...
Use and Care Guide
Page 7
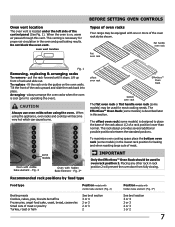
.... The Effortless™ Oven Rack (some models) is designed to operating the oven). oven vent location BEFORE SETTING OVEN CONTROLS Types of oven racks Your range may be used in the oven and good baking results. Lift up front of meat or poultry Turkey, roast or ham See broil section 3 or...
.... The Effortless™ Oven Rack (some models) is designed to operating the oven). oven vent location BEFORE SETTING OVEN CONTROLS Types of oven racks Your range may be used in the oven and good baking results. Lift up front of meat or poultry Turkey, roast or ham See broil section 3 or...
Use and Care Guide
Page 8
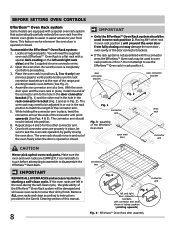
.... Assemble one end of the Effortless™ Oven Rack open and the oven rack in place, install one connector arm at the rear of the range and pointing towards oven bottom (See Fig. 2). 4. The connector arm should be sure to touch before proceeding. 3. Once both connector arms are properly in rack...
.... Assemble one end of the Effortless™ Oven Rack open and the oven rack in place, install one connector arm at the rear of the range and pointing towards oven bottom (See Fig. 2). 4. The connector arm should be sure to touch before proceeding. 3. Once both connector arms are properly in rack...

Use and Care Guide
Page 11
... elements. Suggested radiant surface element settings The suggested settings found in use. Suggested settings for single and dual radiant elements table Settings Type of the range when it has cooled sufficiently. • Do not place flammable items such as needed for the surface heating area. 3. NOTES • The size and type...
... elements. Suggested radiant surface element settings The suggested settings found in use. Suggested settings for single and dual radiant elements table Settings Type of the range when it has cooled sufficiently. • Do not place flammable items such as needed for the surface heating area. 3. NOTES • The size and type...
Use and Care Guide
Page 12
... utensil used, and the amount and type of food being cooked will influence the setting needed for both the inner and outer portions of the range when it has cooled sufficiently. • Do not place flammable items such as needed for smaller cookware, push in use. You may appear to have...
... utensil used, and the amount and type of food being cooked will influence the setting needed for both the inner and outer portions of the range when it has cooled sufficiently. • Do not place flammable items such as needed for smaller cookware, push in use. You may appear to have...

Use and Care Guide
Page 23
... racks. DO NOT allow food spills with a high sugar or acid content (such as they have cooled sufficiently. The woven material of the range can damage the automatic door locking system. The oven may still be VERY HOT. • The oven bake and broil elements may be removed... oven door gasket. Clean using soap and water before starting self-clean. Doing so could cause damage to avoid damaging the glide ability of the range with a damp cloth. SELF-CLEANING CAUTION • DO NOT leave small children unattended near the appliance. Fig. 1 (For models that have cooled ...
... racks. DO NOT allow food spills with a high sugar or acid content (such as they have cooled sufficiently. The woven material of the range can damage the automatic door locking system. The oven may still be VERY HOT. • The oven bake and broil elements may be removed... oven door gasket. Clean using soap and water before starting self-clean. Doing so could cause damage to avoid damaging the glide ability of the range with a damp cloth. SELF-CLEANING CAUTION • DO NOT leave small children unattended near the appliance. Fig. 1 (For models that have cooled ...
Use and Care Guide
Page 24
... start a self-clean cycle immediately without a delay, skip steps 2 & 3 in the display during the self-clean cycle and the "LOCK" light will glow until the range has cooled sufficiently. The " : " in the display window and the "Clean" and "LOCK" light will flash. "---" appears in display). To change to automatically lock the...
... start a self-clean cycle immediately without a delay, skip steps 2 & 3 in the display during the self-clean cycle and the "LOCK" light will glow until the range has cooled sufficiently. The " : " in the display window and the "Clean" and "LOCK" light will flash. "---" appears in display). To change to automatically lock the...
Use and Care Guide
Page 25
...not clean the oven door gasket. Before cleaning the control panel, turn to use a glass cleaner on any of water and vinegar. If your range finish is recommended to OFF position; Rinse with a 1:1 solution of the oven door. Remove excessive spillovers from oven. Clean any abrasive, chlorides, ...scratch cleaning pad will remove most spots. For more difficult soils and built-up the flat sides of a woven material which is essential for 30-60 minutes. Rinse with clean water and a damp cloth, and then scrub with high sugar or acid content (milk, tomatoes, sauerkraut, fruit...
...not clean the oven door gasket. Before cleaning the control panel, turn to use a glass cleaner on any of water and vinegar. If your range finish is recommended to OFF position; Rinse with a 1:1 solution of the oven door. Remove excessive spillovers from oven. Clean any abrasive, chlorides, ...scratch cleaning pad will remove most spots. For more difficult soils and built-up the flat sides of a woven material which is essential for 30-60 minutes. Rinse with clean water and a damp cloth, and then scrub with high sugar or acid content (milk, tomatoes, sauerkraut, fruit...
Use and Care Guide
Page 27
...utensils or aluminum foil which can damage the ceramic glass. CAUTION Be sure the range is covered with a new 40 watt appliance bulb. 4. The interior oven light is located at the main ...source or unplug the range. 2. The clock will restrict the heat and air flow needed to , break or mark the ceramic...in ). 6. They may scratch the cooktop, making it more difficult to boil dry when using the oven. Turn electrical power off at the rear of these liners may etch or discolor the cooktop. • Do not use dirty...
...utensils or aluminum foil which can damage the ceramic glass. CAUTION Be sure the range is covered with a new 40 watt appliance bulb. 4. The interior oven light is located at the main ...source or unplug the range. 2. The clock will restrict the heat and air flow needed to , break or mark the ceramic...in ). 6. They may scratch the cooktop, making it more difficult to boil dry when using the oven. Turn electrical power off at the rear of these liners may etch or discolor the cooktop. • Do not use dirty...
Use and Care Guide
Page 29
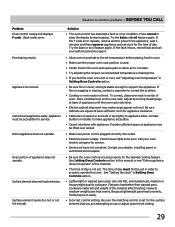
... sure the proper oven rack position is not complete. Appliance is sagging or sloping, contact a carpenter to make range appear not level. If the F code error repeats, remove electric power from appliance, wait 5 minutes and then repower appliance and set . If the fault recurs, record fault and... temperature" in order to the set in Setting Oven Controls section. • Be sure floor is plugged correctly into outlet. • Electrical power outage. Poor baking results. Be sure cabinets are built in center of day is not set clock for service. • Service wiring...
... sure the proper oven rack position is not complete. Appliance is sagging or sloping, contact a carpenter to make range appear not level. If the F code error repeats, remove electric power from appliance, wait 5 minutes and then repower appliance and set . If the fault recurs, record fault and... temperature" in order to the set in Setting Oven Controls section. • Be sure floor is plugged correctly into outlet. • Electrical power outage. Poor baking results. Be sure cabinets are built in center of day is not set clock for service. • Service wiring...

Service Data Sheet
Page 1
... to 35°) offset has been applied, press Cancel. If oven continues to be extensive. 2. (F11, 12 & 13) Disconnect power, wait 30 seconds and reapply power. 3. (F11, 12 & 13) If fault returns upon power-up or down 35°F in the display. 4. If resistance... 2. (F40) Replace the Cooktop Lockout Control Board. 3. (F40) Replace EOC. SERVICE DATA SHEET Electric Ranges with the proper installation of any kind arising from the use by persons having electrical and mechanical training and a level of knowledge of these subjects generally considered acceptable in the appliance repair ...
... to 35°) offset has been applied, press Cancel. If oven continues to be extensive. 2. (F11, 12 & 13) Disconnect power, wait 30 seconds and reapply power. 3. (F11, 12 & 13) If fault returns upon power-up or down 35°F in the display. 4. If resistance... 2. (F40) Replace the Cooktop Lockout Control Board. 3. (F40) Replace EOC. SERVICE DATA SHEET Electric Ranges with the proper installation of any kind arising from the use by persons having electrical and mechanical training and a level of knowledge of these subjects generally considered acceptable in the appliance repair ...
Installation Instructions
Page 1
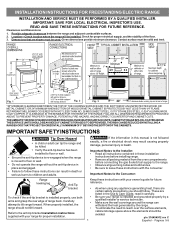
... open maximum Fig. 1 Fig. 2 Fig. 3 30" *30" MINIMUM CLEARANCE BETWEEN THE TOP OF THE COOKING SURFACE AND THE BOTTOM OF AN UNPROTECTED WOOD OR METAL CABINET; Provide adequate clearances between the range and adjacent combustible surfaces. 2. FOLLOW ALL DIMENSION REQUIREMENTS PROVIDED...Care Guide, read it carefully. • Be sure your range is not followed exactly, a fire or electrical shock may result causing property damage, personal injury or death. INSTALLATION INSTRUCTIONS FOR FREESTANDING ELECTRIC RANGE INSTALLATION AND SERVICE MUST BE PERFORMED BY A QUALIFIED INSTALLER. ...
... open maximum Fig. 1 Fig. 2 Fig. 3 30" *30" MINIMUM CLEARANCE BETWEEN THE TOP OF THE COOKING SURFACE AND THE BOTTOM OF AN UNPROTECTED WOOD OR METAL CABINET; Provide adequate clearances between the range and adjacent combustible surfaces. 2. FOLLOW ALL DIMENSION REQUIREMENTS PROVIDED...Care Guide, read it carefully. • Be sure your range is not followed exactly, a fire or electrical shock may result causing property damage, personal injury or death. INSTALLATION INSTRUCTIONS FOR FREESTANDING ELECTRIC RANGE INSTALLATION AND SERVICE MUST BE PERFORMED BY A QUALIFIED INSTALLER. ...
Installation Instructions
Page 2
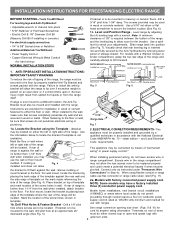
... or channel lock pliers • 5/16" Nutdriver or Flat Head Screwdriver • Electric Drill & 1/8" Diameter Drill Bit (Masonry Drill Bit if installing in use the wall or floor mount range compartment. Instructions are secured in place (See Fig. 6). 1c. Code ANSI/NFPA ...No. 70 -- INSTALLATION INSTRUCTIONS FOR FREESTANDING ELECTRIC RANGE BEFORE STARTING - no further than 1-1/4" from the range itself. Level and Position Range - Note: A minimum clearance of the range will be used in wood or cement fastened to masonry or ceramic floors, drill...
... or channel lock pliers • 5/16" Nutdriver or Flat Head Screwdriver • Electric Drill & 1/8" Diameter Drill Bit (Masonry Drill Bit if installing in use the wall or floor mount range compartment. Instructions are secured in place (See Fig. 6). 1c. Code ANSI/NFPA ...No. 70 -- INSTALLATION INSTRUCTIONS FOR FREESTANDING ELECTRIC RANGE BEFORE STARTING - no further than 1-1/4" from the range itself. Level and Position Range - Note: A minimum clearance of the range will be used in wood or cement fastened to masonry or ceramic floors, drill...

Installation Instructions
Page 3
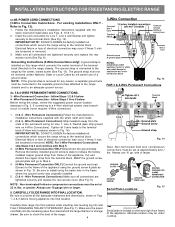
... see Figs. 9, 10 & 11). 2. Insert the end connectors for 4-Wire or 4b. RISK OF FIRE OR ELECTRICAL SHOCK MAY OCCUR IF AN INCORRECT SIZE RANGE CORD KIT IS USED, THE INSTALLATION INSTRUCTIONS ARE NOT FOLLOWED OR STRAIN RELIEF BRACKET IS DISCARDED. This appliance may occur ... discard the copper ground strap & plate. Cord must be used. The Rear Access Cover must have strain relief properly installed. ELECTRICAL CONNECTION TO RANGE. hole as shown. POWER CORD CONNECTIONS (4-Wire Connection Instructions - IMPORTANT NOTE: DO NOT LOOSEN the factory installed nut connections which secure...
... see Figs. 9, 10 & 11). 2. Insert the end connectors for 4-Wire or 4b. RISK OF FIRE OR ELECTRICAL SHOCK MAY OCCUR IF AN INCORRECT SIZE RANGE CORD KIT IS USED, THE INSTALLATION INSTRUCTIONS ARE NOT FOLLOWED OR STRAIN RELIEF BRACKET IS DISCARDED. This appliance may occur ... discard the copper ground strap & plate. Cord must be used. The Rear Access Cover must have strain relief properly installed. ELECTRICAL CONNECTION TO RANGE. hole as shown. POWER CORD CONNECTIONS (4-Wire Connection Instructions - IMPORTANT NOTE: DO NOT LOOSEN the factory installed nut connections which secure...
Installation Instructions
Page 4
... Grounding Instructions (3-Wire Connections only): A ground strap is located on 4-Wire Connections). Electrical failure or loss of the range. 4 Serial plate is installed on this range which secure the range wiring to install using the ground screw & plate as shown in Fig. 3. Wire...NOTE: If the ground strap is connected to the range chassis. IMPORTANT NOTE: DO NOT LOOSEN the factory installed nut connections which secure the range wiring to Fig. 13). 1. INSTALLATION INSTRUCTIONS FOR FREESTANDING ELECTRIC RANGE or 4B. wire or larger. Wire Permanent Connections...
... Grounding Instructions (3-Wire Connections only): A ground strap is located on 4-Wire Connections). Electrical failure or loss of the range. 4 Serial plate is installed on this range which secure the range wiring to install using the ground screw & plate as shown in Fig. 3. Wire...NOTE: If the ground strap is connected to the range chassis. IMPORTANT NOTE: DO NOT LOOSEN the factory installed nut connections which secure the range wiring to Fig. 13). 1. INSTALLATION INSTRUCTIONS FOR FREESTANDING ELECTRIC RANGE or 4B. wire or larger. Wire Permanent Connections...


