
Use and Care Manual
Page 9
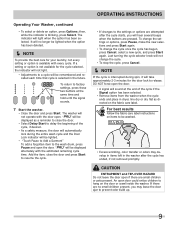
... selections and press Start again. • To change the cycle. • To stop the cycle, press Cancel. Í NOTE If the cycle is selected in dryer, line dry or dry flat the same time and hold until the signal sounds. 7 Start the washer. • Close the door and press Start...
... selections and press Start again. • To change the cycle. • To stop the cycle, press Cancel. Í NOTE If the cycle is selected in dryer, line dry or dry flat the same time and hold until the signal sounds. 7 Start the washer. • Close the door and press Start...

Use and Care Manual
Page 22
.... • Add nonprecipitating water conditioner to wash water to remove detergent residue. • Add liquid fabric softener to final rinse. • Dry load in dryer. • Remove lint with bar soap.
.... • Add nonprecipitating water conditioner to wash water to remove detergent residue. • Add liquid fabric softener to final rinse. • Dry load in dryer. • Remove lint with bar soap.
Installation Instructions
Page 3
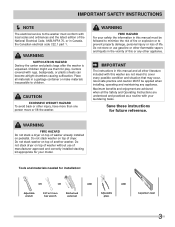
...this washer are understood and practiced as a routine with your laundering tasks. WARNING FIRE HAZARD Do not stack a dryer on top of washer already installed on top of dryer. Do not stack washer on pedestal. Do not store or use gasoline or other appliance. Save these instructions ...OR OR AND AND Adjustable wrench 3/8" or 10 mm box wrench Ratchet and socket set Adjustable pliers Carpenter's level 3 Do not stack dryer on top of another washer. WARNING SUFFOCATION HAZARD Destroy the carton and plastic bags after the washer is unpacked. IMPORTANT The instructions in ...
...this washer are understood and practiced as a routine with your laundering tasks. WARNING FIRE HAZARD Do not stack a dryer on top of washer already installed on top of dryer. Do not stack washer on pedestal. Do not store or use gasoline or other appliance. Save these instructions ...OR OR AND AND Adjustable wrench 3/8" or 10 mm box wrench Ratchet and socket set Adjustable pliers Carpenter's level 3 Do not stack dryer on top of another washer. WARNING SUFFOCATION HAZARD Destroy the carton and plastic bags after the washer is unpacked. IMPORTANT The instructions in ...

Installation Instructions
Page 5
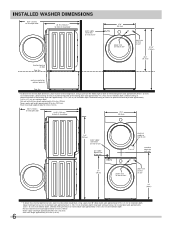
... TOP FRONT Alcove 0" (0 cm) 0" (0 cm)* 0" (0 cm) n/a UnderCounter 0" (0 cm) 0" (0 cm)* 0" (0 cm) n/a Closet 0" (0 cm) 0" (0 cm)* 0" (0 cm) 1" (2.5 cm) 0" (0cm) 0" (0cm) Installation in a Recess or Closet If washer and dryer are required to be necessary. Air openings are installed in the same closet, door ventilation is required: A minimum of 120 square inches (774.2 cm²...
... TOP FRONT Alcove 0" (0 cm) 0" (0 cm)* 0" (0 cm) n/a UnderCounter 0" (0 cm) 0" (0 cm)* 0" (0 cm) n/a Closet 0" (0 cm) 0" (0 cm)* 0" (0 cm) 1" (2.5 cm) 0" (0cm) 0" (0cm) Installation in a Recess or Closet If washer and dryer are required to be necessary. Air openings are installed in the same closet, door ventilation is required: A minimum of 120 square inches (774.2 cm²...
Installation Instructions
Page 6
... pipe on rear of gas unit electrical supply on rear of unit centerline height for rear vent 37" (94cm) power cord on rear of unit2 drain hose on rear of exhaust on stacked dryer adds approximately 4 in. (10.2 cm) to installation depth. Using a quick-turn 90° ...-turn 90° elbow (right) adds approximately 0.75 in . (10.2 cm) to installation depth. Upward venting of exhaust on pedestal-mounted or freestanding dryer adds approximately 4 in . (2 cm) to installation depth. 1Hot and cold inlet hose length approximately 43 inches (109cm) 2Power supply cord length approximately 60 ...
... pipe on rear of gas unit electrical supply on rear of unit centerline height for rear vent 37" (94cm) power cord on rear of unit2 drain hose on rear of exhaust on stacked dryer adds approximately 4 in. (10.2 cm) to installation depth. Using a quick-turn 90° ...-turn 90° elbow (right) adds approximately 0.75 in . (10.2 cm) to installation depth. Upward venting of exhaust on pedestal-mounted or freestanding dryer adds approximately 4 in . (2 cm) to installation depth. 1Hot and cold inlet hose length approximately 43 inches (109cm) 2Power supply cord length approximately 60 ...
Installation Instructions
Page 11
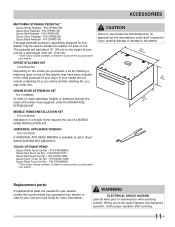
...operation after servicing. 11 If your model did not include a stacking kit or you desire another stacking kit, you purchased your dryer. P/N CFPWD15B A storage pedestal accessory, specifically designed for your washer, contact the source where you purchased your washer...washer may order one. ACCESSORIES MATCHING STORAGE PEDESTAL* Classic White Pedestal - Contact the source where you may have been included in dryer/ washer/pedestal feet adjustment. P/N CFPWD15N Classic Red Pedestal - P/N 5304468812 Classic Red Touch Up Pen - WARNING ELECTRICAL SHOCK ...
...operation after servicing. 11 If your model did not include a stacking kit or you desire another stacking kit, you purchased your dryer. P/N CFPWD15B A storage pedestal accessory, specifically designed for your washer, contact the source where you purchased your washer...washer may order one. ACCESSORIES MATCHING STORAGE PEDESTAL* Classic White Pedestal - Contact the source where you may have been included in dryer/ washer/pedestal feet adjustment. P/N CFPWD15N Classic Red Pedestal - P/N 5304468812 Classic Red Touch Up Pen - WARNING ELECTRICAL SHOCK ...


