Use and Care Manual
Page 4
... type wall receptacle Do not, under any user maintenance. It may be necessary to reinforce the floor to comply with 3-prong grounded plug 4 IMPORTANT SAFETY INSTRUCTIONS PREVENT INJURY • To prevent shock hazard and assure stability during operation, the washer must be installed and electrically grounded by an authorized servicer unless specifically recommended in this Use & Care Guide. The motor will be removed...
... type wall receptacle Do not, under any user maintenance. It may be necessary to reinforce the floor to comply with 3-prong grounded plug 4 IMPORTANT SAFETY INSTRUCTIONS PREVENT INJURY • To prevent shock hazard and assure stability during operation, the washer must be installed and electrically grounded by an authorized servicer unless specifically recommended in this Use & Care Guide. The motor will be removed...
Use and Care Manual
Page 9
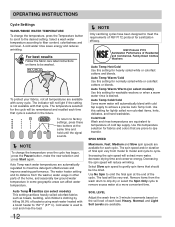
... and press Start again. • To change the cycle. • To stop the cycle, press Cancel. Í NOTE If the cycle is selected in dryer, line dry or dry flat as a reminder to close the door and press Start to resume the cycle. • If changes to the wash drum, press Pause and open the door. • A signal will hear several beeps when the buttons are small...
... and press Start again. • To change the cycle. • To stop the cycle, press Cancel. Í NOTE If the cycle is selected in dryer, line dry or dry flat as a reminder to close the door and press Start to resume the cycle. • If changes to the wash drum, press Pause and open the door. • A signal will hear several beeps when the buttons are small...
Use and Care Manual
Page 11
... (on select models) Use this cycle to 90 minutes. Spin Only Use the Spin Only cycle anytime you set your outlet is extra large, the cycle time will occur before the door can be extended by an internal boost heater to ensure proper performance during this cycle. To add a rinse prior to the load. Cold water is added to cool down and drain will be opened. Quick Quickly...
... (on select models) Use this cycle to 90 minutes. Spin Only Use the Spin Only cycle anytime you set your outlet is extra large, the cycle time will occur before the door can be extended by an internal boost heater to ensure proper performance during this cycle. To add a rinse prior to the load. Cold water is added to cool down and drain will be opened. Quick Quickly...
Use and Care Manual
Page 12
... final spin at the same time and hold until the signal sounds. Í NOTE To change the temperature, press the Temperature button to scroll to meet the requirements of Residential and Commercial, Family-Sized Clothes Washers Auto Temp Hot/Cold Use this setting for washable woolens or when a warm water rinse is not available with every cycle. A cold water rinse saves energy and reduces wrinkling. NSF Protocol...
... final spin at the same time and hold until the signal sounds. Í NOTE To change the temperature, press the Temperature button to scroll to meet the requirements of Residential and Commercial, Family-Sized Clothes Washers Auto Temp Hot/Cold Use this setting for washable woolens or when a warm water rinse is not available with every cycle. A cold water rinse saves energy and reduces wrinkling. NSF Protocol...
Use and Care Manual
Page 13
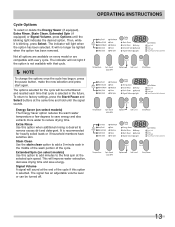
... level or can be lighted when the option has been removed. The indicator will improve water extraction, decrease drying time and save energy and also extracts more water to factory settings, press the Start/Pause and Select buttons at the same time and hold until the blinking light indicates the desired option. Extended Spin (on every model or are compatible with that cycle is selected in...
... level or can be lighted when the option has been removed. The indicator will improve water extraction, decrease drying time and save energy and also extracts more water to factory settings, press the Start/Pause and Select buttons at the same time and hold until the blinking light indicates the desired option. Extended Spin (on every model or are compatible with that cycle is selected in...

Use and Care Manual
Page 16
...; Never wash items which can set stains. • Consult care label instructions for treatments to avoid on specific fabrics. • Check for colorfastness by testing stain remover products on stain removal products. • Keep stain removal products in their original labeled containers and out of children's reach. • Thoroughly wash any utensils used. • Do not combine stain...
...; Never wash items which can set stains. • Consult care label instructions for treatments to avoid on specific fabrics. • Check for colorfastness by testing stain remover products on stain removal products. • Keep stain removal products in their original labeled containers and out of children's reach. • Thoroughly wash any utensils used. • Do not combine stain...
Use and Care Manual
Page 19
... the lock tab. Rinse thoroughly with a combination of ¾ cup liquid chlorine bleach and 1 gallon hot tap water to remove traces of the drawer cavity and press down firmly on the drum. Remove all residue from the upper and lower parts of the recess. • Replace the insert by wiping the drum with tap water. • To clean the drawer opening, use...
... the lock tab. Rinse thoroughly with a combination of ¾ cup liquid chlorine bleach and 1 gallon hot tap water to remove traces of the drawer cavity and press down firmly on the drum. Remove all residue from the upper and lower parts of the recess. • Replace the insert by wiping the drum with tap water. • To clean the drawer opening, use...
Use and Care Manual
Page 20
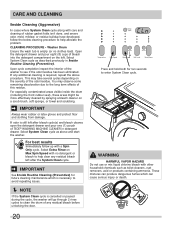
... and start the washer. WARNING HARMFUL VAPOR HAZARD Do not use or mix liquid chlorine bleach with other household chemicals such as above procedure. CLEANING PROCEDURE - Select Extra Rinse on the left after the System Clean cycle. Open the detergent drawer and pour eight (8) cups of bleach into the detergent compartment on Max Spin Speed with no clothes load). This...
... and start the washer. WARNING HARMFUL VAPOR HAZARD Do not use or mix liquid chlorine bleach with other household chemicals such as above procedure. CLEANING PROCEDURE - Select Extra Rinse on the left after the System Clean cycle. Open the detergent drawer and pour eight (8) cups of bleach into the detergent compartment on Max Spin Speed with no clothes load). This...
Use and Care Manual
Page 21
... or moved in freezing temperatures, follow these winterizing instructions to prevent damage to the washer: 1 Turn off water supply faucets. 2 Disconnect hoses from water supply and drain water from hoses. 3 Plug electrical cord into a properly grounded electrical outlet. 4 Add 1 gallon (3.8 L) nontoxic recreational vehicle (RV) antifreeze to the floor. Close door. 5 Select the Spin Only cycle. Replace drawer. 8 Store washer in an upright position. 9 To remove antifreeze from tape or...
... or moved in freezing temperatures, follow these winterizing instructions to prevent damage to the washer: 1 Turn off water supply faucets. 2 Disconnect hoses from water supply and drain water from hoses. 3 Plug electrical cord into a properly grounded electrical outlet. 4 Add 1 gallon (3.8 L) nontoxic recreational vehicle (RV) antifreeze to the floor. Close door. 5 Select the Spin Only cycle. Replace drawer. 8 Store washer in an upright position. 9 To remove antifreeze from tape or...
Use and Care Manual
Page 25
... and foam block have it becomes overheated. Washer door is a power outage, call local electric company. Vibrating noise. Reset circuit breaker or replace fuse. If problem is not completely closed. Close door completely. Adjust leveling legs. Stop washer and redistribute wash load. Do not increase fuse capacity. Turn on . Washer motor will automatically restart after washer is a circuit overload, have not been removed during the spin cycle. OCCURRENCE NOISE High pitch "jet engine" noise. If problem is restarted...
... and foam block have it becomes overheated. Washer door is a power outage, call local electric company. Vibrating noise. Reset circuit breaker or replace fuse. If problem is not completely closed. Close door completely. Adjust leveling legs. Stop washer and redistribute wash load. Do not increase fuse capacity. Turn on . Washer motor will automatically restart after washer is a circuit overload, have not been removed during the spin cycle. OCCURRENCE NOISE High pitch "jet engine" noise. If problem is restarted...
Use and Care Manual
Page 26
... proper spinning. Water collects in area. Water leaks. Washer is too small. Load is overloaded. Water is loose at least 120°F (49°C). Hot water heater is set too low or is too tall. Water temperature should be at nearby faucet with candy or meat thermometer. Maximum Reduce standpipe height to wrong supply faucets. Run rinse cycle. Hot and cold water hoses are not completely Fully open . Water...
... proper spinning. Water collects in area. Water leaks. Washer is too small. Load is overloaded. Water is loose at least 120°F (49°C). Hot water heater is set too low or is too tall. Water temperature should be at nearby faucet with candy or meat thermometer. Maximum Reduce standpipe height to wrong supply faucets. Run rinse cycle. Hot and cold water hoses are not completely Fully open . Water...
Use and Care Manual
Page 27
... warranty period should service be required. YOU MAY ALSO HAVE OTHER RIGHTS THAT VARY FROM STATE TO STATE. Food loss due to change or add to floors, cabinets, walls, etc. 13. Products with the provided instructions. 8. Service calls which are subject to any parts of parts other than genuine Electrolux parts or parts obtained from its original owner to repair or replace appliance light bulbs, air...
... warranty period should service be required. YOU MAY ALSO HAVE OTHER RIGHTS THAT VARY FROM STATE TO STATE. Food loss due to change or add to floors, cabinets, walls, etc. 13. Products with the provided instructions. 8. Service calls which are subject to any parts of parts other than genuine Electrolux parts or parts obtained from its original owner to repair or replace appliance light bulbs, air...
Installation Instructions
Page 2
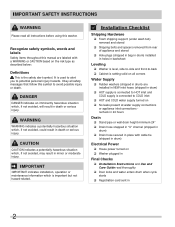
...hose snapped in "U" channel (shipped in drum) ‰ Drain hose secured in place with a WARNING or CAUTION based on ‰ Washer plugged in Final Checks ‰ Installation Instructions and Use and Care Guide read all instructions before using this symbol to -back ‰ Cabinet is setting...SAFETY INSTRUCTIONS WARNING Please read thoroughly ‰ Door locks and water enters drum when cycle starts ‰ Registration card sent in 2 IMPORTANT IMPORTANT indicates installation, operation or maintenance information which , if not avoided, may result in backsheet Leveling ‰ Washer ...
...hose snapped in "U" channel (shipped in drum) ‰ Drain hose secured in place with a WARNING or CAUTION based on ‰ Washer plugged in Final Checks ‰ Installation Instructions and Use and Care Guide read all instructions before using this symbol to -back ‰ Cabinet is setting...SAFETY INSTRUCTIONS WARNING Please read thoroughly ‰ Door locks and water enters drum when cycle starts ‰ Registration card sent in 2 IMPORTANT IMPORTANT indicates installation, operation or maintenance information which , if not avoided, may result in backsheet Leveling ‰ Washer ...
Installation Instructions
Page 4
... washer is equipped with 3-prong grounded plug Í NOTE GFI (Ground Fault Interrupter) receptacle is the owner's responsibility to have a licensed electrician replace it is not required. branch circuit fused with threading for electrical current. 2 Since your water pressure. Properly grounded 3-prong receptacle to whether the appliance is properly grounded. 1 The washer MUST be located so the power supply cord is accessible when the washer is properly installed...
... washer is equipped with 3-prong grounded plug Í NOTE GFI (Ground Fault Interrupter) receptacle is the owner's responsibility to have a licensed electrician replace it is not required. branch circuit fused with threading for electrical current. 2 Since your water pressure. Properly grounded 3-prong receptacle to whether the appliance is properly grounded. 1 The washer MUST be located so the power supply cord is accessible when the washer is properly installed...

Installation Instructions
Page 10
..., remove, or bypass the grounding prong. IMPORTANT Check to ensure the power is off at a circuit breaker/fuse box. 5 Carefully slide the washer to the standpipe, inlet hose, laundry tub, etc. Recheck for level and rock corners for future reference. Í NOTE A wiring diagram and technical data sheet are located under any questions during initial operation, please review the "Service Prevention Checklist" in your Use & Care Guide before plugging the power cord into an outlet. 3 Plug...
..., remove, or bypass the grounding prong. IMPORTANT Check to ensure the power is off at a circuit breaker/fuse box. 5 Carefully slide the washer to the standpipe, inlet hose, laundry tub, etc. Recheck for level and rock corners for future reference. Í NOTE A wiring diagram and technical data sheet are located under any questions during initial operation, please review the "Service Prevention Checklist" in your Use & Care Guide before plugging the power cord into an outlet. 3 Plug...
Installation Instructions
Page 11
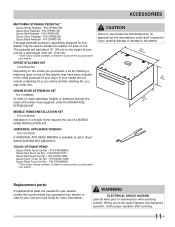
... HOME INSTALLATION KIT P/N 137067200 Installation in a mobile home requires the use of use accessories manufactured by (or approved by) the manufacturer could result in dryer/ washer/pedestal feet adjustment. WARNING ELECTRICAL SHOCK HAZARD Label all wires prior to aid in personal injury, property damage or damage to the washer. (682.57.0cm" ) (3185c.0m") (2667.5c"m) Replacement parts: If replacements parts are needed for stacking a matching dryer on the model...
... HOME INSTALLATION KIT P/N 137067200 Installation in a mobile home requires the use of use accessories manufactured by (or approved by) the manufacturer could result in dryer/ washer/pedestal feet adjustment. WARNING ELECTRICAL SHOCK HAZARD Label all wires prior to aid in personal injury, property damage or damage to the washer. (682.57.0cm" ) (3185c.0m") (2667.5c"m) Replacement parts: If replacements parts are needed for stacking a matching dryer on the model...
Data Sheet
Page 1
.... 8. Quick Check If there is activated. NOTE: During normal operation, the display may have caused the control to confirm functionality. 2. control lock is no error displayed and the washer momentarily starts then turns back off: 1. The control will operate in that cluster at one time to enter a special factory test mode. Diagnostic Test The diagnostic test is used to normal operation. When the door is opened, the drum light should enter...
.... 8. Quick Check If there is activated. NOTE: During normal operation, the display may have caused the control to confirm functionality. 2. control lock is no error displayed and the washer momentarily starts then turns back off: 1. The control will operate in that cluster at one time to enter a special factory test mode. Diagnostic Test The diagnostic test is used to normal operation. When the door is opened, the drum light should enter...
Data Sheet
Page 2
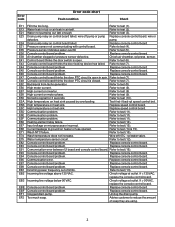
... control board thinks the door PTC circuit is open . E56 High motor current. Refer to test (15). E66 Heating element relay failure. Refer to test (10). Refer to test (5). rpl water valve. Replace console control board. Refer to test (15). E38 Air chamber clogged or pressure sensor defective. sensor. Refer to test (2). E5D Communication problem. E82 Console control board problem. If > 90VAC, replace the console control board. Error code Error code chart Fault condition Check E11 Fill time too long. E13 Water...
... control board thinks the door PTC circuit is open . E56 High motor current. Refer to test (15). E66 Heating element relay failure. Refer to test (10). Refer to test (5). rpl water valve. Replace console control board. Refer to test (15). E38 Air chamber clogged or pressure sensor defective. sensor. Refer to test (2). E5D Communication problem. E82 Console control board problem. If > 90VAC, replace the console control board. Error code Error code chart Fault condition Check E11 Fill time too long. E13 Water...
Data Sheet
Page 3
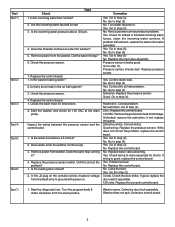
.... Replace pressure sensor. Correct water leak. Correct the air leak problem. Correct problem. If this correct the problem? 1. No. Replace the control board. Washer spins. Did the water fill stop coming in the air bell system? 3. Replace the control board. 1. Remove power from the washer. Is the loading door closed? 2. No. Pressure sensor checks bad. No. Go to step (4). No. No. Check wiring to step (5). If wiring is good, replace the control board. If good, replace the door switch assembly. 120 volts. Start...
.... Replace pressure sensor. Correct water leak. Correct the air leak problem. Correct problem. If this correct the problem? 1. No. Replace the control board. Washer spins. Did the water fill stop coming in the air bell system? 3. Replace the control board. 1. Remove power from the washer. Is the loading door closed? 2. No. Pressure sensor checks bad. No. Go to step (4). No. No. Check wiring to step (5). If wiring is good, replace the control board. If good, replace the door switch assembly. 120 volts. Start...
Data Sheet
Page 4
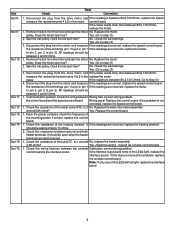
.... Does the tub spin free? motor. All readings should be between 4 and 6 Ohms. Test 11: 1. Check the wiring between ground and both heater terminals. Replace the control board. Replace the water inlet valve assembly around No, replace the heater assembly. 4.8K ohms? Disconnect the plug from the motor and spin the motor No. control board. Remove the belt from the drive motor and If the reading is between the console If defective, correct wiring problem. Go to...
.... Does the tub spin free? motor. All readings should be between 4 and 6 Ohms. Test 11: 1. Check the wiring between ground and both heater terminals. Replace the control board. Replace the water inlet valve assembly around No, replace the heater assembly. 4.8K ohms? Disconnect the plug from the motor and spin the motor No. control board. Remove the belt from the drive motor and If the reading is between the console If defective, correct wiring problem. Go to...


