
Technical Data Sheet
Page 1
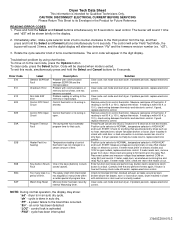
... blocked lint filter, blocked exhaust, air leaks around air duct, broken blower fan blades, worn or loose drum seals, dryer installed in a certain amount of thermistor. Clear code, exit mode and start dryer. If reading is within a certain period of the heater circuit. Remove wires from the top, and then press and hold the Select and Cancel buttons simultaneously for that would extend dry times such as: no heating) Temperature reading of control thermistor has not changed...
... blocked lint filter, blocked exhaust, air leaks around air duct, broken blower fan blades, worn or loose drum seals, dryer installed in a certain amount of thermistor. Clear code, exit mode and start dryer. If reading is within a certain period of the heater circuit. Remove wires from the top, and then press and hold the Select and Cancel buttons simultaneously for that would extend dry times such as: no heating) Temperature reading of control thermistor has not changed...
Technical Data Sheet
Page 2
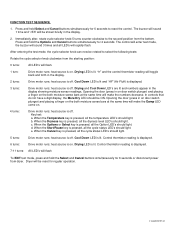
.... Opening the door (press in on door switch plunger) and placing a finger on the both moisture sense bars at the same time will make the Damp LED come on . b. d. e. Control thermistor reading is pressed, all the temperature LED's should light. 5 turns: Drive motor runs; Immediately after, rotate cycle selector knob 5 turns counter-clockwise to select the following tests: Rotate the cycle selector knob clockwise from the starting position: 0 turns...
.... Opening the door (press in on door switch plunger) and placing a finger on the both moisture sense bars at the same time will make the Damp LED come on . b. d. e. Control thermistor reading is pressed, all the temperature LED's should light. 5 turns: Drive motor runs; Immediately after, rotate cycle selector knob 5 turns counter-clockwise to select the following tests: Rotate the cycle selector knob clockwise from the starting position: 0 turns...
Use and Care Manual
Page 2
... de modèle et de série • Service Keep it shall be killed or seriously injured if you or others is the safety alert symbol. Model Number This Use and Care Guide provides general operating instructions for several other appliance. - Use the dryer only as household waste. Failure to use any electrical switch; All safety messages will help prevent potential negative consequences...
... de modèle et de série • Service Keep it shall be killed or seriously injured if you or others is the safety alert symbol. Model Number This Use and Care Guide provides general operating instructions for several other appliance. - Use the dryer only as household waste. Failure to use any electrical switch; All safety messages will help prevent potential negative consequences...
Use and Care Manual
Page 3
..., soaked in U.S.A. Some rubber materials, when heated, can occur. The interior of the dryer, lint screen housing and exhaust duct should be practiced when installing, operating and maintaining any type of Fire - See Care and Cleaning. • Do not operate the dryer if the lint screen is removed from electrical power cord. A clothes dryer produces combustible lint. The dryer must be cleaned approximately every 18 months by qualified service personnel. Protect Children • Do not...
..., soaked in U.S.A. Some rubber materials, when heated, can occur. The interior of the dryer, lint screen housing and exhaust duct should be practiced when installing, operating and maintaining any type of Fire - See Care and Cleaning. • Do not operate the dryer if the lint screen is removed from electrical power cord. A clothes dryer produces combustible lint. The dryer must be cleaned approximately every 18 months by qualified service personnel. Protect Children • Do not...
Use and Care Manual
Page 4
... to resume the cycle. 6. Dryer heat may not have it inside . • Close the door and press Start to the dryer, the electrical power cord of static electricity, which may permanently set some stains. Fill out the load with controls. - Do not tamper with small and medium sized items. • For delicate or very small loads, add 2 lint-free towels for operating your specific model information. 5. Repeat stain removal process before...
... to resume the cycle. 6. Dryer heat may not have it inside . • Close the door and press Start to the dryer, the electrical power cord of static electricity, which may permanently set some stains. Fill out the load with controls. - Do not tamper with small and medium sized items. • For delicate or very small loads, add 2 lint-free towels for operating your specific model information. 5. Repeat stain removal process before...
Use and Care Manual
Page 5
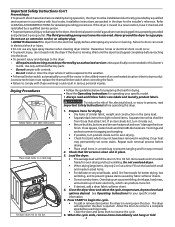
... the electrical power cord to dry items which causes longer drying times. Reversible Dryer Door Your dryer is not in place. • If the dryer drum becomes stained from using the drying rack. 4. Drying Rack (some models) A drum light will come on top of the rack. When items are dry, remove the rack and replace the lint screen. A clothes dryer produces combustible lint. Dry thoroughly and replace. Features Place the front bar under the lip of the lint screen opening. 3. Care and Cleaning Clean lint screen after every load. End of Cycle Signal...
... the electrical power cord to dry items which causes longer drying times. Reversible Dryer Door Your dryer is not in place. • If the dryer drum becomes stained from using the drying rack. 4. Drying Rack (some models) A drum light will come on top of the rack. When items are dry, remove the rack and replace the lint screen. A clothes dryer produces combustible lint. Dry thoroughly and replace. Features Place the front bar under the lip of the lint screen opening. 3. Care and Cleaning Clean lint screen after every load. End of Cycle Signal...
Use and Care Manual
Page 6
... starting the dryer. Common Drying Problems Many drying problems involve poor cleaning results, poor soil and stain removal, residues of cardboard or thin fiberboard under the front leveling legs to prevent damage to complete drying. • Block knits into shape. Wrinkling • Overloading. • Leaving items in washer or dryer to electricity. • Or, add a fabric softener sheet and reduce static electricity. • Lint screen not clean tumble without heat...
... starting the dryer. Common Drying Problems Many drying problems involve poor cleaning results, poor soil and stain removal, residues of cardboard or thin fiberboard under the front leveling legs to prevent damage to complete drying. • Block knits into shape. Wrinkling • Overloading. • Leaving items in washer or dryer to electricity. • Or, add a fabric softener sheet and reduce static electricity. • Lint screen not clean tumble without heat...
Use and Care Manual
Page 7
... plugged in dryer too long. Electric dryer is not covered by the warranty. 7 Exhaust duct must have anough air supply to a 208 volt circuit. Insufficient sorting of the dryer feels too hot or smells hot. or buttons are 2 house fuses in the dryer circuit. Remove objects from the dryer lint screen before starting each cycle. Drum damage caused by foreign objects or permanently attached items is connected to support the burner flame (gas models). Thermal limiter tripped. Outside exhaust hood or exhaust duct...
... plugged in dryer too long. Electric dryer is not covered by the warranty. 7 Exhaust duct must have anough air supply to a 208 volt circuit. Insufficient sorting of the dryer feels too hot or smells hot. or buttons are 2 house fuses in the dryer circuit. Remove objects from the dryer lint screen before starting each cycle. Drum damage caused by foreign objects or permanently attached items is connected to support the burner flame (gas models). Thermal limiter tripped. Outside exhaust hood or exhaust duct...
Use and Care Manual
Page 8
... FROM ANY BREACH OF THIS WRITTEN LIMITED WARRANTY OR ANY IMPLIED WARRANTY. Obligations for servicing, such as abuse, misuse, inadequate power supply, accidents, fires, or acts of God. USA 1.800.944.9044 Electrolux Major Appliances North America P.O. Product that has been transferred from its original owner to repair or replace appliance light bulbs, air filters, water filters, other consumables, or knobs, handles, or...
... FROM ANY BREACH OF THIS WRITTEN LIMITED WARRANTY OR ANY IMPLIED WARRANTY. Obligations for servicing, such as abuse, misuse, inadequate power supply, accidents, fires, or acts of God. USA 1.800.944.9044 Electrolux Major Appliances North America P.O. Product that has been transferred from its original owner to repair or replace appliance light bulbs, air filters, water filters, other consumables, or knobs, handles, or...
Installation Instructions
Page 2
...-lock adjustable pliers. 3. Pipe thread sealer (Gas). 9. CONTENTS Pre-Installation Requirements...2 Electrical Requirements...3 Exhaust System Requirements...3-4 Gas Supply Requirements...4-5 Location of Your Dryer...5 Rough-In Dimensions...6 Reversing Door Swing...7 Unpacking ...8 General Installation...8 Replacement Parts...8 Mobile Home Installation...8-9 Electrical Installation...9 Grounding Requirements...9 0Gas Connection...9-10 Electrical Connections-3-wire...10 Electrical Connections-4-wire...10 Español...11-20 SAFETY INSTRUCTIONS Before beginning installation, carefully...
...-lock adjustable pliers. 3. Pipe thread sealer (Gas). 9. CONTENTS Pre-Installation Requirements...2 Electrical Requirements...3 Exhaust System Requirements...3-4 Gas Supply Requirements...4-5 Location of Your Dryer...5 Rough-In Dimensions...6 Reversing Door Swing...7 Unpacking ...8 General Installation...8 Replacement Parts...8 Mobile Home Installation...8-9 Electrical Installation...9 Grounding Requirements...9 0Gas Connection...9-10 Electrical Connections-3-wire...10 Electrical Connections-4-wire...10 Español...11-20 SAFETY INSTRUCTIONS Before beginning installation, carefully...
Installation Instructions
Page 3
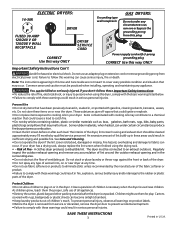
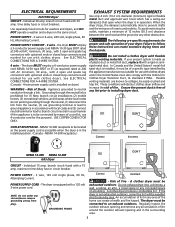
... exhaust outdoors. Regularly inspect the outdoor exhaust opening and in any area of 12 inches (30.5 cm) clearance between the vent hood and the ground or any concealed space of fire. POWER SUPPLY CORD KIT - 3 wire - See ELECTRICAL CONNECTIONS FOR A 4-WIRE SYSTEM. (Canada - 4-wire power supply cord is equipped with 30 amp. Flexible venting materials are specific requirements for proper and safe operation of Fire - maximum time delay fuse or circuit breaker. A clothes dryer...
... exhaust outdoors. Regularly inspect the outdoor exhaust opening and in any area of 12 inches (30.5 cm) clearance between the vent hood and the ground or any concealed space of fire. POWER SUPPLY CORD KIT - 3 wire - See ELECTRICAL CONNECTIONS FOR A 4-WIRE SYSTEM. (Canada - 4-wire power supply cord is equipped with 30 amp. Flexible venting materials are specific requirements for proper and safe operation of Fire - maximum time delay fuse or circuit breaker. A clothes dryer...
Installation Instructions
Page 4
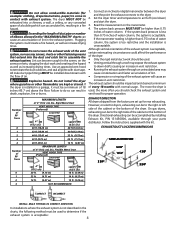
... 4 Number of 90° Turns 0 28 ft.(8.53 m) 16 ft. (4.87 m) MAXIMUM LENGTH of water column, the system is too restrictive and the installation is used to assemble the exhaust system. Plugging the system could affect the performance of the dryer: • Only the rigid metal duct work and creating a fire hazard as well as increase drying times. If the manometer reading is acceptable: 4 However, on electric dryers, exhausting...
... 4 Number of 90° Turns 0 28 ft.(8.53 m) 16 ft. (4.87 m) MAXIMUM LENGTH of water column, the system is too restrictive and the installation is used to assemble the exhaust system. Plugging the system could affect the performance of the dryer: • Only the rigid metal duct work and creating a fire hazard as well as increase drying times. If the manometer reading is acceptable: 4 However, on electric dryers, exhausting...
Installation Instructions
Page 5
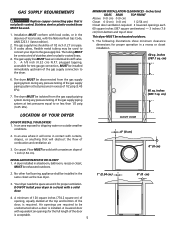
... the Gas dryer. 3. cm) LOCATION OF YOUR DRYER DO NOT INSTALL YOUR DRYER: 1. The dryer MUST be exhausted outdoors. 5. In an area exposed to the dryer. 6. The tubing MUST be of the door is installed. plugged tapping, accessible for the full length of 1/2 inch (1.27 cm) pipe. 3. MINIMUM INSTALLATION CLEARANCES - inches (387.1 sq. Installation MUST conform with local codes, or in a closet with equivalent air openings for test gauge connection, MUST...
... the Gas dryer. 3. cm) LOCATION OF YOUR DRYER DO NOT INSTALL YOUR DRYER: 1. The dryer MUST be exhausted outdoors. 5. In an area exposed to the dryer. 6. The tubing MUST be of the door is installed. plugged tapping, accessible for the full length of 1/2 inch (1.27 cm) pipe. 3. MINIMUM INSTALLATION CLEARANCES - inches (387.1 sq. Installation MUST conform with local codes, or in a closet with equivalent air openings for test gauge connection, MUST...
Installation Instructions
Page 6
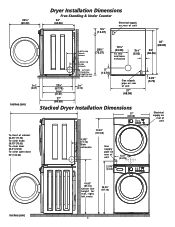
...5" (12.70) Electrical supply on rear of unit 13½" (34.29) To rear and base exhausts 23/8" (6.03) 25/8" (6.67) 22¾" (57.79) 243/8" (61.91) 15/8" (4.13) Gas supply pipe on rear of unit 27" (68.58) 35" (88.90) 34" (86.36) 2.25" (5.72) inches (cm) 27" (68.58) Stacked Dryer Installation Dimensions 27" (68.58) ...
...5" (12.70) Electrical supply on rear of unit 13½" (34.29) To rear and base exhausts 23/8" (6.03) 25/8" (6.67) 22¾" (57.79) 243/8" (61.91) 15/8" (4.13) Gas supply pipe on rear of unit 27" (68.58) 35" (88.90) 34" (86.36) 2.25" (5.72) inches (cm) 27" (68.58) Stacked Dryer Installation Dimensions 27" (68.58) ...
Installation Instructions
Page 7
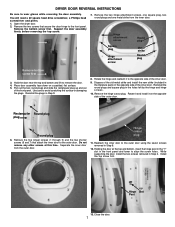
DRYER DOOR REVERSAL INSTRUCTIONS Be sure to the outer door. Remove the two hinge attachment screws, one square plug, two round plugs and one metal strike from the outer door. Place door assembly face down on the opposite side of the inner door. 9. Reinstall the round plugs and square plug in the front panel and lower to the outer door using the seven screws removed in Step 9. 8. Remove the five...
DRYER DOOR REVERSAL INSTRUCTIONS Be sure to the outer door. Remove the two hinge attachment screws, one square plug, two round plugs and one metal strike from the outer door. Place door assembly face down on the opposite side of the inner door. 9. Reinstall the round plugs and square plug in the front panel and lower to the outer door using the seven screws removed in Step 9. 8. Remove the five...
Installation Instructions
Page 8
.... 2. Turn on all wires prior to pick up or move the dryer. 2. NOTE: On gas dryers, before making another attempt to children. Rigid metal duct is unpacked. To prevent damage, do not use the control panel as boxes, clothing, etc.) obstructs the flow of use them for this manual and all four legs. 3. If replacements parts are not meant to purchase stacking kit accessory part number STACKIT3. Verify proper operation...
.... 2. Turn on all wires prior to pick up or move the dryer. 2. NOTE: On gas dryers, before making another attempt to children. Rigid metal duct is unpacked. To prevent damage, do not use the control panel as boxes, clothing, etc.) obstructs the flow of use them for this manual and all four legs. 3. If replacements parts are not meant to purchase stacking kit accessory part number STACKIT3. Verify proper operation...
Installation Instructions
Page 9
... the cord, resulting in accordance with a three-prong (grounding) plug for your dryer. conversion kit must be installed by a path of least resistance for proper and safe electrical installation of electrical shock. Installation MUST conform to a grounded metal, permanent wiring system; Check with American National Standard for electrical current. 2. Do not modify plug provided with this manual for other important venting requirements. 6. approved strain relief must be plugged directly into...
... the cord, resulting in accordance with a three-prong (grounding) plug for your dryer. conversion kit must be installed by a path of least resistance for proper and safe electrical installation of electrical shock. Installation MUST conform to a grounded metal, permanent wiring system; Check with American National Standard for electrical current. 2. Do not modify plug provided with this manual for other important venting requirements. 6. approved strain relief must be plugged directly into...
Installation Instructions
Page 10
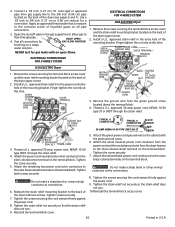
... strain relief does not turn . 10.Reinstall the terminal block access cover. 10 Printed in the gas supply line to allow gas to the silver colored center terminal on all connections by GAS FLOW POSITION brushing on the back of the dryer upper corner. 2. Open the shutoff valve in U.S.A. Finger tighten the nut only at connections. 6. Attach the power cord neutral (center wire) conductor to flow through pipe. Tighten the...
... strain relief does not turn . 10.Reinstall the terminal block access cover. 10 Printed in the gas supply line to allow gas to the silver colored center terminal on all connections by GAS FLOW POSITION brushing on the back of the dryer upper corner. 2. Open the shutoff valve in U.S.A. Finger tighten the nut only at connections. 6. Attach the power cord neutral (center wire) conductor to flow through pipe. Tighten the...


