
Users Guide
Page 3
Contents ES-200/ES-300W User's Guide ...7 Scanner Basics...8 Scanner Parts Locations ...8 Scanner Parts...8 Scanner Buttons and Lights...12 User Replaceable Epson Scanner Parts and Accessories 14 Changing the Power Save Settings...14 Charging the Battery (ES-300W)...15 Loading Originals...18 Loading Originals in the Input Tray...18 Original Document ... Wi-Fi Network 45 Manually Connecting to a Wi-Fi Router Using EpsonNet Config 46 Setting Up Network Scanning...49 Determining the Scanner's IP Address 50 Direct Wi-Fi Mode (AP Mode) Setup 51 Enabling a Direct Wi-Fi (AP Mode) Connection 52...
Contents ES-200/ES-300W User's Guide ...7 Scanner Basics...8 Scanner Parts Locations ...8 Scanner Parts...8 Scanner Buttons and Lights...12 User Replaceable Epson Scanner Parts and Accessories 14 Changing the Power Save Settings...14 Charging the Battery (ES-300W)...15 Loading Originals...18 Loading Originals in the Input Tray...18 Original Document ... Wi-Fi Network 45 Manually Connecting to a Wi-Fi Router Using EpsonNet Config 46 Setting Up Network Scanning...49 Determining the Scanner's IP Address 50 Direct Wi-Fi Mode (AP Mode) Setup 51 Enabling a Direct Wi-Fi (AP Mode) Connection 52...
Users Guide
Page 4
......63 Scanning ...65 Starting a Scan...65 Starting a Scan from a Scanner Button 65 Assigning Start Button Settings or Scan Jobs 66 Starting a Scan Using the Epson Scan 2 Icon 67 Starting a Scan from a Scanning Program 69 Scanning with Document Capture Pro and Document Capture 71 Scanning in Epson Scan 2 ...74 Additional Scanning Settings - Windows 86 Scanning Using...
......63 Scanning ...65 Starting a Scan...65 Starting a Scan from a Scanner Button 65 Assigning Start Button Settings or Scan Jobs 66 Starting a Scan Using the Epson Scan 2 Icon 67 Starting a Scan from a Scanning Program 69 Scanning with Document Capture Pro and Document Capture 71 Scanning in Epson Scan 2 ...74 Additional Scanning Settings - Windows 86 Scanning Using...
Users Guide
Page 18
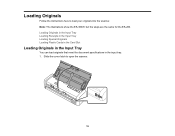
Note: The illustrations show the ES-300W, but the steps are the same for the ES-200. Loading Originals Follow the instructions here to open the scanner. 18 Slide the cover latch to load your originals into the scanner. Loading Originals in the Input Tray Loading Receipts in the Input Tray Loading Special Originals Loading Plastic Cards in the Card Slot Loading Originals in the Input Tray You can load originals that meet the document specifications in the input tray. 1.
Note: The illustrations show the ES-300W, but the steps are the same for the ES-200. Loading Originals Follow the instructions here to open the scanner. 18 Slide the cover latch to load your originals into the scanner. Loading Originals in the Input Tray Loading Receipts in the Input Tray Loading Special Originals Loading Plastic Cards in the Card Slot Loading Originals in the Input Tray You can load originals that meet the document specifications in the input tray. 1.
Users Guide
Page 25
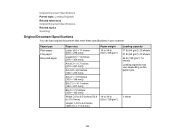
... sheets 21 lb (80 g/m²): 20 sheets 34 lb (128 g/m²): 12 sheets Loading capacity may vary depending on the paper type. 1 sheet 25 Original Document Specifications Parent topic: Loading Originals Related references Original Document Specifications Related topics Scanning Original Document Specifications You can load original documents that meet these specifications in your scanner.
... sheets 21 lb (80 g/m²): 20 sheets 34 lb (128 g/m²): 12 sheets Loading capacity may vary depending on the paper type. 1 sheet 25 Original Document Specifications Parent topic: Loading Originals Related references Original Document Specifications Related topics Scanning Original Document Specifications You can load original documents that meet these specifications in your scanner.

Users Guide
Page 26
...g/m²): 8 cards 58 lb (220 g/m²): 6 cards Caution: Do not load the following types of originals in the scanner, or they may be damaged or may damage the scanner: • Photos • Thermal paper • Coated paper • Glossy originals • Fabric or other non-paper... originals • Originals with uneven surfaces, such as embossed documents • Originals containing staples or paper clips • Originals ...
...g/m²): 8 cards 58 lb (220 g/m²): 6 cards Caution: Do not load the following types of originals in the scanner, or they may be damaged or may damage the scanner: • Photos • Thermal paper • Coated paper • Glossy originals • Fabric or other non-paper... originals • Originals with uneven surfaces, such as embossed documents • Originals containing staples or paper clips • Originals ...
Users Guide
Page 28
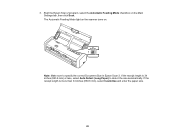
If the receipt length is 34 inches (863.6 mm) or less, select Auto Detect (Long Paper) to specify the correct Document Size in Epson Scan 2. The Automatic Feeding Mode light on the scanner turns on the Main Settings tab, then click Scan. Note: Make sure to detect the size automatically. If the receipt length is more than 34 inches (863.6 mm), select Customize and enter the paper size. 28 Start the Epson Scan 2 program, select the Automatic Feeding Mode checkbox on . 3.
If the receipt length is 34 inches (863.6 mm) or less, select Auto Detect (Long Paper) to specify the correct Document Size in Epson Scan 2. The Automatic Feeding Mode light on the scanner turns on the Main Settings tab, then click Scan. Note: Make sure to detect the size automatically. If the receipt length is more than 34 inches (863.6 mm), select Customize and enter the paper size. 28 Start the Epson Scan 2 program, select the Automatic Feeding Mode checkbox on . 3.

Users Guide
Page 57
If there is WPS-enabled, look for a button labeled WPS on your router or access point. Check your scanner to open the scanner. 57 Note: To check if your router is no hardware button, there may be a virtual WPS button in the software for the device. Slide the ... to a Network If you have a WPS-enabled wireless router or access point, you can use Wi-Fi Protected Setup (WPS) to connect your network product documentation for details.
If there is WPS-enabled, look for a button labeled WPS on your router or access point. Check your scanner to open the scanner. 57 Note: To check if your router is no hardware button, there may be a virtual WPS button in the software for the device. Slide the ... to a Network If you have a WPS-enabled wireless router or access point, you can use Wi-Fi Protected Setup (WPS) to connect your network product documentation for details.

Users Guide
Page 58
Set the connection mode switch on the scanner to the Wi-Fi position. 3. 2. Turn on the router or access point, see the documentation provided with your wireless router or access point until the security light flashes. Press and hold the WPS button on your router or access point for the ready and Wi-Fi lights on the scanner to flash simultaneously. 4. Note: If you cannot locate the WPS button, or there are no buttons on the scanner. Wait for details. 58
Set the connection mode switch on the scanner to the Wi-Fi position. 3. 2. Turn on the router or access point, see the documentation provided with your wireless router or access point until the security light flashes. Press and hold the WPS button on your router or access point for the ready and Wi-Fi lights on the scanner to flash simultaneously. 4. Note: If you cannot locate the WPS button, or there are no buttons on the scanner. Wait for details. 58

Users Guide
Page 65
... have assigned to your computer or network (ES-300W). 2. Make sure the scanner is connected to the button. Document Capture Pro (Windows) and Document Capture (Mac) do not support scanning from a Scanner Button You can scan original documents or photos and save them as digital files...start button on your scanner. 1. Note: Make sure Epson Scan 2 and Document Capture Pro (Windows) or Document Capture (Mac) are installed on your product for scanning, start button. Launch Epson Scan 2 before scanning from the start button in Document Capture Pro (Windows) or Document Capture (Mac). 65...
... have assigned to your computer or network (ES-300W). 2. Make sure the scanner is connected to the button. Document Capture Pro (Windows) and Document Capture (Mac) do not support scanning from a Scanner Button You can scan original documents or photos and save them as digital files...start button on your scanner. 1. Note: Make sure Epson Scan 2 and Document Capture Pro (Windows) or Document Capture (Mac) are installed on your product for scanning, start button. Launch Epson Scan 2 before scanning from the start button in Document Capture Pro (Windows) or Document Capture (Mac). 65...

Users Guide
Page 66
... you want to the start button on your scanner over a wireless network (ES-300W). You do one of the window, then click Event Settings. 6. Select Switch to the product. 2. Note: See the Help information in the Document Capture Pro (Windows) or Document Capture (Mac) program. Launch Epson Scan 2 before scanning from the start button on...
... you want to the start button on your scanner over a wireless network (ES-300W). You do one of the window, then click Event Settings. 6. Select Switch to the product. 2. Note: See the Help information in the Document Capture Pro (Windows) or Document Capture (Mac) program. Launch Epson Scan 2 before scanning from the start button on...

Users Guide
Page 74
...topic: Scanning Related tasks Loading Originals in the Input Tray Scanning in Epson Scan 2 Scanning in Epson Scan 2 Epson Scan 2 automatically scans your document and saves the scanned file in PDF format in your scanning program. Start Epson Scan 2. 74 Depending on the destination you cannot see a preview ... are scanning using the card slot, slide the mode selector to the current captured images, click the Add Page button, select Acquire from Scanner, and repeat the previous steps. 9. If you would like to scan additional originals and add them as necessary. 1. If you are scanning...
...topic: Scanning Related tasks Loading Originals in the Input Tray Scanning in Epson Scan 2 Scanning in Epson Scan 2 Epson Scan 2 automatically scans your document and saves the scanned file in PDF format in your scanning program. Start Epson Scan 2. 74 Depending on the destination you cannot see a preview ... are scanning using the card slot, slide the mode selector to the current captured images, click the Add Page button, select Acquire from Scanner, and repeat the previous steps. 9. If you would like to scan additional originals and add them as necessary. 1. If you are scanning...

Users Guide
Page 79
... settings you select in OCR (Optical Character Recognition) programs. Skip Blank Pages If the scanner detects marks from the graphics. Not all adjustment settings may be available, depending on the Epson Scan 2 Advanced Settings tab. Dropout The scan will not pick up the color you ...Adjusts the midtone density of the overall scanned image. Additional Scanning Settings - Descreening Removes the ripple pattern that might appear in text documents. This setting is available only if you select. Contrast Adjusts the difference between the light and dark areas of the scanned image....
... settings you select in OCR (Optical Character Recognition) programs. Skip Blank Pages If the scanner detects marks from the graphics. Not all adjustment settings may be available, depending on the Epson Scan 2 Advanced Settings tab. Dropout The scan will not pick up the color you ...Adjusts the midtone density of the overall scanned image. Additional Scanning Settings - Descreening Removes the ripple pattern that might appear in text documents. This setting is available only if you select. Contrast Adjusts the difference between the light and dark areas of the scanned image....

Users Guide
Page 82
...business or plastic card using the ADF, slide the mode selector to ADF. Select Epson Software, then select Document Capture Pro. • Windows 8.x: Navigate to a SharePoint Server or Cloud Service ...Parent topic: Scanning Scanning Two Originals onto One Sheet (Stitching Images) - Scan paper up to 44 inches (1,117.6 mm) in the scanner...computer screen/post on the web: 96 to 200 dpi • Print/fax/convert to editable text (OCR)/create searchable PDF: 200 to 300 dpi • You will scan the...
...business or plastic card using the ADF, slide the mode selector to ADF. Select Epson Software, then select Document Capture Pro. • Windows 8.x: Navigate to a SharePoint Server or Cloud Service ...Parent topic: Scanning Scanning Two Originals onto One Sheet (Stitching Images) - Scan paper up to 44 inches (1,117.6 mm) in the scanner...computer screen/post on the web: 96 to 200 dpi • Print/fax/convert to editable text (OCR)/create searchable PDF: 200 to 300 dpi • You will scan the...

Users Guide
Page 86
... versions): Click or Start, and select All Programs or Programs. Select ABBYY FineReader 12 Sprint > ABBYY FineReader 12 Sprint. Select the language used in the scanner. 3. Windows You can use the ABBYY FineReader OCR program to convert scanned documents to card. 2. Click Scan...
... versions): Click or Start, and select All Programs or Programs. Select ABBYY FineReader 12 Sprint > ABBYY FineReader 12 Sprint. Select the language used in the scanner. 3. Windows You can use the ABBYY FineReader OCR program to convert scanned documents to card. 2. Click Scan...

Users Guide
Page 87
Reload the ejected original in the scanner. 10. Click Scan to . Select the program or format you want to scan to Document. 11. Select your document and click Save. 87 Select a name and a file format for your scanner settings. 8. You see a window like this: 7. Click Preview and adjust the area you want to scan, if necessary. 9. You see the Save As window. 12.
Reload the ejected original in the scanner. 10. Click Scan to . Select the program or format you want to scan to Document. 11. Select your document and click Save. 87 Select a name and a file format for your scanner settings. 8. You see a window like this: 7. Click Preview and adjust the area you want to scan, if necessary. 9. You see the Save As window. 12.

Users Guide
Page 88
... from the Source list. 5. You see a window like this: 4. Parent topic: Convert Scanned Documents to editable text. 1. Select the language used in the document you are finished scanning, close the ABBYY FineReader window. Select your original in the scanner. 3. When you are scanning using the card slot, slide the mode selector to card...
... from the Source list. 5. You see a window like this: 4. Parent topic: Convert Scanned Documents to editable text. 1. Select the language used in the document you are finished scanning, close the ABBYY FineReader window. Select your original in the scanner. 3. When you are scanning using the card slot, slide the mode selector to card...

Users Guide
Page 92
... Text (OCR) Related tasks Loading Originals in the Input Tray Saving Scanned Documents as instructed on your scanner software as a Searchable PDF You can scan a document and save the text in a searchable PDF. If you want to card. 92 Note: The required Epson Scan 2 OCR Component is installed automatically when you are scanning using...
... Text (OCR) Related tasks Loading Originals in the Input Tray Saving Scanned Documents as instructed on your scanner software as a Searchable PDF You can scan a document and save the text in a searchable PDF. If you want to card. 92 Note: The required Epson Scan 2 OCR Component is installed automatically when you are scanning using...

Users Guide
Page 93
...Start Epson Scan 2. 4. Reload the ejected original in the document text is selected as the Image Format setting. 8. Load your scan settings. 5. Select Searchable PDF as the Text Language setting. 11. Click OK. 12. Select Options from the Image Format list. Make sure the language used in the scanner. ...7. Click Scan. 93 2. Click Preview and adjust the area you want to scan, if necessary. 6. You see the Image Format Options window. 9. Select your original in the scanner. 3. Select the Text tab. 10. Confirm the...
...Start Epson Scan 2. 4. Reload the ejected original in the document text is selected as the Image Format setting. 8. Load your scan settings. 5. Select Searchable PDF as the Text Language setting. 11. Click OK. 12. Select Options from the Image Format list. Make sure the language used in the scanner. ...7. Click Scan. 93 2. Click Preview and adjust the area you want to scan, if necessary. 6. You see the Image Format Options window. 9. Select your original in the scanner. 3. Select the Text tab. 10. Confirm the...

Users Guide
Page 94
..., and select All Programs or Programs. Select Epson Software > Document Capture Pro. Load your scans in the scanner. 2. Windows You can use Document Capture Pro (Windows) to save your original in one of the following to start Document Capture Pro: • Windows 10: Click and select All Apps > Epson Software > Document Capture Pro. • Windows 8.x: Navigate to...
..., and select All Programs or Programs. Select Epson Software > Document Capture Pro. Load your scans in the scanner. 2. Windows You can use Document Capture Pro (Windows) to save your original in one of the following to start Document Capture Pro: • Windows 10: Click and select All Apps > Epson Software > Document Capture Pro. • Windows 8.x: Navigate to...

Users Guide
Page 122
...: • Check the USB cable connection between the computer and scanner. • Make sure Document Capture Pro (Windows) or Document Capture (Mac) is ready to operate the scanner on a USB power supply. • If the scanner does not turn off when operating on the battery (ES-300W), disconnect the AC adapter and USB cable and press...
...: • Check the USB cable connection between the computer and scanner. • Make sure Document Capture Pro (Windows) or Document Capture (Mac) is ready to operate the scanner on a USB power supply. • If the scanner does not turn off when operating on the battery (ES-300W), disconnect the AC adapter and USB cable and press...


