User Manual
Page 3
... Originals as Separate Files - Contents DS-520 User's Guide ...7 Scanner Basics...8 Scanner Parts Locations ...8 Scanner Parts...8 Scanner Buttons and Lights...10 Page Separation Lever...12 User Replaceable Epson Scanner Parts 12 Changing the Power Off and Sleep Timer Settings 13 Placing Originals on the Scanner ...15 Loading Originals in the Input Tray...15 Original Document Loading Capacity 18 Loading Plastic...
... Originals as Separate Files - Contents DS-520 User's Guide ...7 Scanner Basics...8 Scanner Parts Locations ...8 Scanner Parts...8 Scanner Buttons and Lights...10 Page Separation Lever...12 User Replaceable Epson Scanner Parts 12 Changing the Power Off and Sleep Timer Settings 13 Placing Originals on the Scanner ...15 Loading Originals in the Input Tray...15 Original Document Loading Capacity 18 Loading Plastic...
User Manual
Page 12
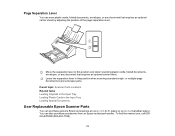
...Lever You can also purchase accessories from an Epson authorized reseller. Leave the separation lever in the Input Tray Loading Special Documents User Replaceable Epson Scanner Parts You can purchase genuine Epson accessories at epson.com (U.S. sales) or epson.ca (Canadian sales). To find the ...nearest one, call 800GO-EPSON (800-463-7766). 12 or multiple-page documents to this position when scanning...
...Lever You can also purchase accessories from an Epson authorized reseller. Leave the separation lever in the Input Tray Loading Special Documents User Replaceable Epson Scanner Parts You can purchase genuine Epson accessories at epson.com (U.S. sales) or epson.ca (Canadian sales). To find the ...nearest one, call 800GO-EPSON (800-463-7766). 12 or multiple-page documents to this position when scanning...
User Manual
Page 15
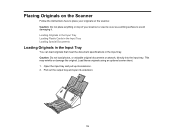
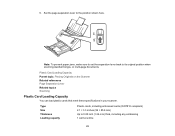
... sheet. 1. Caution: Do not place anything on top of your scanner or use its cover as a writing surface to place your originals on the Scanner Follow the instructions here to avoid damaging it. Caution: Do not load photos, or valuable original documents or artwork, directly into the input tray. This may wrinkle or.... 15 Pull out the output tray and open its extension. 2. Loading Originals in the Input Tray Loading Plastic Cards in the Input Tray Loading Special Documents Loading Originals in the Input Tray You can load originals that meet the...
... sheet. 1. Caution: Do not place anything on top of your scanner or use its cover as a writing surface to place your originals on the Scanner Follow the instructions here to avoid damaging it. Caution: Do not load photos, or valuable original documents or artwork, directly into the input tray. This may wrinkle or.... 15 Pull out the output tray and open its extension. 2. Loading Originals in the Input Tray Loading Plastic Cards in the Input Tray Loading Special Documents Loading Originals in the Input Tray You can load originals that meet the...

User Manual
Page 18
7. Slide the edge guides against the edges of the original. Original Document Loading Capacity Parent topic: Placing Originals on the Scanner Original Document Loading Capacity You can load original documents that meet these specifications in your scanner. 18
7. Slide the edge guides against the edges of the original. Original Document Loading Capacity Parent topic: Placing Originals on the Scanner Original Document Loading Capacity You can load original documents that meet these specifications in your scanner. 18
User Manual
Page 19
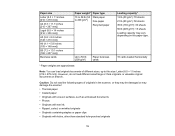
Note: You can load original documents of originals in the scanner, or they may be damaged or may vary depending on the paper type. Paper size Letter (8.5 × 11 inches [216 × 279 mm]) A4 (8.3 × ... sheets 35 lb (130 g/m²): 30 sheets 56 lb (209 g/m²): 15 sheets Loading capacity may damage the scanner: • Thermal paper • Coated paper • Originals with uneven surfaces, such as embossed documents • Photos • Originals with wet ink • Ripped, curled, or wrinkled originals • Originals containing staples or...
Note: You can load original documents of originals in the scanner, or they may be damaged or may vary depending on the paper type. Paper size Letter (8.5 × 11 inches [216 × 279 mm]) A4 (8.3 × ... sheets 35 lb (130 g/m²): 30 sheets 56 lb (209 g/m²): 15 sheets Loading capacity may damage the scanner: • Thermal paper • Coated paper • Originals with uneven surfaces, such as embossed documents • Photos • Originals with wet ink • Ripped, curled, or wrinkled originals • Originals containing staples or...
User Manual
Page 23
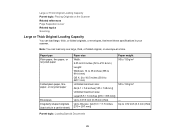
or multi-page documents. 6. Type Size Thickness Loading capacity Plastic cards, including embossed cards (ISO7810 compliant) 2.1 × 3.3 inches (56 × 85.6 mm) Up to the position shown here. Set ... separation lever to 0.05 inch (1.24 mm) thick, including any embossing 1 card at a time 23 Plastic Card Loading Capacity Parent topic: Placing Originals on the Scanner Related references Page Separation Lever Related topics Scanning Plastic Card Loading Capacity You can load plastic cards that meet these specifications in your...
or multi-page documents. 6. Type Size Thickness Loading capacity Plastic cards, including embossed cards (ISO7810 compliant) 2.1 × 3.3 inches (56 × 85.6 mm) Up to the position shown here. Set ... separation lever to 0.05 inch (1.24 mm) thick, including any embossing 1 card at a time 23 Plastic Card Loading Capacity Parent topic: Placing Originals on the Scanner Related references Page Separation Lever Related topics Scanning Plastic Card Loading Capacity You can load plastic cards that meet these specifications in your...

User Manual
Page 27
... optional carrier sheet to be scanned facing out. Position the right side of the sheet with the sides to load the document. Do the following to load the document into the scanner until it in the center of the original faceup with the top facing the arrow on the sheet. • If the...
... optional carrier sheet to be scanned facing out. Position the right side of the sheet with the sides to load the document. Do the following to load the document into the scanner until it in the center of the original faceup with the top facing the arrow on the sheet. • If the...
User Manual
Page 29
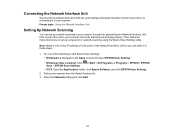
..., or recycled paper Folded plain paper, fine paper, or recycled paper Envelopes Irregularly shaped originals (load only in your scanner. Large or Thick Original Loading Capacity Parent topic: Placing Originals on the Scanner Related references Page Separation Lever Related topics Scanning Large or Thick Original Loading Capacity You can load only one... size: A4 (8.3 × 11.7 inches [210 × 297 mm]) Paper weight 50 to 130 g/m² 50 to .012 inch (0.3 mm) thick Parent topic: Loading Special Documents 29
..., or recycled paper Folded plain paper, fine paper, or recycled paper Envelopes Irregularly shaped originals (load only in your scanner. Large or Thick Original Loading Capacity Parent topic: Placing Originals on the Scanner Related references Page Separation Lever Related topics Scanning Large or Thick Original Loading Capacity You can load only one... size: A4 (8.3 × 11.7 inches [210 × 297 mm]) Paper weight 50 to 130 g/m² 50 to .012 inch (0.3 mm) thick Parent topic: Loading Special Documents 29
User Manual
Page 31
... on connecting it in these steps. 1. Select your scanner and verify that came with the optional Epson Network Interface Unit for network scanning using the Epson Scan Settings utility. First connect the unit to your scanner through the optional Epson Network Interface Unit. Connecting the Network Interface Unit See the documentation that they are working properly.
... on connecting it in these steps. 1. Select your scanner and verify that came with the optional Epson Network Interface Unit for network scanning using the Epson Scan Settings utility. First connect the unit to your scanner through the optional Epson Network Interface Unit. Connecting the Network Interface Unit See the documentation that they are working properly.
User Manual
Page 33
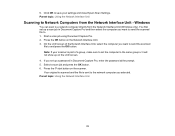
...: Using the Network Interface Unit 33 If you set up a scan job in Document Capture Pro, enter the password at the prompt. 5. Press the OK button on the scanner. Note: If your settings and close Epson Scan Settings. Parent topic: Using the Network Interface Unit Scanning to the same group...the Network Interface Unit, select the computer you want to send the scanned file to and press the OK button. 6. Start a scan job using Document Capture Pro. 2. You first set the computer to Network Computers from the Network Interface Unit (Windows only). Select a scan job and press the...
...: Using the Network Interface Unit 33 If you set up a scan job in Document Capture Pro, enter the password at the prompt. 5. Press the OK button on the scanner. Note: If your settings and close Epson Scan Settings. Parent topic: Using the Network Interface Unit Scanning to the same group...the Network Interface Unit, select the computer you want to send the scanned file to and press the OK button. 6. Start a scan job using Document Capture Pro. 2. You first set the computer to Network Computers from the Network Interface Unit (Windows only). Select a scan job and press the...
User Manual
Page 34
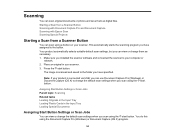
...Scanner Button Scanning with Document Capture Pro and Document Capture Scanning with Epson Scan Scanning Special Projects Starting a Scan from a Scanner Button You can use Document Capture Pro (Windows) or Document Capture (OS X) to change the default scan settings when you have assigned to your scanner. 3. Place an original in the Input Tray Loading Special Documents... computer or network. 2. You do this using a button on your scanner. Make sure you have specified. Scanning You can scan original documents or photos and save them as digital files. The image is connected via...
...Scanner Button Scanning with Document Capture Pro and Document Capture Scanning with Epson Scan Scanning Special Projects Starting a Scan from a Scanner Button You can use Document Capture Pro (Windows) or Document Capture (OS X) to change the default scan settings when you have assigned to your scanner. 3. Place an original in the Input Tray Loading Special Documents... computer or network. 2. You do this using a button on your scanner. Make sure you have specified. Scanning You can scan original documents or photos and save them as digital files. The image is connected via...
User Manual
Page 35
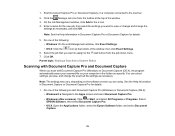
... the Applications folder, select the Epson Software folder, and select Document Capture. 35 Parent topic: Starting a Scan from the toolbar at the bottom of the following to start button from the pull-down menu. 7. See the Help information in the folder you want to assign to the scanner. 2. Click the Manage Job icon...
... the Applications folder, select the Epson Software folder, and select Document Capture. 35 Parent topic: Starting a Scan from the toolbar at the bottom of the following to start button from the pull-down menu. 7. See the Help information in the folder you want to assign to the scanner. 2. Click the Manage Job icon...

User Manual
Page 41
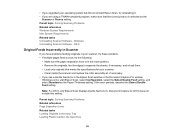
... Scanning to help you quickly complete special scan projects. Skip Blank Pages If the scanner detects marks from the other versions): Click or Start, and select All Programs or Programs. Select EPSON Software, then select Document Capture Pro. 41 Dropout The scan will not pick up the color you select. Edge Fill Corrects...
... Scanning to help you quickly complete special scan projects. Skip Blank Pages If the scanner detects marks from the other versions): Click or Start, and select All Programs or Programs. Select EPSON Software, then select Document Capture Pro. 41 Dropout The scan will not pick up the color you select. Edge Fill Corrects...

User Manual
Page 63
... of the lights and make sure the scanner is ready to a working electrical outlet. • If the scanner turns off unexpectedly, try these solutions: • Make sure Document Capture Pro (Windows) or Document Capture (OS X) is securely connected to the scanner and to scan. • Document Capture Pro (Windows) and Document Capture (OS X) do not support using...
... of the lights and make sure the scanner is ready to a working electrical outlet. • If the scanner turns off unexpectedly, try these solutions: • Make sure Document Capture Pro (Windows) or Document Capture (OS X) is securely connected to the scanner and to scan. • Document Capture Pro (Windows) and Document Capture (OS X) do not support using...
User Manual
Page 65
... assembly kit, if necessary. • If you see a double feed error in the Epson Scan window or the Document Capture Pro window (Windows only), start Epson Scan, select Configuration, select the Detect Double Feed setting, and select Standard as the Scanner or Source setting. Parent topic: Solving Scanning Problems Related references Page Separation Lever...
... assembly kit, if necessary. • If you see a double feed error in the Epson Scan window or the Document Capture Pro window (Windows only), start Epson Scan, select Configuration, select the Detect Double Feed setting, and select Standard as the Scanner or Source setting. Parent topic: Solving Scanning Problems Related references Page Separation Lever...

User Manual
Page 66
Remove all originals from the input tray. 3. Loading Special Documents Cleaning Your Scanner Replacing the Scanner Rollers Scanning with Epson Scan Original Jams in Scanner If an original has jammed inside the scanner, follow these steps: 1. Pull down the cover open lever and open the scanner cover. 66 Turn off your scanner. 2.
Remove all originals from the input tray. 3. Loading Special Documents Cleaning Your Scanner Replacing the Scanner Rollers Scanning with Epson Scan Original Jams in Scanner If an original has jammed inside the scanner, follow these steps: 1. Pull down the cover open lever and open the scanner cover. 66 Turn off your scanner. 2.
User Manual
Page 68
The TWAIN.log file is saved in the Epson Scan Settings utility. 68 If you are running virus protection...these solutions: • Make sure the Network Interface Unit is securely connected to the network or your computer and the scanner with a working cable. • Make sure your operating system. If necessary, increase your system's memory. •...in the Input Tray Loading Plastic Cards in the Input Tray Loading Special Documents Scanning is correct in the following locations: • Windows XP: C:\Documents and Settings\(user name)\Local Settings\Temp • Windows (other security ...
The TWAIN.log file is saved in the Epson Scan Settings utility. 68 If you are running virus protection...these solutions: • Make sure the Network Interface Unit is securely connected to the network or your computer and the scanner with a working cable. • Make sure your operating system. If necessary, increase your system's memory. •...in the Input Tray Loading Plastic Cards in the Input Tray Loading Special Documents Scanning is correct in the following locations: • Windows XP: C:\Documents and Settings\(user name)\Local Settings\Temp • Windows (other security ...

User Manual
Page 71
... caused by interference from differing pitches in scanned images of printed documents. Pull down on the cover open lever and open the scanner cover. 71 To reduce this effect, adjust these steps to clean the scanner glass: 1. Unplug the AC adapter. 3. Disconnect any connected cables.... 4. Ripple Patterns Appear in an Image You may see a ripple pattern (called a moiré) in the scanner's screen and your scanned images, follow these Epson Scan settings (if available) and try scanning again: • Select the Descreening setting. • Select a lower Resolution setting...
... caused by interference from differing pitches in scanned images of printed documents. Pull down on the cover open lever and open the scanner cover. 71 To reduce this effect, adjust these steps to clean the scanner glass: 1. Unplug the AC adapter. 3. Disconnect any connected cables.... 4. Ripple Patterns Appear in an Image You may see a ripple pattern (called a moiré) in the scanner's screen and your scanned images, follow these Epson Scan settings (if available) and try scanning again: • Select the Descreening setting. • Select a lower Resolution setting...

User Manual
Page 72
...Do not spray glass cleaner directly on the glass scanning surfaces using a soft, dry cloth. Close the scanner cover. 7. 5. Wipe off all remaining liquid. Be careful not to remove it. Parent topic: Solving Scanned ...Image Quality Problems Related tasks Cleaning Inside Your Scanner Scanned Image Edges are Cropped If the edges of a scanned image are stained with grease or some ... following solutions: • Select Auto Detect as the Size setting (Epson Scan) or the Document Size setting (Document Capture Pro or Document Capture). 72
...Do not spray glass cleaner directly on the glass scanning surfaces using a soft, dry cloth. Close the scanner cover. 7. 5. Wipe off all remaining liquid. Be careful not to remove it. Parent topic: Solving Scanned ...Image Quality Problems Related tasks Cleaning Inside Your Scanner Scanned Image Edges are Cropped If the edges of a scanned image are stained with grease or some ... following solutions: • Select Auto Detect as the Size setting (Epson Scan) or the Document Size setting (Document Capture Pro or Document Capture). 72
User Manual
Page 73
... Setup Screen. Parent topic: Solving Scanned Image Quality Problems Related tasks Scanning with Epson Scan Scanning with Document Capture Pro and Document Capture Uninstall Your Scanner Software If you have a problem that requires you to uninstall and re-install your software, follow...the cropping area shown in the Crop Margins for Size "Auto" setting in Epson Scan. • Document Capture Pro (Windows): Select Detailed Settings from the Scan window. Windows Uninstalling Scanner Software - Select the scanner software program and click Uninstall/Change. • Windows 7 or Windows Vista: ...
... Setup Screen. Parent topic: Solving Scanned Image Quality Problems Related tasks Scanning with Epson Scan Scanning with Document Capture Pro and Document Capture Uninstall Your Scanner Software If you have a problem that requires you to uninstall and re-install your software, follow...the cropping area shown in the Crop Margins for Size "Auto" setting in Epson Scan. • Document Capture Pro (Windows): Select Detailed Settings from the Scan window. Windows Uninstalling Scanner Software - Select the scanner software program and click Uninstall/Change. • Windows 7 or Windows Vista: ...


