
Technical Reference
Page 9
... v Chapter 1 Product Overview Product Structure 1-1 Model 1-1 Accessories 1-1 Options 1-1 Consumable products 1-1 TM-T88II/TM-88III Comparison Table 1-2 Part Names and Basic Operation 1-3 Part Names 1-3 Control Panel 1-3 Power Switch 1-4 Connectors 1-5 Handling the Printer 1-5 Installing and Replacing Roll Paper 1-6 Power Switch Cover 1-7 Shipping Procedures 1-8 Chapter 2 Setup Installing the Printer 2-2 Precautions for Horizontal Installation 2-2 Precautions for Wall Installation 2-2 Setting the...
... v Chapter 1 Product Overview Product Structure 1-1 Model 1-1 Accessories 1-1 Options 1-1 Consumable products 1-1 TM-T88II/TM-88III Comparison Table 1-2 Part Names and Basic Operation 1-3 Part Names 1-3 Control Panel 1-3 Power Switch 1-4 Connectors 1-5 Handling the Printer 1-5 Installing and Replacing Roll Paper 1-6 Power Switch Cover 1-7 Shipping Procedures 1-8 Chapter 2 Setup Installing the Printer 2-2 Precautions for Horizontal Installation 2-2 Precautions for Wall Installation 2-2 Setting the...
Technical Reference
Page 10
...10 Paper Sensors 3-10 Printer Cover Sensor 3-10 Offline ...Printer Status 4-2 Precautions When the Printer Is Offline 4-2 Outputting Hex Dumps 4-2 Chapter 5 Product Specifications Product Specifications (TM-T88II/TM-T88III 5-1 Print Specifications (TM-T88II/TM-T88III 5-2 Character Specifications (TM-T88II/TM-T88III 5-3 Paper Specifications (TM-T88II/TM-T88III 5-3 Printable Area (TM-T88II/TM-T88III 5-4 Print Position versus Cutter Position (TM-88II/TM88III 5-5 Overview of External Dimensions (TM-T88II/TM-T88III 5-6 External Dimensions 5-6 Operating Specifications (TM-T88II/TM-T88III...
...10 Paper Sensors 3-10 Printer Cover Sensor 3-10 Offline ...Printer Status 4-2 Precautions When the Printer Is Offline 4-2 Outputting Hex Dumps 4-2 Chapter 5 Product Specifications Product Specifications (TM-T88II/TM-T88III 5-1 Print Specifications (TM-T88II/TM-T88III 5-2 Character Specifications (TM-T88II/TM-T88III 5-3 Paper Specifications (TM-T88II/TM-T88III 5-3 Printable Area (TM-T88II/TM-T88III 5-4 Print Position versus Cutter Position (TM-88II/TM88III 5-5 Overview of External Dimensions (TM-T88II/TM-T88III 5-6 External Dimensions 5-6 Operating Specifications (TM-T88II/TM-T88III...
Technical Reference
Page 13
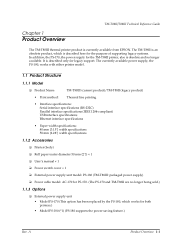
...TM-T88II/T88III Technical Reference Guide The TM-T88III thermal printer product is described only for PS-170. (The PS-170 and TM-T88II are no longer available. The TM-T88II is an obsolete product, which is described here for the purpose of supporting legacy systems. In addition, the PS-170, the power supply for the TM-T88II printer... 1.1.2 Accessories ❏ Printer (body) ❏ Roll paper (outer diameter 50 mm {2"}) × 1 ❏ User's manual × 1 ❏ Power switch cover × 1 ❏ External power supply unit model: PS-180 (TM-T88III: packaged power supply) ...
...TM-T88II/T88III Technical Reference Guide The TM-T88III thermal printer product is described only for PS-170. (The PS-170 and TM-T88II are no longer available. The TM-T88II is an obsolete product, which is described here for the purpose of supporting legacy systems. In addition, the PS-170, the power supply for the TM-T88II printer... 1.1.2 Accessories ❏ Printer (body) ❏ Roll paper (outer diameter 50 mm {2"}) × 1 ❏ User's manual × 1 ❏ Power switch cover × 1 ❏ External power supply unit model: PS-180 (TM-T88III: packaged power supply) ...
Technical Reference
Page 15
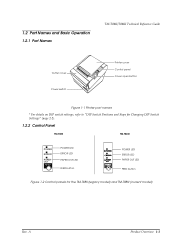
... 1-3 1.2 Part Names and Basic Operation 1.2.1 Part Names TM-T88II/T88III Technical Reference Guide Cutter cover Power switch FOEEUPDATPEERRRPOORWER Printer cover Control panel Cover open button Figure 1-1 Printer part names * For details on DIP switch settings, refer to "DIP Switch Positions and Steps for Changing DIP Switch Settings" (page 2-2). 1.2.2 Control Panel TM-T88II TM-T88III POWER ERROR PAPER OUT FEED POWER LED ERROR...
... 1-3 1.2 Part Names and Basic Operation 1.2.1 Part Names TM-T88II/T88III Technical Reference Guide Cutter cover Power switch FOEEUPDATPEERRRPOORWER Printer cover Control panel Cover open button Figure 1-1 Printer part names * For details on DIP switch settings, refer to "DIP Switch Positions and Steps for Changing DIP Switch Settings" (page 2-2). 1.2.2 Control Panel TM-T88II TM-T88III POWER ERROR PAPER OUT FEED POWER LED ERROR...
Technical Reference
Page 17
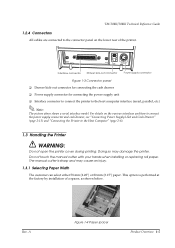
...Power supply connector for connecting the power supply unit ❏ Interface connector to connect the printer to the Host Computer" (page 2-8). 1.3 Handling the Printer WARNING: Do not open the printer cover during printing. Do not touch the manual cutter with your hands when installing or replacing ... the printer. Doing so may cause an injury. 1.3.1 Selecting Paper Width The customer can select either 58 mm {2.28"} or 80 mm {3.15"} paper. A Figure 1-4 Paper spacer Product Overview 1-5 For details on the lower rear of a spacer, as shown below. Rev. TM-T88II/T88III Technical ...
...Power supply connector for connecting the power supply unit ❏ Interface connector to connect the printer to the Host Computer" (page 2-8). 1.3 Handling the Printer WARNING: Do not open the printer cover during printing. Do not touch the manual cutter with your hands when installing or replacing ... the printer. Doing so may cause an injury. 1.3.1 Selecting Paper Width The customer can select either 58 mm {2.28"} or 80 mm {3.15"} paper. A Figure 1-4 Paper spacer Product Overview 1-5 For details on the lower rear of a spacer, as shown below. Rev. TM-T88II/T88III Technical ...
Technical Reference
Page 19
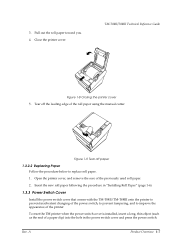
... a long, thin object (such as the end of a paper clip) into the hole in "Installing Roll Paper" (page 1-6). 1.3.3 Power Switch Cover Install the power switch cover that comes with the TM-T88II/TM-T88III onto the printer to prevent inadvertent changing of the roll paper using the manual cutter. Tear off paper 1.3.2.2 Replacing Paper Follow the procedure...
... a long, thin object (such as the end of a paper clip) into the hole in "Installing Roll Paper" (page 1-6). 1.3.3 Power Switch Cover Install the power switch cover that comes with the TM-T88II/TM-T88III onto the printer to prevent inadvertent changing of the roll paper using the manual cutter. Tear off paper 1.3.2.2 Replacing Paper Follow the procedure...
Technical Reference
Page 23
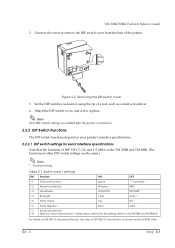
... DIP switch cover, and screw in place. is turned on. 2.2.2 DIP Switch Functions The DIP switch functions depend on your printer's interface specifications. 2.2.2.1 DIP switch settings for serial interface specifications Note that the settings differ on the TM-T88II and TM-T88III.)) For details on the TM-T88II and TM-88III. (...Table 2-1 Switch bank 1 settings SW Function ON OFF 1-1 Data receive error Ignore "?" DSW1 DSW2 Figure 2-2 Removing the DIP switch cover 3. Set the DIP switches as desired, using the tip of the printer. TM-T88II/T88III Technical Reference Guide 2.
... DIP switch cover, and screw in place. is turned on. 2.2.2 DIP Switch Functions The DIP switch functions depend on your printer's interface specifications. 2.2.2.1 DIP switch settings for serial interface specifications Note that the settings differ on the TM-T88II and TM-T88III.)) For details on the TM-T88II and TM-88III. (...Table 2-1 Switch bank 1 settings SW Function ON OFF 1-1 Data receive error Ignore "?" DSW1 DSW2 Figure 2-2 Removing the DIP switch cover 3. Set the DIP switches as desired, using the tip of the printer. TM-T88II/T88III Technical Reference Guide 2.
Technical Reference
Page 47
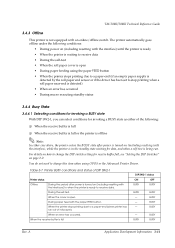
...to receive data • During the self-test • When the roll paper cover is open . For details on how to change this item when using the paper FEED button • When the printer stops printing due to a paper-end (if an empty paper supply is detected by...a BUSY state as either case above, the printer enters the BUSY state after power is turned on (including resetting with the interface) until the printer is ready • When the printer is waiting to receive data. TM-T88II/T88III Technical Reference Guide 3.4.3 Offline This printer is not equipped with the paper FEED button....
...to receive data • During the self-test • When the roll paper cover is open . For details on how to change this item when using the paper FEED button • When the printer stops printing due to a paper-end (if an empty paper supply is detected by...a BUSY state as either case above, the printer enters the BUSY state after power is turned on (including resetting with the interface) until the printer is ready • When the printer is waiting to receive data. TM-T88II/T88III Technical Reference Guide 3.4.3 Offline This printer is not equipped with the paper FEED button....
Technical Reference
Page 49
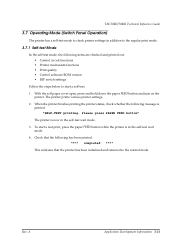
...printer is now in the self-test wait mode. 3. Check that the printer has been initialized and returned to start a test print, press the paper FEED button while the printer is printed: "SELF-TEST printing. Rev. TM-T88II/T88III... Technical Reference Guide 3.7 Operating Mode (Switch Panel Operation) The printer has a self-test mode to check printer ... items are checked and printed out: • Control circuit functions • Printer mechanism functions • Print quality • Control software ROM version •...
...printer is now in the self-test wait mode. 3. Check that the printer has been initialized and returned to start a test print, press the paper FEED button while the printer is printed: "SELF-TEST printing. Rev. TM-T88II/T88III... Technical Reference Guide 3.7 Operating Mode (Switch Panel Operation) The printer has a self-test mode to check printer ... items are checked and printed out: • Control circuit functions • Printer mechanism functions • Print quality • Control software ROM version •...


