

User Manual
Page 5
EMC and Safety Standards Applied Product Name: TM-T88II Model Name: M129B The following standards are so labeled. (EMC is tested using the EPSON PS-170 power supply) Europe: CE Marking Safety: EN60950 North America: EMI: FCC/ICES-003 Class A Safety: UL 1950/CSA ... The connection of this device. iii You are cautioned that are applied only to the printers that changes or modifications not expressly approved by SEIKO EPSON Corporation could void your authority to this printer will invalidate the EMC standards of a non-shielded printer interface cable to operate the equipment.
EMC and Safety Standards Applied Product Name: TM-T88II Model Name: M129B The following standards are so labeled. (EMC is tested using the EPSON PS-170 power supply) Europe: CE Marking Safety: EN60950 North America: EMI: FCC/ICES-003 Class A Safety: UL 1950/CSA ... The connection of this device. iii You are cautioned that are applied only to the printers that changes or modifications not expressly approved by SEIKO EPSON Corporation could void your authority to this printer will invalidate the EMC standards of a non-shielded printer interface cable to operate the equipment.
User Manual
Page 9
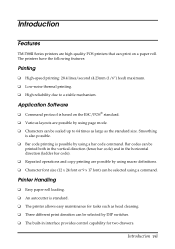
...printers have the following features: Printing ❏ High-speed printing: 28.4 lines/second (4.23mm (1/6") feed) maximum. ❏ Low-noise thermal printing. ❏ High reliability due to 64 times as large as head cleaning. ❏ Three different print densities can be selected by DIP switches. ❏ The built-in the horizontal direction.... Bar codes can be printed both in the vertical direction (fence bar code) and in interface provides control capability for two drawers. Introduction Features TM-T88II Series printers are possible by using a bar code command. Smoothing ...
...printers have the following features: Printing ❏ High-speed printing: 28.4 lines/second (4.23mm (1/6") feed) maximum. ❏ Low-noise thermal printing. ❏ High reliability due to 64 times as large as head cleaning. ❏ Three different print densities can be selected by DIP switches. ❏ The built-in the horizontal direction.... Bar codes can be printed both in the vertical direction (fence bar code) and in interface provides control capability for two drawers. Introduction Features TM-T88II Series printers are possible by using a bar code command. Smoothing ...
User Manual
Page 26
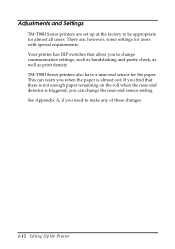
Your printer has DIP switches that there is not enough paper remaining on the roll when the near-end detector is almost out. This can change communication ... to change the near -end sensor for users with special requirements. See Appendix A, if you to make any of these changes. 1-12 Setting Up the Printer TM-T88II Series printers also have a near -end sensor setting. Adjustments and Settings TM-T88II Series printers are , however, some settings for the paper.
Your printer has DIP switches that there is not enough paper remaining on the roll when the near-end detector is almost out. This can change communication ... to change the near -end sensor for users with special requirements. See Appendix A, if you to make any of these changes. 1-12 Setting Up the Printer TM-T88II Series printers also have a near -end sensor setting. Adjustments and Settings TM-T88II Series printers are , however, some settings for the paper.

Technical Reference
Page 3
... all types of EPSON POS printers and displays. Trademarks EPSON and ESC/POS are subject to change without the prior written permission of Seiko Epson Corporation. ❏ The contents of this document are registered trademarks of Change Newly authorized Rev. A Page All pages Details of Seiko Epson Corporation. Revision History Rev. TM-T88II/T88III Technical...
... all types of EPSON POS printers and displays. Trademarks EPSON and ESC/POS are subject to change without the prior written permission of Seiko Epson Corporation. ❏ The contents of this document are registered trademarks of Change Newly authorized Rev. A Page All pages Details of Seiko Epson Corporation. Revision History Rev. TM-T88II/T88III Technical...

Technical Reference
Page 5
Penetration by foreign objects may result in this product or handle cables during a thunderstorm in . Always supply power directly from a standard 100 VAC domestic power outlet. ❏ Handle the power cable with this equipment on top of electric shock, do not set this ...up this manual. Tampering with care. Overloading the outlet may cause equipment damage, fire or shock. Excessive humidity and dust may lead to fire. Warnings TM-T88II/T88III Technical Reference Guide WARNING: ❏ Shut down your equipment immediately if it in. • Be sure to push the plug all the way ...
Penetration by foreign objects may result in this product or handle cables during a thunderstorm in . Always supply power directly from a standard 100 VAC domestic power outlet. ❏ Handle the power cable with this equipment on top of electric shock, do not set this ...up this manual. Tampering with care. Overloading the outlet may cause equipment damage, fire or shock. Excessive humidity and dust may lead to fire. Warnings TM-T88II/T88III Technical Reference Guide WARNING: ❏ Shut down your equipment immediately if it in. • Be sure to push the plug all the way ...

Technical Reference
Page 7
... that was created to the TM-T88II/TM-T88III are listed below. Aim of document TM-T88II User's Manual TM-T88III User's Manual ESC/POS Application Programming Guide TM-T88II/T88III Technical Reference Guide EPSON OPOS ADK Description Provides information to enable POS operators to obtain this Manual This manual describes the TM-T88III, a current EPSON thermal printer product. Contact us to use...
... that was created to the TM-T88II/TM-T88III are listed below. Aim of document TM-T88II User's Manual TM-T88III User's Manual ESC/POS Application Programming Guide TM-T88II/T88III Technical Reference Guide EPSON OPOS ADK Description Provides information to enable POS operators to obtain this Manual This manual describes the TM-T88III, a current EPSON thermal printer product. Contact us to use...
Technical Reference
Page 9
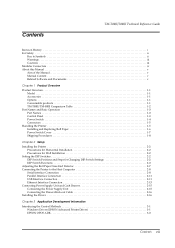
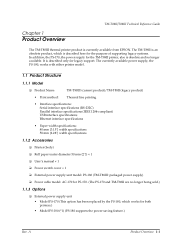
... v Chapter 1 Product Overview Product Structure 1-1 Model 1-1 Accessories 1-1 Options 1-1 Consumable products 1-1 TM-T88II/TM-88III Comparison Table 1-2 Part Names and Basic Operation 1-3 Part Names 1-3 Control Panel 1-3 Power Switch 1-4 Connectors 1-5 Handling the Printer 1-5 Installing and Replacing Roll Paper 1-6 Power Switch Cover 1-7 Shipping Procedures 1-8 Chapter 2 Setup ...Installing the Driver 2-16 Chapter 3 Application Development Information Introducing the Control Methods 3-1 Windows Driver (EPSON Advanced Printer Driver 3-1 EPSON OPOS ADK 3-3 Contents vii
... v Chapter 1 Product Overview Product Structure 1-1 Model 1-1 Accessories 1-1 Options 1-1 Consumable products 1-1 TM-T88II/TM-88III Comparison Table 1-2 Part Names and Basic Operation 1-3 Part Names 1-3 Control Panel 1-3 Power Switch 1-4 Connectors 1-5 Handling the Printer 1-5 Installing and Replacing Roll Paper 1-6 Power Switch Cover 1-7 Shipping Procedures 1-8 Chapter 2 Setup ...Installing the Driver 2-16 Chapter 3 Application Development Information Introducing the Control Methods 3-1 Windows Driver (EPSON Advanced Printer Driver 3-1 EPSON OPOS ADK 3-3 Contents vii
Technical Reference
Page 10
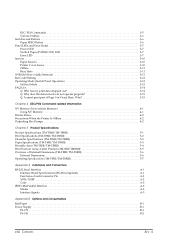
...Memory 4-1 Using NV Memory 4-1 Printer Status 4-2 Precautions When the Printer Is Offline 4-2 Outputting Hex Dumps 4-2 Chapter 5 Product Specifications Product Specifications (TM-T88II/TM-T88III 5-1 Print Specifications (TM-T88II/TM-T88III 5-2 Character Specifications (TM-T88II/TM-T88III 5-3 Paper Specifications (TM-T88II/TM-T88III 5-3 Printable Area (TM-T88II/TM-T88III 5-4 Print Position versus Cutter Position (TM-88II/TM88III 5-5 Overview of External Dimensions (TM-T88II/TM-T88III 5-6 External Dimensions 5-6 Operating Specifications (TM-T88II/TM-T88III 5-7 Appendix A Interfaces...
...Memory 4-1 Using NV Memory 4-1 Printer Status 4-2 Precautions When the Printer Is Offline 4-2 Outputting Hex Dumps 4-2 Chapter 5 Product Specifications Product Specifications (TM-T88II/TM-T88III 5-1 Print Specifications (TM-T88II/TM-T88III 5-2 Character Specifications (TM-T88II/TM-T88III 5-3 Paper Specifications (TM-T88II/TM-T88III 5-3 Printable Area (TM-T88II/TM-T88III 5-4 Print Position versus Cutter Position (TM-88II/TM88III 5-5 Overview of External Dimensions (TM-T88II/TM-T88III 5-6 External Dimensions 5-6 Operating Specifications (TM-T88II/TM-T88III 5-7 Appendix A Interfaces...
Technical Reference
Page 13
...PS-180, works with either printer model. 1.1 Product Structure 1.1.1 Model ❏ Product Name TM-T88III (current product)/TM-T88II (legacy product) • Print method: Thermal line printing • Interface ...TM-T88II printer, also is described only for both printers.) • Model PS-180 (*1) (PS-180 supports the power-saving feature.) Rev. A Product Overview 1-1 Chapter 1 Product Overview TM-T88II/T88III Technical Reference Guide The TM-T88III thermal printer product is an obsolete product, which works for legacy support. The TM-T88II is currently available from EPSON...
...PS-180, works with either printer model. 1.1 Product Structure 1.1.1 Model ❏ Product Name TM-T88III (current product)/TM-T88II (legacy product) • Print method: Thermal line printing • Interface ...TM-T88II printer, also is described only for both printers.) • Model PS-180 (*1) (PS-180 supports the power-saving feature.) Rev. A Product Overview 1-1 Chapter 1 Product Overview TM-T88II/T88III Technical Reference Guide The TM-T88III thermal printer product is an obsolete product, which works for legacy support. The TM-T88II is currently available from EPSON...
Technical Reference
Page 14
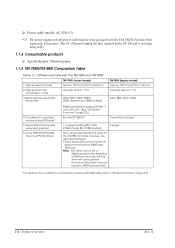
...approx. 1.7 A 2400, 4800, 9600, 19200 4. the TM-T88II. Note: The driver cannot set a 38400 bps baud rate. Selecting a 2400 bps baud rate with the driver will cause garbled characters (the printer does not support a 2400 bps baud rate). * For ...Approx. 150 mm/s (4.72") maximum 2. Driver (EPSON OPOS ADK, Advanced Printer Driver) 38400 is no longer being sold.) 1.1.4 Consumable products ❏ Specified paper: Thermal paper 1.1.5 TM-T88II/TM-88III Comparison Table Table 1-1 Differences between the TM-T88II and TM-T88III TM-T88III (current model) 1. Functions, however, are ...
...approx. 1.7 A 2400, 4800, 9600, 19200 4. the TM-T88II. Note: The driver cannot set a 38400 bps baud rate. Selecting a 2400 bps baud rate with the driver will cause garbled characters (the printer does not support a 2400 bps baud rate). * For ...Approx. 150 mm/s (4.72") maximum 2. Driver (EPSON OPOS ADK, Advanced Printer Driver) 38400 is no longer being sold.) 1.1.4 Consumable products ❏ Specified paper: Thermal paper 1.1.5 TM-T88II/TM-88III Comparison Table Table 1-1 Differences between the TM-T88II and TM-T88III TM-T88III (current model) 1. Functions, however, are ...
Technical Reference
Page 15
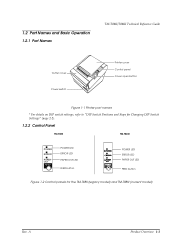
... and Basic Operation 1.2.1 Part Names TM-T88II/T88III Technical Reference Guide Cutter cover Power switch FOEEUPDATPEERRRPOORWER Printer cover Control panel Cover open button Figure 1-1 Printer part names * For details on DIP switch settings, refer to "DIP Switch Positions and Steps for Changing DIP Switch Settings" (page 2-2). 1.2.2 Control Panel TM-T88II TM-T88III POWER ERROR PAPER OUT FEED...
... and Basic Operation 1.2.1 Part Names TM-T88II/T88III Technical Reference Guide Cutter cover Power switch FOEEUPDATPEERRRPOORWER Printer cover Control panel Cover open button Figure 1-1 Printer part names * For details on DIP switch settings, refer to "DIP Switch Positions and Steps for Changing DIP Switch Settings" (page 2-2). 1.2.2 Control Panel TM-T88II TM-T88III POWER ERROR PAPER OUT FEED...
Technical Reference
Page 17
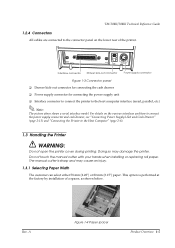
TM-T88II/T88III Technical Reference Guide 1.2.4 Connectors All cables are connected to the connector panel on the various interfaces and how to connect the power supply connector and cash drawer, see "Connecting Power Supply Unit and Cash Drawer" (page 2-15) and "Connecting the Printer to the host... supply connector for connecting the power supply unit ❏ Interface connector to connect the printer to the Host Computer" (page 2-8). 1.3 Handling the Printer WARNING: Do not open the printer cover during printing. The manual cutter is performed at the factory by installation of the...
TM-T88II/T88III Technical Reference Guide 1.2.4 Connectors All cables are connected to the connector panel on the various interfaces and how to connect the power supply connector and cash drawer, see "Connecting Power Supply Unit and Cash Drawer" (page 2-15) and "Connecting the Printer to the host... supply connector for connecting the power supply unit ❏ Interface connector to connect the printer to the Host Computer" (page 2-8). 1.3 Handling the Printer WARNING: Do not open the printer cover during printing. The manual cutter is performed at the factory by installation of the...
Technical Reference
Page 19
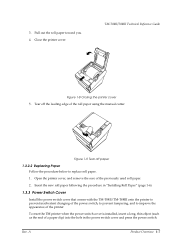
... Cover Install the power switch cover that comes with the TM-T88II/TM-T88III onto the printer to prevent inadvertent changing of the power switch, to prevent tampering, and to replace roll paper. 1. TM-T88II/T88III Technical Reference Guide FOEEUPDTAPEERRRPOORWER Figure 1-8 Closing the printer cover 5. To reset the TM printer when the power switch cover is installed, insert a long...
... Cover Install the power switch cover that comes with the TM-T88II/TM-T88III onto the printer to prevent inadvertent changing of the power switch, to prevent tampering, and to replace roll paper. 1. TM-T88II/T88III Technical Reference Guide FOEEUPDTAPEERRRPOORWER Figure 1-8 Closing the printer cover 5. To reset the TM printer when the power switch cover is installed, insert a long...
Technical Reference
Page 21
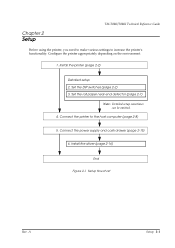
... depending on the environment. 1. Set the DIP switches (page 2-2) 3. Chapter 2 Setup TM-T88II/T88III Technical Reference Guide Before using the printer, you need to make various settings to the host computer (page 2-8) 5. Install the printer (page 2-2) Detailed setup 2. Connect the printer to increase the printer's functionality. Connect the power supply and cash drawer (page 2-15) 6. Set...
... depending on the environment. 1. Set the DIP switches (page 2-2) 3. Chapter 2 Setup TM-T88II/T88III Technical Reference Guide Before using the printer, you need to make various settings to the host computer (page 2-8) 5. Install the printer (page 2-2) Detailed setup 2. Connect the printer to increase the printer's functionality. Connect the power supply and cash drawer (page 2-15) 6. Set...
Technical Reference
Page 23
...settings are the same.) Note: * Factory setting Table 2-1 Switch bank 1 settings SW Function ON OFF 1-1 Data receive error Ignore "?" TM-T88II/T88III Technical Reference Guide 2. A Setup 2-3 Attach the DIP switch cover, and screw in place. Rev. Set the DIP switches as... Switch Functions The DIP switch functions depend on your printer's interface specifications. 2.2.2.1 DIP switch settings for serial interface specifications Note that the settings differ on the TM-T88II and TM-T88III.)) For details on the TM-T88II and TM-88III. (The functions of receive buffer full BUSY ...
...settings are the same.) Note: * Factory setting Table 2-1 Switch bank 1 settings SW Function ON OFF 1-1 Data receive error Ignore "?" TM-T88II/T88III Technical Reference Guide 2. A Setup 2-3 Attach the DIP switch cover, and screw in place. Rev. Set the DIP switches as... Switch Functions The DIP switch functions depend on your printer's interface specifications. 2.2.2.1 DIP switch settings for serial interface specifications Note that the settings differ on the TM-T88II and TM-T88III.)) For details on the TM-T88II and TM-88III. (The functions of receive buffer full BUSY ...
Technical Reference
Page 24
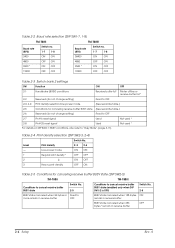
... Function ON OFF 2-1 Handshake (BUSY) conditions Receive buffer full Printer offline or receive buffer full * 2-2 Reserved (do not change setting) Fixed to OFF 2-3, 2-4 Print density selection/low-power mode (See separate table.) 2-5 Conditions for canceling receive buffer BUSY state (DIP SW2-5) TM-T88II TM-T88III Conditions to cancel receive buffer BUSY state Switch No...
... Function ON OFF 2-1 Handshake (BUSY) conditions Receive buffer full Printer offline or receive buffer full * 2-2 Reserved (do not change setting) Fixed to OFF 2-3, 2-4 Print density selection/low-power mode (See separate table.) 2-5 Conditions for canceling receive buffer BUSY state (DIP SW2-5) TM-T88II TM-T88III Conditions to cancel receive buffer BUSY state Switch No...
Technical Reference
Page 25
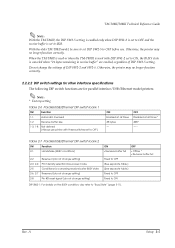
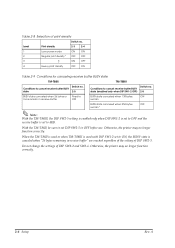
When the TM-T88II is used or when the TM-T88III is used with these switches set to ON, the BUSY state is set to 4KB. Otherwise, the printer may no longer function correctly. 2.2.2.2 DIP switch settings for parallel interface/USB/Ethernet model printers. Do not change setting) ON OFF • ...do not change the settings of DIP SW2-5 setting. Rev. With the older TM-T88II model, be sure to set DIP SW2-5 to "Busy State" (page 3-11). A Setup 2-5 TM-T88II/T88III Technical Reference Guide Note: With the TM-T88III, the DIP SW2-5 setting is enabled only when DIP SW1-2 is ...
When the TM-T88II is used or when the TM-T88III is used with these switches set to ON, the BUSY state is set to 4KB. Otherwise, the printer may no longer function correctly. 2.2.2.2 DIP switch settings for parallel interface/USB/Ethernet model printers. Do not change setting) ON OFF • ...do not change the settings of DIP SW2-5 setting. Rev. With the older TM-T88II model, be sure to set DIP SW2-5 to "Busy State" (page 3-11). A Setup 2-5 TM-T88II/T88III Technical Reference Guide Note: With the TM-T88III, the DIP SW2-5 setting is enabled only when DIP SW1-2 is ...
Technical Reference
Page 26
... no. Otherwise, the printer may no longer function correctly. 2-6 Setup Rev. Level Print density 2-3 2-4 1 Low-power mode ON ON 2 Regular print density * OFF OFF ↔ 3 ON OFF 4 Heavy print density OFF ON Table 2-9 Conditions for canceling receive buffer BUSY state TM-T88II TM-T88III Switch no . Conditions...is used with DIP SW1-2 set DIP SW2-5 to 4KB. With the TM-T88II, be sure to set to cancel receive buffer BUSY state 2-5 Switch no . A When the TM-T88II is used or when TM-T88III is set to OFF before use. Conditions to cancel receive buffer BUSY...
... no. Otherwise, the printer may no longer function correctly. 2-6 Setup Rev. Level Print density 2-3 2-4 1 Low-power mode ON ON 2 Regular print density * OFF OFF ↔ 3 ON OFF 4 Heavy print density OFF ON Table 2-9 Conditions for canceling receive buffer BUSY state TM-T88II TM-T88III Switch no . Conditions...is used with DIP SW1-2 set DIP SW2-5 to 4KB. With the TM-T88II, be sure to set to cancel receive buffer BUSY state 2-5 Switch no . A When the TM-T88II is used or when TM-T88III is set to OFF before use. Conditions to cancel receive buffer BUSY...

Technical Reference
Page 27
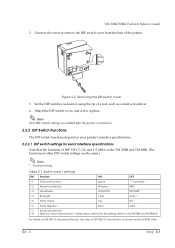
... the positioning plate with a core inner diameter of 12 mm {0.47"} and outer diameter of 18 mm {0.71"} so that the detection lever operates smoothly. 5. TM-T88II/T88III Technical Reference Guide 2.3 Adjusting the Roll Paper Near-End Detector Below are as possible.
... the positioning plate with a core inner diameter of 12 mm {0.47"} and outer diameter of 18 mm {0.71"} so that the detection lever operates smoothly. 5. TM-T88II/T88III Technical Reference Guide 2.3 Adjusting the Roll Paper Near-End Detector Below are as possible.
Technical Reference
Page 28
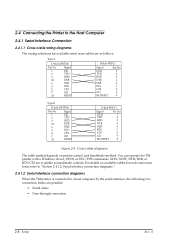
...cables for each connection form, refer to "Section 2.4.1.2, Serial interface connection diagrams." 2.4.1.2 Serial interface connection diagrams When the TM printer is connected to the Host Computer 2.4.1 Serial Interface Connection 2.4.1.1 Cross cable wiring diagrams The wiring selections for available serial ...cross cables are as handshake controls. A You can operate the TM printer with a Windows driver, OPOS, or ESC/POS commands. 2.4 Connecting the Printer to a host computer by the serial interface, the following two connection forms are possible: &#...
...cables for each connection form, refer to "Section 2.4.1.2, Serial interface connection diagrams." 2.4.1.2 Serial interface connection diagrams When the TM printer is connected to the Host Computer 2.4.1 Serial Interface Connection 2.4.1.1 Cross cable wiring diagrams The wiring selections for available serial ...cross cables are as handshake controls. A You can operate the TM printer with a Windows driver, OPOS, or ESC/POS commands. 2.4 Connecting the Printer to a host computer by the serial interface, the following two connection forms are possible: &#...


