

User Manual
Page 2
Label inside cutter section Label inside printer cover Caution label above for the drawer kick-out connector. ATTENTION: La téte thermique est chaude. VORSICHT: Der Thermalkopf ist heiß. Printer Parts and Labels Cutter cover Printer cover FOEEUPDTAPEERRRPOORWER Control panel POWER ERROR PAPER OUT FFEEEEDD Cover open button Caution Labels Labels CAUTION: Thermal head is hot.
Label inside cutter section Label inside printer cover Caution label above for the drawer kick-out connector. ATTENTION: La téte thermique est chaude. VORSICHT: Der Thermalkopf ist heiß. Printer Parts and Labels Cutter cover Printer cover FOEEUPDTAPEERRRPOORWER Control panel POWER ERROR PAPER OUT FFEEEEDD Cover open button Caution Labels Labels CAUTION: Thermal head is hot.

User Manual
Page 3
Printer Parts and Labels inside front cover Ordering Paper page ix Where to key areas of topics, see the Contents. Quick Reference This Quick Reference will direct you to order paper. Installing and Replacing Paper page 1-7 How to correct problems. i Solving Problems page 3-1 How to load or change the paper roll. Setting Up the Printer page 1-1 How to set up the printer. For a complete listing of this Operator's Manual.
Printer Parts and Labels inside front cover Ordering Paper page ix Where to key areas of topics, see the Contents. Quick Reference This Quick Reference will direct you to order paper. Installing and Replacing Paper page 1-7 How to correct problems. i Solving Problems page 3-1 How to load or change the paper roll. Setting Up the Printer page 1-1 How to set up the printer. For a complete listing of this Operator's Manual.
User Manual
Page 5
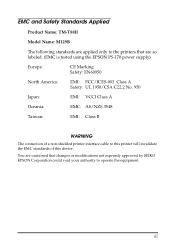
... to operate the equipment. EMC and Safety Standards Applied Product Name: TM-T88II Model Name: M129B The following standards are applied only to the printers that are cautioned that changes or modifications not expressly approved by SEIKO EPSON Corporation could void your authority to this printer will invalidate the EMC standards of this device. iii
... to operate the equipment. EMC and Safety Standards Applied Product Name: TM-T88II Model Name: M129B The following standards are applied only to the printers that are cautioned that changes or modifications not expressly approved by SEIKO EPSON Corporation could void your authority to this printer will invalidate the EMC standards of this device. iii

User Manual
Page 6
... apparatus complies with the instruction manual, may cause harmful interference to radio communications. Operation of the FCC Rules. CE Marking The printer conforms to the following Directives and Norms Directive 89/336/EEC EN 55022 Class B EN 55024 IEC 61000-4-2 IEC 61000-4-3 IEC 61000-4-4 IEC 61000-4-5 IEC 61000-4-6 IEC ...61000-4-11 Directive 90/384/EEC EN45501 FCC Compliance Statement For American Users This equipment has been tested and found to comply with the limits for ...
... apparatus complies with the instruction manual, may cause harmful interference to radio communications. Operation of the FCC Rules. CE Marking The printer conforms to the following Directives and Norms Directive 89/336/EEC EN 55022 Class B EN 55024 IEC 61000-4-2 IEC 61000-4-3 IEC 61000-4-4 IEC 61000-4-5 IEC 61000-4-6 IEC ...61000-4-11 Directive 90/384/EEC EN45501 FCC Compliance Statement For American Users This equipment has been tested and found to comply with the limits for ...

User Manual
Page 8
...tells how to avoid serious bodily injury. CAUTION: Observe cautions to avoid minor injury to yourself or damage to your printer. Note: Notes have important information and useful tips on using the printer. ❏ Chapter 3 contains troubleshooting information. vi Quick Reference Warnings, Cautions, and Notes WARNING: Follow warnings carefully...DIP switch and paper near end settings. About This Manual Setting Up and Using ❏ Chapter 1 contains information on unpacking the printer and setting it up. ❏ Chapter 2 contains information on the operation of your equipment.
...tells how to avoid serious bodily injury. CAUTION: Observe cautions to avoid minor injury to yourself or damage to your printer. Note: Notes have important information and useful tips on using the printer. ❏ Chapter 3 contains troubleshooting information. vi Quick Reference Warnings, Cautions, and Notes WARNING: Follow warnings carefully...DIP switch and paper near end settings. About This Manual Setting Up and Using ❏ Chapter 1 contains information on unpacking the printer and setting it up. ❏ Chapter 2 contains information on the operation of your equipment.
User Manual
Page 9
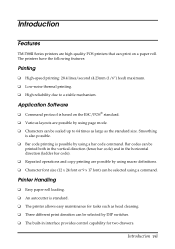
...thermal printing. ❏ High reliability due to 64 times as large as head cleaning. ❏ Three different print densities can be selected by DIP switches. ❏ The built-in interface provides control capability for tasks such as the standard size. Introduction Features TM-T88II Series printers are high-quality POS printers... x 17 font) can be selected using a command. Bar codes can be printed both in the vertical direction (fence bar code) and in the horizontal direction (ladder bar code). ❏ Repeated operations and copy printing are possible by using page mode. ❏...
...thermal printing. ❏ High reliability due to 64 times as large as head cleaning. ❏ Three different print densities can be selected by DIP switches. ❏ The built-in interface provides control capability for tasks such as the standard size. Introduction Features TM-T88II Series printers are high-quality POS printers... x 17 font) can be selected using a command. Bar codes can be printed both in the vertical direction (fence bar code) and in the horizontal direction (ladder bar code). ❏ Repeated operations and copy printing are possible by using page mode. ❏...

User Manual
Page 13
... Replacing the Paper Roll 1-7 Using the Power Switch Cover 1-10 Self Test 1-10 Running the self test 1-10 Adjustments and Settings 1-12 Chapter 2 Using the Printer Operating the Control Panel 2-1 Control Panel 2-1 Chapter 3 Troubleshooting Troubleshooting 3-1 General problems 3-1 Printing problems 3-1 Cleaning the print head 3-3 Paper handling problems 3-3 Auto cutter problems 3-5 Hexadecimal Dump...
... Replacing the Paper Roll 1-7 Using the Power Switch Cover 1-10 Self Test 1-10 Running the self test 1-10 Adjustments and Settings 1-12 Chapter 2 Using the Printer Operating the Control Panel 2-1 Control Panel 2-1 Chapter 3 Troubleshooting Troubleshooting 3-1 General problems 3-1 Printing problems 3-1 Cleaning the print head 3-3 Paper handling problems 3-3 Auto cutter problems 3-5 Hexadecimal Dump...

User Manual
Page 15
Setting Up the Printer 1-1 Printer FOEEUPDTAPEERRRPOORWER Paper roll Hexagonal Switch cover lock screws (only for the serial interface) See the note on page 1-3 for the standard specification printer. Chapter 1 Setting Up the Printer Unpacking The illustration below shows the items included for information about the hexagonal lock screws.
Setting Up the Printer 1-1 Printer FOEEUPDTAPEERRRPOORWER Paper roll Hexagonal Switch cover lock screws (only for the serial interface) See the note on page 1-3 for the standard specification printer. Chapter 1 Setting Up the Printer Unpacking The illustration below shows the items included for information about the hexagonal lock screws.
User Manual
Page 16
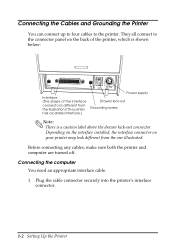
...installed, the interface connector on the back of the printer, which is shown below: FG Interface (The shape of the interface connector is a caution label above the drawer kick-out connector. Connecting the Cables and Grounding the Printer You can connect up to four cables to the ...connector panel on your printer may look different from the illustration if the printer has a parallel interface.) FG DK DC24V Power supply Drawer kick-out Grounding ...
...installed, the interface connector on the back of the printer, which is shown below: FG Interface (The shape of the interface connector is a caution label above the drawer kick-out connector. Connecting the Cables and Grounding the Printer You can connect up to four cables to the ...connector panel on your printer may look different from the illustration if the printer has a parallel interface.) FG DK DC24V Power supply Drawer kick-out Grounding ...

User Manual
Page 17
...type screws using a hex screwdriver (5 mm). Connecting the Drawer WARNING: Use a drawer that matches the printer specifications. Inch screw Millimeter screw If the printer has a parallel interface, squeeze the wire clips on the printer together until they lock in place on both sides of the connector. 3. If the... printer has a serial interface, tighten the screws on both sides of the cable to the computer. Using an improper drawer may damage the drawer as well as the printer. Setting Up the Printer 1-3 2. Attach the other end of the cable ...
...type screws using a hex screwdriver (5 mm). Connecting the Drawer WARNING: Use a drawer that matches the printer specifications. Inch screw Millimeter screw If the printer has a parallel interface, squeeze the wire clips on the printer together until they lock in place on both sides of the connector. 3. If the... printer has a serial interface, tighten the screws on both sides of the cable to the computer. Using an improper drawer may damage the drawer as well as the printer. Setting Up the Printer 1-3 2. Attach the other end of the cable ...

User Manual
Page 19
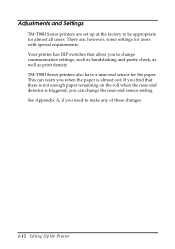
Make sure the wire is turned off. 2. Be sure the printer is AWG 18 or equivalent. 1. Connect the ground wire to ground your printer. Setting Up the Printer 1-5 Das Kabel der Schublade an die Schnappsteckerbuchse hinten am Drucker neben dem Netßzanschluß anschließen. Grounding the Printer You need a ground wire to the printer using one of the FG screws on the back of the printer, as shown. FG FG DK DC24V Connecting the Power Supply Use the optional EPSON PS-170 or equivalent power supply for your printer.
Make sure the wire is turned off. 2. Be sure the printer is AWG 18 or equivalent. 1. Connect the ground wire to ground your printer. Setting Up the Printer 1-5 Das Kabel der Schublade an die Schnappsteckerbuchse hinten am Drucker neben dem Netßzanschluß anschließen. Grounding the Printer You need a ground wire to the printer using one of the FG screws on the back of the printer, as shown. FG FG DK DC24V Connecting the Power Supply Use the optional EPSON PS-170 or equivalent power supply for your printer.

User Manual
Page 20
... may damage the power supply or the printer. Otherwise you may damage the power supply or the printer. 1. Note: To remove the DC cable connector, make sure the power supply's power cord is not plugged into an electrical outlet. Otherwise, you use the EPSON PS-170 power supply or equivalent. Check... the label on the power supply to make sure the power supply is unplugged; Plug in the power cord. then grasp the connector at the arrow and pull it straight out. 1-6 Setting Up the Printer Using an incorrect power...
... may damage the power supply or the printer. Otherwise you may damage the power supply or the printer. 1. Note: To remove the DC cable connector, make sure the power supply's power cord is not plugged into an electrical outlet. Otherwise, you use the EPSON PS-170 power supply or equivalent. Check... the label on the power supply to make sure the power supply is unplugged; Plug in the power cord. then grasp the connector at the arrow and pull it straight out. 1-6 Setting Up the Printer Using an incorrect power...

User Manual
Page 21
Do not use paper rolls that have the paper glued to use paper rolls that meet the specifications. Remove the used paper roll core, if there is not receiving data; Setting Up the Printer 1-7 Make sure the printer is one. otherwise, data may be lost. 2. Open the paper roll cover by pressing the cover-open the cover, see page 3-4 or 3-6 in Troubleshooting. FFEOEEEUPDDTAPEERRRPOORWER 3. Installing or Replacing the Paper Roll Note: Be sure to the core, because the printer cannot detect the paper end correctly. 1. If the cover-open button will not open button.
Do not use paper rolls that have the paper glued to use paper rolls that meet the specifications. Remove the used paper roll core, if there is not receiving data; Setting Up the Printer 1-7 Make sure the printer is one. otherwise, data may be lost. 2. Open the paper roll cover by pressing the cover-open the cover, see page 3-4 or 3-6 in Troubleshooting. FFEOEEEUPDDTAPEERRRPOORWER 3. Installing or Replacing the Paper Roll Note: Be sure to the core, because the printer cannot detect the paper end correctly. 1. If the cover-open button will not open button.

User Manual
Page 22
Be sure to note the correct direction that the paper comes off the roll. 1-8 Setting Up the Printer FOEEUPDTAPEERRRPOORWER 5. Insert the paper roll as shown. 4.
Be sure to note the correct direction that the paper comes off the roll. 1-8 Setting Up the Printer FOEEUPDTAPEERRRPOORWER 5. Insert the paper roll as shown. 4.

User Manual
Page 23
Tear off the paper as shown. FFEOEEEUPDDTAPEERRRPOORWER Setting Up the Printer 1-9 Pull out a small amount of paper, as shown. Then close the cover. 6. FOEEUPDTAPEERRRPOORWER 7.
Tear off the paper as shown. FFEOEEEUPDDTAPEERRRPOORWER Setting Up the Printer 1-9 Pull out a small amount of paper, as shown. Then close the cover. 6. FOEEUPDTAPEERRRPOORWER 7.

User Manual
Page 24
... is independent of any other equipment or software. Running the self test 1. If you know if your printer is turned off and the printer covers are closed properly. 1-10 Setting Up the Printer Make sure the printer is operating properly. Continued use this cover, install it as shown in the illustration below. This test...: If an accident occurs when the power switch cover is attached, unplug the power supply cord from the outlet immediately. It checks the control circuits, printer mechanisms, print quality, ROM version, and DIP switch settings.
... is independent of any other equipment or software. Running the self test 1. If you know if your printer is turned off and the printer covers are closed properly. 1-10 Setting Up the Printer Make sure the printer is operating properly. Continued use this cover, install it as shown in the illustration below. This test...: If an accident occurs when the power switch cover is attached, unplug the power supply cord from the outlet immediately. It checks the control circuits, printer mechanisms, print quality, ROM version, and DIP switch settings.

User Manual
Page 25
... the FEED button again to receive data as soon as it completes the self test. The self test prints the printer settings and then prints the following : *** completed *** The printer is ready to continue the self test. The self test automatically ends and cuts the paper after printing the following ..., cuts the paper, and pauses. (The PAPER OUT light blinks.) Self test printing. Please press the PAPER FEED button. 3. The printer prints a pattern using the switch on the printer using the built-in character set. 4. While holding down the FEED button, turn on the front of the...
... the FEED button again to receive data as soon as it completes the self test. The self test prints the printer settings and then prints the following : *** completed *** The printer is ready to continue the self test. The self test automatically ends and cuts the paper after printing the following ..., cuts the paper, and pauses. (The PAPER OUT light blinks.) Self test printing. Please press the PAPER FEED button. 3. The printer prints a pattern using the switch on the printer using the built-in character set. 4. While holding down the FEED button, turn on the front of the...
User Manual
Page 26
TM-T88II Series printers also have a near -end detector is almost out. There are set up at the factory to be appropriate for users with special requirements. This can ... handshaking and parity check, as well as print density. See Appendix A, if you to make any of these changes. 1-12 Setting Up the Printer Adjustments and Settings TM-T88II Series printers are , however, some settings for almost all users. If you find that allow you need to change the near-end sensor setting. Your...
TM-T88II Series printers also have a near -end detector is almost out. There are set up at the factory to be appropriate for users with special requirements. This can ... handshaking and parity check, as well as print density. See Appendix A, if you to make any of these changes. 1-12 Setting Up the Printer Adjustments and Settings TM-T88II Series printers are , however, some settings for almost all users. If you find that allow you need to change the near-end sensor setting. Your...

User Manual
Page 27
Control Panel POWER ERROR PAPER OUT FEED Button The button can also hold down the FEED button to advance paper one line. Using the Printer 2-1 Press the FEED button once to feed paper continuously. You can be disabled by the ESC c 5 command. Chapter 2 Using the Printer Operating the Control Panel You can control the basic paper feeding operations of the printer with the button on the control panel. The indicator lights help you monitor the printer's status.
Control Panel POWER ERROR PAPER OUT FEED Button The button can also hold down the FEED button to advance paper one line. Using the Printer 2-1 Press the FEED button once to feed paper continuously. You can be disabled by the ESC c 5 command. Chapter 2 Using the Printer Operating the Control Panel You can control the basic paper feeding operations of the printer with the button on the control panel. The indicator lights help you monitor the printer's status.

User Manual
Page 28
See Chapter 3 for information on what to do when this light comes on . PAPER OUT This light indicates the near end of the paper roll. When the light blinks, it indicates the self-test printing standby state or macro execution standby state when the macro execution command is on . Install a new paper roll, and the printer will continue printing. ERROR This indicates an error. Panel lights POWER The POWER light is on whenever the printer is used. 2-2 Using the Printer
See Chapter 3 for information on what to do when this light comes on . PAPER OUT This light indicates the near end of the paper roll. When the light blinks, it indicates the self-test printing standby state or macro execution standby state when the macro execution command is on . Install a new paper roll, and the printer will continue printing. ERROR This indicates an error. Panel lights POWER The POWER light is on whenever the printer is used. 2-2 Using the Printer


