

User Manual
Page 3
... standards are applied only to cause harmful interference, in the U.S. TM-T90 User's Manual 1 Neither is likely to the printers that changes or modifications not expressly approved by Seiko Epson Corporation. Neither Seiko Epson Corporation nor its affiliates shall be required to the use of Seiko Epson Corporation. Operation of this equipment in a commercial environment. While every...
... standards are applied only to cause harmful interference, in the U.S. TM-T90 User's Manual 1 Neither is likely to the printers that changes or modifications not expressly approved by Seiko Epson Corporation. Neither Seiko Epson Corporation nor its affiliates shall be required to the use of Seiko Epson Corporation. Operation of this equipment in a commercial environment. While every...
User Manual
Page 4
... before leaving it produces smoke, a strange odor, or unusual noise. Immediately unplug the equipment and contact your dealer or a SEIKO EPSON service center for advice. If water or other than those mentioned in locations subject to high humidity or dust levels. Doing so may..., unplug the power cord immediately, and then contact your dealer or a SEIKO EPSON service center for advice. Do not use the specified power source. Excessive humidity and dust may cause fire. 2 TM-T90 User's Manual Do not place heavy objects on a firm, stable, horizontal surface. Never stand...
... before leaving it produces smoke, a strange odor, or unusual noise. Immediately unplug the equipment and contact your dealer or a SEIKO EPSON service center for advice. If water or other than those mentioned in locations subject to high humidity or dust levels. Doing so may..., unplug the power cord immediately, and then contact your dealer or a SEIKO EPSON service center for advice. Do not use the specified power source. Excessive humidity and dust may cause fire. 2 TM-T90 User's Manual Do not place heavy objects on a firm, stable, horizontal surface. Never stand...
User Manual
Page 5
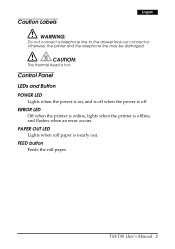
ERROR LED Off when the printer is online, lights when the printer is hot. CAUTION: The thermal head is offline, and flashes when an error occurs. Caution Labels English WARNING: Do not connect a telephone line to the drawer kick-out connector; otherwise, the printer and the telephone line may be damaged. TM-T90 User's Manual 3 Control Panel LEDs and Button POWER LED Lights when the power is on, and is off . PAPER OUT LED Lights when roll paper is off when the power is nearly out. FEED button Feeds the roll paper.
ERROR LED Off when the printer is online, lights when the printer is hot. CAUTION: The thermal head is offline, and flashes when an error occurs. Caution Labels English WARNING: Do not connect a telephone line to the drawer kick-out connector; otherwise, the printer and the telephone line may be damaged. TM-T90 User's Manual 3 Control Panel LEDs and Button POWER LED Lights when the power is on, and is off . PAPER OUT LED Lights when roll paper is off when the power is nearly out. FEED button Feeds the roll paper.
User Manual
Page 6
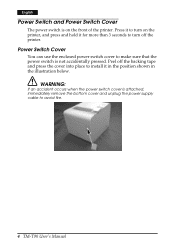
... switch cover is attached, immediately remove the bottom cover and unplug the power supply cable to make sure that the power switch is on the printer, and press and hold it for more than 3 seconds to turn off the backing tape and press the cover into place to install it to... turn on the front of the printer. Power Switch Cover You can use the enclosed power switch cover to avoid fire. 4 TM-T90 User's Manual Press it in the position shown in the illustration below.
... switch cover is attached, immediately remove the bottom cover and unplug the power supply cable to make sure that the power switch is on the printer, and press and hold it for more than 3 seconds to turn off the backing tape and press the cover into place to install it to... turn on the front of the printer. Power Switch Cover You can use the enclosed power switch cover to avoid fire. 4 TM-T90 User's Manual Press it in the position shown in the illustration below.
User Manual
Page 7
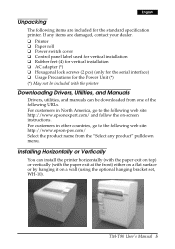
TM-T90 User's Manual 5 If any product" pulldown menu. For customers in other countries, go to the following web site: http://www.epson-pos.com/ Select the product name from one of the following URLs. For customers in North America, go to the following ...wall (using the optional hanging bracket set, WH-10). Installing Horizontally or Vertically You can be included with the printer Downloading Drivers, Utilities, and Manuals Drivers, utilities, and manuals can install the printer horizontally (with the paper exit on top) or vertically (with the paper exit at the front) either on a...
TM-T90 User's Manual 5 If any product" pulldown menu. For customers in other countries, go to the following web site: http://www.epson-pos.com/ Select the product name from one of the following URLs. For customers in North America, go to the following ...wall (using the optional hanging bracket set, WH-10). Installing Horizontally or Vertically You can be included with the printer Downloading Drivers, Utilities, and Manuals Drivers, utilities, and manuals can install the printer horizontally (with the paper exit on top) or vertically (with the paper exit at the front) either on a...

User Manual
Page 8
Close the paper roll cover; Note: To hang the printer on the wall, see the Wall Hanging Bracket Set Installation Manual provided with the guide, as shown in the illustrations below . 3. Insert a paper roll and pull out a small amount of paper, aligning the paper with the ...WH-10 for instructions. Open the paper roll cover, using the cover open lever. 2. then tear off the roll paper. 6 TM-T90 User's Manual English When you install the printer vertically, attach the rubber feet and control panel label as shown below . Installing the Paper Roll Note: Be sure to use paper...
Close the paper roll cover; Note: To hang the printer on the wall, see the Wall Hanging Bracket Set Installation Manual provided with the guide, as shown in the illustrations below . 3. Insert a paper roll and pull out a small amount of paper, aligning the paper with the ...WH-10 for instructions. Open the paper roll cover, using the cover open lever. 2. then tear off the roll paper. 6 TM-T90 User's Manual English When you install the printer vertically, attach the rubber feet and control panel label as shown below . Installing the Paper Roll Note: Be sure to use paper...

User Manual
Page 9
.... ❏ If the autocutter is jammed, turn it into one of the cover. Wait for the head to see the section below and push the TM-T90 User's Manual 7 Troubleshooting ERROR LED on . If the LED is a paper jam, remove the jammed paper and follow the instructions in the illustration below . ❏ ... in the Installing the Paper Roll section to close the cover completely by pushing down on the printer and remove the cutter cover. Close the cover or replace the paper if necessary. ❏ If the printer has been printing a lot, the head may be hot. Paper jam Turn off and then ...
.... ❏ If the autocutter is jammed, turn it into one of the cover. Wait for the head to see the section below and push the TM-T90 User's Manual 7 Troubleshooting ERROR LED on . If the LED is a paper jam, remove the jammed paper and follow the instructions in the illustration below . ❏ ... in the Installing the Paper Roll section to close the cover completely by pushing down on the printer and remove the cutter cover. Close the cover or replace the paper if necessary. ❏ If the printer has been printing a lot, the head may be hot. Paper jam Turn off and then ...
User Manual
Page 10
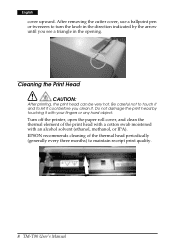
EPSON recommends cleaning of the print head with a cotton swab moistened with your fingers or any hard object. Turn off the printer, open the paper roll cover, and clean the thermal element of the thermal head periodically (generally every three months) to let it cool before you see a... triangle in the direction indicated by touching it and to maintain receipt print quality. . 8 TM-T90 User's Manual Do not ...
EPSON recommends cleaning of the print head with a cotton swab moistened with your fingers or any hard object. Turn off the printer, open the paper roll cover, and clean the thermal element of the thermal head periodically (generally every three months) to let it cool before you see a... triangle in the direction indicated by touching it and to maintain receipt print quality. . 8 TM-T90 User's Manual Do not ...
User Manual
Page 11
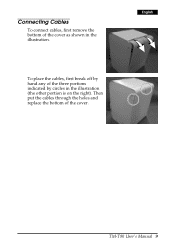
Then put the cables through the holes and replace the bottom of the three portions indicated by hand any of the cover. To place the cables, first break off by circles in the illustration. English TM-T90 User's Manual 9 Connecting Cables To connect cables, first remove the bottom of the cover as shown in the illustration (the other portion is on the right).
Then put the cables through the holes and replace the bottom of the three portions indicated by hand any of the cover. To place the cables, first break off by circles in the illustration. English TM-T90 User's Manual 9 Connecting Cables To connect cables, first remove the bottom of the cover as shown in the illustration (the other portion is on the right).
User Manual
Page 12
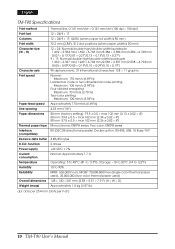
... to 90% Reliability MTBF: 360,000 hours, MCBF: 70,000,000 lines (single-color thermal paper used), 35,000,000 (two-color thermal paper used) Overall dimensions 148 × 140 × 201 mm {5.83 × 5.51 × 7.91"} (H × W × D) Weight (mass) Approximately 1.8 kg {3.97 lb} dpi: dots per 25.4 mm (dots per inch) 10 TM-T90 User's Manual
... to 90% Reliability MTBF: 360,000 hours, MCBF: 70,000,000 lines (single-color thermal paper used), 35,000,000 (two-color thermal paper used) Overall dimensions 148 × 140 × 201 mm {5.83 × 5.51 × 7.91"} (H × W × D) Weight (mass) Approximately 1.8 kg {3.97 lb} dpi: dots per 25.4 mm (dots per inch) 10 TM-T90 User's Manual


