User Manual
Page 4
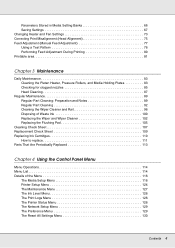
... Waste Ink 100 Replacing the Wiper and Wiper Cleaner 102 Replacing the Flushing Pad 105 Cleaning Check Sheet 107 Replacement Check Sheet 109 Replacing Ink Cartridges 110 How to replace 111 Parts That Are Periodically Replaced 113 Chapter 4 Using the Control Panel Menu Menu Operations 114 Menu List 114 Details of the Menu 118 The Media Setup Menu 118 Printer Setup Menu 124 The Maintenance Menu 127 The Ink Level Menu 128 The Print Logs Menu 128 The Printer Status Menu 128 The Network Setup Menu 129 The Preference Menu 129 The Reset All Settings Menu 130...
... Waste Ink 100 Replacing the Wiper and Wiper Cleaner 102 Replacing the Flushing Pad 105 Cleaning Check Sheet 107 Replacement Check Sheet 109 Replacing Ink Cartridges 110 How to replace 111 Parts That Are Periodically Replaced 113 Chapter 4 Using the Control Panel Menu Menu Operations 114 Menu List 114 Details of the Menu 118 The Media Setup Menu 118 Printer Setup Menu 124 The Maintenance Menu 127 The Ink Level Menu 128 The Print Logs Menu 128 The Printer Status Menu 128 The Network Setup Menu 129 The Preference Menu 129 The Reset All Settings Menu 130...
User Manual
Page 7
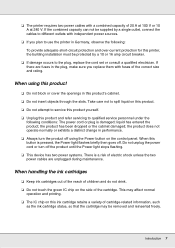
... cover the openings in the plug, make sure you plan to use the printer in performance. ❏ Always turn off . When using the Power button on this ink cartridge retains a variety of the cartridge. Introduction 7 Take care not to spill liquid on the side of cartridge-related information, such as the ink cartridge status, so that the cartridge may affect normal operation and printing. ❏ The IC chip on the control panel...
... cover the openings in the plug, make sure you plan to use the printer in performance. ❏ Always turn off . When using the Power button on this ink cartridge retains a variety of the cartridge. Introduction 7 Take care not to spill liquid on the side of cartridge-related information, such as the ink cartridge status, so that the cartridge may affect normal operation and printing. ❏ The IC chip on the control panel...

User Manual
Page 11
... cables. 19 LAN port Connects the LAN cable. 20 USB port Connects the USB cable. 21 Maintenance cover (right) Open this cover when performing regular maintenance. On/flashes : An error has occurred; Raise the lever to release the media prior to removal. 23 Alert lamp This lamp lights or flashes when an error occurs. the type of the printer, or removing jammed media. Off : No error. 24 Control panel See "Control panel" on the control panel's screen. Check the message on page 15. 25 Front cover Open when loading media, cleaning...
... cables. 19 LAN port Connects the LAN cable. 20 USB port Connects the USB cable. 21 Maintenance cover (right) Open this cover when performing regular maintenance. On/flashes : An error has occurred; Raise the lever to release the media prior to removal. 23 Alert lamp This lamp lights or flashes when an error occurs. the type of the printer, or removing jammed media. Off : No error. 24 Control panel See "Control panel" on the control panel's screen. Check the message on page 15. 25 Front cover Open when loading media, cleaning...

User Manual
Page 16
... options can be adjusted during printing. Introduction 16 See "The Media Setup Menu" on . Keep the u button pressed to feed the media. See "Menu Operations" on page 114. 6 y button (back button) Press this button displays the Heating & Drying menu, where you can also adjust Additional Dryer settings. 4 Display Displays the printer's status, menus, error messages, and so on page 118. See "Using the Control Panel Menu" on page 114. 9 OK button ❏ Pressing this button when a menu item is highlighted displays options for the selected...
... options can be adjusted during printing. Introduction 16 See "The Media Setup Menu" on . Keep the u button pressed to feed the media. See "Menu Operations" on page 114. 6 y button (back button) Press this button displays the Heating & Drying menu, where you can also adjust Additional Dryer settings. 4 Display Displays the printer's status, menus, error messages, and so on page 118. See "Using the Control Panel Menu" on page 114. 9 OK button ❏ Pressing this button when a menu item is highlighted displays options for the selected...

User Manual
Page 19
... Warning or error 1 2 1 Status indicators The ink cartridge status is low. The height of the indicator changes with a new cartridge. : The ink cartridge is inserted. You need to engage the lock. : An error occurred. Lower the lock lever to print. 4 Ink cartridge status Displays the approximate level of cleaning liquid remaining in the cartridge in the menus. replace with the level of ink remaining. : Ink is indicated as shown below. Check the message on page 128. 2 Ink color codes BK : Black Y : Yellow...
... Warning or error 1 2 1 Status indicators The ink cartridge status is low. The height of the indicator changes with a new cartridge. : The ink cartridge is inserted. You need to engage the lock. : An error occurred. Lower the lock lever to print. 4 Ink cartridge status Displays the approximate level of cleaning liquid remaining in the cartridge in the menus. replace with the level of ink remaining. : Ink is indicated as shown below. Check the message on page 128. 2 Ink color codes BK : Black Y : Yellow...
User Manual
Page 22
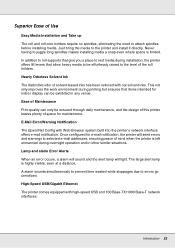
.... Once configured for e-mail notification, the printer will light. High-Speed USB/Gigabit Ethernet The printer comes equipped with Web Browser system built into the printer's network interface offers e-mail notification. Nearly Odorless Solvent Ink The distinctive odor of Use Easy Media Installation and Take up The roll and roll core holders require no spindles, eliminating the need to the level of Maintenance Print quality can...
.... Once configured for e-mail notification, the printer will light. High-Speed USB/Gigabit Ethernet The printer comes equipped with Web Browser system built into the printer's network interface offers e-mail notification. Nearly Odorless Solvent Ink The distinctive odor of Use Easy Media Installation and Take up The roll and roll core holders require no spindles, eliminating the need to the level of Maintenance Print quality can...

User Manual
Page 26
... using the printer. ❏ Because the green IC chip contains the cartridge's own information such as the remaining ink level, you move ink cartridges from a cold place to replace" on page 111. You may leak. ❏ Ink cartridges inserted in storage, keep the ink supply ports free of cartridges that have ink around the ink supply port, so be able to print properly. ❏ Do not drop or knock cartridges against hard...
... using the printer. ❏ Because the green IC chip contains the cartridge's own information such as the remaining ink level, you move ink cartridges from a cold place to replace" on page 111. You may leak. ❏ Ink cartridges inserted in storage, keep the ink supply ports free of cartridges that have ink around the ink supply port, so be able to print properly. ❏ Do not drop or knock cartridges against hard...

User Manual
Page 28
... software RIP documentation for printing. ❏ The latest applications can configure various network settings for a simple network connection. This is to be downloaded from your computer. Install the EPSON communications driver (EPSON SC-S30600 Series Comm Driver). A software RIP is not a printer driver. Introduction 28 Install as it allows you can be used to update firmware from a computer and copy the media settings bank created in question. See "Starting EPSON LFP Remote Panel 2" on page 29 and "Exiting EPSON...
... software RIP documentation for printing. ❏ The latest applications can configure various network settings for a simple network connection. This is to be downloaded from your computer. Install the EPSON communications driver (EPSON SC-S30600 Series Comm Driver). A software RIP is not a printer driver. Introduction 28 Install as it allows you can be used to update firmware from a computer and copy the media settings bank created in question. See "Starting EPSON LFP Remote Panel 2" on page 29 and "Exiting EPSON...

User Manual
Page 89
... from ink and ink cleaner. ❏ A maintenance kit (supplied with printer) Contains gloves, cleaning sticks, wiper, wiper cleaner, and flushing pad. check the printout to determine whether the problem has been resolved. See "Checking for ink stains that you paused the printer in Step 1, printing will resume when head cleaning is used. Regular Maintenance The printer requires regular part cleaning and part replacement to help schedule maintenance. Maintenance 89 Print the check sheet to maintain print quality...
... from ink and ink cleaner. ❏ A maintenance kit (supplied with printer) Contains gloves, cleaning sticks, wiper, wiper cleaner, and flushing pad. check the printout to determine whether the problem has been resolved. See "Checking for ink stains that you paused the printer in Step 1, printing will resume when head cleaning is used. Regular Maintenance The printer requires regular part cleaning and part replacement to help schedule maintenance. Maintenance 89 Print the check sheet to maintain print quality...

User Manual
Page 90
... any static electricity. Failure to observe this precaution could damage the print head. ❏ Do not get alcohol or water on Cleaning ❏ Remove the media from the printer before starting work to discharge any parts that can make stains even harder to prevent the print head drying out. Using Ink Cleaner To clean ink stains that do not require cleaning. ❏ A clean room wipe (not included) A lint-free...
... any static electricity. Failure to observe this precaution could damage the print head. ❏ Do not get alcohol or water on Cleaning ❏ Remove the media from the printer before starting work to discharge any parts that can make stains even harder to prevent the print head drying out. Using Ink Cleaner To clean ink stains that do not require cleaning. ❏ A clean room wipe (not included) A lint-free...

User Manual
Page 115
... Media Setup Menu" on whether RIP Settings or a media setting bank is selected. The options available for RIP settings and media setting banks 1 to 30 (media setting bank number) Customize Settings Current Settings Change settings for currently selected media. Auto(Uni-D), Auto(Bi-D), Manual(Uni-D), Manual(Bi-D) Roll Type Printable Side Out, Printable Side In Tension Measurement Periodically, Every Page, Off Media Tension 0 to 40 1 to 30 (media setting bank) Setting Name Up to 22 half-size characters Feed Adjustment Auto, Manual Platen Gap 1.5, 2.0, 2.5 Head Alignment Auto...
... Media Setup Menu" on whether RIP Settings or a media setting bank is selected. The options available for RIP settings and media setting banks 1 to 30 (media setting bank number) Customize Settings Current Settings Change settings for currently selected media. Auto(Uni-D), Auto(Bi-D), Manual(Uni-D), Manual(Bi-D) Roll Type Printable Side Out, Printable Side In Tension Measurement Periodically, Every Page, Off Media Tension 0 to 40 1 to 30 (media setting bank) Setting Name Up to 22 half-size characters Feed Adjustment Auto, Manual Platen Gap 1.5, 2.0, 2.5 Head Alignment Auto...

User Manual
Page 117
Head Maintenance Waste Ink Counter Parameter Print Execute (Light), Execute (Medium), Execute (Heavy) Execute (Light), Execute (Medium), Execute (Heavy) C1/M1 Y1/BK1 BK2/Y2 M2/C2 All Nozzles Move Head - Printer Status See "The Printer Status Menu" on page 128. Firmware Version IP Address Setting Auto Panel Bonjour Print Status Sheet Restore Settings Print XXXXXXm2 (XXXXXX ft2) Print Not Started, Disabled, Enabled Last_Uploaded:, (Not Uploaded), MM/DD/YY HH:MM GMT XXXXXXX,X_XX,XXXX IP: 000.000...
Head Maintenance Waste Ink Counter Parameter Print Execute (Light), Execute (Medium), Execute (Heavy) Execute (Light), Execute (Medium), Execute (Heavy) C1/M1 Y1/BK1 BK2/Y2 M2/C2 All Nozzles Move Head - Printer Status See "The Printer Status Menu" on page 128. Firmware Version IP Address Setting Auto Panel Bonjour Print Status Sheet Restore Settings Print XXXXXXm2 (XXXXXX ft2) Print Not Started, Disabled, Enabled Last_Uploaded:, (Not Uploaded), MM/DD/YY HH:MM GMT XXXXXXX,X_XX,XXXX IP: 000.000...

User Manual
Page 126
... another option for another operation involving printer hardware is performed. Choose the frequency with which the performs auto head cleaning: never (Off) or once every 1 to 10 pages. This option is used to choose the interval before the specified number of hours. To reactivate the control panel display, press any button in the Printer Setup menu to their default settings. The control panel display will however turn off automatically. Select 1 to...
... another option for another operation involving printer hardware is performed. Choose the frequency with which the performs auto head cleaning: never (Off) or once every 1 to 10 pages. This option is used to choose the interval before the specified number of hours. To reactivate the control panel display, press any button in the Printer Setup menu to their default settings. The control panel display will however turn off automatically. Select 1 to...

User Manual
Page 131
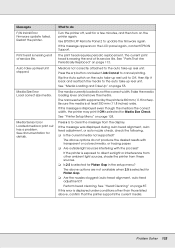
... select Job Cancel. See the Setup Guide and the Heavy Media Roll System Setup Guide. Problem Solver 131 Then restart printer. Clogged nozzles detected. Check that the installed software RIP is compatible with the heavy roll auto take -up Reel Unit. Chapter 5 Problem Solver When a Message is Displayed If one of Media Feeding Unit and Auto Take-up reel units, turn the printer off and install the correct equipment. Ready a new ink cartridge. See "Head Cleaning" on page 25. ❏ Remove and...
... select Job Cancel. See the Setup Guide and the Heavy Media Roll System Setup Guide. Problem Solver 131 Then restart printer. Clogged nozzles detected. Check that the installed software RIP is compatible with the heavy roll auto take -up Reel Unit. Chapter 5 Problem Solver When a Message is Displayed If one of Media Feeding Unit and Auto Take-up reel units, turn the printer off and install the correct equipment. Ready a new ink cartridge. See "Head Cleaning" on page 25. ❏ Remove and...
User Manual
Page 132
... Media Size Check. See "Printer Setup Menu" on page 55. If the message was displayed during auto head alignment, auto feed adjustment, or auto nozzle check, check the following. ❏ Is the current media not supported? Print head is selected for a few minutes, and then turn on page 113. Auto Take-up reel unit to Off, then flip it back and reattach the media to update the firmware again. Media Size Error Load correct size media. Use EPSON LFP Remote Panel 2 to the auto take-up reel unit. Raise the media loading...
... Media Size Check. See "Printer Setup Menu" on page 55. If the message was displayed during auto head alignment, auto feed adjustment, or auto nozzle check, check the following. ❏ Is the current media not supported? Print head is selected for a few minutes, and then turn on page 113. Auto Take-up reel unit to Off, then flip it back and reattach the media to update the firmware again. Media Size Error Load correct size media. Use EPSON LFP Remote Panel 2 to the auto take-up reel unit. Raise the media loading...

User Manual
Page 133
... power cable is replaced. A call for assistance. Carriage error Media feed error Circuit error Ink system error Component has reached end of error. If the same call for service code is displayed on the LCD panel, contact EPSON Support for service has occurred, the printer automatically stops printing. Tell them the maintenance request code. Call-for service is "XXXX". If this doesn't work, note the code and call occurs if you continue to do A part used in the printer...
... power cable is replaced. A call for assistance. Carriage error Media feed error Circuit error Ink system error Component has reached end of error. If the same call for service code is displayed on the LCD panel, contact EPSON Support for service has occurred, the printer automatically stops printing. Tell them the maintenance request code. Call-for service is "XXXX". If this doesn't work, note the code and call occurs if you continue to do A part used in the printer...

User Manual
Page 134
... it being used correctly? Make sure your computer's USB port. o Is the interface cable connected directly to the printer. Connect the printer and the computer directly with the spare cable. Ask the USB hub manufacturer about USB hub operation. See "Specifications Table" on . o When using , the operation of the computer and the printer. Troubleshooting You cannot print (because the printer does not work) The printer does not turn on page 147. o Is there any problem with the...
... it being used correctly? Make sure your computer's USB port. o Is the interface cable connected directly to the printer. Connect the printer and the computer directly with the spare cable. Ask the USB hub manufacturer about USB hub operation. See "Specifications Table" on . o When using , the operation of the computer and the printer. Troubleshooting You cannot print (because the printer does not work) The printer does not turn on page 147. o Is there any problem with the...

User Manual
Page 135
... messages on page 131. o Are the network settings correct? o Confirm the printer operation. Wait for a long time. Problem Solver 135 o Connect the printer directly to the computer using the printer" on page 85. The printer has an error. See "Control panel" on the network environment. Test Pattern Does Not Print Correctly o Perform head cleaning. If you cannot print via USB, there are some problems on page 15 and "When a Message is printing, but nothing prints The print head moves, but nothing prints. The printer adjusts...
... messages on page 131. o Are the network settings correct? o Confirm the printer operation. Wait for a long time. Problem Solver 135 o Connect the printer directly to the computer using the printer" on page 85. The printer has an error. See "Control panel" on the network environment. Test Pattern Does Not Print Correctly o Perform head cleaning. If you cannot print via USB, there are some problems on page 15 and "When a Message is printing, but nothing prints The print head moves, but nothing prints. The printer adjusts...

User Manual
Page 149
... help using any other " indicates products except for solutions to common problems. You can download drivers, firmware, and documentation, get FAQs and troubleshooting advice, or e-mail Epson with your product for inkjet, SPC, Page, and SIDM. Contacting Epson Support Epson provides technical support and information on your printer serial number and proof of purchase. Days and hours of professional printing products through Friday. Or you can purchase genuine EPSON ink cartridges, paper...
... help using any other " indicates products except for solutions to common problems. You can download drivers, firmware, and documentation, get FAQs and troubleshooting advice, or e-mail Epson with your product for inkjet, SPC, Page, and SIDM. Contacting Epson Support Epson provides technical support and information on your printer serial number and proof of purchase. Days and hours of professional printing products through Friday. Or you can purchase genuine EPSON ink cartridges, paper...

User Manual
Page 154
...use in the operation of nuclear facilities, aircraft navigation, communication systems, or air traffic control machines in strict compliance at all damages (other than as part of the name of products derived from the Original Code or to endorse or promote products derived from the Original Code other trademarks, service...INTERFERENCE WITH YOUR ENJOYMENT OF THE COVERED CODE, THAT THE FUNCTIONS CONTAINED IN THE COVERED CODE WILL MEET YOUR REQUIREMENTS, THAT THE OPERATION OF THE COVERED CODE WILL BE UNINTERRUPTED OR ERROR-FREE, OR THAT DEFECTS IN THE COVERED CODE WILL BE CORRECTED. TO THE ...
...use in the operation of nuclear facilities, aircraft navigation, communication systems, or air traffic control machines in strict compliance at all damages (other than as part of the name of products derived from the Original Code or to endorse or promote products derived from the Original Code other trademarks, service...INTERFERENCE WITH YOUR ENJOYMENT OF THE COVERED CODE, THAT THE FUNCTIONS CONTAINED IN THE COVERED CODE WILL MEET YOUR REQUIREMENTS, THAT THE OPERATION OF THE COVERED CODE WILL BE UNINTERRUPTED OR ERROR-FREE, OR THAT DEFECTS IN THE COVERED CODE WILL BE CORRECTED. TO THE ...


