
User Manual
Page 4
... 10 Status light 10 Network connector 10 About the Software 11 How To Overview 12 Selecting a Printing Method 13 Printing from Windows 13 Printing from OS X 13 Features of the Printing Methods 13 Installing Components on Your Computer 14 About Installing Components on Your Computer 14 Windows 8.x/7/Vista/Server 2012/Server 2008 14 Windows XP 15 Windows Server 2003 17 OS X 18 Setting Up the Network Interface 18 Connecting the Network...
... 10 Status light 10 Network connector 10 About the Software 11 How To Overview 12 Selecting a Printing Method 13 Printing from Windows 13 Printing from OS X 13 Features of the Printing Methods 13 Installing Components on Your Computer 14 About Installing Components on Your Computer 14 Windows 8.x/7/Vista/Server 2012/Server 2008 14 Windows XP 15 Windows Server 2003 17 OS X 18 Setting Up the Network Interface 18 Connecting the Network...
User Manual
Page 8
... network interface, install the configuration software, and modify network settings of your product, to quickly and easily configure the network interface to work only with your printer and computers. Introduction About Your Printer Your printer has a built-in this manual, automatically selects the correct standard when it automatically selects appropriate network protocols. Because the network interface supports multiple protocols and automatically detects protocols on your network using the network interface on a network. Use the Software Disc or downloaded software...
... network interface, install the configuration software, and modify network settings of your product, to quickly and easily configure the network interface to work only with your printer and computers. Introduction About Your Printer Your printer has a built-in this manual, automatically selects the correct standard when it automatically selects appropriate network protocols. Because the network interface supports multiple protocols and automatically detects protocols on your network using the network interface on a network. Use the Software Disc or downloaded software...
User Manual
Page 12
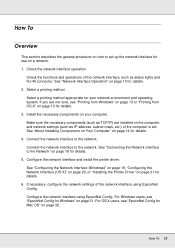
... network interface for use on page 32. Select a printing method. Connect the network interface to the network. For OS X users, see "EpsonNet Config for your computer. If you are installed on page 10 for details. 3. See "Network Interface Operation" on the computer, and network settings (such as status lights and RJ-45 connector. See "Configuring the Network Interface (Windows)" on page 19, "Configuring the Network Interface (OS X)" on page 20, or "Installing the Printer Driver...
... network interface for use on page 32. Select a printing method. Connect the network interface to the network. For OS X users, see "EpsonNet Config for your computer. If you are installed on page 10 for details. 3. See "Network Interface Operation" on the computer, and network settings (such as status lights and RJ-45 connector. See "Configuring the Network Interface (Windows)" on page 19, "Configuring the Network Interface (OS X)" on page 20, or "Installing the Printer Driver...
User Manual
Page 19
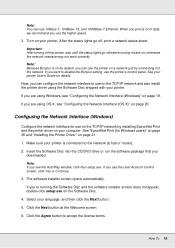
... printer's control panel. Make sure your printer User's Guide for use the higher speed. 3. If you use on page 19. The software installer screen opens automatically. Turn on page 21. 1. See your printer is on by default, you can configure the network interface to the network (a hub or router). 2. When you print a lot of data, we recommend you see the AutoPlay window, click Run setup.exe. If you downloaded. See "EpsonNet Print (for Windows users)" on page 36 and "Installing the Printer Driver...
... printer's control panel. Make sure your printer User's Guide for use the higher speed. 3. If you use on page 19. The software installer screen opens automatically. Turn on page 21. 1. See your printer is on by default, you can configure the network interface to the network (a hub or router). 2. When you print a lot of data, we recommend you see the AutoPlay window, click Run setup.exe. If you downloaded. See "EpsonNet Print (for Windows users)" on page 36 and "Installing the Printer Driver...
User Manual
Page 21
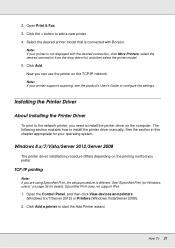
Open Print & Fax. 3. Note: If your printer supports scanning, see the product's User's Guide to start the Add Printer wizard. See "EpsonNet Print (for Windows users)" on the TCP/IP network. How To 21 Windows 8.x/7/Vista/Server 2012/Server 2008 The printer driver installation procedure differs depending on the printing method you need to the network printer, you prefer. TCP/IP printing Note: If you can use the printer on page 36 for your printer is not displayed with Bonjour...
Open Print & Fax. 3. Note: If your printer supports scanning, see the product's User's Guide to start the Add Printer wizard. See "EpsonNet Print (for Windows users)" on the TCP/IP network. How To 21 Windows 8.x/7/Vista/Server 2012/Server 2008 The printer driver installation procedure differs depending on the printing method you need to the network printer, you prefer. TCP/IP printing Note: If you can use the printer on page 36 for your printer is not displayed with Bonjour...
User Manual
Page 23
... downloaded. 2. Close the software installer screen. 3. O Software package: Navigate to install the printer driver. How To 23 Click Browse. 5. Click OK in the Install From Disk dialog box. 6. 6. Select the Standard radio button and then select EPSON Network Printer. Click Next. 7. Installing the printer driver 1. If an error occurs, the following : O CD/DVD: Select the CD/DVD drive for the drive, and and navigate to select the Replace existing driver radio button...
... downloaded. 2. Close the software installer screen. 3. O Software package: Navigate to install the printer driver. How To 23 Click Browse. 5. Click OK in the Install From Disk dialog box. 6. 6. Select the Standard radio button and then select EPSON Network Printer. Click Next. 7. Installing the printer driver 1. If an error occurs, the following : O CD/DVD: Select the CD/DVD drive for the drive, and and navigate to select the Replace existing driver radio button...

User Manual
Page 26
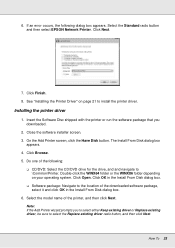
... Install From Disk dialog box. O Software package: Navigate to install the printer driver. Note: If the Add Printer wizard prompts you downloaded. 2. If an error occurs, the following : O CD/DVD: Select the CD/DVD drive for the drive, and and navigate to select the Replace existing driver radio button, and then click Next. Installing the printer driver 1. On the Add Printer screen, click the Have Disk button. See "Installing the printer driver...
... Install From Disk dialog box. O Software package: Navigate to install the printer driver. Note: If the Add Printer wizard prompts you downloaded. 2. If an error occurs, the following : O CD/DVD: Select the CD/DVD drive for the drive, and and navigate to select the Replace existing driver radio button, and then click Next. Installing the printer driver 1. On the Add Printer screen, click the Have Disk button. See "Installing the printer driver...
User Manual
Page 29
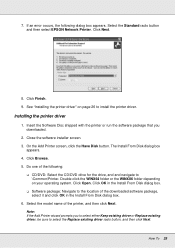
... the Add Printer wizard prompts you downloaded. 2. On the Add Printer screen, click the Have Disk button. How To 29 Click Open. Click OK in the Install From Disk dialog box. 6. Installing the printer driver 1. Select the Standard radio button and then select EPSON Network Printer. Double-click the WINX64 folder or the WINX86 folder depending on page 26 to the location of the downloaded software package, select...
... the Add Printer wizard prompts you downloaded. 2. On the Add Printer screen, click the Have Disk button. How To 29 Click Open. Click OK in the Install From Disk dialog box. 6. Installing the printer driver 1. Select the Standard radio button and then select EPSON Network Printer. Double-click the WINX64 folder or the WINX86 folder depending on page 26 to the location of the downloaded software package, select...
User Manual
Page 30
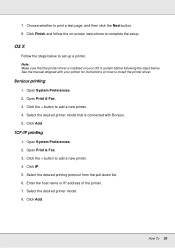
... printer model that the printer driver is connected with your OS X system before following the steps below to print a test page, and then click the Next button. 8. Click the + button to add a new printer. 4. Click Add. Click Finish and follow the on how to complete the setup. Bonjour printing 1. Open System Preferences. 2. Open Print & Fax. 3. TCP/IP printing 1. Click the + button to add a new printer. 4. Enter the host name or IP address...
... printer model that the printer driver is connected with your OS X system before following the steps below to print a test page, and then click the Next button. 8. Click the + button to add a new printer. 4. Click Add. Click Finish and follow the on how to complete the setup. Bonjour printing 1. Open System Preferences. 2. Open Print & Fax. 3. TCP/IP printing 1. Click the + button to add a new printer. 4. Enter the host name or IP address...
User Manual
Page 40
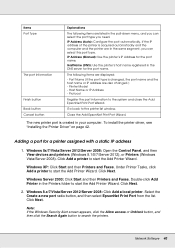
... Allow access or Unblock button, and then click the Search Again button to the system and close the Add EpsonNet Print Port Wizard. The new printer port is changed, the port name and the host name or IP address are also changed.) - Windows 8x/7/Vista/Server 2012/Server 2008: Open the Control Panel, and then View devices and printers (Windows 8.1/8/7/Server 2012), or Printers (Windows Vista/Server 2008). Double-click Add Printer in your computer. Network Software 40...
... Allow access or Unblock button, and then click the Search Again button to the system and close the Add EpsonNet Print Port Wizard. The new printer port is changed, the port name and the host name or IP address are also changed.) - Windows 8x/7/Vista/Server 2012/Server 2008: Open the Control Panel, and then View devices and printers (Windows 8.1/8/7/Server 2012), or Printers (Windows Vista/Server 2008). Double-click Add Printer in your computer. Network Software 40...

User Manual
Page 43
... Configure Port button. To configure the printer port, see "Configuring the Printer Port" on -screen instructions to -peer printing. Click OK. 6. Select the model name of the printer, and then click Next. Configuring the Printer Port Follow the steps below to select the Replace existing driver radio button. Windows XP/Server 2003: Click Start and then Printers and Faxes. 2. The printer is now ready for your selection. 1. Click OK in the Install From Disk dialog box. 7. Network Software...
... Configure Port button. To configure the printer port, see "Configuring the Printer Port" on -screen instructions to -peer printing. Click OK. 6. Select the model name of the printer, and then click Next. Configuring the Printer Port Follow the steps below to select the Replace existing driver radio button. Windows XP/Server 2003: Click Start and then Printers and Faxes. 2. The printer is now ready for your selection. 1. Click OK in the Install From Disk dialog box. 7. Network Software...

User Manual
Page 46
... Model Name and IP Address do Set a valid IP address. To do this, select Options from the View menu. What to start configuring the network interface, be used because no network is not set the IP address for the computer. What to do Set the IP address for the network interface using EpsonNet Config for Windows or Mac OS, or the printer's control panel. To print a network status sheet, see the printer's User Guide. What to do Install the...
... Model Name and IP Address do Set a valid IP address. To do this, select Options from the View menu. What to start configuring the network interface, be used because no network is not set the IP address for the computer. What to do Set the IP address for the network interface using EpsonNet Config for Windows or Mac OS, or the printer's control panel. To print a network status sheet, see the printer's User Guide. What to do Install the...

Users Guide
Page 4
... on Loading Media 35 Loading Media 36 Make settings for Loaded Media 36 Using the Auto Take-up Reel Unit (An Optional Item for the SC-F6400/SC-F6430/SC-F6440/ SC-F6460 37 Important Points for Correct Take-up 38 Loading into the Auto Take-up Reel Unit. . . . . . 38 Printing 41 Removing Media 41 Cutting Media 42 Removing the Take-up Roll 42 Removing Media 43 Optimizing Media Settings (Print Head Alignment and Media Feed Adjustment 44 Print Head Alignment 44 Media Feed Adjustment 45 Adjusting...
... on Loading Media 35 Loading Media 36 Make settings for Loaded Media 36 Using the Auto Take-up Reel Unit (An Optional Item for the SC-F6400/SC-F6430/SC-F6440/ SC-F6460 37 Important Points for Correct Take-up 38 Loading into the Auto Take-up Reel Unit. . . . . . 38 Printing 41 Removing Media 41 Cutting Media 42 Removing the Take-up Roll 42 Removing Media 43 Optimizing Media Settings (Print Head Alignment and Media Feed Adjustment 44 Print Head Alignment 44 Media Feed Adjustment 45 Adjusting...

Users Guide
Page 18
... settings menu where you want to check details for the media, Time until printing is currently selected. Time until media replacement displays the estimated time. SC-F6400 Series/SC-F6400H Series User's Guide Introduction B Status display area Displays the printer's status and warning messages. You can change to On, the remaining amount of the image being printed and the file name. Displays a progress bar showing the printing progress. When a print job is the Pause (Suspend) button. Pressing the display area while printing displays...
... settings menu where you want to check details for the media, Time until printing is currently selected. Time until media replacement displays the estimated time. SC-F6400 Series/SC-F6400H Series User's Guide Introduction B Status display area Displays the printer's status and warning messages. You can change to On, the remaining amount of the image being printed and the file name. Displays a progress bar showing the printing progress. When a print job is the Pause (Suspend) button. Pressing the display area while printing displays...
Users Guide
Page 47
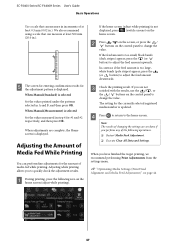
... (20.0 in.). If the home screen (adjust while printing) is displayed. In contrast, if the feed amount is too small, black bands (dark stripes) appear; press the (or button) to adjust the feed amount upwards. The setting for the adjustment pattern is not displayed, press (switch screens) on page 44 47 U "Optimizing Media Settings (Print Head Alignment and Media Feed Adjustment)" on the home screen. SC-F6400 Series/SC-F6400H Series User's Guide Basic Operations Use a scale that can measure at...
... (20.0 in.). If the home screen (adjust while printing) is displayed. In contrast, if the feed amount is too small, black bands (dark stripes) appear; press the (or button) to adjust the feed amount upwards. The setting for the adjustment pattern is not displayed, press (switch screens) on page 44 47 U "Optimizing Media Settings (Print Head Alignment and Media Feed Adjustment)" on the home screen. SC-F6400 Series/SC-F6400H Series User's Guide Basic Operations Use a scale that can measure at...

Users Guide
Page 75
... removed or replaced. When Media Remaining Information is set Remaining Amount Management in the preceding or following information is printed. Prints information, such as the remaining amount of media used 75 The following printout. To print the media remaining information, set to On, the remaining amount is printed on the printed side of the cut position. SC-F6400 Series/SC-F6400H Series User's Guide Control Panel Menu Item Parameter Nozzle Check between Pages On Execution Timing Print...
... removed or replaced. When Media Remaining Information is set Remaining Amount Management in the preceding or following information is printed. Prints information, such as the remaining amount of media used 75 The following printout. To print the media remaining information, set to On, the remaining amount is printed on the printed side of the cut position. SC-F6400 Series/SC-F6400H Series User's Guide Control Panel Menu Item Parameter Nozzle Check between Pages On Execution Timing Print...

Users Guide
Page 82
...are replacing the waste ink bottle before the message indicating that it at any missing colors. Perform Auto Cleaning first. Maintenance Menu Item Print Head Nozzle Check Head Cleaning Auto Cleaning Cleaning(Light) Cleaning(Heavy) Cleaning the Maintenance Parts Print Head Capping Station/ Wiper Replace Waste Ink Bottle Replace Auto cutter blade Explanation Print a pattern, and then check the status of wear and the model number for each consumable item. U "Head Cleaning" on page 61 Start replacing the auto cutter blade. U "Print Head Nozzle Check" on the control panel's screen...
...are replacing the waste ink bottle before the message indicating that it at any missing colors. Perform Auto Cleaning first. Maintenance Menu Item Print Head Nozzle Check Head Cleaning Auto Cleaning Cleaning(Light) Cleaning(Heavy) Cleaning the Maintenance Parts Print Head Capping Station/ Wiper Replace Waste Ink Bottle Replace Auto cutter blade Explanation Print a pattern, and then check the status of wear and the model number for each consumable item. U "Head Cleaning" on page 61 Start replacing the auto cutter blade. U "Print Head Nozzle Check" on the control panel's screen...
Users Guide
Page 85
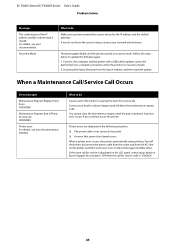
... same call for the IP address and the default gateway. Tell them the maintenance request code. SC-F6400 Series/SC-F6400H Series User's Guide Problem Solver Messages The combination of its service life. Connect the computer and the printer with a USB cable (updates cannot be cleared occurs When a printer error occurs, the printer automatically stops printing. Recovery Mode What to update the firmware again. 1. For details, see your dealer or Epson Support and tell them the call...
... same call for the IP address and the default gateway. Tell them the maintenance request code. SC-F6400 Series/SC-F6400H Series User's Guide Problem Solver Messages The combination of its service life. Connect the computer and the printer with a USB cable (updates cannot be cleared occurs When a printer error occurs, the printer automatically stops printing. Recovery Mode What to update the firmware again. 1. For details, see your dealer or Epson Support and tell them the call...

Users Guide
Page 86
... the network settings correct? o View the message displayed in properly? Make sure the power cable is it being used correctly? o Is the cable plugged in the control panel. U "System Requirements" on page 101 o When using a USB hub, is securely plugged into the printer. However, we recommend that the interface cable is recognized correctly on page 64 Check the next section if the nozzle check pattern is not broken nor bent. Because a nozzle check pattern can be printed without connecting...
... the network settings correct? o View the message displayed in properly? Make sure the power cable is it being used correctly? o Is the cable plugged in the control panel. U "System Requirements" on page 101 o When using a USB hub, is securely plugged into the printer. However, we recommend that the interface cable is recognized correctly on page 64 Check the next section if the nozzle check pattern is not broken nor bent. Because a nozzle check pattern can be printed without connecting...
Support Guide
Page 4
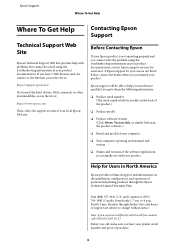
...; Product serial number (The serial number label is usually on the installation, configuration, and operation of professional printing products through Friday. Contacting Epson Support Before Contacting Epson If your Epson product is not listed below, contact the dealer where you purchased your product documentation, contact Epson support services for Users in your printer serial number and proof of your product Help for assistance. Epson support will be able to the Internet, access the...
...; Product serial number (The serial number label is usually on the installation, configuration, and operation of professional printing products through Friday. Contacting Epson Support Before Contacting Epson If your Epson product is not listed below, contact the dealer where you purchased your product documentation, contact Epson support services for Users in your printer serial number and proof of your product Help for assistance. Epson support will be able to the Internet, access the...


