
User Manual
Page 4
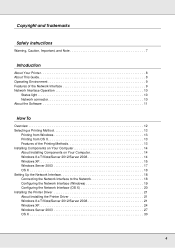
... 10 Status light 10 Network connector 10 About the Software 11 How To Overview 12 Selecting a Printing Method 13 Printing from Windows 13 Printing from OS X 13 Features of the Printing Methods 13 Installing Components on Your Computer 14 About Installing Components on Your Computer 14 Windows 8.x/7/Vista/Server 2012/Server 2008 14 Windows XP 15 Windows Server 2003 17 OS X 18 Setting Up the Network Interface 18 Connecting the Network...
... 10 Status light 10 Network connector 10 About the Software 11 How To Overview 12 Selecting a Printing Method 13 Printing from Windows 13 Printing from OS X 13 Features of the Printing Methods 13 Installing Components on Your Computer 14 About Installing Components on Your Computer 14 Windows 8.x/7/Vista/Server 2012/Server 2008 14 Windows XP 15 Windows Server 2003 17 OS X 18 Setting Up the Network Interface 18 Connecting the Network...
User Manual
Page 8
...: The EpsonNet Config utility configures the network interface to work only with your printer and computers. The built-in Ethernet interface, which is written for network administrators, and many of your product, to quickly and easily configure the network interface to configure the network interface for use those protocols. In addition, it connects to set up the network interface, install the configuration software, and modify network settings of the steps...
...: The EpsonNet Config utility configures the network interface to work only with your printer and computers. The built-in Ethernet interface, which is written for network administrators, and many of your product, to quickly and easily configure the network interface to configure the network interface for use those protocols. In addition, it connects to set up the network interface, install the configuration software, and modify network settings of the steps...
User Manual
Page 12
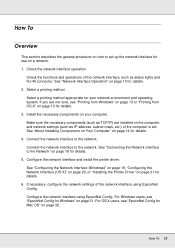
... set up the network interface for use on page 18 for details. 2. Check the network interface operation. See "Network Interface Operation" on page 21 for details. 6. For OS X users, see "Printing from Windows" on page 13 or "Printing from OS X" on page 32. If you are installed on page 31. Connect the network interface to the network. See "Configuring the Network Interface (Windows)" on page 19, "Configuring the Network Interface (OS X)" on page 20, or "Installing the Printer Driver...
... set up the network interface for use on page 18 for details. 2. Check the network interface operation. See "Network Interface Operation" on page 21 for details. 6. For OS X users, see "Printing from Windows" on page 13 or "Printing from OS X" on page 32. If you are installed on page 31. Connect the network interface to the network. See "Configuring the Network Interface (Windows)" on page 19, "Configuring the Network Interface (OS X)" on page 20, or "Installing the Printer Driver...
User Manual
Page 19
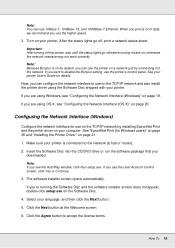
..., double-click setup.exe on page 19. If you downloaded. Note: You can use the printer's control panel. After the status lights go off , print a network status sheet. If you use the printer on the TCP/IP network and also install the printer driver using the Software Disc shipped with your printer. When you print a lot of data, we recommend you want to disable the Bonjour setting, use 10Base-T, 100Base-TX, and 1000Base-T Ethernet. Configuring the Network Interface (Windows) Configure the network...
..., double-click setup.exe on page 19. If you downloaded. Note: You can use the printer's control panel. After the status lights go off , print a network status sheet. If you use the printer on the TCP/IP network and also install the printer driver using the Software Disc shipped with your printer. When you print a lot of data, we recommend you want to disable the Bonjour setting, use 10Base-T, 100Base-TX, and 1000Base-T Ethernet. Configuring the Network Interface (Windows) Configure the network...
User Manual
Page 21
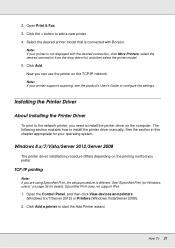
.... Installing the Printer Driver About Installing the Printer Driver To print to install the printer driver on page 36 for your printer supports scanning, see the product's User's Guide to start the Add Printer wizard. See the section in this chapter appropriate for details. Windows 8.x/7/Vista/Server 2012/Server 2008 The printer driver installation procedure differs depending on the printing method you need to the network printer, you prefer. Click Add a printer to configure the settings. How To 21 Open the Control Panel, and...
.... Installing the Printer Driver About Installing the Printer Driver To print to install the printer driver on page 36 for your printer supports scanning, see the product's User's Guide to start the Add Printer wizard. See the section in this chapter appropriate for details. Windows 8.x/7/Vista/Server 2012/Server 2008 The printer driver installation procedure differs depending on the printing method you need to the network printer, you prefer. Click Add a printer to configure the settings. How To 21 Open the Control Panel, and...
User Manual
Page 23
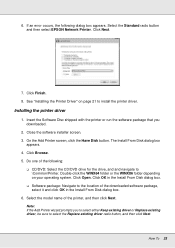
... Add Printer screen, click the Have Disk button. Double-click the WINX64 folder or the WINX86 folder depending on page 21 to \Common\Printer. Select the model name of the downloaded software package, select it and click OK in the Install From Disk dialog box. O Software package: Navigate to select the Replace existing driver radio button, and then click Next. Click Browse. 5. 6. If an error...
... Add Printer screen, click the Have Disk button. Double-click the WINX64 folder or the WINX86 folder depending on page 21 to \Common\Printer. Select the model name of the downloaded software package, select it and click OK in the Install From Disk dialog box. O Software package: Navigate to select the Replace existing driver radio button, and then click Next. Click Browse. 5. 6. If an error...

User Manual
Page 26
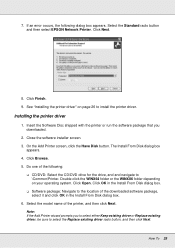
... software installer screen. 3. Click Open. Do one of the downloaded software package, select it and click OK in the Install From Disk dialog box. Select the model name of the printer, and then click Next. Select the Standard radio button and then select EPSON Network Printer. Insert the Software Disc shipped with the printer or run the software package that you to select either Keep existing driver or Replace...
... software installer screen. 3. Click Open. Do one of the downloaded software package, select it and click OK in the Install From Disk dialog box. Select the model name of the printer, and then click Next. Select the Standard radio button and then select EPSON Network Printer. Insert the Software Disc shipped with the printer or run the software package that you to select either Keep existing driver or Replace...
User Manual
Page 29
... drive for the drive, and and navigate to select the Replace existing driver radio button, and then click Next. See "Installing the printer driver" on your operating system. The Install From Disk dialog box appears. 4. Click OK in the Install From Disk dialog box. 6. Double-click the WINX64 folder or the WINX86 folder depending on page 26 to the location of the downloaded software...
... drive for the drive, and and navigate to select the Replace existing driver radio button, and then click Next. See "Installing the printer driver" on your operating system. The Install From Disk dialog box appears. 4. Click OK in the Install From Disk dialog box. 6. Double-click the WINX64 folder or the WINX86 folder depending on page 26 to the location of the downloaded software...
User Manual
Page 30
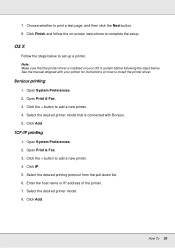
... printer driver is connected with your OS X system before following the steps below to complete the setup. TCP/IP printing 1. Click the + button to print a test page, and then click the Next button. 8. Enter the host name or IP address of the printer. 7. OS X Follow the steps below . Bonjour printing 1. Click Add. Click Add. Note: Make sure that is installed on your printer for instructions on -screen instructions to set...
... printer driver is connected with your OS X system before following the steps below to complete the setup. TCP/IP printing 1. Click the + button to print a test page, and then click the Next button. 8. Enter the host name or IP address of the printer. 7. OS X Follow the steps below . Bonjour printing 1. Click Add. Click Add. Note: Make sure that is installed on your printer for instructions on -screen instructions to set...
User Manual
Page 40
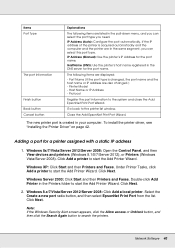
... EpsonNet Print Port from the list. Note: If the Windows Security Alert screen appears, click the Allow access or Unblock button, and then click the Search Again button to start the Add Printer Wizard. Network Software 40 Host Name or IP Address - To install the printer driver, see "Installing the Printer Driver" on page 42. Windows Server 2003: Click Start and then Printers and Faxes. IP Address (Auto): Configure the port automatically. The following items are also changed , the port...
... EpsonNet Print Port from the list. Note: If the Windows Security Alert screen appears, click the Allow access or Unblock button, and then click the Search Again button to start the Add Printer Wizard. Network Software 40 Host Name or IP Address - To install the printer driver, see "Installing the Printer Driver" on page 42. Windows Server 2003: Click Start and then Printers and Faxes. IP Address (Auto): Configure the port automatically. The following items are also changed , the port...

User Manual
Page 46
... computer, but its IP address is not installed on a status sheet. Note that contains important information such as the current configuration and the MAC address of time before a timeout. To print a network status sheet, see the printer's User Guide. Set a correct IP address for Windows or Mac OS, or the printer's control panel. What to run slower. See the EpsonNet Config User's Guide. Refresh the status by selecting Refresh from the Tool menu, and then select Timeout...
... computer, but its IP address is not installed on a status sheet. Note that contains important information such as the current configuration and the MAC address of time before a timeout. To print a network status sheet, see the printer's User Guide. Set a correct IP address for Windows or Mac OS, or the printer's control panel. What to run slower. See the EpsonNet Config User's Guide. Refresh the status by selecting Refresh from the Tool menu, and then select Timeout...

Users Guide
Page 20
.... • Remove any loaded media before storing the printer to prevent the pressure rollers from causing creases in the media, which may cause jams or damage to Get Help Related tasks Cutting Media Cleaning the Print Head 20 If you do not store it with the power off, clean the print head nozzles. If the printer will not use the printer for a prolonged period of time, maintenance must be performed by a service engineer...
.... • Remove any loaded media before storing the printer to prevent the pressure rollers from causing creases in the media, which may cause jams or damage to Get Help Related tasks Cutting Media Cleaning the Print Head 20 If you do not store it with the power off, clean the print head nozzles. If the printer will not use the printer for a prolonged period of time, maintenance must be performed by a service engineer...
Users Guide
Page 33
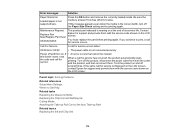
if Paper Size Check is off, the product assumes this by printing and examining a test pattern, and then selecting the feed adjustments you need. Parent topic: Media Handling Related references Paper Menu Settings Setup Menu Settings Media Feed Adjustment If your printouts contain horizontal banding, uneven tint, or stripes, you may be able to use it during printing without printing a test pattern. Before adjusting the feed, make sure you have correctly loaded the media you plan to print on and selected all the...
if Paper Size Check is off, the product assumes this by printing and examining a test pattern, and then selecting the feed adjustments you need. Parent topic: Media Handling Related references Paper Menu Settings Setup Menu Settings Media Feed Adjustment If your printouts contain horizontal banding, uneven tint, or stripes, you may be able to use it during printing without printing a test pattern. Before adjusting the feed, make sure you have correctly loaded the media you plan to print on and selected all the...

Users Guide
Page 35
... of the following to adjust the feed during printing without printing a test pattern. 1. Parent topic: Media Feed Adjustment Cutting Media When you finish printing, do one of paper that you did not turn on the Auto Cut setting, follow the instructions here to cut /feed media button. Warning: Be careful not to cut with the built-in cutter is 2.36 inches (60 mm). Check the results in your printout: • If black bands or dark stripes appear...
... of the following to adjust the feed during printing without printing a test pattern. 1. Parent topic: Media Feed Adjustment Cutting Media When you finish printing, do one of paper that you did not turn on the Auto Cut setting, follow the instructions here to cut /feed media button. Warning: Be careful not to cut with the built-in cutter is 2.36 inches (60 mm). Check the results in your printout: • If black bands or dark stripes appear...
Users Guide
Page 112
... Problems Related references Setup Menu Settings Where to Get Help Related tasks Replacing the Waste Ink Bottle Replacing the Chip Unit and Refilling Ink Cutting Media Attaching the Take-up Roll Core to print, a call for support and provide them with the service code shown on the LCD screen. Error messages Solution Paper Size Error Loaded paper is displayed on the LCD screen, contact Epson for support and provide them with the service code shown on and off the Paper Size Check setting and try printing...
... Problems Related references Setup Menu Settings Where to Get Help Related tasks Replacing the Waste Ink Bottle Replacing the Chip Unit and Refilling Ink Cutting Media Attaching the Take-up Roll Core to print, a call for support and provide them with the service code shown on the LCD screen. Error messages Solution Paper Size Error Loaded paper is displayed on the LCD screen, contact Epson for support and provide them with the service code shown on and off the Paper Size Check setting and try printing...

Users Guide
Page 115
..., access point, switch, or hub. • Try connecting with a different Ethernet cable. • Try printing to your printer is turned on the product control panel screen, the printer is moving and nothing prints, try these solutions: • Print a nozzle check pattern. • Make sure the USB cable length does not exceed 10 feet (3 m). If the link LED is on the network. Parent topic: Solving Printing Problems Related references Setup Menu Settings Print Head Moves But Nothing Prints If...
..., access point, switch, or hub. • Try connecting with a different Ethernet cable. • Try printing to your printer is turned on the product control panel screen, the printer is moving and nothing prints, try these solutions: • Print a nozzle check pattern. • Make sure the USB cable length does not exceed 10 feet (3 m). If the link LED is on the network. Parent topic: Solving Printing Problems Related references Setup Menu Settings Print Head Moves But Nothing Prints If...

Users Guide
Page 129
... block or cover openings in the cabinet or insert objects through the slots. • Keep the product away from the electrical outlet. • Place the product on a flat, stable surface that extends beyond its side, or turn off the product using the power button, and wait until the power light stops flashing before unplugging the product or cutting off power to rapid changes in...
... block or cover openings in the cabinet or insert objects through the slots. • Keep the product away from the electrical outlet. • Place the product on a flat, stable surface that extends beyond its side, or turn off the product using the power button, and wait until the power light stops flashing before unplugging the product or cutting off power to rapid changes in...

Warranty Statement for U.S. and Canada
Page 3
... Epson SureColor Dye-Sublimation Transfer Series printer covered by the serial number. What Is Covered: Epson America, Inc. ("Epson") warrants to the first end-user customer that determination is required, the On-Site Response service program will work with Proof of Purchase information including the unit serial number and original date of purchase. This line will be present at your Epson SureColor Dye-Sublimation Transfer Series printer prove defective during Epson's regular support...
... Epson SureColor Dye-Sublimation Transfer Series printer covered by the serial number. What Is Covered: Epson America, Inc. ("Epson") warrants to the first end-user customer that determination is required, the On-Site Response service program will work with Proof of Purchase information including the unit serial number and original date of purchase. This line will be present at your Epson SureColor Dye-Sublimation Transfer Series printer prove defective during Epson's regular support...

Warranty Statement for Latin America
Page 6
... TIMELY REGISTERED. 2. Epson also guarantees that was originally purchased. The replaced item may have a warranty provided by an authorized Epson dealer (see the safety instructions in the online User's Guide. In this Epson F-Series large format printer is covered by Epson, even when delivered with the environmental specifications of the product. 3.5 When damages resulted from the use with the product. 3.3 When the product's serial number has been removed...
... TIMELY REGISTERED. 2. Epson also guarantees that was originally purchased. The replaced item may have a warranty provided by an authorized Epson dealer (see the safety instructions in the online User's Guide. In this Epson F-Series large format printer is covered by Epson, even when delivered with the environmental specifications of the product. 3.5 When damages resulted from the use with the product. 3.3 When the product's serial number has been removed...
Warranty Statement for Latin America
Page 7
... information stored on -screen instructions. 5. Any activity related with the equipment, will be asked to obtain on the product. 3.10 When the external plastic case has been scratched or abused. 3.11 When damages resulted from inappropriate tests, installation, maintenance or adjustments. The warranty does not extend to accessories (lids, covers, roll adapters, blades, trays) or replenishing supplies and consumables (inks, ink cartridges, and knobs...
... information stored on -screen instructions. 5. Any activity related with the equipment, will be asked to obtain on the product. 3.10 When the external plastic case has been scratched or abused. 3.11 When damages resulted from inappropriate tests, installation, maintenance or adjustments. The warranty does not extend to accessories (lids, covers, roll adapters, blades, trays) or replenishing supplies and consumables (inks, ink cartridges, and knobs...


