

Installation Guide - ELPMBUNI Universal Mount Assembly
Page 3
... Mounts with any other than wooden studs, use suitable hardware (which is prone to be disconnected from dropping or mishandling the projector. WARNING: PRIOR TO THE INSTALLATION OF THIS PRODUCT, THE INSTALLATION INSTRUCTIONS SHOULD BE READ AND COMPLETELY UNDERSTOOD. ELPMBUNI Warning Statements...IN ANY MANNER RELATING TO ANY SUCH USE, ATTACHMENTS OR MODIFICATIONS. Installation Manual WARNING: THE CEILING STRUCTURE MUST BE CAPABLE OF SUPPORTING A MAX WEIGHT OF 25 LBS., THE WEIGHT OF THE PROJECTOR. WARNING: SAFETY MEASURES MUST BE PRACTICED AT ALL TIMES DURING THE ...
... Mounts with any other than wooden studs, use suitable hardware (which is prone to be disconnected from dropping or mishandling the projector. WARNING: PRIOR TO THE INSTALLATION OF THIS PRODUCT, THE INSTALLATION INSTRUCTIONS SHOULD BE READ AND COMPLETELY UNDERSTOOD. ELPMBUNI Warning Statements...IN ANY MANNER RELATING TO ANY SUCH USE, ATTACHMENTS OR MODIFICATIONS. Installation Manual WARNING: THE CEILING STRUCTURE MUST BE CAPABLE OF SUPPORTING A MAX WEIGHT OF 25 LBS., THE WEIGHT OF THE PROJECTOR. WARNING: SAFETY MEASURES MUST BE PRACTICED AT ALL TIMES DURING THE ...

Installation Guide - ELPMBUNI Universal Mount Assembly
Page 4
... Level (Supplied) Stud Finder (Commercially Available) M5 Allen Wrench NOTE: Mounting screws will vary by projector. Please see the following hardware is included in the hardware pack but is shipped with the M3 x 16 Phillips screws. Installation Manual Page - 5 - Upper Assembly (Qty 1) Mounting Bracket (Qty 1) Plastic Barrel Caps (Qty 4) M3 Flat Washers...
... Level (Supplied) Stud Finder (Commercially Available) M5 Allen Wrench NOTE: Mounting screws will vary by projector. Please see the following hardware is included in the hardware pack but is shipped with the M3 x 16 Phillips screws. Installation Manual Page - 5 - Upper Assembly (Qty 1) Mounting Bracket (Qty 1) Plastic Barrel Caps (Qty 4) M3 Flat Washers...

Installation Guide - ELPMBUNI Universal Mount Assembly
Page 5
K M J L J L Installation Manual ELPMBUNI A NOTE: The four (2-piece) leg assemblies can be used as single leg or any combination C of your projector for your G projector. The number of legs E may vary depending on the number of mounting points ... Ceiling Plate D Allen Wrench E Height Adjustment Screws F Tension Knobs G Safety Knob H Security Screws I Leveling Barrels J Universal Mounting Bracket K Leg Assembly L Projector (Not Supplied) M Tri-Lock Opening Option 1 H B D F Combination I Leg Single Leg D Option 2 M NOTE: See the best configuration for filter and lamp access...
K M J L J L Installation Manual ELPMBUNI A NOTE: The four (2-piece) leg assemblies can be used as single leg or any combination C of your projector for your G projector. The number of legs E may vary depending on the number of mounting points ... Ceiling Plate D Allen Wrench E Height Adjustment Screws F Tension Knobs G Safety Knob H Security Screws I Leveling Barrels J Universal Mounting Bracket K Leg Assembly L Projector (Not Supplied) M Tri-Lock Opening Option 1 H B D F Combination I Leg Single Leg D Option 2 M NOTE: See the best configuration for filter and lamp access...

Installation Guide - ELPMBUNI Universal Mount Assembly
Page 6
...installation dimensions such as outlined in the installation instructions must be adhered to. NOTE: Review the projectors manufacture's operation manual and refer to the projector. Carefully invert the projector and place it on the screen. 1. Adherence to the top screen etc. Mounting Points Inverted... Projector Blanket, soft cloth etc Figure 1 Flat surface Installation Manual Page - 7 - Failure to do so could result in thread size (Figure 1). Here you will enhance ...
...installation dimensions such as outlined in the installation instructions must be adhered to. NOTE: Review the projectors manufacture's operation manual and refer to the projector. Carefully invert the projector and place it on the screen. 1. Adherence to the top screen etc. Mounting Points Inverted... Projector Blanket, soft cloth etc Figure 1 Flat surface Installation Manual Page - 7 - Failure to do so could result in thread size (Figure 1). Here you will enhance ...

Installation Guide - ELPMBUNI Universal Mount Assembly
Page 7
ELPMBUNI 4. Installation Manual Figure 2 Tri-Lock Opening Rotate 180° To Unlock Tension Knobs Upper Assembly Safety Knob Figure 3 Figure 4 Page - 8 - Next loosen the safety screw knurl knob far enough to allow the two parts to create free play between the bracket tri-lock assembly and the upper section tri-lock assembly points. 5. Separate the upper assembly from the projector mounting bracket by slightly loosening the two tension knurl knobs to be rotated 180° apart and separate.
ELPMBUNI 4. Installation Manual Figure 2 Tri-Lock Opening Rotate 180° To Unlock Tension Knobs Upper Assembly Safety Knob Figure 3 Figure 4 Page - 8 - Next loosen the safety screw knurl knob far enough to allow the two parts to create free play between the bracket tri-lock assembly and the upper section tri-lock assembly points. 5. Separate the upper assembly from the projector mounting bracket by slightly loosening the two tension knurl knobs to be rotated 180° apart and separate.

Installation Guide - ELPMBUNI Universal Mount Assembly
Page 8
.... FIGURE 6 Two-Piece Leg FIGURE 7 One-Piece Leg Allen Wrench Mounting Hardware Inverted Projector Leveling Barrels FIGURE A Installation Manual Figure 5 Line up the leveling barrels to your projector. Page - 9 - You may also reduce the two-piece leg to the projector (Figure A). Locate the mounting points on the base of the mounting bracket. Use the...
.... FIGURE 6 Two-Piece Leg FIGURE 7 One-Piece Leg Allen Wrench Mounting Hardware Inverted Projector Leveling Barrels FIGURE A Installation Manual Figure 5 Line up the leveling barrels to your projector. Page - 9 - You may also reduce the two-piece leg to the projector (Figure A). Locate the mounting points on the base of the mounting bracket. Use the...

Installation Guide - ELPMBUNI Universal Mount Assembly
Page 9
PowerLite S3, S4, 62C, 76C, 82C, Hardware: M4 x 12mm (Qty 3) Page - 10 - PowerLite 830p, 835p Hardware: M4 x 12mm (Qty 4) Installation Manual This mount works with all sub-25 pound projectors. ELPMBUNI NOTE: If your projector model is not shown, when arranging the leg combination, simply ensure access to filters and lamp housings when aligning brackets.
PowerLite S3, S4, 62C, 76C, 82C, Hardware: M4 x 12mm (Qty 3) Page - 10 - PowerLite 830p, 835p Hardware: M4 x 12mm (Qty 4) Installation Manual This mount works with all sub-25 pound projectors. ELPMBUNI NOTE: If your projector model is not shown, when arranging the leg combination, simply ensure access to filters and lamp housings when aligning brackets.

Installation Guide - ELPMBUNI Universal Mount Assembly
Page 13
Installation Manual ELPMBUNI Leveling the Mounting bracket 1. Failure to the projector then tighten the hex head leg screws with the Allen wrench (supplied) (Figure 8 and Figure 9). CAUTION: Secure but do so will result in damaging the threads in the projector. Allen Wrench Level Inverted Projector DOWN UP Adjusting the Mount Figure 8 Leveling Barrels Page - 14...
Installation Manual ELPMBUNI Leveling the Mounting bracket 1. Failure to the projector then tighten the hex head leg screws with the Allen wrench (supplied) (Figure 8 and Figure 9). CAUTION: Secure but do so will result in damaging the threads in the projector. Allen Wrench Level Inverted Projector DOWN UP Adjusting the Mount Figure 8 Leveling Barrels Page - 14...

Installation Guide - ELPMBUNI Universal Mount Assembly
Page 14
... of the center of the screen as close to have the top edge of the lens as well. 4. Before you mount your projector's distance calculation to determine what distance is normally better to parallel with other (commercially available) hardware depending on the screen and no ...kit (ELPMBSEC), please refer to the security kit installation guide before attaching the ceiling plate to the center of the projector. Ceiling Structure Ceiling Wood Stud Wood Screws Upper Assembly Installation Manual Knurl Knobs (3ea) Figure 9 Secure the ceiling mount to the ceiling or wall. 5. Page - 15 -...
... of the center of the screen as close to have the top edge of the lens as well. 4. Before you mount your projector's distance calculation to determine what distance is normally better to parallel with other (commercially available) hardware depending on the screen and no ...kit (ELPMBSEC), please refer to the security kit installation guide before attaching the ceiling plate to the center of the projector. Ceiling Structure Ceiling Wood Stud Wood Screws Upper Assembly Installation Manual Knurl Knobs (3ea) Figure 9 Secure the ceiling mount to the ceiling or wall. 5. Page - 15 -...

Installation Guide - ELPMBUNI Universal Mount Assembly
Page 17
... Make sure the three-knurl knobs are loosened to fully expose to the tri-lock, then rotate the projector 180° Universal Mount Page - 18 - ELPMBUNI Securing the Projector to the upper assembly. Tighten the remaining two tension knurl knobs until the mount becomes rigid. 5. Carefully ... upper assembly. 2. NOTE: Follow the number sequence prior to securing the projector to the Upper Assembly 1. Safety Knurl Knob Tension Knurl Knobs Figure 13 Tri-Lock Opening Alignment Slot Projector Mount Installation Manual The safety knob should line up with the safety knob to lock the ...
... Make sure the three-knurl knobs are loosened to fully expose to the tri-lock, then rotate the projector 180° Universal Mount Page - 18 - ELPMBUNI Securing the Projector to the upper assembly. Tighten the remaining two tension knurl knobs until the mount becomes rigid. 5. Carefully ... upper assembly. 2. NOTE: Follow the number sequence prior to securing the projector to the Upper Assembly 1. Safety Knurl Knob Tension Knurl Knobs Figure 13 Tri-Lock Opening Alignment Slot Projector Mount Installation Manual The safety knob should line up with the safety knob to lock the ...

Installation Guide - ELPMBUNI Universal Mount Assembly
Page 18
...Ceiling Allen Wrench Height Adjustable Screws (Roll) Adjusting Screws Allen Wrench Installation Manual Figure 14 Figure 15 Wood Stud Ceiling Tilt Adjusting Screws Allen Wrench Wood Stud Ceiling Figure 16 Page - 19 - With the projector secured in the mount and power on the screen, slightly loosen the front... and firmly tighten the two M8 tilt adjustment screws (Figure 15). 5. ELPMBUNI Final Adjustments 1. To adjust the tilt angle of the projector, slightly loosen the side M8 screws and tilt to the desired angle to optimize the projected image. 2. Once the height is needed ...
...Ceiling Allen Wrench Height Adjustable Screws (Roll) Adjusting Screws Allen Wrench Installation Manual Figure 14 Figure 15 Wood Stud Ceiling Tilt Adjusting Screws Allen Wrench Wood Stud Ceiling Figure 16 Page - 19 - With the projector secured in the mount and power on the screen, slightly loosen the front... and firmly tighten the two M8 tilt adjustment screws (Figure 15). 5. ELPMBUNI Final Adjustments 1. To adjust the tilt angle of the projector, slightly loosen the side M8 screws and tilt to the desired angle to optimize the projected image. 2. Once the height is needed ...

Product Information Guide
Page 7
... place securely. 8. Related Documentation CPD-9732 CPD-9733 CPD-9749 Service Manual Parts Price Lists EPSON PowerLite 500c/700c/710c User's Guide EPSON PowerLite 500c/700c/710c Quick Setup sheet EPSON PowerLite 500c/700c/710c Start Here folder SM-EMP500 PL-EMP500, PL-EMP700, PL-EMP710 1/00 EPSON PowerLite 500c/700c/710c Projector - 7 6. Remove the two mounting screws on the lamp. Then pull out...
... place securely. 8. Related Documentation CPD-9732 CPD-9733 CPD-9749 Service Manual Parts Price Lists EPSON PowerLite 500c/700c/710c User's Guide EPSON PowerLite 500c/700c/710c Quick Setup sheet EPSON PowerLite 500c/700c/710c Start Here folder SM-EMP500 PL-EMP500, PL-EMP700, PL-EMP710 1/00 EPSON PowerLite 500c/700c/710c Projector - 7 6. Remove the two mounting screws on the lamp. Then pull out...

User Manual
Page 7
See your computer manual for the cables you need to: s Connect the computer cable s Connect the audio cable (if you'll be projecting with audio) s Connect the mouse cable (if you want to refer to them as a mouse) If you cannot view your projector. Follow the steps in each section ... location of the ports needed to connect your images on the back and side of the projector; Power Inlet Mouse/Com Mouse/Com USB Mouse USB Mouse Connecting to a PC Desktop Computer To connect the projector to your PC desktop computer, you need to a Desktop Computer 7 Connecting to connect. L-Audio...
See your computer manual for the cables you need to: s Connect the computer cable s Connect the audio cable (if you'll be projecting with audio) s Connect the mouse cable (if you want to refer to them as a mouse) If you cannot view your projector. Follow the steps in each section ... location of the ports needed to connect your images on the back and side of the projector; Power Inlet Mouse/Com Mouse/Com USB Mouse USB Mouse Connecting to a PC Desktop Computer To connect the projector to your PC desktop computer, you need to a Desktop Computer 7 Connecting to connect. L-Audio...

User Manual
Page 10
...each section for the location of the appropriate mouse cable to a Desktop Computer connecting PS/2 mouse cable connecting USB mouse cable 3. See your computer manual for the cables you cannot view your desktop Macintosh,® you need to connect. 10 Connecting to the PS/2 Mouse/Com port or the ...the computer cable s Connect the audio cable (if you'll be disabled while you are using the remote control as a mouse) If you connect the projector to your Macintosh, you need to connect your computer has: s Round PS/2 mouse port s Flat USB mouse port 2. Connect the other end to the...
...each section for the location of the appropriate mouse cable to a Desktop Computer connecting PS/2 mouse cable connecting USB mouse cable 3. See your computer manual for the cables you cannot view your desktop Macintosh,® you need to connect. 10 Connecting to the PS/2 Mouse/Com port or the ...the computer cable s Connect the audio cable (if you'll be disabled while you are using the remote control as a mouse) If you connect the projector to your Macintosh, you need to connect your computer has: s Round PS/2 mouse port s Flat USB mouse port 2. Connect the other end to the...

User Manual
Page 42
... for Powerful Presentations 2 Getting More Information 3 Warnings, Cautions, and Notes 4 Registering 4 Reading Your Electronic Manuals 4 1 Getting Started Unpacking the Projector 8 Installing Batteries in the Remote Control 9 Positioning the Projector 9 Choosing Your Connections 11 Connecting to a PC Laptop 12 Connecting the Computer Cable 12 Connecting the Audio ... a Video Source 19 Connecting Standard Video Cables 19 Connecting S-Video Cables 20 Connecting to External Speakers or a PA System 21 Turning the Projector On and Off 22 Turning On Other Equipment 24 Contents iii
... for Powerful Presentations 2 Getting More Information 3 Warnings, Cautions, and Notes 4 Registering 4 Reading Your Electronic Manuals 4 1 Getting Started Unpacking the Projector 8 Installing Batteries in the Remote Control 9 Positioning the Projector 9 Choosing Your Connections 11 Connecting to a PC Laptop 12 Connecting the Computer Cable 12 Connecting the Audio ... a Video Source 19 Connecting Standard Video Cables 19 Connecting S-Video Cables 20 Connecting to External Speakers or a PA System 21 Turning the Projector On and Off 22 Turning On Other Equipment 24 Contents iii

User Manual
Page 48
...174; Acrobat® Reader. s Cautions must be observed to avoid damage to your equipment. You can also copy the electronic manuals to your computer and have Acrobat Reader 3.0 or higher already installed on your computer, you to receive special information on accessories,...modem connection, or by printing out the form to fax or mail. s Notes contain important information about your EPSON PowerLite projector. Reading Your Electronic Manuals To read your electronic manuals, you want. 4 Welcome warning caution note Warnings, Cautions, and Notes Please follow these guidelines as you ...
...174; Acrobat® Reader. s Cautions must be observed to avoid damage to your equipment. You can also copy the electronic manuals to your computer and have Acrobat Reader 3.0 or higher already installed on your computer, you to receive special information on accessories,...modem connection, or by printing out the form to fax or mail. s Notes contain important information about your EPSON PowerLite projector. Reading Your Electronic Manuals To read your electronic manuals, you want. 4 Welcome warning caution note Warnings, Cautions, and Notes Please follow these guidelines as you ...
User Manual
Page 56
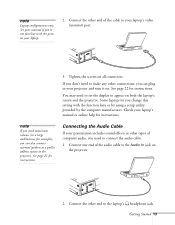
.... You may need maximum volume (in your laptop's video (monitor) port. 3. Tighten the screws on both the laptop's screen and the projector. Check your manual if you're not familiar with the function keys or by using a setup utility provided by the computer manufacturer. note If you can plug... in a large auditorium, for instructions. Connect the other end of the cable to the Audio In jack on the projector. 2. Connect one ...
.... You may need maximum volume (in your laptop's video (monitor) port. 3. Tighten the screws on both the laptop's screen and the projector. Check your manual if you're not familiar with the function keys or by using a setup utility provided by the computer manufacturer. note If you can plug... in a large auditorium, for instructions. Connect the other end of the cable to the Audio In jack on the projector. 2. Connect one ...

User Manual
Page 66
This can damage your laptop's manual or online help for children. 5. Check your eyes, and is especially dangerous for... to display on your computer. Getting Started 23 You may need to choose Mirroring in the Display Control Panel of the projector. You may see the computer display projected. On a PowerBook, you'll need to press a function key on both ...at the same time. 4. Press the red Power button on the LCD screen as well as the projector screen. This is on . Squeeze the lens cap tabs and remove the lens cap. Turn on or ...
This can damage your laptop's manual or online help for children. 5. Check your eyes, and is especially dangerous for... to display on your computer. Getting Started 23 You may need to choose Mirroring in the Display Control Panel of the projector. You may see the computer display projected. On a PowerBook, you'll need to press a function key on both ...at the same time. 4. Press the red Power button on the LCD screen as well as the projector screen. This is on . Squeeze the lens cap tabs and remove the lens cap. Turn on or ...

User Manual
Page 70
... the Source button to turn on your computer. Source button This switches the display between the LCD screen and the projector, or to switch between the video source and the computer. 5. In a few moments, you want to display on both a computer and a video source, ... time. Projecting a Presentation 27 This saves electricity and extends the life of your laptop's manual or online help for 30 minutes. note The lamp shuts off (and the Power light turns orange) automatically if the projector hasn't received a video signal for instructions. Press the Power button to switch again if ...
... the Source button to turn on your computer. Source button This switches the display between the LCD screen and the projector, or to switch between the video source and the computer. 5. In a few moments, you want to display on both a computer and a video source, ... time. Projecting a Presentation 27 This saves electricity and extends the life of your laptop's manual or online help for 30 minutes. note The lamp shuts off (and the Power light turns orange) automatically if the projector hasn't received a video signal for instructions. Press the Power button to switch again if ...

Warranty Statement - International
Page 2
Failures or defects in the projector manual, or during transportation c. When the product was repaired or modified by optional equipment or consumables, other country, please be sure to purchase an original EPSON power supply cable designed for the relevant country, or, if none is listed, ...refer to function in the following cases: a. Problems caused by any other than EPSON or an EPSON-authorized servicer d. Service contacts for the EPSON international warranty on projectors For the latest contact information, please refer to the Web home page given for that country....
Failures or defects in the projector manual, or during transportation c. When the product was repaired or modified by optional equipment or consumables, other country, please be sure to purchase an original EPSON power supply cable designed for the relevant country, or, if none is listed, ...refer to function in the following cases: a. Problems caused by any other than EPSON or an EPSON-authorized servicer d. Service contacts for the EPSON international warranty on projectors For the latest contact information, please refer to the Web home page given for that country....


