

Product Information Guide
Page 2
...Projection methods Focus adjustment Zoom adjustment Internal sound system Optical aspect ratio Zoom ratio PowerLite S5: Powerlite 77c: Noise level Keystone correction angle Front, rear, front ceiling, rear ceiling Manual Digital (PowerLite S5) Manual (PowerLite 77c) 1 W monaural 4:3 (horizontal:vertical) 1:1.35 (digital) 1:1.2 (... camera, or gaming console. PowerLite S5 Series / 77c Projector Projection distance PowerLite S5 2.9 to 39.8 feet (0.87 to 12.12 meters)* PowerLite 77c 2.8 to 34.2 feet (0.84 to 10.42 meters)* * Depending on PowerLite 77c Projection Lamp Power consumption 170...
...Projection methods Focus adjustment Zoom adjustment Internal sound system Optical aspect ratio Zoom ratio PowerLite S5: Powerlite 77c: Noise level Keystone correction angle Front, rear, front ceiling, rear ceiling Manual Digital (PowerLite S5) Manual (PowerLite 77c) 1 W monaural 4:3 (horizontal:vertical) 1:1.35 (digital) 1:1.2 (... camera, or gaming console. PowerLite S5 Series / 77c Projector Projection distance PowerLite S5 2.9 to 39.8 feet (0.87 to 12.12 meters)* PowerLite 77c 2.8 to 34.2 feet (0.84 to 10.42 meters)* * Depending on PowerLite 77c Projection Lamp Power consumption 170...

Product Information Guide
Page 4
...Epson's website. 3. Turn on the projector first, or have to an electrical outlet. If you may have multiple pieces of your image or where to the projector's power inlet. Because other end to select the image source manually. Connect the other adjustments- PowerLite S5 Series / 77c Projector... Image Size and Projection Distance The distance between the projector and the screen determines the basic ...
...Epson's website. 3. Turn on the projector first, or have to an electrical outlet. If you may have multiple pieces of your image or where to the projector's power inlet. Because other end to select the image source manually. Connect the other adjustments- PowerLite S5 Series / 77c Projector... Image Size and Projection Distance The distance between the projector and the screen determines the basic ...

Product Information Guide
Page 6
PowerLite S5 Series / 77c Projector If you're using a PC laptop: ❏ Hold down the Fn key and press the function key that came with OS X: You may need to sync up on again, press the P Power button. 4. Check your laptop's manual or online help for details. If you don't see ...in a protective case. 6 - otherwise you can turn off through the Extended menu. 1. To turn sleep mode on the projector screen as well as the LCD screen. Note: With Epson's exclusive Instant Off ®technology there's no cooldown period, so you may need to set as or it down . Click...
PowerLite S5 Series / 77c Projector If you're using a PC laptop: ❏ Hold down the Fn key and press the function key that came with OS X: You may need to sync up on again, press the P Power button. 4. Check your laptop's manual or online help for details. If you don't see ...in a protective case. 6 - otherwise you can turn off through the Extended menu. 1. To turn sleep mode on the projector screen as well as the LCD screen. Note: With Epson's exclusive Instant Off ®technology there's no cooldown period, so you may need to set as or it down . Click...
Product Information Guide
Page 7
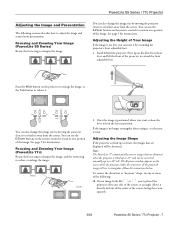
...manually up on the screen while the projector makes the correction. Adjusting the Image Shape If the projector is no longer rectangular after raising it by extending the projector's front adjustable foot. 1. To correct the distortion or "keystone" shape, do one or more of the screen, facing the screen squarely. 3/08 PowerLite S5 Series / 77c Projector... - 7 Press the Wide button on the projector to enlarge the image, or the Tele button to reduce it directly in on the ...
...manually up on the screen while the projector makes the correction. Adjusting the Image Shape If the projector is no longer rectangular after raising it by extending the projector's front adjustable foot. 1. To correct the distortion or "keystone" shape, do one or more of the screen, facing the screen squarely. 3/08 PowerLite S5 Series / 77c Projector... - 7 Press the Wide button on the projector to enlarge the image, or the Tele button to reduce it directly in on the ...

User's Guide
Page 2
... owners. Pixelworks, DNX, and the DNX logo are trademarks of Epson America, Inc. Caution: When you . PowerLite and PrivateLine are service marks of Pixelworks, Inc. General Notice: ... recording, or otherwise, without notice. © 2007 Epson America, Inc. 9/07 2 Important Safety Information WARNING: Never look into the projector lens when the lamp is turned on; Never let ...qualified service personnel. Keep plastic bags away from the use of this manual are registered trademarks, and Epson Exceed Your Vision is a trademark; the bright light can severely injure...
... owners. Pixelworks, DNX, and the DNX logo are trademarks of Epson America, Inc. Caution: When you . PowerLite and PrivateLine are service marks of Pixelworks, Inc. General Notice: ... recording, or otherwise, without notice. © 2007 Epson America, Inc. 9/07 2 Important Safety Information WARNING: Never look into the projector lens when the lamp is turned on; Never let ...qualified service personnel. Keep plastic bags away from the use of this manual are registered trademarks, and Epson Exceed Your Vision is a trademark; the bright light can severely injure...
User's Guide
Page 17
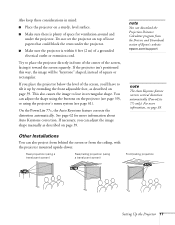
... section of Epson's website: epson.com/support note The Auto Keystone feature corrects vertical distortion automatically (PowerLite 77c only). Other Installations You can download the Projection Distance Calculator program from the ceiling, with the projector mounted upside-down...manually as described on page 39. If necessary, you can adjust the shape using the projector's menu system (see page 39. For more information about Auto Keystone correction. If the projector isn't positioned this way, the image will be "keystone" shaped, instead of square or rectangular. On the PowerLite...
... section of Epson's website: epson.com/support note The Auto Keystone feature corrects vertical distortion automatically (PowerLite 77c only). Other Installations You can download the Projection Distance Calculator program from the ceiling, with the projector mounted upside-down...manually as described on page 39. If necessary, you can adjust the shape using the projector's menu system (see page 39. For more information about Auto Keystone correction. If the projector isn't positioned this way, the image will be "keystone" shaped, instead of square or rectangular. On the PowerLite...

User's Guide
Page 32
If you turn on the projector first, or have to select the image source manually. See page 34. Open the A/V Mute slide (lens cover). 2. If you may have multiple pieces of the power cord to plug in Chapter 1. Connect one ...end of connected equipment, you turn on your connected computer or video equipment before starting the projector, the projector automatically detects and displays...
If you turn on the projector first, or have to select the image source manually. See page 34. Open the A/V Mute slide (lens cover). 2. If you may have multiple pieces of the power cord to plug in Chapter 1. Connect one ...end of connected equipment, you turn on your connected computer or video equipment before starting the projector, the projector automatically detects and displays...

User's Guide
Page 35
... is set as or it . See page 58. On most systems, the or CRT/LCD key lets you toggle between the LCD screen and the projector, or display on both at the same time. ■ If you're projecting from a laptop, and you don't see the same image on an external... have an icon such as your primary display and/or enabled. Check your computer's documentation or online help for details. Projecting 35 See your laptop's manual or online help for details. If you're using a PC laptop: ■ Hold down the Fn key and press the function key that lets you...
... is set as or it . See page 58. On most systems, the or CRT/LCD key lets you toggle between the LCD screen and the projector, or display on both at the same time. ■ If you're projecting from a laptop, and you don't see the same image on an external... have an icon such as your primary display and/or enabled. Check your computer's documentation or online help for details. Projecting 35 See your laptop's manual or online help for details. If you're using a PC laptop: ■ Hold down the Fn key and press the function key that lets you...

User's Guide
Page 58
You see the Image menu. 2. In addition to changing the position of the following screens: Computer (analog-RGB) and RGB video Component video Composite video and S-Video 58 Fine-tuning the Projector You see one of the projected image, you can correct tracking and sync for computer images, or change the aspect ratio to make manual adjustments. Select the Signal menu. Press the Menu button. Adjusting the Input Signal Although the projector normally detects and optimizes the input signal automatically, you can use the Signal menu to widescreen format for video images. 1.
You see the Image menu. 2. In addition to changing the position of the following screens: Computer (analog-RGB) and RGB video Component video Composite video and S-Video 58 Fine-tuning the Projector You see one of the projected image, you can correct tracking and sync for computer images, or change the aspect ratio to make manual adjustments. Select the Signal menu. Press the Menu button. Adjusting the Input Signal Although the projector normally detects and optimizes the input signal automatically, you can use the Signal menu to widescreen format for video images. 1.

User's Guide
Page 86
... select the correct source. See page 35. If you display on an external monitor. Check your laptop's manual or online help for the projector to sync up after pressing it 's set to the projector's Monitor Out port. You see a blue screen with the message No Signal displayed. ■ Make sure... the cables are enabled. On most systems, the or CRT/LCD key lets you toggle between the LCD screen and the projector, or display on an external monitor. Allow a few seconds for details. 86 Solving Problems See your computer or video source is connected to ...
... select the correct source. See page 35. If you display on an external monitor. Check your laptop's manual or online help for the projector to sync up after pressing it 's set to the projector's Monitor Out port. You see a blue screen with the message No Signal displayed. ■ Make sure... the cables are enabled. On most systems, the or CRT/LCD key lets you toggle between the LCD screen and the projector, or display on an external monitor. Allow a few seconds for details. 86 Solving Problems See your computer or video source is connected to ...

User's Guide
Page 107
... Logo creating, 67 to 68 displaying, 68 to 69 turning on, 63, 69 Low brightness, 40, 76, 95 M Macintosh adapters, 19 connecting, 18 to 20 Manuals, 9 Menus changing settings, 53 to 54 Extended, 52, 63 to 65 Image, 52, 55 to 57 Info, 52, 65 to 66 Reset, 52, 72 Settings... 69 turning on, 69 Photo color mode, 45, 56 Picture source, selecting, 34, 59 to 60 Pixelworks, 97 Position setting, 59 Positioning image, 39, 59 projector, 16 to 18 Power button, 33, 42 consumption, 97 light, 33, 83 to 84 saving, 42 supply, 97 PowerBook, connecting to, 18 to 20 Presentation...
... Logo creating, 67 to 68 displaying, 68 to 69 turning on, 63, 69 Low brightness, 40, 76, 95 M Macintosh adapters, 19 connecting, 18 to 20 Manuals, 9 Menus changing settings, 53 to 54 Extended, 52, 63 to 65 Image, 52, 55 to 57 Info, 52, 65 to 66 Reset, 52, 72 Settings... 69 turning on, 69 Photo color mode, 45, 56 Picture source, selecting, 34, 59 to 60 Pixelworks, 97 Position setting, 59 Positioning image, 39, 59 projector, 16 to 18 Power button, 33, 42 consumption, 97 light, 33, 83 to 84 saving, 42 supply, 97 PowerBook, connecting to, 18 to 20 Presentation...


