User Manual
Page 3
... to an HDMI Video Source 34 Connecting to a Component-to Go for Additional Information 16 Projector Part Locations ...16 Projector Parts - Control Panel ...21 Projector Parts - Contents PowerLite® Pro G6050W/G6150/G6450WU/G6550WU User's Guide 9 Introduction to Your Projector ...10 Projector Features...10 Product Box Contents...11 Additional Components ...13 Optional Equipment and Replacement Parts 13 Warranty...
... to an HDMI Video Source 34 Connecting to a Component-to Go for Additional Information 16 Projector Part Locations ...16 Projector Parts - Control Panel ...21 Projector Parts - Contents PowerLite® Pro G6050W/G6150/G6450WU/G6550WU User's Guide 9 Introduction to Your Projector ...10 Projector Features...10 Product Box Contents...11 Additional Components ...13 Optional Equipment and Replacement Parts 13 Warranty...
User Manual
Page 4
... Attaching and Removing the Cable Cover 43 Attaching and Removing the HDMI Cable Clip 44 Installing Batteries in the Remote Control 45 Using the Projector on a Network ...48 Wired Network Projection...48 Connecting to a Wired Network ...49 Selecting Wired Network Settings 49 Wireless Network Projection ...52... Mac OS X 61 Enabling WPA or EAP Security ...62 Wireless Security Menu Settings 63 Registering a Digital Certificate on the Projector 64 Secure HTTP...64 Registering Digital Certificates from a Web Browser 65 Digital Certificate Types for Registration via Web Control 66 Setting Up...
... Attaching and Removing the Cable Cover 43 Attaching and Removing the HDMI Cable Clip 44 Installing Batteries in the Remote Control 45 Using the Projector on a Network ...48 Wired Network Projection...48 Connecting to a Wired Network ...49 Selecting Wired Network Settings 49 Wireless Network Projection ...52... Mac OS X 61 Enabling WPA or EAP Security ...62 Wireless Security Menu Settings 63 Registering a Digital Certificate on the Projector 64 Secure HTTP...64 Registering Digital Certificates from a Web Browser 65 Digital Certificate Types for Registration via Web Control 66 Setting Up...
User Manual
Page 5
Crestron RoomView Support...72 Setting Up Crestron RoomView Support 72 Controlling a Networked Projector Using Crestron RoomView 73 Using Basic Projector Features ...75 Turning On the Projector ...75 Turning Off the Projector ...77 Selecting the Language for the Projector Menus 78 Setting the Screen Type ...78 Adjusting the Image Position with Screen Position 79 Displaying a Test Pattern...
Crestron RoomView Support...72 Setting Up Crestron RoomView Support 72 Controlling a Networked Projector Using Crestron RoomView 73 Using Basic Projector Features ...75 Turning On the Projector ...75 Turning Off the Projector ...77 Selecting the Language for the Projector Menus 78 Setting the Screen Type ...78 Adjusting the Image Position with Screen Position 79 Displaying a Test Pattern...
User Manual
Page 6
... 111 Installing a Security Cable ...112 Projecting Two Images Simultaneously 112 Using Multiple Projectors...114 Projector Identification System for Multiple Projector Control 115 Setting the Projector ID ...115 Setting the Remote Control ID 116 Adjusting the Position of the Projected Image From Multiple Projectors 117 Adjusting the Overlapping Areas with Point Correction 118 Scaling an Image...
... 111 Installing a Security Cable ...112 Projecting Two Images Simultaneously 112 Using Multiple Projectors...114 Projector Identification System for Multiple Projector Control 115 Setting the Projector ID ...115 Setting the Remote Control ID 116 Adjusting the Position of the Projected Image From Multiple Projectors 117 Adjusting the Overlapping Areas with Point Correction 118 Scaling an Image...
User Manual
Page 7
... Maintenance...155 Replacing the Lamp ...155 Resetting the Lamp Timer...159 Replacing the Remote Control Batteries 160 Transporting the Projector...162 Solving Problems ...163 Projection Problem Tips ...163 Projector Light Status ...163 Using the Projector Help Displays ...167 Solving Image or Sound Problems 167 Solutions When No Image Appears 168 Solutions When "No...
... Maintenance...155 Replacing the Lamp ...155 Resetting the Lamp Timer...159 Replacing the Remote Control Batteries 160 Transporting the Projector...162 Solving Problems ...163 Projection Problem Tips ...163 Projector Light Status ...163 Using the Projector Help Displays ...167 Solving Image or Sound Problems 167 Solutions When No Image Appears 168 Solutions When "No...
User Manual
Page 8
... Network Alert E-Mails are Not Received 175 Where to Get Help...175 Technical Specifications ...177 General Projector Specifications ...177 Projector Lamp Specifications...179 Remote Control Specifications ...180 Projector Dimension Specifications 180 Projector Electrical Specifications ...181 Projector Environmental Specifications 182 Projector Safety and Approvals Specifications 182 Supported Video Display Formats...183 Notices ...187 Recycling...187 Important Safety...
... Network Alert E-Mails are Not Received 175 Where to Get Help...175 Technical Specifications ...177 General Projector Specifications ...177 Projector Lamp Specifications...179 Remote Control Specifications ...180 Projector Dimension Specifications 180 Projector Electrical Specifications ...181 Projector Environmental Specifications 182 Projector Safety and Approvals Specifications 182 Supported Video Display Formats...183 Notices ...187 Recycling...187 Important Safety...

User Manual
Page 10
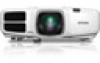
... Additional Information Projector Part Locations Projector Features The PowerLite Pro G6050W, G6150, G6450WU, and G6550WU projectors include these sections to -use setup and operation features • Interchangeable bayonet lens options • Project images side by side from two separate input sources • Create one large seamless display when projecting from multiple projectors using Edge Blending • Epson's Instant...
... Additional Information Projector Part Locations Projector Features The PowerLite Pro G6050W, G6150, G6450WU, and G6550WU projectors include these sections to -use setup and operation features • Interchangeable bayonet lens options • Project images side by side from two separate input sources • Create one large seamless display when projecting from multiple projectors using Edge Blending • Epson's Instant...

User Manual
Page 11
... Locations Product Box Contents Save all of these parts: 11 Make sure your projector box included all the packaging in case you need to all networked projectors (Windows only) Note: The PowerLite Pro G6550WU projector with the standard lens is shown in most illustrations in this manual, unless noted otherwise. • Support for Crestron RoomView...
... Locations Product Box Contents Save all of these parts: 11 Make sure your projector box included all the packaging in case you need to all networked projectors (Windows only) Note: The PowerLite Pro G6550WU projector with the standard lens is shown in most illustrations in this manual, unless noted otherwise. • Support for Crestron RoomView...
User Manual
Page 12
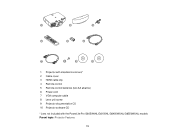
1 Projector with standard zoom lens* 2 Cable cover 3 HDMI cable clip 4 Remote control 5 Remote control batteries (two AA alkaline) 6 Power cord 7 VGA computer cable 8 Lens unit screw 9 Projector documentation CD 10 Projector software CD * Lens not included with the PowerLite Pro G6050WNL/G6150NL/G6450WUNL/G6550WUNL models Parent topic: Projector Features 12
1 Projector with standard zoom lens* 2 Cable cover 3 HDMI cable clip 4 Remote control 5 Remote control batteries (two AA alkaline) 6 Power cord 7 VGA computer cable 8 Lens unit screw 9 Projector documentation CD 10 Projector software CD * Lens not included with the PowerLite Pro G6050WNL/G6150NL/G6450WUNL/G6550WUNL models Parent topic: Projector Features 12
User Manual
Page 13
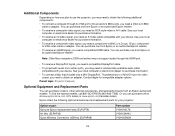
... Depending on how you plan to use the projector, you may need a commercially available audio cable compatible with your device. Epson offers the following additional components: • To connect a computer through its VGA port to the projector's BNC ports, you need a VGA-to-5-BNC... To receive an HDMI signal, you need an S-Video cable compatible with your device. sales) or www.epson.ca (Canadian sales). See your projector: Option or part Genuine Epson replacement lamp (ELPLP76) Air filter (ELPAF43) Quick Wireless Connection USB key (ELPAP09) Part number V13H010L76 V13H134A43...
... Depending on how you plan to use the projector, you may need a commercially available audio cable compatible with your device. Epson offers the following additional components: • To connect a computer through its VGA port to the projector's BNC ports, you need a VGA-to-5-BNC... To receive an HDMI signal, you need an S-Video cable compatible with your device. sales) or www.epson.ca (Canadian sales). See your projector: Option or part Genuine Epson replacement lamp (ELPLP76) Air filter (ELPAF43) Quick Wireless Connection USB key (ELPAP09) Part number V13H010L76 V13H134A43...
User Manual
Page 14
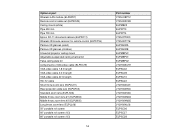
...) Remote control cable set (ELPKC28) Ceiling mount (white) Pipe 450 mm Pipe 700 mm Epson DC-11 document camera (ELPDC11) Wireless IR mouse receiver for remote control (ELPST16) Passive 3D glasses (adult) Passive 3D glasses (children) Universal projector ceiling mount Adjustable suspended ceiling channel kit False ceiling plate kit Component-to-VGA...
...) Remote control cable set (ELPKC28) Ceiling mount (white) Pipe 450 mm Pipe 700 mm Epson DC-11 document camera (ELPDC11) Wireless IR mouse receiver for remote control (ELPST16) Passive 3D glasses (adult) Passive 3D glasses (children) Universal projector ceiling mount Adjustable suspended ceiling channel kit False ceiling plate kit Component-to-VGA...

User Manual
Page 15
...Service. See the Extra Care Road Service brochure for your product online using the projector CD or at this site: www.epson.com/webreg. Register your unit to Your Projector 15 Registering also lets you won't have to wait for details. Parent topic.... • Notes contain important information about your projector. • Tips contain additional projection information. Instead, Epson will ship you a replacement unit anywhere in these notations as you project with your projector. Parent topic: Projector Features Notations Used in the Documentation Follow the guidelines...
...Service. See the Extra Care Road Service brochure for your product online using the projector CD or at this site: www.epson.com/webreg. Register your unit to Your Projector 15 Registering also lets you won't have to wait for details. Parent topic.... • Notes contain important information about your projector. • Tips contain additional projection information. Instead, Epson will ship you a replacement unit anywhere in these notations as you project with your projector. Parent topic: Projector Features Notations Used in the Documentation Follow the guidelines...
User Manual
Page 16
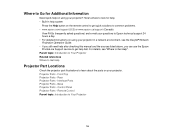
Projector Parts - Base Projector Parts - Rear Projector Parts - Interface Ports Projector Parts - Control Panel Projector Parts - Parent topic: Introduction to Your Projector Related references Where to Get Help Projector Part Locations Check the projector part illustrations to Go for help: • Built-in a network environment, see "Where to get quick solutions to common problems. • www.epson.com/support (U.S) or...
Projector Parts - Base Projector Parts - Rear Projector Parts - Interface Ports Projector Parts - Control Panel Projector Parts - Parent topic: Introduction to Your Projector Related references Where to Get Help Projector Part Locations Check the projector part illustrations to Go for help: • Built-in a network environment, see "Where to get quick solutions to common problems. • www.epson.com/support (U.S) or...
User Manual
Page 17
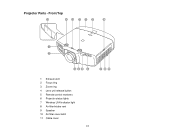
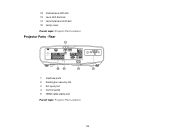
Projector Parts - Front/Top 1 Exhaust vent 2 Focus ring 3 Zoom ring 4 Lens unit release button 5 Remote control receivers 6 Projector status lights 7 Wireless LAN indicator light 8 Air filter/intake vent 9 Speaker 10 Air filter cover latch 11 Cable cover 17
Projector Parts - Front/Top 1 Exhaust vent 2 Focus ring 3 Zoom ring 4 Lens unit release button 5 Remote control receivers 6 Projector status lights 7 Wireless LAN indicator light 8 Air filter/intake vent 9 Speaker 10 Air filter cover latch 11 Cable cover 17
User Manual
Page 18
Rear 1 Interface ports 2 Kensington security slot 3 AC input port 4 Control panel 5 HDMI cable clamp slot Parent topic: Projector Part Locations 18 12 Vertical lens shift dial 13 Lens shift dial lock 14 Horizontal lens shift dial 15 Lamp cover Parent topic: Projector Part Locations Projector Parts -
Rear 1 Interface ports 2 Kensington security slot 3 AC input port 4 Control panel 5 HDMI cable clamp slot Parent topic: Projector Part Locations 18 12 Vertical lens shift dial 13 Lens shift dial lock 14 Horizontal lens shift dial 15 Lamp cover Parent topic: Projector Part Locations Projector Parts -
User Manual
Page 20
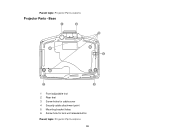
Parent topic: Projector Part Locations Projector Parts - Base 1 Front adjustable foot 2 Rear feet 3 Screw holes for cable cover 4 Security cable attachment point 5 Mounting bracket holes 6 Screw hole for lens unit release button Parent topic: Projector Part Locations 20
Parent topic: Projector Part Locations Projector Parts - Base 1 Front adjustable foot 2 Rear feet 3 Screw holes for cable cover 4 Security cable attachment point 5 Mounting bracket holes 6 Screw hole for lens unit release button Parent topic: Projector Part Locations 20
User Manual
Page 21
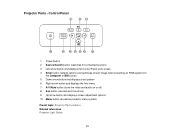
... (turns the video and audio on or off) 8 Esc button (cancels/exits functions) 9 Up arrow button and displays screen adjustment options 10 Menu button (accesses projector menu system) Parent topic: Projector Part Locations Related references Projector Light Status 21...
... (turns the video and audio on or off) 8 Esc button (cancels/exits functions) 9 Up arrow button and displays screen adjustment options 10 Menu button (accesses projector menu system) Parent topic: Projector Part Locations Related references Projector Light Status 21...
User Manual
Page 23
HDBaseT and SDI do not function on the PowerLite Pro G6050W/G6150/G6450WU/G6550WU) 4 Auto button (automatically adjusts position, tracking, and sync settings when projecting analog RGB signals from a computer over a network connection) 13 Volume up/down buttons ... or BNC ports) 5 Aspect button (selects the image aspect ratio) 6 Test Pattern button (displays a test pattern) 7 Freeze button (stops video action) 8 Menu button (accesses projector menu system) 9 Arrow buttons (move through on ) 2 Standby button (turns power off picture and sound) 25 Color Mode button (selects display modes) 23
HDBaseT and SDI do not function on the PowerLite Pro G6050W/G6150/G6450WU/G6550WU) 4 Auto button (automatically adjusts position, tracking, and sync settings when projecting analog RGB signals from a computer over a network connection) 13 Volume up/down buttons ... or BNC ports) 5 Aspect button (selects the image aspect ratio) 6 Test Pattern button (displays a test pattern) 7 Freeze button (stops video action) 8 Menu button (accesses projector menu system) 9 Arrow buttons (move through on ) 2 Standby button (turns power off picture and sound) 25 Color Mode button (selects display modes) 23
User Manual
Page 24
26 Search button (searches for connected sources) 27 Light button (lights up the buttons temporarily) 28 Indicator light (lights up when the remote control is in use) 29 Remote control signal emitter (emits remote control signals) Parent topic: Projector Part Locations 24
26 Search button (searches for connected sources) 27 Light button (lights up the buttons temporarily) 28 Indicator light (lights up when the remote control is in use) 29 Remote control signal emitter (emits remote control signals) Parent topic: Projector Part Locations 24
User Manual
Page 25
... extension cord. Keep these sections to set up your projector in the following ways: 25 Setting Up the Projector Follow the instructions in these considerations in mind as you want to use . Projector Placement Projector Connections Attaching and Removing the Lens Unit Attaching and Removing... Attaching and Removing the HDMI Cable Clip Installing Batteries in the Remote Control Projector Placement You can also install the projector in a ceiling mount if you select a projector location: • Place the projector on a sturdy, level surface or install it on almost any flat surface...
... extension cord. Keep these sections to set up your projector in the following ways: 25 Setting Up the Projector Follow the instructions in these considerations in mind as you want to use . Projector Placement Projector Connections Attaching and Removing the Lens Unit Attaching and Removing... Attaching and Removing the HDMI Cable Clip Installing Batteries in the Remote Control Projector Placement You can also install the projector in a ceiling mount if you select a projector location: • Place the projector on a sturdy, level surface or install it on almost any flat surface...


