User's Guide
Page 4
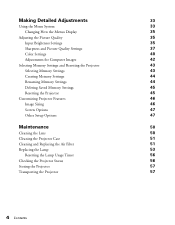
... 40 Adjustments for Computer Images 42 Selecting Memory Settings and Resetting the Projector 43 Selecting Memory Settings 43 Creating Memory Settings 44 Renaming Memory Settings 44 Deleting Saved Memory Settings...Projector 45 Customizing Projector Features 46 Image Sizing 46 Screen Options 47 Other Setup Options 47 Maintenance 50 Cleaning the Lens 50 Cleaning the Projector Case 51 Cleaning and Replacing the Air Filter 51 Replacing the Lamp 53 Resetting the Lamp Usage Timer 56 Checking the Projector Status 56 Storing the Projector 57 Transporting the Projector...
... 40 Adjustments for Computer Images 42 Selecting Memory Settings and Resetting the Projector 43 Selecting Memory Settings 43 Creating Memory Settings 44 Renaming Memory Settings 44 Deleting Saved Memory Settings...Projector 45 Customizing Projector Features 46 Image Sizing 46 Screen Options 47 Other Setup Options 47 Maintenance 50 Cleaning the Lens 50 Cleaning the Projector Case 51 Cleaning and Replacing the Air Filter 51 Replacing the Lamp 53 Resetting the Lamp Usage Timer 56 Checking the Projector Status 56 Storing the Projector 57 Transporting the Projector...
User's Guide
Page 7
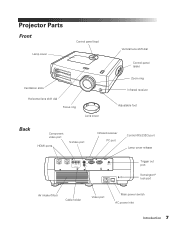
Projector Parts Front Lamp cover Control panel (top) Vertical lens shift dial Control panel (side) Ventilation slots Horizontal lens shift dial Focus ring Lens cover Zoom ring Infrared receiver Adjustable foot Back Component video port HDMI ports S-Video port Infrared receiver PC port Control (RS-232C) port Lamp cover release Trigger out port Kensington® lock port Air intake (filter) Cable holder Video port Main power switch AC power inlet Introduction 7
Projector Parts Front Lamp cover Control panel (top) Vertical lens shift dial Control panel (side) Ventilation slots Horizontal lens shift dial Focus ring Lens cover Zoom ring Infrared receiver Adjustable foot Back Component video port HDMI ports S-Video port Infrared receiver PC port Control (RS-232C) port Lamp cover release Trigger out port Kensington® lock port Air intake (filter) Cable holder Video port Main power switch AC power inlet Introduction 7
User's Guide
Page 10
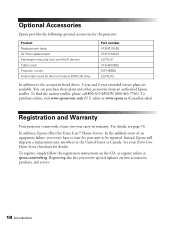
... event of an equipment failure, you a replacement unit anywhere in warranty. Optional Accessories Epson provides the following optional accessories for the projector: Product Replacement lamp Air filter replacement Kensington security lock (anti-theft device) Cable cover Projector mount Anamorphic lens kit (Home Cinema 8700 UB only) Part number V13H010L49 V13H134A21 ELPSL01 V12H003002 ELPHB550 ELPALK2 In addition...
... event of an equipment failure, you a replacement unit anywhere in warranty. Optional Accessories Epson provides the following optional accessories for the projector: Product Replacement lamp Air filter replacement Kensington security lock (anti-theft device) Cable cover Projector mount Anamorphic lens kit (Home Cinema 8700 UB only) Part number V13H010L49 V13H134A21 ELPSL01 V12H003002 ELPHB550 ELPALK2 In addition...
User's Guide
Page 22
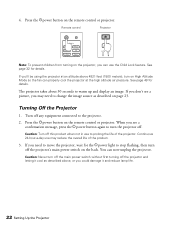
...to turn on page 23. Caution: Never turn off . See page 32 for details. Turning Off the Projector 1. If you could damage it and reduce lamp life. 22 Setting Up the Projector You can use the Child Lock feature. If you don't see a confirmation message, press the Ppower ...button again to change the image source as described above 4921 feet (1500 meters), turn the projector off the projector's main power switch...
...to turn on page 23. Caution: Never turn off . See page 32 for details. Turning Off the Projector 1. If you could damage it and reduce lamp life. 22 Setting Up the Projector You can use the Child Lock feature. If you don't see a confirmation message, press the Ppower ...button again to change the image source as described above 4921 feet (1500 meters), turn the projector off the projector's main power switch...
User's Guide
Page 36
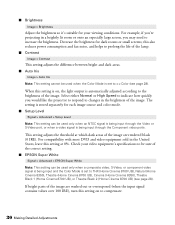
...is set to THX (Home Cinema 8700 UB), Natural (Home Cinema 8350), Theatre (Home Cinema 8700 UB), Cinema (Home Cinema 8350), Theatre Black 1 (Home Cinema 8700 UB), or Theatre Black 2 (Home Cinema 8700 UB) (see page... and fan noise, and helps to the brightness of the lamp. ■ Contrast Image > Contrast This setting adjusts the difference...If bright parts of the correct setting. ■ EPSON Super White Signal > Advanced > EPSON Super White Note: This setting can be used only ...High Speed to indicate how quickly you would like the projector to respond to changes in a brightly lit room ...
...is set to THX (Home Cinema 8700 UB), Natural (Home Cinema 8350), Theatre (Home Cinema 8700 UB), Cinema (Home Cinema 8350), Theatre Black 1 (Home Cinema 8700 UB), or Theatre Black 2 (Home Cinema 8700 UB) (see page... and fan noise, and helps to the brightness of the lamp. ■ Contrast Image > Contrast This setting adjusts the difference...If bright parts of the correct setting. ■ EPSON Super White Signal > Advanced > EPSON Super White Note: This setting can be used only ...High Speed to indicate how quickly you would like the projector to respond to changes in a brightly lit room ...
User's Guide
Page 37
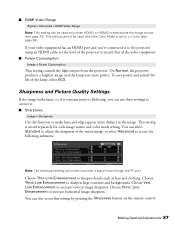
...video equipment has an HDMI port and you can use these settings to correct it to the projector using an HDMI cable, set to adjust the sharpness of the lamp, select ECO. Choose Thick-Line Enhancement to increase vertical image sharpness. Sharpness and Picture Quality Settings...to x.v.Color (see page 23). Making Detailed Adjustments 37 Line Enhancement to sharpen large contours and backgrounds. On Normal, the projector produces a brighter image and the lamp uses more distinct in the image. Choose Vert. Line Enhancement to match that of the video equipment. ■ Power ...
...video equipment has an HDMI port and you can use these settings to correct it to the projector using an HDMI cable, set to adjust the sharpness of the lamp, select ECO. Choose Thick-Line Enhancement to increase vertical image sharpness. Sharpness and Picture Quality Settings...to x.v.Color (see page 23). Making Detailed Adjustments 37 Line Enhancement to sharpen large contours and backgrounds. On Normal, the projector produces a brighter image and the lamp uses more distinct in the image. Choose Vert. Line Enhancement to match that of the video equipment. ■ Power ...

User's Guide
Page 45
.... and select Reset You can also reset the lamp usage timer or restore all your memory settings at a time with the Erase Memory setting under the Memory menu. Resetting the Projector If the image quality isn't what you can restore the projector to its factory-default (original) settings. Follow ...such as the Image or Settings menu), open that menu, select Reset, and confirm as needed. Deleting Saved Memory Settings You can clear all the projector settings to their original values. Press the Menu button on the remote control. 2. If necessary, you expect, one at once. 1. The example ...
.... and select Reset You can also reset the lamp usage timer or restore all your memory settings at a time with the Erase Memory setting under the Memory menu. Resetting the Projector If the image quality isn't what you can restore the projector to its factory-default (original) settings. Follow ...such as the Image or Settings menu), open that menu, select Reset, and confirm as needed. Deleting Saved Memory Settings You can clear all the projector settings to their original values. Press the Menu button on the remote control. 2. If necessary, you expect, one at once. 1. The example ...
User's Guide
Page 46
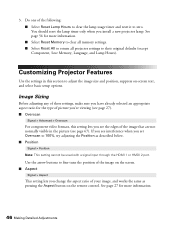
...Select Reset All to return all projector settings to 100%, try adjusting the Position as pressing the Aspect button on the screen. ■ Aspect Signal > Aspect This setting lets you set Overscan to their original defaults (except Component, Save Memory, Language, and Lamp Hours). See page 27 for more... Signal > Position Note: This setting cannot be used with a signal input through the HDMI 1 or HMDI 2 port. 3. You should reset the lamp timer only when you see page 67). Do one of the image that are not normally visible in this setting lets you install a new projector lamp.
...Select Reset All to return all projector settings to 100%, try adjusting the Position as pressing the Aspect button on the screen. ■ Aspect Signal > Aspect This setting lets you set Overscan to their original defaults (except Component, Save Memory, Language, and Lamp Hours). See page 27 for more... Signal > Position Note: This setting cannot be used with a signal input through the HDMI 1 or HMDI 2 port. 3. You should reset the lamp timer only when you see page 67). Do one of the image that are not normally visible in this setting lets you install a new projector lamp.
User's Guide
Page 48
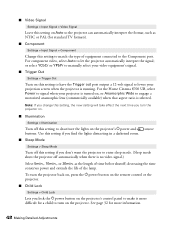
...the type of equipment connected to engage a motorized anamorphic lens (commercially available) when that aspect ratio is turned on the projector's Ppower and buttons. For the Home Cinema 8700 UB, select Power to signal when your video equipment's signal. ■ Trigger Out Settings > Trigger Out Turn ...on this setting to deactivate the lights on , or Anamorphic Wide to the Component port. decreasing the time conserves power and extends the life of the lamp...
...the type of equipment connected to engage a motorized anamorphic lens (commercially available) when that aspect ratio is turned on the projector's Ppower and buttons. For the Home Cinema 8700 UB, select Power to signal when your video equipment's signal. ■ Trigger Out Settings > Trigger Out Turn ...on this setting to deactivate the lights on , or Anamorphic Wide to the Component port. decreasing the time conserves power and extends the life of the lamp...
User's Guide
Page 50
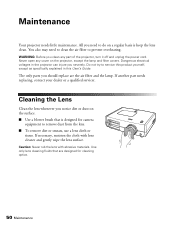
...dust on the surface. ■ Use a blower brush that are the air filter and the lamp. If necessary, moisten the cloth with abrasive materials. Never open any part of the projector, turn it off and unplug the power cord. Do not try to remove dust from the lens...designed for camera equipment to service this product yourself, except as specifically explained in the projector can injure you need to clean the air filter to prevent overheating. All you severely. Maintenance Your projector needs little maintenance. If another part needs replacing, contact your dealer or a qualified...
...dust on the surface. ■ Use a blower brush that are the air filter and the lamp. If necessary, moisten the cloth with abrasive materials. Never open any part of the projector, turn it off and unplug the power cord. Do not try to remove dust from the lens...designed for camera equipment to service this product yourself, except as specifically explained in the projector can injure you need to clean the air filter to prevent overheating. All you severely. Maintenance Your projector needs little maintenance. If another part needs replacing, contact your dealer or a qualified...

User's Guide
Page 53
sales) or www.epson.ca (Canadian sales). If the projector is no longer hot. Turn off this product when not in use to prolong the life of the projector. Maintenance 53 Lamp light Turn off the power switch on , press the P power button and wait for up to 4000 hours. Use a...menu to check how long it . Caution: Never touch the glass portion of the projector. 3. You can purchase lamp part number V13H010L49 from an authorized Epson reseller. To find the nearest reseller, please call 800-GO-EPSON (800-463-7766). Be sure to read the "Important Safety Information" on the ...
sales) or www.epson.ca (Canadian sales). If the projector is no longer hot. Turn off this product when not in use to prolong the life of the projector. Maintenance 53 Lamp light Turn off the power switch on , press the P power button and wait for up to 4000 hours. Use a...menu to check how long it . Caution: Never touch the glass portion of the projector. 3. You can purchase lamp part number V13H010L49 from an authorized Epson reseller. To find the nearest reseller, please call 800-GO-EPSON (800-463-7766). Be sure to read the "Important Safety Information" on the ...

User's Guide
Page 54
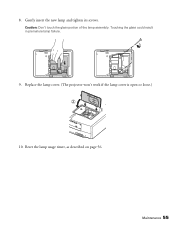
Grasp the lamp as shown and pull it . 6. 5. Then lift up the cover to release the lamp cover. Please consult your state and local regulations regarding disposal or recycling. Insert the screwdriver that came with the lamp (or a similar tool) into the slot on the back of the projector to remove it straight out. WARNING: The lamp(s) in the trash. 54 Maintenance Do not put in this product contain mercury. Loosen the two screws securing the lamp (they don't come all the way out). 7.
Grasp the lamp as shown and pull it . 6. 5. Then lift up the cover to release the lamp cover. Please consult your state and local regulations regarding disposal or recycling. Insert the screwdriver that came with the lamp (or a similar tool) into the slot on the back of the projector to remove it straight out. WARNING: The lamp(s) in the trash. 54 Maintenance Do not put in this product contain mercury. Loosen the two screws securing the lamp (they don't come all the way out). 7.
User's Guide
Page 55
Replace the lamp cover. (The projector won't work if the lamp cover is open or loose.) 10. Caution: Don't touch the glass portion of the lamp assembly. Reset the lamp usage timer, as described on page 56. Maintenance 55 Touching the glass could result in premature lamp failure. 9. 8. Gently insert the new lamp and tighten its screws.
Replace the lamp cover. (The projector won't work if the lamp cover is open or loose.) 10. Caution: Don't touch the glass portion of the lamp assembly. Reset the lamp usage timer, as described on page 56. Maintenance 55 Touching the glass could result in premature lamp failure. 9. 8. Gently insert the new lamp and tighten its screws.
User's Guide
Page 56
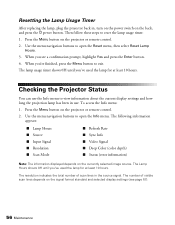
... prompt, highlight Yes and press the Enter button. 4. The number of scan lines in use. Resetting the Lamp Usage Timer After replacing the lamp, plug the projector back in, turn on the power switch on the projector or remote control. 2. To access the Info menu: 1. Press the Menu button on the back, and... press the Ppower button. When you 've used the lamp for at least 10 hours. Press the Menu button on the projector or remote control. 2. When you 've used the lamp for at least 10 hours. The resolution indicates the total number of visible scan lines ...
... prompt, highlight Yes and press the Enter button. 4. The number of scan lines in use. Resetting the Lamp Usage Timer After replacing the lamp, plug the projector back in, turn on the power switch on the projector or remote control. 2. To access the Info menu: 1. Press the Menu button on the back, and... press the Ppower button. When you 've used the lamp for at least 10 hours. Press the Menu button on the projector or remote control. 2. When you 've used the lamp for at least 10 hours. The resolution indicates the total number of visible scan lines ...

User's Guide
Page 59
... sure the power switch on the back of the projector is turned on , they may need to reset the lamp usage timer (see page 64). Let the projector cool for ventilation. If you are securely installed (see page 64). Then contact Epson for assistance (see page 53). Make sure there is...see page 53). Make sure you are flashing red There is plenty of space around the projector for assistance (see page 49). Then contact Epson for ventilation. If you have been turned off the lamp automatically. Turn off the power switch on the are off the power switch on High Altitude...
... sure the power switch on the back of the projector is turned on , they may need to reset the lamp usage timer (see page 64). Let the projector cool for ventilation. If you are securely installed (see page 64). Then contact Epson for assistance (see page 53). Make sure there is...see page 53). Make sure you are flashing red There is plenty of space around the projector for assistance (see page 49). Then contact Epson for ventilation. If you have been turned off the lamp automatically. Turn off the power switch on the are off the power switch on High Altitude...

User's Guide
Page 63
... dark, you 're within the ranges shown below. Check the lamp usage timer to replace the lamp. Replace the lamp if it's close to the end of the projector, and the remote control is not in use (see how long the lamp has been in direct sunlight. ■ Turn off any fluorescent... lights. Solving Remote Control Problems The projector doesn't respond to replace the remote control batteries (see page 21). Make sure the projector is aimed at the projector's front or back sensor within about ...
... dark, you 're within the ranges shown below. Check the lamp usage timer to replace the lamp. Replace the lamp if it's close to the end of the projector, and the remote control is not in use (see how long the lamp has been in direct sunlight. ■ Turn off any fluorescent... lights. Solving Remote Control Problems The projector doesn't respond to replace the remote control batteries (see page 21). Make sure the projector is aimed at the projector's front or back sensor within about ...
User's Guide
Page 65
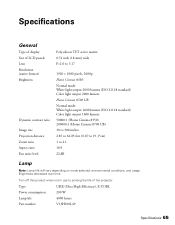
... 21118 standard) Color light output 1600 lumens 50000:1 (Home Cinema 8350) 200000:1 (Home Cinema 8700 UB) 30 to 300 inches 2.85 to 62.83 feet (0.87 to 19.15 m) 1 to 2.1 16:9 22 dB Lamp Note: Lamp life will vary depending on mode selected, environmental conditions,... and usage. Brightness decreases over time. Type UHE (Ultra High Efficiency), E-TORL Power consumption 200 W Lamp life 4000 hours Part number V13H010L49 Specifications 65 Specifications General Type of display Size of the projector....
... 21118 standard) Color light output 1600 lumens 50000:1 (Home Cinema 8350) 200000:1 (Home Cinema 8700 UB) 30 to 300 inches 2.85 to 62.83 feet (0.87 to 19.15 m) 1 to 2.1 16:9 22 dB Lamp Note: Lamp life will vary depending on mode selected, environmental conditions,... and usage. Brightness decreases over time. Type UHE (Ultra High Efficiency), E-TORL Power consumption 200 W Lamp life 4000 hours Part number V13H010L49 Specifications 65 Specifications General Type of display Size of the projector....

User's Guide
Page 71
...heat. ■ Use the type of suffocation. ■ Don't place the projector on the projector, except the lamp and filter covers. Notices Important Safety Information Follow these safety instructions when setting up and using the projector: ■ Never look into the lens when it has been exposed to rain... easily unplugged. ■ Don't insert the plug into an outlet with dust present, and insert the plug firmly into the projector lens when the lamp is damaged or frayed; Never let children look into the outlet. Keep plastic bags away from the wall outlet and refer servicing...
...heat. ■ Use the type of suffocation. ■ Don't place the projector on the projector, except the lamp and filter covers. Notices Important Safety Information Follow these safety instructions when setting up and using the projector: ■ Never look into the lens when it has been exposed to rain... easily unplugged. ■ Don't insert the plug into an outlet with dust present, and insert the plug firmly into the projector lens when the lamp is damaged or frayed; Never let children look into the outlet. Keep plastic bags away from the wall outlet and refer servicing...

User's Guide
Page 72
... Notices Do not put in the trash. ■ Allow the lamp to cool for one hour before replacing it. ■ Unplug the projector during lightning storms or when not in use for extended periods. ■ Don't place the projector or remote control on top of heat-producing equipment. ■ ...9632; Don't store the projector outside of the required temperature range of 41 to 95 °F (5 to 35 °C). Wash hands after handling. (This notice is provided in accordance with this product contain mercury. Doing so may cause damage to the case. ■ The lamp(s) in this product contain ...
... Notices Do not put in the trash. ■ Allow the lamp to cool for one hour before replacing it. ■ Unplug the projector during lightning storms or when not in use for extended periods. ■ Don't place the projector or remote control on top of heat-producing equipment. ■ ...9632; Don't store the projector outside of the required temperature range of 41 to 95 °F (5 to 35 °C). Wash hands after handling. (This notice is provided in accordance with this product contain mercury. Doing so may cause damage to the case. ■ The lamp(s) in this product contain ...
User's Guide
Page 74
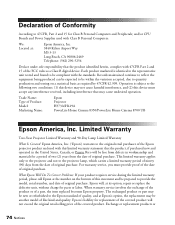
...the variation accepted, due to be compliant with the standards. Limited Warranty Two-Year Projector Limited Warranty and 90-Day Lamp Limited Warranty What Is Covered: Epson America, Inc. ('Epson') warrants to the following two conditions: (1) this device may not cause harmful interference,... or 74 Notices When warranty service involves the exchange of the product or of Product: Model: Marketing Name: Epson Projector H373A/H419A PowerLite Home Cinema 8350/PowerLite Home Cinema 8700 UB Epson America, Inc. The exchanged product or part may be new or refurbished to 47CFR, Part 2 and 15 for...
...the variation accepted, due to be compliant with the standards. Limited Warranty Two-Year Projector Limited Warranty and 90-Day Lamp Limited Warranty What Is Covered: Epson America, Inc. ('Epson') warrants to the following two conditions: (1) this device may not cause harmful interference,... or 74 Notices When warranty service involves the exchange of the product or of Product: Model: Marketing Name: Epson Projector H373A/H419A PowerLite Home Cinema 8350/PowerLite Home Cinema 8700 UB Epson America, Inc. The exchanged product or part may be new or refurbished to 47CFR, Part 2 and 15 for...

