
User Manual
Page 4
... Selecting Wireless Network Settings in OS X 46 Setting Up Wireless Network Security 46 Wireless Security Menu Settings 47 Using Basic Projector Features ...48 Turning On the Projector ...48 Turning Off the Projector ...50 Viewing 3D Images ...51 Pairing the 3D Glasses with the Projector 53 Charging the 3D Glasses...53 3D Viewing...
... Selecting Wireless Network Settings in OS X 46 Setting Up Wireless Network Security 46 Wireless Security Menu Settings 47 Using Basic Projector Features ...48 Turning On the Projector ...48 Turning Off the Projector ...50 Viewing 3D Images ...51 Pairing the 3D Glasses with the Projector 53 Charging the 3D Glasses...53 3D Viewing...
User Manual
Page 5
... Ratio ...65 Changing the Image Aspect Ratio 66 Available Image Aspect Ratios ...66 Color Mode...67 Changing the Color Mode...67 Available Color Modes...68 Turning On Auto Iris...69 Using Picture in Picture ...69 Available Picture in Picture Options 70 Controlling the Volume with the Volume Buttons 71 Projecting a Slide...
... Ratio ...65 Changing the Image Aspect Ratio 66 Available Image Aspect Ratios ...66 Color Mode...67 Changing the Color Mode...67 Available Color Modes...68 Turning On Auto Iris...69 Using Picture in Picture ...69 Available Picture in Picture Options 70 Controlling the Volume with the Volume Buttons 71 Projecting a Slide...

User Manual
Page 20
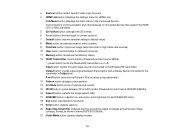
Remote Control 1 On button (turns on projector) 2 P-in-P button (controls the Picture-in-Picture mode) 20 Related references Projector Light Status Projector Parts -
Remote Control 1 On button (turns on projector) 2 P-in-P button (controls the Picture-in-Picture mode) 20 Related references Projector Light Status Projector Parts -
User Manual
Page 21
PowerLite Home Cinema 3500/3510/3600e) 16 Aspect button (selects the image aspect ratio) 17 RGBCMY button (adjusts hue, saturation, and brightness for different functions) 11 Memory button (accesses the Memory menu) 12 WiHD Transmitter control buttons (PowerLite Home Cinema 3600e) power button (turns the WirelessHD transmitter on -screen options) 7 Default button (returns ... Enter button (selects options) 20 Super Res Detail Enh (reduces blurring around the edges of images and enhances image contrast; PowerLite Home Cinema 3500/3510/3600e) 21 Color Mode button (selects display modes) 21
PowerLite Home Cinema 3500/3510/3600e) 16 Aspect button (selects the image aspect ratio) 17 RGBCMY button (adjusts hue, saturation, and brightness for different functions) 11 Memory button (accesses the Memory menu) 12 WiHD Transmitter control buttons (PowerLite Home Cinema 3600e) power button (turns the WirelessHD transmitter on -screen options) 7 Default button (returns ... Enter button (selects options) 20 Super Res Detail Enh (reduces blurring around the edges of images and enhances image contrast; PowerLite Home Cinema 3500/3510/3600e) 21 Color Mode button (selects display modes) 21

User Manual
Page 22
PowerLite Home Cinema 3500/3510/3600e) 24 Illumination button (temporarily lights the remote control buttons) 25 Standby button (turns off sound only; 22 Volume up/down buttons (adjust speaker volume; PowerLite Home Cinema 3500/3510/3600e) 23 Mute button (turns off the projector) Parent topic: Projector Part Locations 22
PowerLite Home Cinema 3500/3510/3600e) 24 Illumination button (temporarily lights the remote control buttons) 25 Standby button (turns off sound only; 22 Volume up/down buttons (adjust speaker volume; PowerLite Home Cinema 3500/3510/3600e) 23 Mute button (turns off the projector) Parent topic: Projector Part Locations 22
User Manual
Page 29
... to the projector. This allows you will use the projector at altitudes above 4921 feet (1500 m), turn on High Altitude Mode to mirror your device manufacturer for PowerLite Home Cinema 3500/3510/3600e). • For video projection, connect devices such as a flash drive or camera. Note...without sound (audio available only for compatible adapter options. • For sound, you can connect audio input cables, if necessary (PowerLite Home Cinema 3500/3510/3600e). • Connect any type of computer that allows you to connect to External USB Devices Parent topic: Setting Up ...
... to the projector. This allows you will use the projector at altitudes above 4921 feet (1500 m), turn on High Altitude Mode to mirror your device manufacturer for PowerLite Home Cinema 3500/3510/3600e). • For video projection, connect devices such as a flash drive or camera. Note...without sound (audio available only for compatible adapter options. • For sound, you can connect audio input cables, if necessary (PowerLite Home Cinema 3500/3510/3600e). • Connect any type of computer that allows you to connect to External USB Devices Parent topic: Setting Up ...

User Manual
Page 38
Make sure the connected USB source is turned on a connected USB device or memory card reader. Connect the USB cable (or USB flash drive or USB memory card reader) to External USB Devices ...
Make sure the connected USB source is turned on a connected USB device or memory card reader. Connect the USB cable (or USB flash drive or USB memory card reader) to External USB Devices ...
User Manual
Page 39
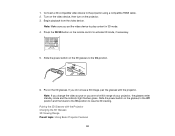
... uses the two AA batteries that came with a connected USB device or camera, you finish presenting with the projector. If the device has a power button, turn off and unplug the device. 2. 2. Open the battery cover. 39 Parent topic: Connecting to cycle through other USB sources, if available.
... uses the two AA batteries that came with a connected USB device or camera, you finish presenting with the projector. If the device has a power button, turn off and unplug the device. 2. 2. Open the battery cover. 39 Parent topic: Connecting to cycle through other USB sources, if available.
User Manual
Page 42
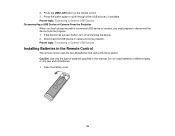
The light flashes when the module is installed and operating. Parent topic: Wireless Network Projection Related references Optional Equipment and Replacement Parts Selecting Wireless Network Settings Manually Before you can project from your wireless network, you must select the network settings for the projector using its menu system. 1. Press the Menu button. 42 The light on the wireless LAN module turns on the projector. 2. Turn on when the module is communicating over the network. Insert the wireless LAN module into the USB Type A port.
The light flashes when the module is installed and operating. Parent topic: Wireless Network Projection Related references Optional Equipment and Replacement Parts Selecting Wireless Network Settings Manually Before you can project from your wireless network, you must select the network settings for the projector using its menu system. 1. Press the Menu button. 42 The light on the wireless LAN module turns on the projector. 2. Turn on when the module is communicating over the network. Insert the wireless LAN module into the USB Type A port.
User Manual
Page 44
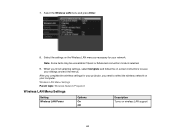
7. Wireless LAN Menu Settings Parent topic: Wireless Network Projection Wireless LAN Menu Settings Setting Wireless LAN Power Options On Off Description Turns on your computer. When you need to save your network. Note: Some items may be unavailable if Quick or Advanced connection mode is selected. 9. Select ...
7. Wireless LAN Menu Settings Parent topic: Wireless Network Projection Wireless LAN Menu Settings Setting Wireless LAN Power Options On Off Description Turns on your computer. When you need to save your network. Note: Some items may be unavailable if Quick or Advanced connection mode is selected. 9. Select ...
User Manual
Page 45
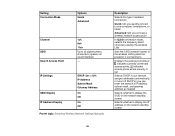
... Network Settings Manually Description Selects the type of the wireless LAN system the projector is set Selects DHCP if your network assigns addresses automatically, or turns off DHCP so you connect a wireless network access point In Quick connection mode, selects the frequency band (channel) used by the wireless LAN Sets the...
... Network Settings Manually Description Selects the type of the wireless LAN system the projector is set Selects DHCP if your network assigns addresses automatically, or turns off DHCP so you connect a wireless network access point In Quick connection mode, selects the frequency band (channel) used by the wireless LAN Sets the...
User Manual
Page 46
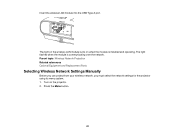
... correct information. 1. Do one of the following security options to the projector, select the correct wireless network in OS X. 1. Click Connect. Make sure AirPort is turned on, then do one of the screen. 2. Parent topic: Wireless Network Projection Selecting Wireless Network Settings in OS X Before connecting to match the settings used...
... correct information. 1. Do one of the following security options to the projector, select the correct wireless network in OS X. 1. Click Connect. Make sure AirPort is turned on, then do one of the screen. 2. Parent topic: Wireless Network Projection Selecting Wireless Network Settings in OS X Before connecting to match the settings used...

User Manual
Page 48
...an Image Source Projection Modes Image Aspect Ratio Color Mode Using Picture in these sections to use your projector's basic features. Turning On the Projector Turning Off the Projector Viewing 3D Images Selecting the Language for the Projector Menus Adjusting the Image Height Adjusting the Image Position Using... Lens Shift Image Shape Resizing the Image with the Volume Buttons Projecting a Slide Show Turning On the Projector Turn on the computer or video equipment you want to use before you turn on the projector so it can display the image source. 48
...an Image Source Projection Modes Image Aspect Ratio Color Mode Using Picture in these sections to use your projector's basic features. Turning On the Projector Turning Off the Projector Viewing 3D Images Selecting the Language for the Projector Menus Adjusting the Image Height Adjusting the Image Position Using... Lens Shift Image Shape Resizing the Image with the Volume Buttons Projecting a Slide Show Turning On the Projector Turn on the computer or video equipment you want to use before you turn on the projector so it can display the image source. 48

User Manual
Page 49
.... 49 The Status light flashes blue as you plug it in. Note: With Direct Power On turned on, the projector turns on the projector. Plug the power cord into an electrical outlet. Press the power button on the projector or the On button on the remote ...control to the projector's power inlet. 3. Remove the projector's lens cover. 2. The projector's power light turns blue. 1. This indicates that the projector is warmed up . Once the projector is receiving power. 4.
.... 49 The Status light flashes blue as you plug it in. Note: With Direct Power On turned on, the projector turns on the projector. Plug the power cord into an electrical outlet. Press the power button on the projector or the On button on the remote ...control to the projector's power inlet. 3. Remove the projector's lens cover. 2. The projector's power light turns blue. 1. This indicates that the projector is warmed up . Once the projector is receiving power. 4.
User Manual
Page 50
...on the projector to prolong the life of the following: • Press the power button on the remote control. The lamp and the Status light turns off the projector. 1. Note: When using the A/V Mute feature, the projector lamp is especially dangerous for children. Do one of the projector. ...Brightness decreases over time. This can see a projected image right away, try the following: • Turn on the connected computer or video device. • Insert a DVD or other button to it so you do not see the computer display during ...
...on the projector to prolong the life of the following: • Press the power button on the remote control. The lamp and the Status light turns off the projector. 1. Note: When using the A/V Mute feature, the projector lamp is especially dangerous for children. Do one of the projector. ...Brightness decreases over time. This can see a projected image right away, try the following: • Turn on the connected computer or video device. • Insert a DVD or other button to it so you do not see the computer display during ...
User Manual
Page 52
... video device, then turn on the 3D glasses to the On position. 6. Slide the power switch on the projector. 3. Connect a 3D-compatible video device to resume 3D viewing. Press ...
... video device, then turn on the 3D glasses to the On position. 6. Slide the power switch on the projector. 3. Connect a 3D-compatible video device to resume 3D viewing. Press ...

User Manual
Page 53
...Pairing the 3D Glasses with the Projector Pair the glasses with the projector to HDMI. 3. Project a 3D image. 4. If pairing is successful, the light turns green for 3D viewing. 1. Move the glasses within 10 feet (3 m) of the projector, then hold down the Pairing button on the glasses flashes red... to the On position. 5. Slide the power switch on the projector. 2. Turn on the 3D glasses to indicate a low battery. 53 The status light on the glasses flashes green and red. Set the image source to establish...
...Pairing the 3D Glasses with the Projector Pair the glasses with the projector to HDMI. 3. Project a 3D image. 4. If pairing is successful, the light turns green for 3D viewing. 1. Move the glasses within 10 feet (3 m) of the projector, then hold down the Pairing button on the glasses flashes red... to the On position. 5. Slide the power switch on the projector. 2. Turn on the 3D glasses to indicate a low battery. 53 The status light on the glasses flashes green and red. Set the image source to establish...

User Manual
Page 54
Connect the other end of the cable to charge the glasses. Parent topic: Viewing 3D Images 54 The glasses are fully charged when the status light on the projector or any other device such as a computer that has an active USB Type A port. Note: Make sure you connect the cable in the correct orientation or you may damage the glasses or cable. 2. 1. Connect the smaller end of the glasses. Note: The projector must be turned on the bridge of the charging cable to the port on to the USB Type A port on the glasses stays green.
Connect the other end of the cable to charge the glasses. Parent topic: Viewing 3D Images 54 The glasses are fully charged when the status light on the projector or any other device such as a computer that has an active USB Type A port. Note: Make sure you connect the cable in the correct orientation or you may damage the glasses or cable. 2. 1. Connect the smaller end of the glasses. Note: The projector must be turned on the bridge of the charging cable to the port on to the USB Type A port on the glasses stays green.

User Manual
Page 55
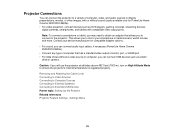
3D Viewing Range When you view 3D images, make sure you are positioned within the viewing range shown here. 1 32 ft (10 m) Parent topic: Viewing 3D Images Selecting the Language for the Projector Menus If you want to view the projector's menus and messages in another language, you can change the Language setting. 1. Press the Menu button. 55 Turn on the projector. 2.
3D Viewing Range When you view 3D images, make sure you are positioned within the viewing range shown here. 1 32 ft (10 m) Parent topic: Viewing 3D Images Selecting the Language for the Projector Menus If you want to view the projector's menus and messages in another language, you can change the Language setting. 1. Press the Menu button. 55 Turn on the projector. 2.

User Manual
Page 56
If the image is too high or low, you can adjust the image height using the projector's adjustable feet. 1. Select the Language setting and press Enter. 5. Turn on the projector and display an image. 2. Parent topic: Using Basic Projector Features Adjusting the Image Height If you want to adjust their height. 56 Select the language you are projecting from a table or other flat surface, and the image is tilted, rotate the front feet to use and press Enter. 6. Press Menu or Esc to exit the menus. 3. Select the Settings menu and press Enter. 4.
If the image is too high or low, you can adjust the image height using the projector's adjustable feet. 1. Select the Language setting and press Enter. 5. Turn on the projector and display an image. 2. Parent topic: Using Basic Projector Features Adjusting the Image Height If you want to adjust their height. 56 Select the language you are projecting from a table or other flat surface, and the image is tilted, rotate the front feet to use and press Enter. 6. Press Menu or Esc to exit the menus. 3. Select the Settings menu and press Enter. 4.


