

User Manual
Page 3
... Computer Sources 34 Connecting to a Computer for VGA Video 34 Connecting to Go for HDMI Video and Audio 35 3 Contents PowerLite Home Cinema 3000/3500/3510/3600e User's Guide 9 Introduction to Your Projector ...10 Projector Features...10 Product Box Contents...11 Additional Components ...12 Optional Equipment and Replacement Parts 13 Warranty and Registration Information 14 Notations...
... Computer Sources 34 Connecting to a Computer for VGA Video 34 Connecting to Go for HDMI Video and Audio 35 3 Contents PowerLite Home Cinema 3000/3500/3510/3600e User's Guide 9 Introduction to Your Projector ...10 Projector Features...10 Product Box Contents...11 Additional Components ...12 Optional Equipment and Replacement Parts 13 Warranty and Registration Information 14 Notations...
User Manual
Page 4
...USB Devices 37 USB Device Projection...37 Connecting a USB Device or Camera to the Projector 38 Selecting the Connected USB Source 38 Disconnecting a USB Device or Camera From the Projector 39 Installing Batteries in the Remote Control 39 Wireless Network Projection ...41 Installing the ...Up Wireless Network Security 46 Wireless Security Menu Settings 47 Using Basic Projector Features ...48 Turning On the Projector ...48 Turning Off the Projector ...50 Viewing 3D Images ...51 Pairing the 3D Glasses with the Projector 53 Charging the 3D Glasses...53 3D Viewing Range...55 Selecting the...
...USB Devices 37 USB Device Projection...37 Connecting a USB Device or Camera to the Projector 38 Selecting the Connected USB Source 38 Disconnecting a USB Device or Camera From the Projector 39 Installing Batteries in the Remote Control 39 Wireless Network Projection ...41 Installing the ...Up Wireless Network Security 46 Wireless Security Menu Settings 47 Using Basic Projector Features ...48 Turning On the Projector ...48 Turning Off the Projector ...50 Viewing 3D Images ...51 Pairing the 3D Glasses with the Projector 53 Charging the 3D Glasses...53 3D Viewing Range...55 Selecting the...
User Manual
Page 5
...Show ...71 Supported Slideshow File Types 72 Slideshow Features ...72 Starting a Slide Show ...72 Slideshow Display Options ...74 Adjusting Projector Features ...76 Shutting Off the Picture and Sound Temporarily 76 Adjusting the Color Convergence (Panel Alignment 76 Saving Settings to ...Memory and Using Saved Settings 80 Projector Security Features...81 Locking the Projector's Buttons ...82 Unlocking the Projector's Buttons 83 Installing a Security Cable ...83 Using WirelessHD ...84 WirelessHD Transmitter Parts...84 ...
...Show ...71 Supported Slideshow File Types 72 Slideshow Features ...72 Starting a Slide Show ...72 Slideshow Display Options ...74 Adjusting Projector Features ...76 Shutting Off the Picture and Sound Temporarily 76 Adjusting the Color Convergence (Panel Alignment 76 Saving Settings to ...Memory and Using Saved Settings 80 Projector Security Features...81 Locking the Projector's Buttons ...82 Unlocking the Projector's Buttons 83 Installing a Security Cable ...83 Using WirelessHD ...84 WirelessHD Transmitter Parts...84 ...
User Manual
Page 6
... Maintenance...118 Replacing the Lamp ...119 Resetting the Lamp Timer...123 Replacing the Remote Control Batteries 124 Transporting the Projector...126 Solving Problems ...128 Projection Problem Tips ...128 Projector Light Status ...129 Solving Image or Sound Problems 131 Solutions When No Image Appears 132 Solutions When "No Signal" Message Appears 133 Displaying...
... Maintenance...118 Replacing the Lamp ...119 Resetting the Lamp Timer...123 Replacing the Remote Control Batteries 124 Transporting the Projector...126 Solving Problems ...128 Projection Problem Tips ...128 Projector Light Status ...129 Solving Image or Sound Problems 131 Solutions When No Image Appears 132 Solutions When "No Signal" Message Appears 133 Displaying...
User Manual
Page 7
... Source Does Not Display Correctly 138 Solutions to Sound Problems ...138 Solving Projector or Remote Control Operation Problems 139 Solutions to Projector Power or Shut-Off Problems 139 Solutions to Problems with the Remote Control... Get Help...141 Technical Specifications ...143 General Projector Specifications ...143 Projector Lamp Specifications...145 Remote Control Specifications ...145 Projector Dimension Specifications 146 Projector Electrical Specifications ...146 Projector Environmental Specifications 147 Projector Safety and Approvals Specifications 148 Supported Video Display...
... Source Does Not Display Correctly 138 Solutions to Sound Problems ...138 Solving Projector or Remote Control Operation Problems 139 Solutions to Projector Power or Shut-Off Problems 139 Solutions to Problems with the Remote Control... Get Help...141 Technical Specifications ...143 General Projector Specifications ...143 Projector Lamp Specifications...145 Remote Control Specifications ...145 Projector Dimension Specifications 146 Projector Electrical Specifications ...146 Projector Environmental Specifications 147 Projector Safety and Approvals Specifications 148 Supported Video Display...
User Manual
Page 10
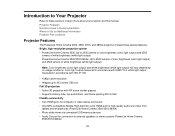
...) • Photo slide shows via connected USB memory devices • Audio Out port for Additional Information Projector Part Locations Projector Features The PowerLite Home Cinema 3000, 3500, 3510, and 3600e projectors include these sections to external speakers or stereo system (PowerLite Home Cinema 3500/3510/3600e) 10 Color light output measured in the Documentation Where to Go for connection to learn...
...) • Photo slide shows via connected USB memory devices • Audio Out port for Additional Information Projector Part Locations Projector Features The PowerLite Home Cinema 3000, 3500, 3510, and 3600e projectors include these sections to external speakers or stereo system (PowerLite Home Cinema 3500/3510/3600e) 10 Color light output measured in the Documentation Where to Go for connection to learn...
User Manual
Page 11
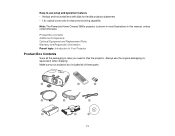
... • 1.6× optical zoom ratio for improved zooming capability Note: The PowerLite Home Cinema 3600e projector is shown in most illustrations in case you need to -use the original packaging (or equivalent) when shipping. Make sure your projector box included all the packaging in this manual, unless noted otherwise. Product Box Contents Additional Components Optional...
... • 1.6× optical zoom ratio for improved zooming capability Note: The PowerLite Home Cinema 3600e projector is shown in most illustrations in case you need to -use the original packaging (or equivalent) when shipping. Make sure your projector box included all the packaging in this manual, unless noted otherwise. Product Box Contents Additional Components Optional...
User Manual
Page 12
... may not require a cable (PowerLite Home Cinema 3500/3510/3600e). • To receive and view a 3D signal, you also need a Blu-ray player that allows you need a compatible HDMI cable. You can purchase one from Epson or an authorized Epson reseller. • To receive an HDMI signal, you to connect to the projector's HDMI port. Older Mac...
... may not require a cable (PowerLite Home Cinema 3500/3510/3600e). • To receive and view a 3D signal, you also need a Blu-ray player that allows you need a compatible HDMI cable. You can purchase one from Epson or an authorized Epson reseller. • To receive an HDMI signal, you to connect to the projector's HDMI port. Older Mac...
User Manual
Page 13
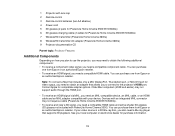
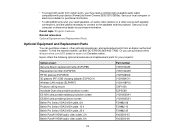
... sound, you may need speakers, an audio video receiver or a video source with your device (PowerLite Home Cinema 3500/3510/3600e). sales) or epson.ca (Canadian sales). See your local computer or electronics dealer for purchase information. Parent topic: Projector Features Related references Optional Equipment and Replacement Parts Optional Equipment and Replacement Parts You can purchase...
... sound, you may need speakers, an audio video receiver or a video source with your device (PowerLite Home Cinema 3500/3510/3600e). sales) or epson.ca (Canadian sales). See your local computer or electronics dealer for purchase information. Parent topic: Projector Features Related references Optional Equipment and Replacement Parts Optional Equipment and Replacement Parts You can purchase...
User Manual
Page 14
... for Additional Information Need quick help : • epson.com/support (U.S) or epson.ca/support (Canada) 14 See the Extra Care Home Service brochure for help on using your product online using the projector CD or at this site: epson.com/webreg Registering also lets you project with your projector. • Tips contain additional projection information. Here...
... for Additional Information Need quick help : • epson.com/support (U.S) or epson.ca/support (Canada) 14 See the Extra Care Home Service brochure for help on using your product online using the projector CD or at this site: epson.com/webreg Registering also lets you project with your projector. • Tips contain additional projection information. Here...

User Manual
Page 15
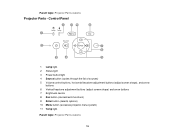
... learn about the parts on using your projector. View FAQs (frequently asked questions) and e-mail your questions to Epson technical support 24 hours a day. • For detailed instructions on your projector in a network environment, see "Where to Get Help". Rear Projector Parts - Base Projector Parts - Control Panel Projector Parts - Projector Parts - Remote Control Parent topic: Introduction to...
... learn about the parts on using your projector. View FAQs (frequently asked questions) and e-mail your questions to Epson technical support 24 hours a day. • For detailed instructions on your projector in a network environment, see "Where to Get Help". Rear Projector Parts - Base Projector Parts - Control Panel Projector Parts - Projector Parts - Remote Control Parent topic: Introduction to...

User Manual
Page 16
Front/Top 1 Lamp cover 2 Exhaust vent 3 Focus ring 4 Lens cap 5 Lens 6 Zoom ring 7 Remote receiver 8 Front adjustable foot 9 Air filter cover and vent 10 Vertical lens shift dial 11 Horizontal lens shift dial 12 Control panel 16 Projector Parts -
Front/Top 1 Lamp cover 2 Exhaust vent 3 Focus ring 4 Lens cap 5 Lens 6 Zoom ring 7 Remote receiver 8 Front adjustable foot 9 Air filter cover and vent 10 Vertical lens shift dial 11 Horizontal lens shift dial 12 Control panel 16 Projector Parts -

User Manual
Page 17
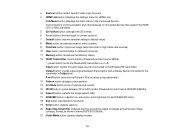
Rear 1 Speakers (PowerLite Home Cinema 3500/3510/3600e) 2 AC input port 3 Trigger out port 4 RS-232C port 5 Audio ports (PowerLite Home Cinema 3500/3510/3600e) 6 Component ports 7 Security cable attachment point 8 Audio Out port (PowerLite Home Cinema 3500/3510/3600e) 9 Cable holder 10 Remote receiver 17 Parent topic: Projector Part Locations Projector Parts -
Rear 1 Speakers (PowerLite Home Cinema 3500/3510/3600e) 2 AC input port 3 Trigger out port 4 RS-232C port 5 Audio ports (PowerLite Home Cinema 3500/3510/3600e) 6 Component ports 7 Security cable attachment point 8 Audio Out port (PowerLite Home Cinema 3500/3510/3600e) 9 Cable holder 10 Remote receiver 17 Parent topic: Projector Part Locations Projector Parts -

User Manual
Page 18
11 USB Type A port 12 Service port 13 Video port 14 HDMI 2 port 15 PC port 16 HDMI 1/MHL (PowerLite Home Cinema 3500/3510/3600e) or HDMI 1 (PowerLite Home Cinema 3000) port Parent topic: Projector Part Locations Related tasks Installing a Security Cable Projector Parts - Base 1 Front adjustable feet 2 Mounting bracket holes 3 Intake vent 18
11 USB Type A port 12 Service port 13 Video port 14 HDMI 2 port 15 PC port 16 HDMI 1/MHL (PowerLite Home Cinema 3500/3510/3600e) or HDMI 1 (PowerLite Home Cinema 3000) port Parent topic: Projector Part Locations Related tasks Installing a Security Cable Projector Parts - Base 1 Front adjustable feet 2 Mounting bracket holes 3 Intake vent 18
User Manual
Page 19
Control Panel 1 Lamp light 2 Status light 3 Power button/light 4 Source button (cycles through the list of sources) 5 Volume control buttons, horizontal keystone adjustment buttons (adjust screen shape), and arrow buttons 6 Vertical keystone adjustment buttons (adjust screen shape) and arrow buttons 7 Brightness sensor 8 Esc button (cancels/exits functions) 9 Enter button (selects options) 10 Menu button (accesses projector menu system) 11 Temp light Parent topic: Projector Part Locations 19 Parent topic: Projector Part Locations Projector Parts -
Control Panel 1 Lamp light 2 Status light 3 Power button/light 4 Source button (cycles through the list of sources) 5 Volume control buttons, horizontal keystone adjustment buttons (adjust screen shape), and arrow buttons 6 Vertical keystone adjustment buttons (adjust screen shape) and arrow buttons 7 Brightness sensor 8 Esc button (cancels/exits functions) 9 Enter button (selects options) 10 Menu button (accesses projector menu system) 11 Temp light Parent topic: Projector Part Locations 19 Parent topic: Projector Part Locations Projector Parts -

User Manual
Page 20
Remote Control 1 On button (turns on projector) 2 P-in-P button (controls the Picture-in-Picture mode) 20 Related references Projector Light Status Projector Parts -
Remote Control 1 On button (turns on projector) 2 P-in-P button (controls the Picture-in-Picture mode) 20 Related references Projector Light Status Projector Parts -
User Manual
Page 21
...modes) 21 PowerLite Home Cinema 3500/3510/3600e) 16 Aspect button (selects the image aspect ratio) 17 RGBCMY button (adjusts hue, saturation, and brightness for different functions) 11 Memory button (accesses the Memory menu) 12 WiHD Transmitter control buttons (PowerLite Home Cinema 3600e) power... button (turns the WirelessHD transmitter on or off) Input button (cycles through image sources connected to the WirelessHD transmitter) Output button (cycles output signal between the projector and a display device connected to...
...modes) 21 PowerLite Home Cinema 3500/3510/3600e) 16 Aspect button (selects the image aspect ratio) 17 RGBCMY button (adjusts hue, saturation, and brightness for different functions) 11 Memory button (accesses the Memory menu) 12 WiHD Transmitter control buttons (PowerLite Home Cinema 3600e) power... button (turns the WirelessHD transmitter on or off) Input button (cycles through image sources connected to the WirelessHD transmitter) Output button (cycles output signal between the projector and a display device connected to...

User Manual
Page 22
PowerLite Home Cinema 3500/3510/3600e) 23 Mute button (turns off the projector) Parent topic: Projector Part Locations 22 PowerLite Home Cinema 3500/3510/3600e) 24 Illumination button (temporarily lights the remote control buttons) 25 Standby button (turns off sound only; 22 Volume up/down buttons (adjust speaker volume;
PowerLite Home Cinema 3500/3510/3600e) 23 Mute button (turns off the projector) Parent topic: Projector Part Locations 22 PowerLite Home Cinema 3500/3510/3600e) 24 Illumination button (temporarily lights the remote control buttons) 25 Standby button (turns off sound only; 22 Volume up/down buttons (adjust speaker volume;
User Manual
Page 23
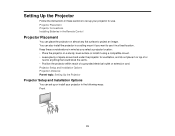
... flat surface to project an image. Projector Placement Projector Connections Installing Batteries in the Remote Control Projector Placement You can set up or install your projector for ventilation, and do not place it in a fixed location. Projector Setup and Installation Options Projection Distance Parent topic: Setting Up the Projector Projector Setup and Installation Options You can place...
... flat surface to project an image. Projector Placement Projector Connections Installing Batteries in the Remote Control Projector Placement You can set up or install your projector for ventilation, and do not place it in a fixed location. Projector Setup and Installation Options Projection Distance Parent topic: Setting Up the Projector Projector Setup and Installation Options You can place...
User Manual
Page 24
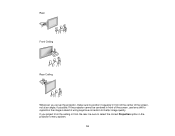
If the projector cannot be sure to select the correct Projection option in the projector's menu system. 24 If you set up the projector, make sure to position it squarely in front of the center of using keystone correction for better image quality. Rear Front Ceiling Rear Ceiling Wherever you project from the ceiling or from the rear, be centered in front of the screen, use lens shift to reposition the image instead of the screen, not at an angle, if possible.
If the projector cannot be sure to select the correct Projection option in the projector's menu system. 24 If you set up the projector, make sure to position it squarely in front of the center of using keystone correction for better image quality. Rear Front Ceiling Rear Ceiling Wherever you project from the ceiling or from the rear, be centered in front of the screen, use lens shift to reposition the image instead of the screen, not at an angle, if possible.


