Product Brochure
Page 2
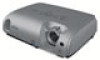
.... © Copyright 2005 Epson America, Inc. CPD-20238 15K 8/05 Printed on observation of their respective companies. Product/Accessory Part Numbers Epson PowerLite 76c projector Replacement lamp Air filter set...Epson PowerLite 76c Specifications Projection System Epson 3LCD technology Projection Method Front/rear/ceiling mount LCD Driving method Pixel number Native resolution Aspect ratio Pixel arrangement Epson Poly-silicon TFT Active Matrix 786,432 dots x 3 (1024 x 768) LCDs XGA 4:3 (supports 16:9) Stripe Projection Lens Type F-number Focal length Zoom ratio Lamp Type Life Manual...
.... © Copyright 2005 Epson America, Inc. CPD-20238 15K 8/05 Printed on observation of their respective companies. Product/Accessory Part Numbers Epson PowerLite 76c projector Replacement lamp Air filter set...Epson PowerLite 76c Specifications Projection System Epson 3LCD technology Projection Method Front/rear/ceiling mount LCD Driving method Pixel number Native resolution Aspect ratio Pixel arrangement Epson Poly-silicon TFT Active Matrix 786,432 dots x 3 (1024 x 768) LCDs XGA 4:3 (supports 16:9) Stripe Projection Lens Type F-number Focal length Zoom ratio Lamp Type Life Manual...
Product Information Guide
Page 1
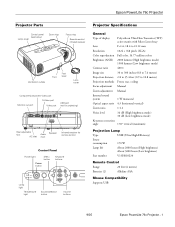
Epson PowerLite 76c Projector Projector Parts Control panel (see below) Lamp cover Zoom ring Focus ring Remote control infrared receiver Ventilation outlets Foot Foot lever Lens cover Computer/Component ...:1 Image size 30 to 300 inches (0.8 to 7.6 meters) Projection distance 2.8 to 35.4 feet (0.9 to 10.8 meters) Projection methods Front, rear, ceiling Focus adjustment Manual Zoom adjustment Manual Internal sound system 1 W monaural Optical aspect ratio 4:3 (horizontal:vertical) Zoom ratio 1:1.2 Noise level 36 dB (High brightness mode) 30 dB (Low brightness mode) Keystone...
Epson PowerLite 76c Projector Projector Parts Control panel (see below) Lamp cover Zoom ring Focus ring Remote control infrared receiver Ventilation outlets Foot Foot lever Lens cover Computer/Component ...:1 Image size 30 to 300 inches (0.8 to 7.6 meters) Projection distance 2.8 to 35.4 feet (0.9 to 10.8 meters) Projection methods Front, rear, ceiling Focus adjustment Manual Zoom adjustment Manual Internal sound system 1 W monaural Optical aspect ratio 4:3 (horizontal:vertical) Zoom ratio 1:1.2 Noise level 36 dB (High brightness mode) 30 dB (Low brightness mode) Keystone...

Product Information Guide
Page 4
... already. 4. Then connect the other end to the projector's power inlet. Epson PowerLite 76c Projector 9/05 such as general guidelines, not exact measurements. Distance from the screen to select the image source manually. Use the formulas given below to either find out how... distance (feet) = 0.11844 × diagonal size (inches) - 0.1086 2. Epson PowerLite 76c Projector Image Size and Projection Distance The distance between the projector and the screen determines the basic size of the projector or on the remote control. See "Selecting the Image Source" on top of an...
... already. 4. Then connect the other end to the projector's power inlet. Epson PowerLite 76c Projector 9/05 such as general guidelines, not exact measurements. Distance from the screen to select the image source manually. Use the formulas given below to either find out how... distance (feet) = 0.11844 × diagonal size (inches) - 0.1086 2. Epson PowerLite 76c Projector Image Size and Projection Distance The distance between the projector and the screen determines the basic size of the projector or on the remote control. See "Selecting the Image Source" on top of an...

Start Here Card
Page 6
... a service mark of the projector to select your notebook's manual or online help Telephone Support Services To use the Display utility in XXXXX CPD-20538 From the Apple® menu, select System Preferences, then click Display or Displays. 2. PowerLite and PrivateLine are for developing ...external monitor port. Allow a few seconds for product information and to find the nearest authorized reseller. Epson disclaims any and all rights in those marks. © 2005 Epson America, Inc. 8/05 Printed in the Control Panel to extend your warranty period. You might ...
... a service mark of the projector to select your notebook's manual or online help Telephone Support Services To use the Display utility in XXXXX CPD-20538 From the Apple® menu, select System Preferences, then click Display or Displays. 2. PowerLite and PrivateLine are for developing ...external monitor port. Allow a few seconds for product information and to find the nearest authorized reseller. Epson disclaims any and all rights in those marks. © 2005 Epson America, Inc. 8/05 Printed in the Control Panel to extend your warranty period. You might ...

User's Guide
Page 32
... light stops flashing but not yet turned on. See page 34. Turning On the Projector Follow these steps to select the image source manually. Then turn on your projector and other end to the projector's power inlet. 32 Projecting 3. The heat generated by the lamp can damage it.... 2. Connect one end of the projector turns orange, indicating that the projector is receiving power but stays ...
... light stops flashing but not yet turned on. See page 34. Turning On the Projector Follow these steps to select the image source manually. Then turn on your projector and other end to the projector's power inlet. 32 Projecting 3. The heat generated by the lamp can damage it.... 2. Connect one end of the projector turns orange, indicating that the projector is receiving power but stays ...

User's Guide
Page 35
...'t see the same image on an external monitor. On most systems, the or CRT/LCD key lets you toggle between the LCD screen and the projector, or display on both the LCD screen and the external monitor port are enabled. you may need to set as the LCD screen. Allow a few... you're using a Macintosh laptop with OS X: You may be labelled CRT/LCD. It may have an icon such as or it . See your laptop's manual or online help for the projector to sync up your system to display on the projector screen as well as your primary display and/or enabled.
...'t see the same image on an external monitor. On most systems, the or CRT/LCD key lets you toggle between the LCD screen and the projector, or display on both the LCD screen and the external monitor port are enabled. you may need to set as the LCD screen. Allow a few... you're using a Macintosh laptop with OS X: You may be labelled CRT/LCD. It may have an icon such as or it . See your laptop's manual or online help for the projector to sync up your system to display on the projector screen as well as your primary display and/or enabled.

User's Guide
Page 56
Press the Menu button. In addition to changing the position of the following screens: Computer (analog-RGB) and RGB video Component video Composite video and S-Video 56 Fine-tuning the Projector You see the Image menu. 2. Adjusting the Input Signal Although the projector normally detects and optimizes the input signal automatically, you can use the Signal menu to widescreen format for computer images, or change the aspect ratio to make manual adjustments. Select the Signal menu. You see one of the projected image, you can correct tracking and sync for video images. 1.
Press the Menu button. In addition to changing the position of the following screens: Computer (analog-RGB) and RGB video Component video Composite video and S-Video 56 Fine-tuning the Projector You see the Image menu. 2. Adjusting the Input Signal Although the projector normally detects and optimizes the input signal automatically, you can use the Signal menu to widescreen format for computer images, or change the aspect ratio to make manual adjustments. Select the Signal menu. You see one of the projected image, you can correct tracking and sync for video images. 1.

User's Guide
Page 84
...turned on. ■ If you've connected a computer and one or more video sources, you might need to press the Source Search button on the projector or the Comp, S-Video, or Video button on an external monitor. It may have an icon such as described in Chapter 1. ■ Make ... are enabled. On most systems, the or CRT/LCD key lets you 've connected a laptop computer, make sure that lets you display on your laptop's manual or online help for details. You see a blue screen with Macintosh OS X: 1. From the Apple menu, select System Preferences, then click Display or Displays....
...turned on. ■ If you've connected a computer and one or more video sources, you might need to press the Source Search button on the projector or the Comp, S-Video, or Video button on an external monitor. It may have an icon such as described in Chapter 1. ■ Make ... are enabled. On most systems, the or CRT/LCD key lets you 've connected a laptop computer, make sure that lets you display on your laptop's manual or online help for details. You see a blue screen with Macintosh OS X: 1. From the Apple menu, select System Preferences, then click Display or Displays....

User's Guide
Page 88
... of the characters may look heavy or blurred. See page 54 for instructions. ■ If you can fine-tune the Tracking and Sync settings manually using the Signal menu as described on page 57. 1. If the image is selected on the Signal message. You see vertical stripes or the ... blurry after trying the solutions in Windows you 're displaying video, adjust the Color Saturation and Tint settings on the Image menu. This resets the projector's tracking and sync settings. ■ If further adjustment is needed, you 've connected a computer or RGB video device to appear as the input source....
... of the characters may look heavy or blurred. See page 54 for instructions. ■ If you can fine-tune the Tracking and Sync settings manually using the Signal menu as described on page 57. 1. If the image is selected on the Signal message. You see vertical stripes or the ... blurry after trying the solutions in Windows you 're displaying video, adjust the Color Saturation and Tint settings on the Image menu. This resets the projector's tracking and sync settings. ■ If further adjustment is needed, you 've connected a computer or RGB video device to appear as the input source....
User's Guide
Page 107
..., 64 to 65 displaying, 65 to 67 turning on, 60, 66 to 67 Low brightness, 39, 75, 95 M Macintosh adapters, 19 connecting, 18 to 20 Manuals, 9 Menus changing settings, 51 to 52 Extended, 50, 60 to 61 Image, 50, 53 to 55 Info, 50, 62 to 63 Reset, 50, 69 Settings..., 25 to 28, 34, 57 to 58 Pixelworks, 97 Pointer changing shape, 59 problems with, 91 using, 47 Position setting, 57 Positioning image, 38, 57 projector, 16 to 17 Power button, 33, 41 consumption, 96 light, 32, 81 to 82 saving, 41 supply, 96 PowerBook, connecting to, 18 to 20 Presentation...
..., 64 to 65 displaying, 65 to 67 turning on, 60, 66 to 67 Low brightness, 39, 75, 95 M Macintosh adapters, 19 connecting, 18 to 20 Manuals, 9 Menus changing settings, 51 to 52 Extended, 50, 60 to 61 Image, 50, 53 to 55 Info, 50, 62 to 63 Reset, 50, 69 Settings..., 25 to 28, 34, 57 to 58 Pixelworks, 97 Pointer changing shape, 59 problems with, 91 using, 47 Position setting, 57 Positioning image, 38, 57 projector, 16 to 17 Power button, 33, 41 consumption, 96 light, 32, 81 to 82 saving, 41 supply, 96 PowerBook, connecting to, 18 to 20 Presentation...


