
Operation Guide - EasyMP Monitor v4.40
Page 2
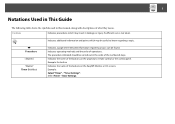
... indicated should be useful to know regarding a topic can be found. 2 Notations Used in This Guide The following table shows the symbols used in this manual, along with descriptions of operations. Indicates a page where detailed information regarding a topic. Indicates the name of the buttons on the projector's remote control or the...
... indicated should be useful to know regarding a topic can be found. 2 Notations Used in This Guide The following table shows the symbols used in this manual, along with descriptions of operations. Indicates a page where detailed information regarding a topic. Indicates the name of the buttons on the projector's remote control or the...
Operation Guide - EasyMP Monitor v4.40
Page 3
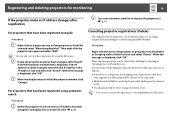
...do an automatic search and registration 14 Procedures for automatic search 14 Procedures for registration 16 Registration by specifying an IP address (Manual registration 17 Registering several projectors to a monitoring group all at once 18 If the projector name or IP address changes after ...registration 20 For projectors that have been registered manually 20 For projectors that have been registered using automatic search 20 Cancelling projector registrations (Delete 20 Monitoring window layout 21 Types of...
...do an automatic search and registration 14 Procedures for automatic search 14 Procedures for registration 16 Registration by specifying an IP address (Manual registration 17 Registering several projectors to a monitoring group all at once 18 If the projector name or IP address changes after ...registration 20 For projectors that have been registered manually 20 For projectors that have been registered using automatic search 20 Cancelling projector registrations (Delete 20 Monitoring window layout 21 Types of...

Operation Guide - EasyMP Monitor v4.40
Page 12
... and select "New" - If Detail list view is displayed, select New - s p.17 q • You can also carry out this operation by specifying an IP address (Manual registration)". Automatic searching will be carried out, and the names of the projectors that are using automatic search (Searching for and registering projectors that have...
... and select "New" - If Detail list view is displayed, select New - s p.17 q • You can also carry out this operation by specifying an IP address (Manual registration)". Automatic searching will be carried out, and the names of the projectors that are using automatic search (Searching for and registering projectors that have...
Operation Guide - EasyMP Monitor v4.40
Page 17
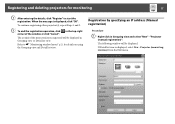
...) from the Edit menu. in Grouping view and select "New" - Registration by specifying an IP address (Manual registration) Procedure A Right-click in the top-right The icon(s) of the window or click "Cancel". If Detail list view is displayed, click "OK". When ...
...) from the Edit menu. in Grouping view and select "New" - Registration by specifying an IP address (Manual registration) Procedure A Right-click in the top-right The icon(s) of the window or click "Cancel". If Detail list view is displayed, click "OK". When ...
Operation Guide - EasyMP Monitor v4.40
Page 18
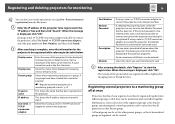
... group all at once" p.18 This shows the name that has been registered on the projector. Monitor Password If a Monitor Password has been set . Projector (manual registration) from the Edit menu. C After searching is registered. The icon(s) of the projector(s) you select one of the registered groups as the first character...
... group all at once" p.18 This shows the name that has been registered on the projector. Monitor Password If a Monitor Password has been set . Projector (manual registration) from the Edit menu. C After searching is registered. The icon(s) of the projector(s) you select one of the registered groups as the first character...
Operation Guide - EasyMP Monitor v4.40
Page 20
... "OK". q You can be deleted if they are as follows. • If you select a Group icon in Grouping view, all projectors that have been registered manually Procedure A Right-click on the desired icons. • Use drag and drop to be deleted in that is displayed. When the message is displayed, click...
... "OK". q You can be deleted if they are as follows. • If you select a Group icon in Grouping view, all projectors that have been registered manually Procedure A Right-click on the desired icons. • Use drag and drop to be deleted in that is displayed. When the message is displayed, click...
Quick Start
Page 4
...remote control to change without notice. © 2009 Epson America, Inc. 11/09 Printed in XXXXXX CPD-27772 Toll or long distance charges may have an icon such as described above. PowerLite and PrivateLine are registered trademarks of support are subject to... and laptop don't display the same image... Windows Try using the projector, install the manuals from an Epson authorized reseller. Depending on an external monitor. Internet Support Visit epson.com/support for details. Product Part number Replacement lamp V13H010L57 Air filter replacement set (2 ...
...remote control to change without notice. © 2009 Epson America, Inc. 11/09 Printed in XXXXXX CPD-27772 Toll or long distance charges may have an icon such as described above. PowerLite and PrivateLine are registered trademarks of support are subject to... and laptop don't display the same image... Windows Try using the projector, install the manuals from an Epson authorized reseller. Depending on an external monitor. Internet Support Visit epson.com/support for details. Product Part number Replacement lamp V13H010L57 Air filter replacement set (2 ...
User's Guide
Page 10
... solving display problems. ■ EasyMP Network Projection Operation Guide Provides detailed instructions on using your projector in a network environment (PDF installed along with this manual from the projector CD). ■ EasyMP Monitor Operation Guide Provides instructions on using the wall mounting hardware included in the box. ■ Quick Setup ... to your equipment. ■ Notes contain important information about your projector. ■ Tips contain additional projection hints. 10 Welcome Using Your Documentation This manual contains all the information you need to Epson support.
... solving display problems. ■ EasyMP Network Projection Operation Guide Provides detailed instructions on using your projector in a network environment (PDF installed along with this manual from the projector CD). ■ EasyMP Monitor Operation Guide Provides instructions on using the wall mounting hardware included in the box. ■ Quick Setup ... to your equipment. ■ Notes contain important information about your projector. ■ Tips contain additional projection hints. 10 Welcome Using Your Documentation This manual contains all the information you need to Epson support.

User's Guide
Page 12
... original packaging (or the equivalent) when you need to another location. Save all packaging in case you have all these parts: 12 Welcome Projector PDF manuals and registration CD-ROM Projector software CD-ROM Power cord Remote control 2 AA batteries (for remote control) Security sticker VGA computer cable Wall plate End...
... original packaging (or the equivalent) when you need to another location. Save all packaging in case you have all these parts: 12 Welcome Projector PDF manuals and registration CD-ROM Projector software CD-ROM Power cord Remote control 2 AA batteries (for remote control) Security sticker VGA computer cable Wall plate End...
User's Guide
Page 25
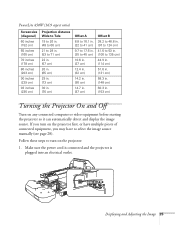
....9 in. (114 cm) 51.6 in. (131 cm) 58.3 in. (148 cm) 60.3 in. (153 cm) Turning the Projector On and Off Turn on the projector: 1. PowerLite 450W (16:9 aspect ratio) Screen size (diagonal) 60 inches (152 cm) 65 inches (165 cm) 70 inches (178 cm) 80 inches (203 cm) 90 inches (229.... (36 cm) 14.7 in. (37 cm) Offset B 38.2 to 48.8 in. (97 to 124 cm) 41.6 to 53 in. (106 to select the image source manually (see page 28). If you turn on any connected computer or video equipment before starting the projector so it can automatically detect and display the...
....9 in. (114 cm) 51.6 in. (131 cm) 58.3 in. (148 cm) 60.3 in. (153 cm) Turning the Projector On and Off Turn on the projector: 1. PowerLite 450W (16:9 aspect ratio) Screen size (diagonal) 60 inches (152 cm) 65 inches (165 cm) 70 inches (178 cm) 80 inches (203 cm) 90 inches (229.... (36 cm) 14.7 in. (37 cm) Offset B 38.2 to 48.8 in. (97 to 124 cm) 41.6 to 53 in. (106 to select the image source manually (see page 28). If you turn on any connected computer or video equipment before starting the projector so it can automatically detect and display the...

User's Guide
Page 45
On Mac OS, double-click the USB Display Installer icon to install the Epson USB Display software. Follow the instructions on your computer's current desktop displayed by the projector. You can connect an optional audio cable if you want ... Warning," select Continue or Continue Anyway. (You see your computer screen as the projector is recognized and the software is installed, you can install it manually. Messages appear on the screen to install the software. 6. See page 113 for instructions. Connect the square end of the cable to the projector's TypeB...
On Mac OS, double-click the USB Display Installer icon to install the Epson USB Display software. Follow the instructions on your computer's current desktop displayed by the projector. You can connect an optional audio cable if you want ... Warning," select Continue or Continue Anyway. (You see your computer screen as the projector is recognized and the software is installed, you can install it manually. Messages appear on the screen to install the software. 6. See page 113 for instructions. Connect the square end of the cable to the projector's TypeB...
User's Guide
Page 63
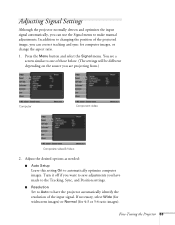
...) or Normal (for computer images, or change the aspect ratio. 1. Adjust the desired options as needed: ■ Auto Setup Leave this setting On to make manual adjustments. Adjusting Signal Settings Although the projector normally detects and optimizes the input signal automatically, you are projecting from.) Computer Component video Composite video/S-Video...
...) or Normal (for computer images, or change the aspect ratio. 1. Adjust the desired options as needed: ■ Auto Setup Leave this setting On to make manual adjustments. Adjusting Signal Settings Although the projector normally detects and optimizes the input signal automatically, you are projecting from.) Computer Component video Composite video/S-Video...

User's Guide
Page 80
Close the air filter cover. If you have the optional USB key, you can configure your connection manually as described on page 81. 80 Using the Projector on a Network Or, you can fasten the module using the screw that came with it. Insert the wireless LAN module as described in the next section. Insert screw here 4. As a security feature, you can use Quick Wireless connection as shown. 3. 2.
Close the air filter cover. If you have the optional USB key, you can configure your connection manually as described on page 81. 80 Using the Projector on a Network Or, you can fasten the module using the screw that came with it. Insert the wireless LAN module as described in the next section. Insert screw here 4. As a security feature, you can use Quick Wireless connection as shown. 3. 2.

User's Guide
Page 115
... sync up after pressing it may not work. Turn the computer and the projector off and then back on again. ■ Depending on your notebook's manual or online help for the projector to select the correct source. Make sure the Mirror Displays checkbox is selected. 5. Solving Problems 115 If you may...
... sync up after pressing it may not work. Turn the computer and the projector off and then back on again. ■ Depending on your notebook's manual or online help for the projector to select the correct source. Make sure the Mirror Displays checkbox is selected. 5. Solving Problems 115 If you may...

User's Guide
Page 118
... select a different Color Mode option in the previous section. ■ If you're projecting from a computer, you can fine-tune the Tracking and Sync settings manually using the Signal menu, as your notebook or computer monitor. Adjust the Tracking to increase the image sharpness. Adjust the Sync setting to eliminate vertical...
... select a different Color Mode option in the previous section. ■ If you're projecting from a computer, you can fine-tune the Tracking and Sync settings manually using the Signal menu, as your notebook or computer monitor. Adjust the Tracking to increase the image sharpness. Adjust the Sync setting to eliminate vertical...

User's Guide
Page 169
..., 111 to 112 Locking buttons, 73 to 74 projector, 74 Logo, saving on projector, 71 to 73 M Macintosh display problems, 115 selecting network settings, 86 Manuals, 10 Menus changing settings, 60 to 61 default settings, restoring, 61 Extended, 67 to 68 Image, 61 to 62 Info, 105 to 106 Network, 77...
..., 111 to 112 Locking buttons, 73 to 74 projector, 74 Logo, saving on projector, 71 to 73 M Macintosh display problems, 115 selecting network settings, 86 Manuals, 10 Menus changing settings, 60 to 61 default settings, restoring, 61 Extended, 67 to 68 Image, 61 to 62 Info, 105 to 106 Network, 77...

