User Manual
Page 3
Control Panel ...19 Projector Parts - Base...18 Projector Parts - Remote Control 20 Setting Up the Projector ...23 Projector Placement...23 Projector Setup and Installation Options 23 Projection Distance...25 Projector Connections...26 Connecting to Computer Sources 27 Connecting to a Computer for USB...31 Connecting to a Composite Video Source 31 Connecting to Go for Sound 32 3 Rear ...17 Projector Parts - Contents Introduction to Your Projector ...9 Projector Features...9 Product Box Contents...10 Additional Components ...12 Optional Equipment and Replacement Parts 12 Warranty and...
Control Panel ...19 Projector Parts - Base...18 Projector Parts - Remote Control 20 Setting Up the Projector ...23 Projector Placement...23 Projector Setup and Installation Options 23 Projection Distance...25 Projector Connections...26 Connecting to Computer Sources 27 Connecting to a Computer for USB...31 Connecting to a Composite Video Source 31 Connecting to Go for Sound 32 3 Rear ...17 Projector Parts - Contents Introduction to Your Projector ...9 Projector Features...9 Product Box Contents...10 Additional Components ...12 Optional Equipment and Replacement Parts 12 Warranty and...
User Manual
Page 4
... USB Devices 32 USB Device Projection...32 Connecting a USB Device or Camera to the Projector 33 Selecting the Connected USB Source 34 Disconnecting a USB Device or Camera From the Projector 34 Connecting to a Document Camera 34 Installing Batteries in the Remote Control 35 Opening...Messages 49 Setting Up Monitoring Using SNMP 49 Controlling a Networked Projector Using a Web Browser 50 Using Basic Projector Features ...53 Turning On the Projector ...53 Turning Off the Projector ...55 Selecting the Language for the Projector Menus 57 Adjusting the Image Height ...57 Image Shape...59 ...
... USB Devices 32 USB Device Projection...32 Connecting a USB Device or Camera to the Projector 33 Selecting the Connected USB Source 34 Disconnecting a USB Device or Camera From the Projector 34 Connecting to a Document Camera 34 Installing Batteries in the Remote Control 35 Opening...Messages 49 Setting Up Monitoring Using SNMP 49 Controlling a Networked Projector Using a Web Browser 50 Using Basic Projector Features ...53 Turning On the Projector ...53 Turning Off the Projector ...55 Selecting the Language for the Projector Menus 57 Adjusting the Image Height ...57 Image Shape...59 ...

User Manual
Page 5
... Buttons 76 Projecting a Slide Show ...77 Slideshow Presentations ...77 Supported Slideshow File Types 78 Starting a Slide Show or Presentation 79 Slideshow Display Options ...81 Adjusting Projector Features ...83 Shutting Off the Picture and Sound Temporarily 83 Stopping Video Action Temporarily ...84 Zooming Into and Out of Images ...84...
... Buttons 76 Projecting a Slide Show ...77 Slideshow Presentations ...77 Supported Slideshow File Types 78 Starting a Slide Show or Presentation 79 Slideshow Display Options ...81 Adjusting Projector Features ...83 Shutting Off the Picture and Sound Temporarily 83 Stopping Video Action Temporarily ...84 Zooming Into and Out of Images ...84...
User Manual
Page 6
... Lamp Timer...125 Replacing the Remote Control Batteries 126 Transporting the Projector...128 Solving Problems ...129 Projection Problem Tips ...129 Projector Light Status ...129 Using the Projector Help Displays ...132 Solving Image or Sound Problems 132 Solutions When... Menu 111 Projector Information Display - Signal Menu 102 Projector Feature Settings - Extended Menu 108 Projector Network Settings - Projector Identification System for Multiple Projector Control 93 Setting the Projector ID...94 Setting the Remote Control ID...94 Matching Multiple-Projector Display Quality ...
... Lamp Timer...125 Replacing the Remote Control Batteries 126 Transporting the Projector...128 Solving Problems ...129 Projection Problem Tips ...129 Projector Light Status ...129 Using the Projector Help Displays ...132 Solving Image or Sound Problems 132 Solutions When... Menu 111 Projector Information Display - Signal Menu 102 Projector Feature Settings - Extended Menu 108 Projector Network Settings - Projector Identification System for Multiple Projector Control 93 Setting the Projector ID...94 Setting the Remote Control ID...94 Matching Multiple-Projector Display Quality ...
User Manual
Page 7
... Incorrect 138 Solutions When There is No Sound or Low Volume 139 Solving Projector or Remote Control Operation Problems 139 Solutions to Projector Power or Shut-Off Problems 140 Solutions to Problems with the Remote Control...to Get Help...142 Technical Specifications ...143 General Projector Specifications ...143 Projector Lamp Specifications...145 Remote Control Specifications ...146 Projector Dimension Specifications 146 Projector Electrical Specifications ...147 Projector Environmental Specifications 148 Projector Safety and Approvals Specifications 148 Supported Video Display Formats...
... Incorrect 138 Solutions When There is No Sound or Low Volume 139 Solving Projector or Remote Control Operation Problems 139 Solutions to Projector Power or Shut-Off Problems 140 Solutions to Problems with the Remote Control...to Get Help...142 Technical Specifications ...143 General Projector Specifications ...143 Projector Lamp Specifications...145 Remote Control Specifications ...146 Projector Dimension Specifications 146 Projector Electrical Specifications ...147 Projector Environmental Specifications 148 Projector Safety and Approvals Specifications 148 Supported Video Display Formats...
User Manual
Page 9
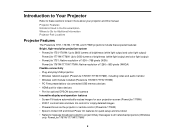
... (WXGA) Flexible connectivity • Plug-and-play USB projection • Wireless network support (PowerLite 1761W/1771W/1776W), including video and audio transfer • Wireless LAN module included (PowerLite 1761W/1771W/1776W) • PC Free presentations via the projector or remote control (PowerLite 1776W) • Epson's Instant Off and Direct Power On features for quick setup and shut down...
... (WXGA) Flexible connectivity • Plug-and-play USB projection • Wireless network support (PowerLite 1761W/1771W/1776W), including video and audio transfer • Wireless LAN module included (PowerLite 1761W/1771W/1776W) • PC Free presentations via the projector or remote control (PowerLite 1776W) • Epson's Instant Off and Direct Power On features for quick setup and shut down...

User Manual
Page 10
Product Box Contents Additional Components Optional Equipment and Replacement Parts Warranty and Registration Information Parent topic: Introduction to ship the projector. Make sure your projector box included all the packaging in case you need to Your Projector Related concepts Projector Part Locations Product Box Contents Save all of these parts: 10 Always use the original packaging (or equivalent) when shipping.
Product Box Contents Additional Components Optional Equipment and Replacement Parts Warranty and Registration Information Parent topic: Introduction to ship the projector. Make sure your projector box included all the packaging in case you need to Your Projector Related concepts Projector Part Locations Product Box Contents Save all of these parts: 10 Always use the original packaging (or equivalent) when shipping.
User Manual
Page 12
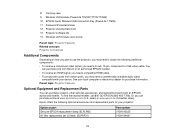
...) Part number V13H010L65 V13H134A31 12 8 Carrying case 9 Wireless LAN module (PowerLite 1761W/1771W/1776W) 10 EPSON Quick Wireless USB Connection Key (PowerLite 1776W) 11 Password Protected sticker 12 Projector documentation CD 13 Projector software CD 14 Wireless LAN module cover screw Parent topic: Projector Features Related concepts Projector Connections Additional Components Depending on how you plan to use the...
...) Part number V13H010L65 V13H134A31 12 8 Carrying case 9 Wireless LAN module (PowerLite 1761W/1771W/1776W) 10 EPSON Quick Wireless USB Connection Key (PowerLite 1776W) 11 Password Protected sticker 12 Projector documentation CD 13 Projector software CD 14 Wireless LAN module cover screw Parent topic: Projector Features Related concepts Projector Connections Additional Components Depending on how you plan to use the...
User Manual
Page 14
... help on converting PowerPoint files into a slide show file format that you can display from a USB device connected to Epson technical support 24 hours a day. • For detailed instructions on using your projector in a network environment (PowerLite 1761W/1771W/1776W), see the warranty brochure that lets you project with your product online using your...
... help on converting PowerPoint files into a slide show file format that you can display from a USB device connected to Epson technical support 24 hours a day. • For detailed instructions on using your projector in a network environment (PowerLite 1761W/1771W/1776W), see the warranty brochure that lets you project with your product online using your...

User Manual
Page 15
For details, see "Where to Your Projector 15 Remote Control Parent topic: Introduction to Get Help". • If you still need help fast. Control Panel Projector Parts - Parent topic: Introduction to Your Projector Related references Where to Get Help Projector Part Locations Check the projector part illustrations to get help after checking this manual and the sources listed above, you can use the EPSON PrivateLine Support service to learn about the parts on your projector. Rear Projector Parts - Projector Parts - Base Projector Parts - Front/Top Projector Parts -
For details, see "Where to Your Projector 15 Remote Control Parent topic: Introduction to Get Help". • If you still need help fast. Control Panel Projector Parts - Parent topic: Introduction to Your Projector Related references Where to Get Help Projector Part Locations Check the projector part illustrations to get help after checking this manual and the sources listed above, you can use the EPSON PrivateLine Support service to learn about the parts on your projector. Rear Projector Parts - Projector Parts - Base Projector Parts - Front/Top Projector Parts -

User Manual
Page 17
Rear 1 AC input port 2 Video port 3 Computer port 4 USB TypeB port 5 USB TypeA port 6 HDMI port 7 Audio port 8 Remote receiver 9 Lamp cover screw 10 Security lock port Parent topic: Projector Part Locations 17 11 Speaker 12 Projector status lights 13 Zoom ring 14 Focus ring (PowerLite 1751/1761W/1771W) 15 Control panel 16 Lamp cover Parent topic: Projector Part Locations Projector Parts -
Rear 1 AC input port 2 Video port 3 Computer port 4 USB TypeB port 5 USB TypeA port 6 HDMI port 7 Audio port 8 Remote receiver 9 Lamp cover screw 10 Security lock port Parent topic: Projector Part Locations 17 11 Speaker 12 Projector status lights 13 Zoom ring 14 Focus ring (PowerLite 1751/1761W/1771W) 15 Control panel 16 Lamp cover Parent topic: Projector Part Locations Projector Parts -
User Manual
Page 18
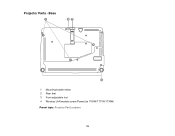
Projector Parts - Base 1 Mounting bracket holes 2 Rear feet 3 Front adjustable foot 4 Wireless LAN module screw (PowerLite 1761W/1771W/1776W) Parent topic: Projector Part Locations 18
Projector Parts - Base 1 Mounting bracket holes 2 Rear feet 3 Front adjustable foot 4 Wireless LAN module screw (PowerLite 1761W/1771W/1776W) Parent topic: Projector Part Locations 18
User Manual
Page 19
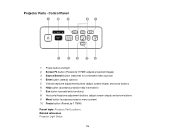
... screen shape) and arrow buttons 6 Help button (accesses projector help information) 7 Esc button (cancels/exits functions) 8 Horizontal keystone adjustment buttons (adjust screen shape) and arrow buttons 9 Menu button (accesses projector menu system) 10 Focus button (PowerLite 1776W) Parent topic: Projector Part Locations Related references Projector Light Status 19 Projector Parts - Control Panel 1 Power button and light 2 Screen...
... screen shape) and arrow buttons 6 Help button (accesses projector help information) 7 Esc button (cancels/exits functions) 8 Horizontal keystone adjustment buttons (adjust screen shape) and arrow buttons 9 Menu button (accesses projector menu system) 10 Focus button (PowerLite 1776W) Parent topic: Projector Part Locations Related references Projector Light Status 19 Projector Parts - Control Panel 1 Power button and light 2 Screen...
User Manual
Page 21
... aspect ratio) 8 Num button (when held down, switches numeric buttons to number function) 9 Menu button (accesses projector menu system) 10 Arrow buttons (move through connected video sources) 4 Screen Fit button (adjusts image shape; functions only on PowerLite 1776W and when not projecting from ceiling) 5 Focus buttons (adjusts the image focus; functions only on...
... aspect ratio) 8 Num button (when held down, switches numeric buttons to number function) 9 Menu button (accesses projector menu system) 10 Arrow buttons (move through connected video sources) 4 Screen Fit button (adjusts image shape; functions only on PowerLite 1776W and when not projecting from ceiling) 5 Focus buttons (adjusts the image focus; functions only on...
User Manual
Page 22
26 USB button (cycles through connected USB sources) 27 Source Search button (searches for connected sources) 28 Remote control light (outputs remote control signals) Parent topic: Projector Part Locations Related tasks Connecting to a Computer for USB Mouse Control 22
26 USB button (cycles through connected USB sources) 27 Source Search button (searches for connected sources) 28 Remote control light (outputs remote control signals) Parent topic: Projector Part Locations Related tasks Connecting to a Computer for USB Mouse Control 22

User Manual
Page 23
... to anything that could block the vents. • Position the projector within reach of a grounded electrical outlet or extension cord. You can place the projector on top of space around and under the projector for use. Keep these sections to view presentations in the Remote... Control Opening the Lens Cover Projector Placement You can also install the projector in a ceiling mount if you select a projector location: • Place the projector on a sturdy, level surface or install it using a compatible mount. • ...
... to anything that could block the vents. • Position the projector within reach of a grounded electrical outlet or extension cord. You can place the projector on top of space around and under the projector for use. Keep these sections to view presentations in the Remote... Control Opening the Lens Cover Projector Placement You can also install the projector in a ceiling mount if you select a projector location: • Place the projector on a sturdy, level surface or install it using a compatible mount. • ...

User Manual
Page 24
Rear Front Ceiling Rear Ceiling Wherever you project from the ceiling or from the rear, be sure to position it squarely in the projector's menu system. If you set up the projector, make sure to select the correct Projection option in front of the center of the screen, not at an angle, if possible. Parent topic: Projector Placement 24
Rear Front Ceiling Rear Ceiling Wherever you project from the ceiling or from the rear, be sure to position it squarely in the projector's menu system. If you set up the projector, make sure to select the correct Projection option in front of the center of the screen, not at an angle, if possible. Parent topic: Projector Placement 24

User Manual
Page 25
... vary depending on the size of the image. Related references Projector Setup Settings - The image size increases the farther the projector is from the screen determines the approximate size of the projected image. (Conversion figures may have been rounded up or down.) PowerLite 1751 4:3 Aspect Ratio Screen or image size 1 50 inches ... 76 to 92 inches (194 to 233 cm) 95 to 115 inches (242 to 291 cm) 143 to 172 inches (364 to place the projector from the screen based on the zoom factor, aspect ratio, and other settings. Use the tables here to determine approximately how far to 438 cm...
... vary depending on the size of the image. Related references Projector Setup Settings - The image size increases the farther the projector is from the screen determines the approximate size of the projected image. (Conversion figures may have been rounded up or down.) PowerLite 1751 4:3 Aspect Ratio Screen or image size 1 50 inches ... 76 to 92 inches (194 to 233 cm) 95 to 115 inches (242 to 291 cm) 143 to 172 inches (364 to place the projector from the screen based on the zoom factor, aspect ratio, and other settings. Use the tables here to determine approximately how far to 438 cm...

User Manual
Page 26
...Signal Menu Image Quality Settings - Image Menu Related tasks Automatically Correcting Image Shape With Screen Fit Focusing the Image Cleaning the Lens Projector Connections You can connect audio input cables, if necessary. • For slide shows without sound. • Connect any type of...• For video projection, connect devices such as a flash drive or camera) or an optional EPSON document camera. Connecting to Computer Sources Connecting to 408 cm) Parent topic: Projector Placement Related references Solutions When the Image is regulated properly. Screen or image size 1 50 inches ...
...Signal Menu Image Quality Settings - Image Menu Related tasks Automatically Correcting Image Shape With Screen Fit Focusing the Image Cleaning the Lens Projector Connections You can connect audio input cables, if necessary. • For slide shows without sound. • Connect any type of...• For video projection, connect devices such as a flash drive or camera) or an optional EPSON document camera. Connecting to Computer Sources Connecting to 408 cm) Parent topic: Projector Placement Related references Solutions When the Image is regulated properly. Screen or image size 1 50 inches ...
User Manual
Page 27
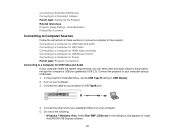
...any available USB port on your computer. 3. Connect the other end to your computer. 5. In the projector's Extended menu, set the USB Type B setting to install the EPSON USB Display software. 27 Connect the cable to your computer meets the system requirements, you can send video... and audio output to a Computer for Sound Parent topic: Projector Connections Connecting to the projector through the computer's USB port (preferably ...
...any available USB port on your computer. 3. Connect the other end to your computer. 5. In the projector's Extended menu, set the USB Type B setting to install the EPSON USB Display software. 27 Connect the cable to your computer meets the system requirements, you can send video... and audio output to a Computer for Sound Parent topic: Projector Connections Connecting to the projector through the computer's USB port (preferably ...


