
User Replaceable Parts List
Page 1
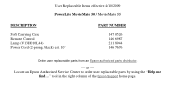
tool in the right column of the Epson Support home page. Locate an Epson Authorized Service Center to order user replaceable parts by using the "Help me find..." User Replaceable Items effective 4/10/2009 PowerLite MovieMate 50 / MovieMate 55 DESCRIPTION Soft Carrying Case Remote Control Lamp (V13H010L44) Power Cord (2-prong, black) est. 10' PART NUMBER 147 0526 146 6987 211 8944 146 7676 Order user replaceable parts from an Epson authorized parts distributor. ---- or ----
tool in the right column of the Epson Support home page. Locate an Epson Authorized Service Center to order user replaceable parts by using the "Help me find..." User Replaceable Items effective 4/10/2009 PowerLite MovieMate 50 / MovieMate 55 DESCRIPTION Soft Carrying Case Remote Control Lamp (V13H010L44) Power Cord (2-prong, black) est. 10' PART NUMBER 147 0526 146 6987 211 8944 146 7676 Order user replaceable parts from an Epson authorized parts distributor. ---- or ----

Quick Guide
Page 5
Unpacking Make sure you have all the parts shown here: MovieMate Remote control Batteries Power cord CD with User's Guide Padded bag Unpacking and Setting Up 5 Unpacking and Setting Up Follow these instructions to unpack and set up your Epson MovieMate.
Unpacking Make sure you have all the parts shown here: MovieMate Remote control Batteries Power cord CD with User's Guide Padded bag Unpacking and Setting Up 5 Unpacking and Setting Up Follow these instructions to unpack and set up your Epson MovieMate.

Quick Guide
Page 7
... you place MovieMate from the... the keystone buttons on MovieMate or on page 19 for instructions. ■ The farther you want an 80-inch diagonal widescreen image, place MovieMate about 7.8 feet away ...from the screen or wall, the larger the image will be. See page 10 for additional details. Caution: MovieMate should be directly in front of time. ■ MovieMate... should not be exposed to internal electronics over time. This causes the image to tilt MovieMate up. ...
... you place MovieMate from the... the keystone buttons on MovieMate or on page 19 for instructions. ■ The farther you want an 80-inch diagonal widescreen image, place MovieMate about 7.8 feet away ...from the screen or wall, the larger the image will be. See page 10 for additional details. Caution: MovieMate should be directly in front of time. ■ MovieMate... should not be exposed to internal electronics over time. This causes the image to tilt MovieMate up. ...

Quick Guide
Page 8
Make sure you have a screen, set it in the dark briefly. 4. Source Volume w Enter T Return 8 Unpacking and Setting Up Expose the remote control to avoid damaging the screen. 2. The light turns orange. If you read all the instructions to bright light for several minutes before using it up following the instructions included with the screen. Open the lens cover, then connect the power cord and plug in the remote control. 3. Put the batteries in MovieMate. The buttons will glow in the dark. Setting Up Epson MovieMate 1.
Make sure you have a screen, set it in the dark briefly. 4. Source Volume w Enter T Return 8 Unpacking and Setting Up Expose the remote control to avoid damaging the screen. 2. The light turns orange. If you read all the instructions to bright light for several minutes before using it up following the instructions included with the screen. Open the lens cover, then connect the power cord and plug in the remote control. 3. Put the batteries in MovieMate. The buttons will glow in the dark. Setting Up Epson MovieMate 1.

Quick Guide
Page 9
To adjust the volume, use the + or - The bright light may affect your DVD into the lens. After about 30 seconds, MovieMate warms up and plugged in this section to adjust the picture and sound for the best home cinema experience. Watching Movies 9 Starting a DVD Movie 1. Insert ... look into the lens, and do not allow children or pets to start playing your movie. Watching Movies After you get your Epson MovieMate set up and the picture comes on the remote control. Volume buttons on the control panel or on . 2. Follow the instructions in , it's easy to look into the slot...
To adjust the volume, use the + or - The bright light may affect your DVD into the lens. After about 30 seconds, MovieMate warms up and plugged in this section to adjust the picture and sound for the best home cinema experience. Watching Movies 9 Starting a DVD Movie 1. Insert ... look into the lens, and do not allow children or pets to start playing your movie. Watching Movies After you get your Epson MovieMate set up and the picture comes on the remote control. Volume buttons on the control panel or on . 2. Follow the instructions in , it's easy to look into the slot...

Quick Guide
Page 10
Adjusting the Picture Once you see your picture, you may need to adjust the image shape. 10 Watching Movies Use the Keystone buttons on the remote control or the control panel to make some adjustments. ■ If the image is too low, you tilt MovieMate, the image will lose its rectangular shape. If you can extend the feet (by rotating them) and tilt MovieMate up.
Adjusting the Picture Once you see your picture, you may need to adjust the image shape. 10 Watching Movies Use the Keystone buttons on the remote control or the control panel to make some adjustments. ■ If the image is too low, you tilt MovieMate, the image will lose its rectangular shape. If you can extend the feet (by rotating them) and tilt MovieMate up.

Quick Guide
Page 12
... room, one of the time MovieMate adjusts the picture automatically for wide-screen or normal video. Normal projects the image in its original proportions (4:3 aspect ratio). ■ To zoom in or out. ■ For non-widescreen DVDs, press the button on the remote control. Press again to change ...brightest picture, and works best when you can adjust the width to height proportion (aspect ratio) manually if necessary. However, you use MovieMate outdoors or in up to the original size. The currently selected color mode is slightly stretched. Fine-Tuning the Image Size Most of ...
... room, one of the time MovieMate adjusts the picture automatically for wide-screen or normal video. Normal projects the image in its original proportions (4:3 aspect ratio). ■ To zoom in or out. ■ For non-widescreen DVDs, press the button on the remote control. Press again to change ...brightest picture, and works best when you can adjust the width to height proportion (aspect ratio) manually if necessary. However, you use MovieMate outdoors or in up to the original size. The currently selected color mode is slightly stretched. Fine-Tuning the Image Size Most of ...

Quick Guide
Page 13
Pressing any of the following color modes, depending on the remote control. ■ To resume, press again. Note: After 5 minutes in a bright room (available only with the blinds or drapes closed. ■ Theatre: Use in completely ... the screen darkens. Watching Movies 13 Pausing a Movie and Turning On the Light When you pause a movie, you can select from the slot. 3. Turning Off Epson MovieMate 1. Press the button to get more popcorn! ■ To pause a movie and light up the screen or wall temporarily. This works great when you need...
Pressing any of the following color modes, depending on the remote control. ■ To resume, press again. Note: After 5 minutes in a bright room (available only with the blinds or drapes closed. ■ Theatre: Use in completely ... the screen darkens. Watching Movies 13 Pausing a Movie and Turning On the Light When you pause a movie, you can select from the slot. 3. Turning Off Epson MovieMate 1. Press the button to get more popcorn! ■ To pause a movie and light up the screen or wall temporarily. This works great when you need...

Quick Guide
Page 15
...right side. Face it to Func.- The remote control doesn't work with the positive (+) and negative (-) ends positioned as shown in the correct position: set at the top or bottom. Epson does not support any third-party remote controls. You've tilted MovieMate to raise or lower the image, causing... it squarely toward the screen. MovieMate is taller on the control panel or...
...right side. Face it to Func.- The remote control doesn't work with the positive (+) and negative (-) ends positioned as shown in the correct position: set at the top or bottom. Epson does not support any third-party remote controls. You've tilted MovieMate to raise or lower the image, causing... it squarely toward the screen. MovieMate is taller on the control panel or...

Quick Guide
Page 18
... dangerous if swallowed. if it doesn't operate normally when you may make a loud noise if it exhibits a distinct change in performance, indicating a need for the remote control out of the reach of children. if it , use for extended periods. ■ Keep the batteries for service; ■ The lamp in this projector...
... dangerous if swallowed. if it doesn't operate normally when you may make a loud noise if it exhibits a distinct change in performance, indicating a need for the remote control out of the reach of children. if it , use for extended periods. ■ Keep the batteries for service; ■ The lamp in this projector...

Quick Guide
Page 19
.... Listening to prevent burn-in direct sunlight for long periods of time. Notices 19 Health & Safety Code § 25249.5 et seq) Epson America, Inc. They provide ventilation and prevent the projector from overheating. Doing so may cause an unstable display and could lead to projector damage... such as described on top of heat-producing equipment or in cabinet unless proper ventilation is provided. ■ Don't leave the projector or remote control on page 16). ■ Do not turn the volume too high, especially when using headphones. WARNING: The cord included with this ...
.... Listening to prevent burn-in direct sunlight for long periods of time. Notices 19 Health & Safety Code § 25249.5 et seq) Epson America, Inc. They provide ventilation and prevent the projector from overheating. Doing so may cause an unstable display and could lead to projector damage... such as described on top of heat-producing equipment or in cabinet unless proper ventilation is provided. ■ Don't leave the projector or remote control on page 16). ■ Do not turn the volume too high, especially when using headphones. WARNING: The cord included with this ...

User's Guide
Page 8
Epson MovieMate 50 Parts and Controls Front View Lens cover slide Remote control receiver Handle Adjustable foot Disc slot Eject button Lens cover Lens Back View Component video ports Computer port Speaker Headphone jack Air intake vent Adjustable foot Video port Audio inputs Air exhaust vent Power inlet Digital coaxial audio-out port USB port Security slot Remote control receiver Speaker 8 Welcome
Epson MovieMate 50 Parts and Controls Front View Lens cover slide Remote control receiver Handle Adjustable foot Disc slot Eject button Lens cover Lens Back View Component video ports Computer port Speaker Headphone jack Air intake vent Adjustable foot Video port Audio inputs Air exhaust vent Power inlet Digital coaxial audio-out port USB port Security slot Remote control receiver Speaker 8 Welcome

User's Guide
Page 10
Function/numerics toggle switch Eject DVD Project from external equipment Adjust picture for several minutes before using it in the dark. Expose the remote control to light for different lighting Fix image shape (if MovieMate is tilted) Pause movie and turn on or off Note: The remote control buttons can glow in the dark. Remote Control Turn MovieMate on light Control playback Control volume Access DVD features 10 Welcome
Function/numerics toggle switch Eject DVD Project from external equipment Adjust picture for several minutes before using it in the dark. Expose the remote control to light for different lighting Fix image shape (if MovieMate is tilted) Pause movie and turn on or off Note: The remote control buttons can glow in the dark. Remote Control Turn MovieMate on light Control playback Control volume Access DVD features 10 Welcome

User's Guide
Page 12
... table lists the distances required for instructions. You can raise it by extending the feet and tilting MovieMate up. The farther you can adjust the shape using the keystone buttons on MovieMate or on the remote control. Standard aspect ratio (4:3) Image size 30 in. (24 × 18 in.) 40 in. (32 × 24... 5.2 ft. 5.8 to 7.8 ft. 7.8 to 10.5 ft. 9.7 to 13.2 ft. 11.7 to 15.8 ft. 14.7 to the surface). If the image is too low, you place MovieMate from the screen or wall, the larger the image will be directly in front of the screen or wall, facing straight ahead (at a 90-degree...
... table lists the distances required for instructions. You can raise it by extending the feet and tilting MovieMate up. The farther you can adjust the shape using the keystone buttons on MovieMate or on the remote control. Standard aspect ratio (4:3) Image size 30 in. (24 × 18 in.) 40 in. (32 × 24... 5.2 ft. 5.8 to 7.8 ft. 7.8 to 10.5 ft. 9.7 to 13.2 ft. 11.7 to 15.8 ft. 14.7 to the surface). If the image is too low, you place MovieMate from the screen or wall, the larger the image will be directly in front of the screen or wall, facing straight ahead (at a 90-degree...

User's Guide
Page 15
... image shape. If you may want to make certain adjustments. ■ If the image is best. Use the Keystone buttons on the remote control or the control panel to shift from different viewing angles. Screen reflective properties are measured as the reflectivity of light in your movie,... brightness may not be uniform enough for the additional brightness. Screen surface quality can extend the feet (by rotating them) and tilt MovieMate up your Epson MovieMate and start your projected image. Adjusting the Picture After you set up . For rooms where you cannot control the light or will ...
... image shape. If you may want to make certain adjustments. ■ If the image is best. Use the Keystone buttons on the remote control or the control panel to shift from different viewing angles. Screen reflective properties are measured as the reflectivity of light in your movie,... brightness may not be uniform enough for the additional brightness. Screen surface quality can extend the feet (by rotating them) and tilt MovieMate up your Epson MovieMate and start your projected image. Adjusting the Picture After you set up . For rooms where you cannot control the light or will ...

User's Guide
Page 16
position.) 16 Playing Movies ■ Use the W and T buttons on the control panel to adjust the image size. ■ Rotate the focus ring to sharpen the picture. ■ To enlarge or reduce the aspect ratio of the picture, press the button on the remote control to select Normal, Full, or Zoom (if available for the video source you're using). (Make sure the toggle switch on the remote control is set to the Func.-
position.) 16 Playing Movies ■ Use the W and T buttons on the control panel to adjust the image size. ■ Rotate the focus ring to sharpen the picture. ■ To enlarge or reduce the aspect ratio of the picture, press the button on the remote control to select Normal, Full, or Zoom (if available for the video source you're using). (Make sure the toggle switch on the remote control is set to the Func.-

User's Guide
Page 17
... the Sound To adjust the volume, use the buttons on the remote control or the MovieMate control panel to temporarily turn off the sound. Volume buttons on the control ■ To pause a movie and display the Epson logo, press remote control or control panel. Pausing There are three ways to pause ...a movie or audio track with MovieMate: ■ To pause a movie, or a music CD or MP3 player track, press on...
... the Sound To adjust the volume, use the buttons on the remote control or the MovieMate control panel to temporarily turn off the sound. Volume buttons on the control ■ To pause a movie and display the Epson logo, press remote control or control panel. Pausing There are three ways to pause ...a movie or audio track with MovieMate: ■ To pause a movie, or a music CD or MP3 player track, press on...

User's Guide
Page 18
... any of the current chapter or track, press on again. buttons to move forward or backward through a video or music CD, press or on the remote control. 2. After 30 minutes, the power shuts off and the screen darkens. Playing in Slow Motion You can play a video frame by frame. 3. Each... , press . Use the , , , and around the image if necessary. Press to return to turn it on the remote control. Skipping ■ To skip to the next chapter or track, press on the remote control. ■ To return to zoom in slow motion. Searching (Fast Forward or Reverse) ■ To move forward...
... any of the current chapter or track, press on again. buttons to move forward or backward through a video or music CD, press or on the remote control. 2. After 30 minutes, the power shuts off and the screen darkens. Playing in Slow Motion You can play a video frame by frame. 3. Each... , press . Use the , , , and around the image if necessary. Press to return to turn it on the remote control. Skipping ■ To skip to the next chapter or track, press on the remote control. ■ To return to zoom in slow motion. Searching (Fast Forward or Reverse) ■ To move forward...

User's Guide
Page 19
Adjusting the Color Mode You can select from the built-in a bright room. Playing Movies 19 The currently selected color mode is displayed on the remote control to the -123 position. ■ After you set the toggle switch, you can simply press the numeric button for playing games with high-speed ...
Adjusting the Color Mode You can select from the built-in a bright room. Playing Movies 19 The currently selected color mode is displayed on the remote control to the -123 position. ■ After you set the toggle switch, you can simply press the numeric button for playing games with high-speed ...

User's Guide
Page 20
..., you want: Concert, Drama, Action, or Sci-Fi. Listening to the headphones using MovieMate's volume controls on the screen. 4. You see the current setting displayed on the control panel or remote control. Adjusting the Sound and Audio Modes You can switch between Stereo and Dolby VS (...virtual surround sound), press again. 3. You see the current setting displayed on the remote control. Listening with Headphones Connect headphones as shown below: After you connect headphones, you 're playing. 1. To display the sound mode, ...
..., you want: Concert, Drama, Action, or Sci-Fi. Listening to the headphones using MovieMate's volume controls on the screen. 4. You see the current setting displayed on the control panel or remote control. Adjusting the Sound and Audio Modes You can switch between Stereo and Dolby VS (...virtual surround sound), press again. 3. You see the current setting displayed on the remote control. Listening with Headphones Connect headphones as shown below: After you connect headphones, you 're playing. 1. To display the sound mode, ...


