
Quick Reference Guide - (Accolade Wireless Audio Set )
Page 2
Contents Welcome 3 Unpacking the Wireless Audio Set 4 Setting Up 5 Overview 5 Connecting the Audio Set Transmitter 6 Connecting the Audio Set Receiver 13 Configuring Your Epson MovieMate 17 Configuring Your DVD Player 18 Using the Wireless Audio Set 19 Powering On Your Equipment 19 Controlling Volume 20 Solving Problems 21 Wireless Audio Set Status Lights 21 Problems and Solutions 24 Help 26 Notices 27 Trademarks 31 2 Contents
Contents Welcome 3 Unpacking the Wireless Audio Set 4 Setting Up 5 Overview 5 Connecting the Audio Set Transmitter 6 Connecting the Audio Set Receiver 13 Configuring Your Epson MovieMate 17 Configuring Your DVD Player 18 Using the Wireless Audio Set 19 Powering On Your Equipment 19 Controlling Volume 20 Solving Problems 21 Wireless Audio Set Status Lights 21 Problems and Solutions 24 Help 26 Notices 27 Trademarks 31 2 Contents

Quick Reference Guide - (Accolade Wireless Audio Set )
Page 3
...Set allows you to transmit digital audio from a standard DVD player with an optical or coaxial audio output to an audio system or a pair of unpowered speakers. Welcome 3 You can use the Wireless Audio Set to transmit audio from an Epson MovieMate™ projector to power a pair of unpowered speakers.... If you don't have access to an audio system, you can also use the Wireless Audio Set's built-in close proximity to your audio system while using a projector and DVD player that are not ...
...Set allows you to transmit digital audio from a standard DVD player with an optical or coaxial audio output to an audio system or a pair of unpowered speakers. Welcome 3 You can use the Wireless Audio Set to transmit audio from an Epson MovieMate™ projector to power a pair of unpowered speakers.... If you don't have access to an audio system, you can also use the Wireless Audio Set's built-in close proximity to your audio system while using a projector and DVD player that are not ...

Quick Reference Guide - (Accolade Wireless Audio Set )
Page 5
... the Audio Set transmitter to your Epson MovieMate or DVD player and the Audio Set receiver to the illustrations below for an example of two common configurations: Home theater system Epson MovieMate Audio system configuration Unpowered speakers Epson MovieMate Unpowered speakers configuration Follow the instructions ... Set Transmitter" on page 6 ■ "Connecting the Audio Set Receiver" on page 13 ■ "Configuring Your Epson MovieMate" on page 17 ■ "Configuring Your DVD Player" on page 18 Setting Up 5 Refer to an audio system (such as a home theater system or a stereo ...
... the Audio Set transmitter to your Epson MovieMate or DVD player and the Audio Set receiver to the illustrations below for an example of two common configurations: Home theater system Epson MovieMate Audio system configuration Unpowered speakers Epson MovieMate Unpowered speakers configuration Follow the instructions ... Set Transmitter" on page 6 ■ "Connecting the Audio Set Receiver" on page 13 ■ "Configuring Your Epson MovieMate" on page 17 ■ "Configuring Your DVD Player" on page 18 Setting Up 5 Refer to an audio system (such as a home theater system or a stereo ...

Quick Reference Guide - (Accolade Wireless Audio Set )
Page 6
..., or you 're finished attaching the antenna, see "Powering the Transmitter" on page 9 Attaching the Antenna 1. If necessary, rotate the antenna so that your Epson MovieMate or DVD player is facing upwards. Caution: Do not use a tool to the transmitter, then hand-tighten the nut at the base of the antenna. When you may...
..., or you 're finished attaching the antenna, see "Powering the Transmitter" on page 9 Attaching the Antenna 1. If necessary, rotate the antenna so that your Epson MovieMate or DVD player is facing upwards. Caution: Do not use a tool to the transmitter, then hand-tighten the nut at the base of the antenna. When you may...

Quick Reference Guide - (Accolade Wireless Audio Set )
Page 9
... "Connecting to the transmitter's OPTICAL audio input port. 4. Remove the protective cap from both ends of the cable to a DVD Player" on page 12. Connecting the Audio Set Transmitter 9 Connect one end of the cable. 2. Connecting to your projector. Locate the shorter optical audio cable, and ... the transmitter's OPTICAL audio input port and store it in the included stand. Connecting the Transmitter's Audio Cable Follow the steps in "Connecting to an Epson MovieMate," below, to connect the transmitter to an...
... "Connecting to the transmitter's OPTICAL audio input port. 4. Remove the protective cap from both ends of the cable to a DVD Player" on page 12. Connecting the Audio Set Transmitter 9 Connect one end of the cable. 2. Connecting to your projector. Locate the shorter optical audio cable, and ... the transmitter's OPTICAL audio input port and store it in the included stand. Connecting the Transmitter's Audio Cable Follow the steps in "Connecting to an Epson MovieMate," below, to connect the transmitter to an...

Quick Reference Guide - (Accolade Wireless Audio Set )
Page 12
Note: If you may also need to remove the protective cap from the DVD player's optical audio output port. You may need to remove the protective cap from the DVD player's optical audio output port. See your DVD player as shown below. Connect the audio cable to the transmitter, then connect the other ... audio cable (not provided) 2. Connecting to determine the type of the cable. If you're connecting to the optical audio output on your DVD player, you 're using the optical audio cable, remove the protective caps from the transmitter's OPTICAL audio input port and store it in a safe...
Note: If you may also need to remove the protective cap from the DVD player's optical audio output port. You may need to remove the protective cap from the DVD player's optical audio output port. See your DVD player as shown below. Connect the audio cable to the transmitter, then connect the other ... audio cable (not provided) 2. Connecting to determine the type of the cable. If you're connecting to the optical audio output on your DVD player, you 're using the optical audio cable, remove the protective caps from the transmitter's OPTICAL audio input port and store it in a safe...

Quick Reference Guide - (Accolade Wireless Audio Set )
Page 15
... connect the receiver to a DVD player, see page 17. ■ If you configure your audio system as shown below. Optical audio cable Coaxial audio cable Optical Coaxial CD/DVD RCA cable (stereo) Audio system Receiver Note: Use only one of the following: ■ If you connected the transmitter to an Epson MovieMate, see page 18.
... connect the receiver to a DVD player, see page 17. ■ If you configure your audio system as shown below. Optical audio cable Coaxial audio cable Optical Coaxial CD/DVD RCA cable (stereo) Audio system Receiver Note: Use only one of the following: ■ If you connected the transmitter to an Epson MovieMate, see page 18.

Quick Reference Guide - (Accolade Wireless Audio Set )
Page 16
... you're finished connecting the speakers, do one of the following: ■ If you connected the transmitter to an Epson MovieMate, see page 18. 16 Setting Up Before you connected the transmitter to a DVD player, see page 17. ■ If you begin, make sure that the receiver is turned off and the volume control...
... you're finished connecting the speakers, do one of the following: ■ If you connected the transmitter to an Epson MovieMate, see page 18. 16 Setting Up Before you connected the transmitter to a DVD player, see page 17. ■ If you begin, make sure that the receiver is turned off and the volume control...

Quick Reference Guide - (Accolade Wireless Audio Set )
Page 18
..."Using the Wireless Audio Set" on page 19. 18 Setting Up You're finished setting up the Wireless Audio Set. Configuring Your DVD Player Some DVD players may differ from the table below. Refer to the documentation for your audio system from the ones shown above. Connection Optical Coaxial RCA... Speaker wire Setting SPDIF/DOLBY/DTS SPDIF/DOLBY/DTS PCM or STEREO PCM or STEREO Note: Your DVD player's settings may require you used to connect the receiver to your DVD player to activate the optical or coaxial audio port and select audio setting for it.
..."Using the Wireless Audio Set" on page 19. 18 Setting Up You're finished setting up the Wireless Audio Set. Configuring Your DVD Player Some DVD players may differ from the table below. Refer to the documentation for your audio system from the ones shown above. Connection Optical Coaxial RCA... Speaker wire Setting SPDIF/DOLBY/DTS SPDIF/DOLBY/DTS PCM or STEREO PCM or STEREO Note: Your DVD player's settings may require you used to connect the receiver to your DVD player to activate the optical or coaxial audio port and select audio setting for it.
Quick Reference Guide - (Accolade Wireless Audio Set )
Page 19
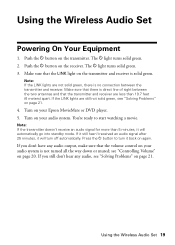
Push the P button on the transmitter. If the LINK lights are still not solid green, see "Controlling Volume" on your Epson MovieMate or DVD player. 5. Push the P button on the receiver. Note: If the LINK lights are less than 5 minutes, it will turn it will automatically go into standby mode. ...
Push the P button on the transmitter. If the LINK lights are still not solid green, see "Controlling Volume" on your Epson MovieMate or DVD player. 5. Push the P button on the receiver. Note: If the LINK lights are less than 5 minutes, it will turn it will automatically go into standby mode. ...

Quick Reference Guide - (Accolade Wireless Audio Set )
Page 22
... lights are flashing green The P lights are solid green and the LINK lights are off . The transmitter has not received an audio signal from your Epson MovieMate or DVD player or hasn't had a link with the receiver and has gone into standby mode. Then press the P button to turn it will turn it .
... lights are flashing green The P lights are solid green and the LINK lights are off . The transmitter has not received an audio signal from your Epson MovieMate or DVD player or hasn't had a link with the receiver and has gone into standby mode. Then press the P button to turn it will turn it .

Quick Reference Guide - (Accolade Wireless Audio Set )
Page 25
Problems and Solutions 25 See the documentation for your audio system are transmitting. see page 17. ■ Make sure that the DVD you are configured correctly for details. No Surround Output ■ If the SURROUND light on the receiver is not solid green, make sure that your Epson MovieMate or DVD player has been configured correctly and that the settings on your audio system for the type of audio you 're playing supports surround audio;
Problems and Solutions 25 See the documentation for your audio system are transmitting. see page 17. ■ Make sure that the DVD you are configured correctly for details. No Surround Output ■ If the SURROUND light on the receiver is not solid green, make sure that your Epson MovieMate or DVD player has been configured correctly and that the settings on your audio system for the type of audio you 're playing supports surround audio;

User's Guide
Page 7
... can set up to Epson. Welcome! MovieMate offers these outstanding features: ■ Flexibility to set up MovieMate and watch a DVD, play a video game, or view your projector and mail it to 3000 hours of use ■ Two-year home service warranty Registration and Warranty The Epson MovieMate 30s comes with your favorite... ■ JVC® DVD player with Dolby® Digital and DTS ■ Built-in JVC speakers with stereo sound ■ Long-life bulb providing up in any room (or even outdoors), from 2.4 feet to 37 feet away from a screen or wall ■ DVD resolution of 480p ■...
... can set up to Epson. Welcome! MovieMate offers these outstanding features: ■ Flexibility to set up MovieMate and watch a DVD, play a video game, or view your projector and mail it to 3000 hours of use ■ Two-year home service warranty Registration and Warranty The Epson MovieMate 30s comes with your favorite... ■ JVC® DVD player with Dolby® Digital and DTS ■ Built-in JVC speakers with stereo sound ■ Long-life bulb providing up in any room (or even outdoors), from 2.4 feet to 37 feet away from a screen or wall ■ DVD resolution of 480p ■...

User's Guide
Page 18
Note: DVD movies are divided into units called titles. Each title may contain any of the following buttons also cancels break ,, . To resume, press panel. To resume, press mode: , , again. After 30 minutes, the power shuts off and the screen darkens. Music CDs and video CDs are divided into tracks...., the lamp turns off , and you need to press the Power button to pause a movie or audio track with MovieMate: ■ To pause a movie, or a music CD or MP3 player track, press on the remote control or on the control panel. Note: After 5 minutes in a dim or dark room...
Note: DVD movies are divided into units called titles. Each title may contain any of the following buttons also cancels break ,, . To resume, press panel. To resume, press mode: , , again. After 30 minutes, the power shuts off and the screen darkens. Music CDs and video CDs are divided into tracks...., the lamp turns off , and you need to press the Power button to pause a movie or audio track with MovieMate: ■ To pause a movie, or a music CD or MP3 player track, press on the remote control or on the control panel. Note: After 5 minutes in a dim or dark room...

User's Guide
Page 23
...has both composite and S-Video ports, use most of video, audio, and computer equipment to MovieMate to play audio from these sources, you can see or hear on page 30. When you view video from an external source, you can use S-Video for wall and ...MP3 player to MovieMate's L and R Audio inputs. Viewing Video from MovieMate ■ Computer or laptop to project anything you also need connection cables, which may be purchased from an electronics store. Using MovieMate With Other Equipment You can connect a variety of MovieMate's controls, including adjusting color mode, volume, DVD ...
...has both composite and S-Video ports, use most of video, audio, and computer equipment to MovieMate to play audio from these sources, you can see or hear on page 30. When you view video from an external source, you can use S-Video for wall and ...MP3 player to MovieMate's L and R Audio inputs. Viewing Video from MovieMate ■ Computer or laptop to project anything you also need connection cables, which may be purchased from an electronics store. Using MovieMate With Other Equipment You can connect a variety of MovieMate's controls, including adjusting color mode, volume, DVD ...

User's Guide
Page 24
Connect the external equipment as shown, using either the yellow composite video port, the S-Video port, or a component video cable and the adapter cable that came with MovieMate. Composite Video Connection Video or Cable or satellite TV VCR or DVD Photo iPod receiver or DVR player Camcorder Output L Audio R Game console Digital camera Video White Red Yellow Main power switch S-Video Connection VCR or DVD player Camcorder Output L Audio R S-Video White Red Main power switch 24 Using MovieMate With Other Equipment 1.
Connect the external equipment as shown, using either the yellow composite video port, the S-Video port, or a component video cable and the adapter cable that came with MovieMate. Composite Video Connection Video or Cable or satellite TV VCR or DVD Photo iPod receiver or DVR player Camcorder Output L Audio R Game console Digital camera Video White Red Yellow Main power switch S-Video Connection VCR or DVD player Camcorder Output L Audio R S-Video White Red Main power switch 24 Using MovieMate With Other Equipment 1.


