
Technical Brief (Impact Printers)
Page 1
... it is a registered trademark of an EPSON's impact printer tells you if it has a narrow or wide carriage: LLL L Nine-pin printers all begin with FX, LX, or DFX Twenty-four pin printers all begin with tireless printheads and superior quality ribbons. L LL L Nine-pin impact printers - both in their names EPSON Sales Training EPSON is a 9- or 24-pin, which : Hit...
... it is a registered trademark of an EPSON's impact printer tells you if it has a narrow or wide carriage: LLL L Nine-pin printers all begin with FX, LX, or DFX Twenty-four pin printers all begin with tireless printheads and superior quality ribbons. L LL L Nine-pin impact printers - both in their names EPSON Sales Training EPSON is a 9- or 24-pin, which : Hit...

Technical Brief (Impact Printers)
Page 6
... and extends the life of extended use a stationary ribbon cartridge. L EPSON's stationary ribbon cartridge Competitive design with the print head assembly unit. Technical Brief-Multimedia projectors Page 6 Reliability-Ribbon quality EPSON brand impact printer ribbons are ... The design used in a mylar film ...Made of the highest grade ABS plastic Offers the highest print quality for dot matrix printers Ultra Letter Quality Keeps the cartridge ...
... and extends the life of extended use a stationary ribbon cartridge. L EPSON's stationary ribbon cartridge Competitive design with the print head assembly unit. Technical Brief-Multimedia projectors Page 6 Reliability-Ribbon quality EPSON brand impact printer ribbons are ... The design used in a mylar film ...Made of the highest grade ABS plastic Offers the highest print quality for dot matrix printers Ultra Letter Quality Keeps the cartridge ...

Product Brochure
Page 2
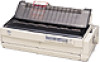
...; Second-bin cut sheet feeder can only be used with High capacity cut sheet feeder (used to form a dual-bin feeder) EPSON • Super-fast printing at 35% page density Print Head Life: 300 million characters Control Panel Buttons: Operate, Pause,... Star compliant Dimensions H x W x D: 10.1" x 25.2" x 15.8" (257 x 639 x 402mm) Weight: approx. 28.8 lb (13 kg.) Product Codes/Accessories FX-2180 impact printer FX-2180 fabric ribbon Pull tractor unit Cut sheet feeders High capacity cut sheet feeder Second-bin cut sheet and envelope feeder, and front sheet guide, roll paper holder...
...; Second-bin cut sheet feeder can only be used with High capacity cut sheet feeder (used to form a dual-bin feeder) EPSON • Super-fast printing at 35% page density Print Head Life: 300 million characters Control Panel Buttons: Operate, Pause,... Star compliant Dimensions H x W x D: 10.1" x 25.2" x 15.8" (257 x 639 x 402mm) Weight: approx. 28.8 lb (13 kg.) Product Codes/Accessories FX-2180 impact printer FX-2180 fabric ribbon Pull tractor unit Cut sheet feeders High capacity cut sheet feeder Second-bin cut sheet and envelope feeder, and front sheet guide, roll paper holder...

Product Information Guide
Page 1
...interface Twinax interface Type B bidirectional parallel Multi-protocol Ethernet print server Model Number C823051 C823071 C823141 C823151 C823452 C823572 11/98 EPSON FX-2180 - 1 Second-bin cut-sheet feeder (C806741) Connects to the high-capacity cut-sheet feeder to create a double-bin ...pull tractor in this feeder. EPSON FX-2180 paper guide cover printer cover rear edge guides paper guide paper separator paper release lever User Replaceable Part Ribbon cartridge Ribbon pack Tractor (pull or front push) Parts Price List Name Ribbon cartridge Ribbon pack Front tractor assembly Part ...
...interface Twinax interface Type B bidirectional parallel Multi-protocol Ethernet print server Model Number C823051 C823071 C823141 C823151 C823452 C823572 11/98 EPSON FX-2180 - 1 Second-bin cut-sheet feeder (C806741) Connects to the high-capacity cut-sheet feeder to create a double-bin ...pull tractor in this feeder. EPSON FX-2180 paper guide cover printer cover rear edge guides paper guide paper separator paper release lever User Replaceable Part Ribbon cartridge Ribbon pack Tractor (pull or front push) Parts Price List Name Ribbon cartridge Ribbon pack Front tractor assembly Part ...

Product Information Guide
Page 3
... entry: 3.9 16.5 100 420 0.0025 0.065 0.0055 0.14 14 24 52.3 90 Plain paper, bond paper, and recycled paper 11/98 EPSON FX-2180 - 3 EPSON FX-2180 Ribbon: Black ribbon cartridge (S015086) Ribbon life of the printer for your printer's voltage. Continuous paper (ordinary and multi-part): Minimum Maximum Width (inches) 4 (mm) 101.6 16 406.4 Length (inches) 4 22 (one page) (mm...
... entry: 3.9 16.5 100 420 0.0025 0.065 0.0055 0.14 14 24 52.3 90 Plain paper, bond paper, and recycled paper 11/98 EPSON FX-2180 - 3 EPSON FX-2180 Ribbon: Black ribbon cartridge (S015086) Ribbon life of the printer for your printer's voltage. Continuous paper (ordinary and multi-part): Minimum Maximum Width (inches) 4 (mm) 101.6 16 406.4 Length (inches) 4 22 (one page) (mm...
Product Information Guide
Page 11
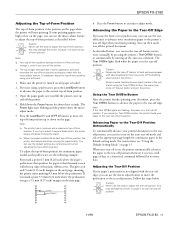
...the appropriate page length for continuous paper in the default-setting mode. Follow the steps below . EPSON FX-2180 Adjusting the Top-of-Form Position The top-of-form position is on, the printer automatically advances the paper to the next top-of-form position. Caution: Never use the tear-...position. 11/98 EPSON FX-2180 - 11 they may damage the printer or cause it beyond these limits, the printer beeps and stops moving the paper briefly. this may come off edge. If you need to adjust it to feed continuous paper with the top edge of the plastic ribbon cover. Advancing ...
...the appropriate page length for continuous paper in the default-setting mode. Follow the steps below . EPSON FX-2180 Adjusting the Top-of-Form Position The top-of-form position is on, the printer automatically advances the paper to the next top-of-form position. Caution: Never use the tear-...position. 11/98 EPSON FX-2180 - 11 they may damage the printer or cause it beyond these limits, the printer beeps and stops moving the paper briefly. this may come off edge. If you need to adjust it to feed continuous paper with the top edge of the plastic ribbon cover. Advancing ...
Product Information Guide
Page 12
... tension unit) by its back edge and pull it cool before you try to turn off the printer. 1. Open the paper guide cover. 3. EPSON FX-2180 11/98 EPSON FX-2180 Note: Your tear-off position setting remains in the ribbon installation position. 3. Make sure the Tear Off/Bin lights are flashing (the paper is off position). The...
... tension unit) by its back edge and pull it cool before you try to turn off the printer. 1. Open the paper guide cover. 3. EPSON FX-2180 11/98 EPSON FX-2180 Note: Your tear-off position setting remains in the ribbon installation position. 3. Make sure the Tear Off/Bin lights are flashing (the paper is off position). The...
Product Information Guide
Page 13
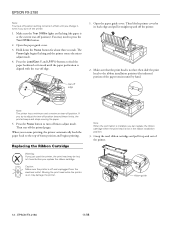
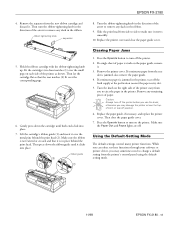
...the paper entry slot. 5. Slide the print head from the printer's control panel using the defaultsetting mode. 11/98 EPSON FX-2180 - 13 Hold the ribbon cartridge with the ribbon-tightening knob up. Gently press down the ribbon guide until both ends click into place. While you can ...often set these functions through your software or printer driver, you may sometimes need ...
...the paper entry slot. 5. Slide the print head from the printer's control panel using the defaultsetting mode. 11/98 EPSON FX-2180 - 13 Hold the ribbon cartridge with the ribbon-tightening knob up. Gently press down the ribbon guide until both ends click into place. While you can ...often set these functions through your software or printer driver, you may sometimes need ...

Product Information Guide
Page 16
... EPSON FX-2180 Unpacking sheet EPSON FX-2180 Service Manual EPSON FX-2180 Parts Price List Transporting the Printer If you think lubrication is installed, remove it lies flat on both sides of the printer with mild detergent dissolved in water. then disconnect the interface cable from the electrical outlet; Let it using the screwdriver that comes with the printer. 8. Remove the ribbon...
... EPSON FX-2180 Unpacking sheet EPSON FX-2180 Service Manual EPSON FX-2180 Parts Price List Transporting the Printer If you think lubrication is installed, remove it lies flat on both sides of the printer with mild detergent dissolved in water. then disconnect the interface cable from the electrical outlet; Let it using the screwdriver that comes with the printer. 8. Remove the ribbon...

User Manual
Page 3
Printer Parts edge guides paper guide cover printer cover front paper guide (closed) control panel paper thickness lever shield plate paper guide paper separator paper release lever knob ribbon cartridge parallel interface tractor paper tension unit front paper guide (open) front edge guides
Printer Parts edge guides paper guide cover printer cover front paper guide (closed) control panel paper thickness lever shield plate paper guide paper separator paper release lever knob ribbon cartridge parallel interface tractor paper tension unit front paper guide (open) front edge guides

User Manual
Page 5
..., and Notes 0-15 Chapter 1 Setting Up the Printer Unpacking the Printer 1-2 Choosing a Place for the Printer 1-4 Positioning the continuous paper supply 1-5 Installing or Replacing the Ribbon Cartridge 1-6 Attaching the Paper Guide and Paper Separator 1-11 Plugging In the Printer 1-13 Connecting the Printer to Your Computer 1-14 Installing the Printer Driver on Your PC 1-15 For Windows...
..., and Notes 0-15 Chapter 1 Setting Up the Printer Unpacking the Printer 1-2 Choosing a Place for the Printer 1-4 Positioning the continuous paper supply 1-5 Installing or Replacing the Ribbon Cartridge 1-6 Attaching the Paper Guide and Paper Separator 1-11 Plugging In the Printer 1-13 Connecting the Printer to Your Computer 1-14 Installing the Printer Driver on Your PC 1-15 For Windows...

User Manual
Page 21
... long life of paper paths. Genuine EPSON ribbon cartridges are also available to replace the ribbon cartridge. To replace a used ribbon cartridge, follow the instructions under "Installing or Replacing the Ribbon Cartridge" on page 1-6. 10 Getting to print on options for your EPSON printer. Ribbon Cartridges Your printer uses the following ribbon cartridge: EPSON black Ribbon cartridge S015086 When printing becomes faint...
... long life of paper paths. Genuine EPSON ribbon cartridges are also available to replace the ribbon cartridge. To replace a used ribbon cartridge, follow the instructions under "Installing or Replacing the Ribbon Cartridge" on page 1-6. 10 Getting to print on options for your EPSON printer. Ribbon Cartridges Your printer uses the following ribbon cartridge: EPSON black Ribbon cartridge S015086 When printing becomes faint...

User Manual
Page 28
Chapter 1 Setting Up the Printer 1 Unpacking the Printer 1-2 Choosing a Place for the Printer 1-4 Positioning the continuous paper supply 1-5 Installing or Replacing the Ribbon Cartridge 1-6 Attaching the Paper Guide and Paper Separator 1-11 Plugging In the Printer 1-13 Connecting the Printer to Your Computer 1-14 Installing the Printer Driver on Your PC 1-15 For Windows 95 or NT 4.0 1-16 For Windows 3.1 or NT 3.5x 1-19 For DOS programs 1-20 Setting Up the Printer 1-1
Chapter 1 Setting Up the Printer 1 Unpacking the Printer 1-2 Choosing a Place for the Printer 1-4 Positioning the continuous paper supply 1-5 Installing or Replacing the Ribbon Cartridge 1-6 Attaching the Paper Guide and Paper Separator 1-11 Plugging In the Printer 1-13 Connecting the Printer to Your Computer 1-14 Installing the Printer Driver on Your PC 1-15 For Windows 95 or NT 4.0 1-16 For Windows 3.1 or NT 3.5x 1-19 For DOS programs 1-20 Setting Up the Printer 1-1

User Manual
Page 29
be permanently attached to the printer. Also, the shape of the power cord plug varies depending on your printer model, the power cord may be sure the plug you bought your location. 1-2 Setting Up the Printer Unpacking the Printer Besides this guide, your printer box should include EPSON printer software disks, a Notice Sheet, and the following items: printer power cord paper guide paper separator screwdriver ribbon cartridge Note: Depending on the country in which you have is the right one for your printer;
be permanently attached to the printer. Also, the shape of the power cord plug varies depending on your printer model, the power cord may be sure the plug you bought your location. 1-2 Setting Up the Printer Unpacking the Printer Besides this guide, your printer box should include EPSON printer software disks, a Notice Sheet, and the following items: printer power cord paper guide paper separator screwdriver ribbon cartridge Note: Depending on the country in which you have is the right one for your printer;

User Manual
Page 33
... (S015086). w Warning: You will need to remove the used the printer, the print head may damage the printer. 2. c Caution: Moving the print head while the printer is connected to install or replace the ribbon cartridge. Products not manufactured by EPSON may cause damage to your printer not covered by hand to an electrical outlet, unplug it...
... (S015086). w Warning: You will need to remove the used the printer, the print head may damage the printer. 2. c Caution: Moving the print head while the printer is connected to install or replace the ribbon cartridge. Products not manufactured by EPSON may cause damage to your printer not covered by hand to an electrical outlet, unplug it...

User Manual
Page 34
Setting Up the Printer 1-7 Make sure that the print head is , let it cool for a few minutes before touching it. Lift the printer cover by hand. if it straight up and off. Then slide the print head to the ribbon installation position (the indented portion of the paper tension unit) by its back edge and then pull it is not hot; t 1 i 4. Note: When you use the pull tractor, you can replace the ribbon cartridge even though the print head is not positioned in the ribbon installation position. 3.
Setting Up the Printer 1-7 Make sure that the print head is , let it cool for a few minutes before touching it. Lift the printer cover by hand. if it straight up and off. Then slide the print head to the ribbon installation position (the indented portion of the paper tension unit) by its back edge and then pull it is not hot; t 1 i 4. Note: When you use the pull tractor, you can replace the ribbon cartridge even though the print head is not positioned in the ribbon installation position. 3.

User Manual
Page 35
the ribbon guide snaps away from the package. Remove the new ribbon cartridge from the metal pins behind the print head. ribbon guide 6. Then turn the ribbon-tightening knob in the direction of the ribbon cartridge and discard the separator. If a used ribbon cartridge. separator ribbon-tightening knob 1-8 Setting Up the Printer Remove the separator from the middle of the arrow to remove any slack in the ribbon. Properly dispose of the used cartridge is installed, grasp the cartridge and pull it slightly forward and up; 5.
the ribbon guide snaps away from the package. Remove the new ribbon cartridge from the metal pins behind the print head. ribbon guide 6. Then turn the ribbon-tightening knob in the direction of the ribbon cartridge and discard the separator. If a used ribbon cartridge. separator ribbon-tightening knob 1-8 Setting Up the Printer Remove the separator from the middle of the arrow to remove any slack in the ribbon. Properly dispose of the used cartridge is installed, grasp the cartridge and pull it slightly forward and up; 5.

User Manual
Page 36
7. Then lay 1 the cartridge flat. 8. Fit the two front notches of the ribbon cartridge over the small pegs on each side of the printer as shown below. Make sure that the two rear notches of the cartridge fit over the small pegs on each side of the printer. Hold the cartridge with the ribbon-tightening knob up. Setting Up the Printer 1-9 Then gently press down the cartridge until both ends click into place.
7. Then lay 1 the cartridge flat. 8. Fit the two front notches of the ribbon cartridge over the small pegs on each side of the printer as shown below. Make sure that the two rear notches of the cartridge fit over the small pegs on each side of the printer. Hold the cartridge with the ribbon-tightening knob up. Setting Up the Printer 1-9 Then gently press down the cartridge until both ends click into place.

User Manual
Page 37
ribbon guide ribbon-tightening knob 10. Turn the ribbon-tightening knob in the direction of the ribbon cartridge (i ) and insert it clicks into place. Lift the ribbon guide of the arrow to make sure it is not twisted or creased and that it moves smoothly. 1-10 Setting Up the Printer Press down the guide until it firmly over the metal pins behind the print head. Then slide the print head from side to side to remove any slack in place behind the print head (t ). Make sure the ribbon is in the ribbon as shown above. 9.
ribbon guide ribbon-tightening knob 10. Turn the ribbon-tightening knob in the direction of the ribbon cartridge (i ) and insert it clicks into place. Lift the ribbon guide of the arrow to make sure it is not twisted or creased and that it moves smoothly. 1-10 Setting Up the Printer Press down the guide until it firmly over the metal pins behind the print head. Then slide the print head from side to side to remove any slack in place behind the print head (t ). Make sure the ribbon is in the ribbon as shown above. 9.

User Manual
Page 184
... outlet; If a pull tractor is installed, remove it . 1. See page 2-9 for a few minutes before touching it as described on both sides of the printer roller. Repack the printer, ribbon cartridge, paper guide, paper separator, and power cord in the original packing materials and place them in their original boxes. 5. Remove any options are...
... outlet; If a pull tractor is installed, remove it . 1. See page 2-9 for a few minutes before touching it as described on both sides of the printer roller. Repack the printer, ribbon cartridge, paper guide, paper separator, and power cord in the original packing materials and place them in their original boxes. 5. Remove any options are...


