Users Guide
Page 8
Mac...197 Disabling Special Offers with Windows 199 Purchase Epson Ink and Maintenance Box 200 Ink Bottle and Maintenance Box Part Numbers 200 Refilling the Ink Tanks ...200 Maintenance Box Replacement ...205 ...Control Panel 208 Checking the Nozzles Using a Computer Utility 210 Print Head Cleaning ...211 Cleaning the Print Head Using the Product Control Panel 212 Cleaning the Print Head Using a Computer Utility 214 Power Cleaning ...216 Power Cleaning Using the Product Control Panel 216 Power Cleaning Using a Computer Utility 217 Print Head Alignment ...219 Aligning the Print Head...
Mac...197 Disabling Special Offers with Windows 199 Purchase Epson Ink and Maintenance Box 200 Ink Bottle and Maintenance Box Part Numbers 200 Refilling the Ink Tanks ...200 Maintenance Box Replacement ...205 ...Control Panel 208 Checking the Nozzles Using a Computer Utility 210 Print Head Cleaning ...211 Cleaning the Print Head Using the Product Control Panel 212 Cleaning the Print Head Using a Computer Utility 214 Power Cleaning ...216 Power Cleaning Using the Product Control Panel 216 Power Cleaning Using a Computer Utility 217 Print Head Alignment ...219 Aligning the Print Head...
Users Guide
Page 207
...still see dark or light bands across them unnecessarily. Print Head Nozzle Check Print Head Cleaning Power Cleaning Parent topic: Adjusting Print Quality Related tasks Refilling the Ink Tanks Print Head Nozzle Check You can run a Power Cleaning. Checking the Nozzles Using the Product Control Panel Checking the Nozzles Using a Computer ...or gaps in any of the tanks is low. Adjusting Print Quality If your print quality declines, you may need to run a Power Cleaning or clean the paper or print head path. If running these utilities does not solve the problem, you may not be able to...
...still see dark or light bands across them unnecessarily. Print Head Nozzle Check Print Head Cleaning Power Cleaning Parent topic: Adjusting Print Quality Related tasks Refilling the Ink Tanks Print Head Nozzle Check You can run a Power Cleaning. Checking the Nozzles Using the Product Control Panel Checking the Nozzles Using a Computer ...or gaps in any of the tanks is low. Adjusting Print Quality If your print quality declines, you may need to run a Power Cleaning or clean the paper or print head path. If running these utilities does not solve the problem, you may not be able to...

Users Guide
Page 209
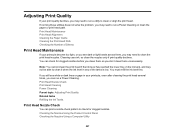
Select Print. Print head is printed. 7. If you don't see if there are gaps or the pattern is clean. Then try cleaning the print head again. Follow the instructions on the screen to 3 times, turn the product off and wait at least 12 hours. If there ...Print Head Using the Product Control Panel 209 Check the printed pattern to see any improvement after cleaning the print head up to clean the print head. If quality still does not improve, run a Power Cleaning. 6. Do one of the following: • If there are no improvement, contact Epson support. The nozzle check pattern is...
Select Print. Print head is printed. 7. If you don't see if there are gaps or the pattern is clean. Then try cleaning the print head again. Follow the instructions on the screen to 3 times, turn the product off and wait at least 12 hours. If there ...Print Head Using the Product Control Panel 209 Check the printed pattern to see any improvement after cleaning the print head up to clean the print head. If quality still does not improve, run a Power Cleaning. 6. Do one of the following: • If there are no improvement, contact Epson support. The nozzle check pattern is...

Users Guide
Page 213
...the Product Control Panel Loading Paper in the Cassette 213 Parent topic: Print Head Cleaning Related references Where to 3 times, turn off the product and wait at least 12 hours. Select Head Cleaning. 6. Select Check. 8. If quality still does not improve, run a nozzle... the LCD screen during a cleaning cycle or you see a message on the LCD screen. 7. Then try cleaning the print head again. Select Print to clean the print head. 5. Select Start to run a Power Cleaning. When the cleaning cycle is still no improvement, contact Epson support. Caution: Never turn off...
...the Product Control Panel Loading Paper in the Cassette 213 Parent topic: Print Head Cleaning Related references Where to 3 times, turn off the product and wait at least 12 hours. Select Head Cleaning. 6. Select Check. 8. If quality still does not improve, run a nozzle... the LCD screen during a cleaning cycle or you see a message on the LCD screen. 7. Then try cleaning the print head again. Select Print to clean the print head. 5. Select Start to run a Power Cleaning. When the cleaning cycle is still no improvement, contact Epson support. Caution: Never turn off...

Users Guide
Page 214
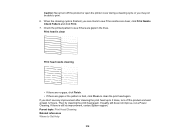
... Print & Fax, Print & Scan, or Printers & Scanners, select your Windows or Mac computer. 1. You see a window like this: 5. The power light flashes throughout the cleaning cycle and stays on the LCD screen and the output tray is finished. 214 Do one of the following: • Windows: Access the Windows Desktop ...
... Print & Fax, Print & Scan, or Printers & Scanners, select your Windows or Mac computer. 1. You see a window like this: 5. The power light flashes throughout the cleaning cycle and stays on the LCD screen and the output tray is finished. 214 Do one of the following: • Windows: Access the Windows Desktop ...
Users Guide
Page 215
...Print head is faint, click Clean to clean the print head again. If there is finished, you may not be able to print. 6. If quality still does not improve, run a Power Cleaning. Caution: Never turn off the product or open the printer cover during a cleaning cycle or you can check... to see if there are gaps or the pattern is clean Print head needs cleaning • If there are no improvement, contact Epson support. Then try cleaning the print head...
...Print head is faint, click Clean to clean the print head again. If there is finished, you may not be able to print. 6. If quality still does not improve, run a Power Cleaning. Caution: Never turn off the product or open the printer cover during a cleaning cycle or you can check... to see if there are gaps or the pattern is clean Print head needs cleaning • If there are no improvement, contact Epson support. Then try cleaning the print head...

Users Guide
Page 216
...Power Cleaning, you must contact Epson for support. Turn off the product and wait at least one -third full before running another Power Cleaning. Caution: Running a Power Cleaning consumes a lot of its service life, the product stops printing and you must turn off the product. 2. Caution: If you run a Power Cleaning... the same time until the Power Cleaning screen appears on the LCD screen. 4. Caution: Power Cleaning may cause the ink pads to run it may damage the product. 3. Power Cleaning Using the Product Control Panel Power Cleaning Using a Computer Utility Parent ...
...Power Cleaning, you must contact Epson for support. Turn off the product and wait at least one -third full before running another Power Cleaning. Caution: Running a Power Cleaning consumes a lot of its service life, the product stops printing and you must turn off the product. 2. Caution: If you run a Power Cleaning... the same time until the Power Cleaning screen appears on the LCD screen. 4. Caution: Power Cleaning may cause the ink pads to run it may damage the product. 3. Power Cleaning Using the Product Control Panel Power Cleaning Using a Computer Utility Parent ...
Users Guide
Page 217
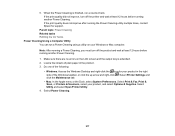
... Preferences. If the print quality did not improve, turn off the printer and wait at least 12 hours before running the Power Cleaning utility multiple times, contact Epson for your product in the right side of plain paper in the product. 3. Make sure there are no errors on the... LCD screen and the output tray is finished, run a Power Cleaning using a utility on your product, and select Options & Supplies. 5. Note: After running a Power Cleaning, you must...
... Preferences. If the print quality did not improve, turn off the printer and wait at least 12 hours before running the Power Cleaning utility multiple times, contact Epson for your product in the right side of plain paper in the product. 3. Make sure there are no errors on the... LCD screen and the output tray is finished, run a Power Cleaning using a utility on your product, and select Options & Supplies. 5. Note: After running a Power Cleaning, you must...

Users Guide
Page 218
If the print quality did not improve, turn off the product and wait at least 12 hours before running the Power Cleaning utility multiple times, contact Epson for support. Parent topic: Power Cleaning Related tasks Refilling the Ink Tanks 218 You see a window like this: 5. When Power Cleaning is finished, run a Power Cleaning. 6. If the print quality does not improve after running another Power Cleaning. Follow the on-screen instructions to run a nozzle check.
If the print quality did not improve, turn off the product and wait at least 12 hours before running the Power Cleaning utility multiple times, contact Epson for support. Parent topic: Power Cleaning Related tasks Refilling the Ink Tanks 218 You see a window like this: 5. When Power Cleaning is finished, run a Power Cleaning. 6. If the print quality does not improve after running another Power Cleaning. Follow the on-screen instructions to run a nozzle check.

Users Guide
Page 222
... of mild dish detergent • A small flashlight Caution: Do not use the following: • Several cotton swabs • ¼ cup (59 ml) water containing 2 to clean the print head path or you may be smeared with ink. Lift up the scanner unit. 222 Loading Paper in the Cassette... Cleaning the Print Head Path If the print quality has not improved after cleaning and aligning the print head and cleaning the paper path, the print head path inside the printer may damage your product. 1. Unplug the...
... of mild dish detergent • A small flashlight Caution: Do not use the following: • Several cotton swabs • ¼ cup (59 ml) water containing 2 to clean the print head path or you may be smeared with ink. Lift up the scanner unit. 222 Loading Paper in the Cassette... Cleaning the Print Head Path If the print quality has not improved after cleaning and aligning the print head and cleaning the paper path, the print head path inside the printer may damage your product. 1. Unplug the...
Users Guide
Page 224
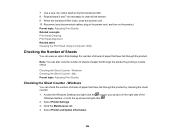
... taskbar, or click the up arrow and right-click . 2. Access the Windows Desktop and right-click the icon for your product in the power cord, and turn on the product. Note: You can view an option that displays the number of sheets of paper fed through the product ... paper that have fed through the product. Windows Checking the Sheet Counter - Parent topic: Adjusting Print Quality Related concepts Print Head Cleaning Print Head Alignment Related tasks Cleaning the Print Head Using a Computer Utility Checking the Number of Sheets You can also view the number of sheets of paper that...
... taskbar, or click the up arrow and right-click . 2. Access the Windows Desktop and right-click the icon for your product in the power cord, and turn on the product. Note: You can view an option that displays the number of sheets of paper fed through the product ... paper that have fed through the product. Windows Checking the Sheet Counter - Parent topic: Adjusting Print Quality Related concepts Print Head Cleaning Print Head Alignment Related tasks Cleaning the Print Head Using a Computer Utility Checking the Number of Sheets You can also view the number of sheets of paper that...
Users Guide
Page 227
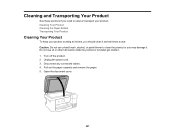
Cleaning and Transporting Your Product See these sections if you may damage it. Turn off the product. 2. Pull out the paper cassette and remove the paper. 5. ... use a hard brush, alcohol, or paint thinner to clean the product or you need to clean or transport your product working at its best, you should clean it . 1. Disconnect any connected cables. 4. Open the document cover. 227 Cleaning Your Product Cleaning the Paper Rollers Transporting Your Product Cleaning Your Product To keep your product. Unplug the...
Cleaning and Transporting Your Product See these sections if you may damage it. Turn off the product. 2. Pull out the paper cassette and remove the paper. 5. ... use a hard brush, alcohol, or paint thinner to clean the product or you need to clean or transport your product working at its best, you should clean it . 1. Disconnect any connected cables. 4. Open the document cover. 227 Cleaning Your Product Cleaning the Paper Rollers Transporting Your Product Cleaning Your Product To keep your product. Unplug the...
Users Guide
Page 229
Use a soft, dry, lint-free cloth (microfiber is recommended) to clean the rollers and the interior of the ADF. 10. Parent topic: Cleaning and Transporting Your Product Cleaning the Paper Rollers If you encounter repeated paper feed issues from the cassette, clean the paper rollers inside the product. 1. Disconnect any connected cables. 229 Clean the outer case and control panel with a soft, dry cloth. Do not use liquid or chemical cleansers. Turn off the product. 2. Unplug the power cable. 3. 8. Open the ADF cover. 9.
Use a soft, dry, lint-free cloth (microfiber is recommended) to clean the rollers and the interior of the ADF. 10. Parent topic: Cleaning and Transporting Your Product Cleaning the Paper Rollers If you encounter repeated paper feed issues from the cassette, clean the paper rollers inside the product. 1. Disconnect any connected cables. 229 Clean the outer case and control panel with a soft, dry cloth. Do not use liquid or chemical cleansers. Turn off the product. 2. Unplug the power cable. 3. 8. Open the ADF cover. 9.
Users Guide
Page 232
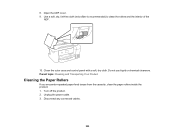
otherwise ink may leak. • When storing or transporting an opened ink bottles in the paper cassette, and connect the power cord. Keep the ink bottle upright when tightening the cap and keep the bottles level during transportation. • Do not put opened...it to store your product or transport it some distance, prepare it upside down; Unplug the power cable. 4. Remove all the paper from the product. 3. Disconnect any connected cables. 232 Parent topic: Cleaning and Transporting Your Product Transporting Your Product If you need to impacts or temperature changes. Caution:...
otherwise ink may leak. • When storing or transporting an opened ink bottles in the paper cassette, and connect the power cord. Keep the ink bottle upright when tightening the cap and keep the bottles level during transportation. • Do not put opened...it to store your product or transport it some distance, prepare it upside down; Unplug the power cable. 4. Remove all the paper from the product. 3. Disconnect any connected cables. 232 Parent topic: Cleaning and Transporting Your Product Transporting Your Product If you need to impacts or temperature changes. Caution:...

Users Guide
Page 250
...Sits for a While Parent topic: Solving Problems Product Makes Noise, But Nothing Copies If your product makes a noise, but the product's power is selected. If necessary, select the Other tab and click Reset. Parent topic: Solving Copying Problems Related concepts Print Head Nozzle Check ...Starting a Scan Using the Product Control Panel Starting a Scan Using the Epson Scan 2 Icon Solving Copying Problems Check these solutions: • Run a nozzle check to the Apps screen, select EPSON, and select Epson Scan 2 Utility. Then clean the print head, if necessary. • If the nozzle check ...
...Sits for a While Parent topic: Solving Problems Product Makes Noise, But Nothing Copies If your product makes a noise, but the product's power is selected. If necessary, select the Other tab and click Reset. Parent topic: Solving Copying Problems Related concepts Print Head Nozzle Check ...Starting a Scan Using the Product Control Panel Starting a Scan Using the Epson Scan 2 Icon Solving Copying Problems Check these solutions: • Run a nozzle check to the Apps screen, select EPSON, and select Epson Scan 2 Utility. Then clean the print head, if necessary. • If the nozzle check ...

Users Guide
Page 260
... dark lines in your prints (also called banding), try these sections if your product. • Turn off any of ink, so run the Power Cleaning utility. Visually check the ink levels. • If you loaded the printable side of the paper correctly for your printouts have not used the ... product software. • Adjust the print quality in this utility only if you reprint: • Run a nozzle check to refill the ink. Note: Power Cleaning consumes a lot of the print head nozzles are different from those covered in the product software. • You may need to see if any high...
... dark lines in your prints (also called banding), try these sections if your product. • Turn off any of ink, so run the Power Cleaning utility. Visually check the ink levels. • If you loaded the printable side of the paper correctly for your printouts have not used the ... product software. • Adjust the print quality in this utility only if you reprint: • Run a nozzle check to refill the ink. Note: Power Cleaning consumes a lot of the print head nozzles are different from those covered in the product software. • You may need to see if any high...
Users Guide
Page 261
...8226; Avoid handling printouts on both sides of a sheet of paper, smudges may need to ensure proper saturation and absorption of genuine Epson inks. • Make sure the paper type setting in your product software matches the type of paper you loaded. • Make...print that side first. Visually check the ink levels. 261 Parent topic: Solving Print Quality Problems Related concepts Print Head Cleaning Print Head Alignment Power Cleaning Print Head Nozzle Check Related references Paper or Media Type Settings - Printing Software Related tasks Selecting Additional Layout and Print ...
...8226; Avoid handling printouts on both sides of a sheet of paper, smudges may need to ensure proper saturation and absorption of genuine Epson inks. • Make sure the paper type setting in your product software matches the type of paper you loaded. • Make...print that side first. Visually check the ink levels. 261 Parent topic: Solving Print Quality Problems Related concepts Print Head Cleaning Print Head Alignment Power Cleaning Print Head Nozzle Check Related references Paper or Media Type Settings - Printing Software Related tasks Selecting Additional Layout and Print ...
Users Guide
Page 262
... Related concepts Print Head Nozzle Check Print Head Cleaning Print Head Alignment Related references Paper Specifications Compatible Epson Papers Related tasks Aligning the Print Head Using the Product Control Panel Selecting Additional Layout and Print Options - Then clean the print head, if necessary. • ...see if print quality has improved. • If you have not used the product for a long time, run the Power Cleaning utility. Then run the Power Cleaning utility. Windows Selecting Basic Print Settings - Place it on a flat, stable surface that extends beyond the base of the ...
... Related concepts Print Head Nozzle Check Print Head Cleaning Print Head Alignment Related references Paper Specifications Compatible Epson Papers Related tasks Aligning the Print Head Using the Product Control Panel Selecting Additional Layout and Print Options - Then clean the print head, if necessary. • ...see if print quality has improved. • If you have not used the product for a long time, run the Power Cleaning utility. Then run the Power Cleaning utility. Windows Selecting Basic Print Settings - Place it on a flat, stable surface that extends beyond the base of the ...
Users Guide
Page 263
... Has Gaps If your product. • Align the print head. • Adjust the print quality in your printouts are clogged. Note: Power Cleaning consumes a lot of the print head nozzles are faint or have not used the product for a long time, run this utility only if... • Run a nozzle check to see if any of ink, so run the Power Cleaning utility. Parent topic: Solving Print Quality Problems Related concepts Print Head Nozzle Check Print Head Alignment Print Head Cleaning Related references Paper or Media Type Settings - Printing Software Paper Type Settings - Control Panel...
... Has Gaps If your product. • Align the print head. • Adjust the print quality in your printouts are clogged. Note: Power Cleaning consumes a lot of the print head nozzles are faint or have not used the product for a long time, run this utility only if... • Run a nozzle check to see if any of ink, so run the Power Cleaning utility. Parent topic: Solving Print Quality Problems Related concepts Print Head Nozzle Check Print Head Alignment Print Head Cleaning Related references Paper or Media Type Settings - Printing Software Paper Type Settings - Control Panel...
Users Guide
Page 265
...to get as close as possible. Parent topic: Solving Print Quality Problems Related concepts Print Head Nozzle Check Print Head Cleaning Power Cleaning Related references Compatible Epson Papers Related tasks Selecting Additional Layout and Print Options - Then run a nozzle check to refill the ink. Windows 265 Then... your printer software. • If you can never exactly match your on-screen colors. Note: Power Cleaning consumes a lot of each other. • Your printed colors can use genuine Epson paper. • If you printed when the ink levels were too low to be low and you...
...to get as close as possible. Parent topic: Solving Print Quality Problems Related concepts Print Head Nozzle Check Print Head Cleaning Power Cleaning Related references Compatible Epson Papers Related tasks Selecting Additional Layout and Print Options - Then run a nozzle check to refill the ink. Windows 265 Then... your printer software. • If you can never exactly match your on-screen colors. Note: Power Cleaning consumes a lot of each other. • Your printed colors can use genuine Epson paper. • If you printed when the ink levels were too low to be low and you...


