Users Guide
Page 3
Advanced Settings Tab 57 3 Contents DS-530 User's Guide ...7 Scanner Basics...8 Scanner Parts Locations ...8 Scanner Parts...8 Scanner Buttons and Lights...11 User Replaceable Epson Scanner Parts and Accessories 12 Changing the Power Off and Sleep Timer Settings 13 Loading Originals...15 Loading...from the Network Interface Unit 42 Scanning ...43 Starting a Scan...43 Starting a Scan from a Scanner Button 43 Assigning Start Button Settings or Scan Jobs 44 Starting a Scan Using the Epson Scan 2 Icon 46 Starting a Scan from a Scanning Program 48 Scanning with Document Capture Pro and ...
Advanced Settings Tab 57 3 Contents DS-530 User's Guide ...7 Scanner Basics...8 Scanner Parts Locations ...8 Scanner Parts...8 Scanner Buttons and Lights...11 User Replaceable Epson Scanner Parts and Accessories 12 Changing the Power Off and Sleep Timer Settings 13 Loading Originals...15 Loading...from the Network Interface Unit 42 Scanning ...43 Starting a Scan...43 Starting a Scan from a Scanner Button 43 Assigning Start Button Settings or Scan Jobs 44 Starting a Scan Using the Epson Scan 2 Icon 46 Starting a Scan from a Scanning Program 48 Scanning with Document Capture Pro and ...

Users Guide
Page 4
... Light Status ...101 Solving Scanning Problems ...102 Scanner Does Not Turn On or Turns Off Unexpectedly 103 Scanner Button Does Not Work as Expected 103 Scanning Software Does Not Operate Correctly 104 Cannot Start Epson Scan 2 ...104 4 OS X ...67 Saving Scanned Documents as a Searchable PDF 69 Saving a Scan as Separate Files - Scanning...
... Light Status ...101 Solving Scanning Problems ...102 Scanner Does Not Turn On or Turns Off Unexpectedly 103 Scanner Button Does Not Work as Expected 103 Scanning Software Does Not Operate Correctly 104 Cannot Start Epson Scan 2 ...104 4 OS X ...67 Saving Scanned Documents as a Searchable PDF 69 Saving a Scan as Separate Files - Scanning...

Users Guide
Page 8
Scanner Parts Locations Changing the Power Off and Sleep Timer Settings Scanner Parts Locations See these sections to identify the parts on your scanner. Scanner Basics See these sections to learn about the basic features of your scanner. Scanner Parts Scanner Buttons and Lights User Replaceable Epson Scanner Parts and Accessories Parent topic: Scanner Basics Scanner Parts 8
Scanner Parts Locations Changing the Power Off and Sleep Timer Settings Scanner Parts Locations See these sections to identify the parts on your scanner. Scanner Basics See these sections to learn about the basic features of your scanner. Scanner Parts Scanner Buttons and Lights User Replaceable Epson Scanner Parts and Accessories Parent topic: Scanner Basics Scanner Parts 8

Users Guide
Page 11
2 Power cord 3 USB cable Parent topic: Scanner Parts Locations Scanner Buttons and Lights Buttons 1 power button 2 double feed detection skip button 3 slow mode button 4 stop button 5 start button 11
2 Power cord 3 USB cable Parent topic: Scanner Parts Locations Scanner Buttons and Lights Buttons 1 power button 2 double feed detection skip button 3 slow mode button 4 stop button 5 start button 11

Users Guide
Page 21
... in the input tray. This may wrinkle or damage the original. Note: If scanning thin or wrinkled paper causes paper jams, press the slow mode button once before scanning to normal speed. Caution: Do not load photos, or valuable original documents or artwork, directly into the input tray.
... in the input tray. This may wrinkle or damage the original. Note: If scanning thin or wrinkled paper causes paper jams, press the slow mode button once before scanning to normal speed. Caution: Do not load photos, or valuable original documents or artwork, directly into the input tray.

Users Guide
Page 29
Slide the edge guides against the edges of the card. 5. Turn off the Detect Double Feed setting on the Main Settings tab in Epson Scan 2 when scanning the cards. Press the double feed detection skip button to disable the Detect Double Feed feature, and scan again. 29 Note: If you do not disable the Detect Double Feed setting and a double feed error occurs, remove the plastic or laminated card from the input tray and then reload it. 4.
Slide the edge guides against the edges of the card. 5. Turn off the Detect Double Feed setting on the Main Settings tab in Epson Scan 2 when scanning the cards. Press the double feed detection skip button to disable the Detect Double Feed feature, and scan again. 29 Note: If you do not disable the Detect Double Feed setting and a double feed error occurs, remove the plastic or laminated card from the input tray and then reload it. 4.
Users Guide
Page 38
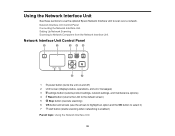
...) 2 LCD screen (displays status, operations, and error messages) 3 settings button (selects product settings, network settings, and maintenance options) 4 Reset button (returns the LCD to the default screen) 5 Stop button (cancels scanning) 6 OK button and arrows (use the optional Epson Network Interface Unit to select it) 7 start button (starts scanning when networking is enabled) Parent topic: Using...
...) 2 LCD screen (displays status, operations, and error messages) 3 settings button (selects product settings, network settings, and maintenance options) 4 Reset button (returns the LCD to the default screen) 5 Stop button (cancels scanning) 6 OK button and arrows (use the optional Epson Network Interface Unit to select it) 7 start button (starts scanning when networking is enabled) Parent topic: Using...

Users Guide
Page 40
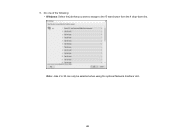
Select your scanner and click Add. 40 You see a screen like this: Note: If you see an Enable Editing button, click it so that you can modify the scanner settings. 3.
Select your scanner and click Add. 40 You see a screen like this: Note: If you see an Enable Editing button, click it so that you can modify the scanner settings. 3.
Users Guide
Page 42
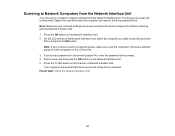
... computer you want to send the scanned file to a network computer directly from the Network Interface Unit. Press the OK button on the scanner or Network Interface Unit. Press the start button on the Network Interface Unit. 2. Parent topic: Using the Network Interface Unit 42 Select a scan job and press the ...OK button on the LCD screen. 3. Scanning to Network Computers from the Network Interface Unit You can scan to . If you want to send the scanned file...
... computer you want to send the scanned file to a network computer directly from the Network Interface Unit. Press the OK button on the scanner or Network Interface Unit. Press the start button on the Network Interface Unit. 2. Parent topic: Using the Network Interface Unit 42 Select a scan job and press the ...OK button on the LCD screen. 3. Scanning to Network Computers from the Network Interface Unit You can scan to . If you want to send the scanned file...

Users Guide
Page 43
... (OS X) and the scan job you have assigned to your product for scanning, start button on the computer connected to the start button. Load an original in Epson Scan 2 Scan Resolution Guidelines Scanning Special Projects Starting a Scan After placing your original documents ...or photos on your computer or network. 2. Press the start button in Document Capture Pro (Windows) or Document Capture (OS X). Starting a Scan from a Scanner Button Starting a Scan Using the Epson Scan 2 Icon Starting a Scan from a Scanning Program Parent topic: Scanning Starting ...
... (OS X) and the scan job you have assigned to your product for scanning, start button on the computer connected to the start button. Load an original in Epson Scan 2 Scan Resolution Guidelines Scanning Special Projects Starting a Scan After placing your original documents ...or photos on your computer or network. 2. Press the start button in Document Capture Pro (Windows) or Document Capture (OS X). Starting a Scan from a Scanner Button Starting a Scan Using the Epson Scan 2 Icon Starting a Scan from a Scanning Program Parent topic: Scanning Starting ...

Users Guide
Page 44
...Document Capture on your scanner. Click the Manage Job icon from the toolbar at the bottom of the window. If you scan using the start button, do this by accessing the scan jobs in Document Capture Pro or Document Capture for the new job, select settings as necessary, and click OK.... Note: See the Help information in the Document Capture Pro (Windows) or Document Capture (OS X) program. 1. Assigning Start Button Settings or Scan Jobs Parent topic: Starting a Scan Assigning Start Button Settings or Scan Jobs You can now use the new scan job when you want to assign a scan job to...
...Document Capture on your scanner. Click the Manage Job icon from the toolbar at the bottom of the window. If you scan using the start button, do this by accessing the scan jobs in Document Capture Pro or Document Capture for the new job, select settings as necessary, and click OK.... Note: See the Help information in the Document Capture Pro (Windows) or Document Capture (OS X) program. 1. Assigning Start Button Settings or Scan Jobs Parent topic: Starting a Scan Assigning Start Button Settings or Scan Jobs You can now use the new scan job when you want to assign a scan job to...
Users Guide
Page 45
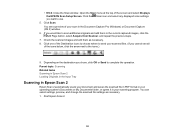
5. Note: Jobs 2 to the start button from the 1 drop-down list. Do one of the following: • Windows: Select the job that you want to assign to 30 can only be selected when using the optional Network Interface Unit. 45
5. Note: Jobs 2 to the start button from the 1 drop-down list. Do one of the following: • Windows: Select the job that you want to assign to 30 can only be selected when using the optional Network Interface Unit. 45

Users Guide
Page 46
... the Apps screen and select Epson Scan 2. • Windows (other versions): Click or Start, and select All Programs or Programs. Select EPSON > Epson Scan 2 > Epson Scan 2. • OS X: Open the Applications folder, open the Epson Software folder, and select Epson Scan 2. 46 Parent topic: Starting a Scan from a Scanner Button Starting a Scan Using the Epson Scan 2 Icon You can...
... the Apps screen and select Epson Scan 2. • Windows (other versions): Click or Start, and select All Programs or Programs. Select EPSON > Epson Scan 2 > Epson Scan 2. • OS X: Open the Applications folder, open the Epson Software folder, and select Epson Scan 2. 46 Parent topic: Starting a Scan from a Scanner Button Starting a Scan Using the Epson Scan 2 Icon You can...

Users Guide
Page 51
... Select any displayed scan settings you want to see a window like this: Note: If you want to use . Note: See the Help information in the Epson Scan 2 window, then click Save. 51 If you created instead, select it from the Job list in the Document Capture Pro or Document Capture window..., click the Start Job button, and skip the rest of the following: • Windows: Click Detailed Settings. Click the Scan icon. Select any displayed scan settings you want ...
... Select any displayed scan settings you want to see a window like this: Note: If you want to use . Note: See the Help information in the Epson Scan 2 window, then click Save. 51 If you created instead, select it from the Job list in the Document Capture Pro or Document Capture window..., click the Start Job button, and skip the rest of the following: • Windows: Click Detailed Settings. Click the Scan icon. Select any displayed scan settings you want ...
Users Guide
Page 52
Open the Scan menu at the top of the Destination icons to choose where to the current captured images, click the Add Page button, select Acquire from Scanner, and repeat the previous steps. 7. Click Scan. If you chose, click OK or Send to use. 5. You see ...send your operating system's Documents or My Documents folder, or opens it in the Document Capture Pro (Windows) or Document Capture (OS X) window. 6. Start Epson Scan 2. 52 • OS X: Close the Scan window. Depending on the destination you would like to the icons.) 9. Parent topic: Scanning Related tasks ...
Open the Scan menu at the top of the Destination icons to choose where to the current captured images, click the Add Page button, select Acquire from Scanner, and repeat the previous steps. 7. Click Scan. If you chose, click OK or Send to use. 5. You see ...send your operating system's Documents or My Documents folder, or opens it in the Document Capture Pro (Windows) or Document Capture (OS X) window. 6. Start Epson Scan 2. 52 • OS X: Close the Scan window. Depending on the destination you would like to the icons.) 9. Parent topic: Scanning Related tasks ...

Users Guide
Page 54
...Document Size setting that matches the size of the original that you want to scan. 4. Select your scan with the settings you want to have Epson Scan 2 automatically detect the size. To see a preview of the additional settings that you want to use on the Main Settings tab. 8. ... the Image Type setting. 6. Click the Advanced Settings tab and select any of your original image type and how you selected, click the Preview button. 54 If you want to use for your scan. 7. You can select Customize to ADF for your product. 2. Select any settings that matches...
...Document Size setting that matches the size of the original that you want to scan. 4. Select your scan with the settings you want to have Epson Scan 2 automatically detect the size. To see a preview of the additional settings that you want to use on the Main Settings tab. 8. ... the Image Type setting. 6. Click the Advanced Settings tab and select any of your original image type and how you selected, click the Preview button. 54 If you want to use for your scan. 7. You can select Customize to ADF for your product. 2. Select any settings that matches...

Users Guide
Page 69
... button. If you want to scan, if necessary. 5. Select your scanner software programs individually, be sure to perform OCR. 1. Click Preview and adjust the area you selected, if available on the Start Here sheet. You see the Save Converted File As window: 8. Note: The required Epson ...Scan OCR Component (Windows) or Epson Scan 2 OCR Component (OS X) is installed automatically when you are using Optical Character Recognition (OCR) and then embedded in ...
... button. If you want to scan, if necessary. 5. Select your scanner software programs individually, be sure to perform OCR. 1. Click Preview and adjust the area you selected, if available on the Start Here sheet. You see the Save Converted File As window: 8. Note: The required Epson ...Scan OCR Component (Windows) or Epson Scan 2 OCR Component (OS X) is installed automatically when you are using Optical Character Recognition (OCR) and then embedded in ...

Users Guide
Page 84
If the glass surface is stained with mild detergent and water. 4. Wipe off the document scanner using the power button. Dust can cause spots in your scanned images. 1. Make sure that connects the flatbed scanner dock to remove it with a soft dry cloth. Clean the ... other hard-to-remove material, use a small amount of the scanner glass. Unplug the AC power cord and disconnect the USB cable that no power button on the flatbed scanner. 2. Parent topic: Using the Optional Flatbed Scanner Dock 84 If the scanner glass is no dust builds up on the surface...
If the glass surface is stained with mild detergent and water. 4. Wipe off the document scanner using the power button. Dust can cause spots in your scanned images. 1. Make sure that connects the flatbed scanner dock to remove it with a soft dry cloth. Clean the ... other hard-to-remove material, use a small amount of the scanner glass. Unplug the AC power cord and disconnect the USB cable that no power button on the flatbed scanner. 2. Parent topic: Using the Optional Flatbed Scanner Dock 84 If the scanner glass is no dust builds up on the surface...

Users Guide
Page 85
Transporting the Flatbed Scanner Dock If you need to the computer. 85 Note: There is no power button on the flatbed scanner. 2. Unplug the AC power cord and disconnect the USB cable that connects the flatbed scanner dock to ship your product, transport it a long distance, or store it for an extended period, prepare it for transportation as described here. 1. Turn off the document scanner using the power button.
Transporting the Flatbed Scanner Dock If you need to the computer. 85 Note: There is no power button on the flatbed scanner. 2. Unplug the AC power cord and disconnect the USB cable that connects the flatbed scanner dock to ship your product, transport it a long distance, or store it for an extended period, prepare it for transportation as described here. 1. Turn off the document scanner using the power button.

Users Guide
Page 90
...momentarily, and then the scanner enters cleaning mode. Use a genuine Epson cleaning kit or a soft, 90 Hold down the start button several times to clean the roller; The rollers on the scanner. 9. Caution: Use only a genuine Epson cleaning kit or soft, moist cloth to rotate the rollers shown ...here. using a genuine Epson cleaning kit or a soft, moist cloth. Wipe off...
...momentarily, and then the scanner enters cleaning mode. Use a genuine Epson cleaning kit or a soft, 90 Hold down the start button several times to clean the roller; The rollers on the scanner. 9. Caution: Use only a genuine Epson cleaning kit or soft, moist cloth to rotate the rollers shown ...here. using a genuine Epson cleaning kit or a soft, moist cloth. Wipe off...