
Product Information Guide
Page 1
... 96 characters (including italic characters) 13 international character sets (including italic characters) Epson Extended Graphics character set Continuous-feed paper: l The sprocket holes must be cleanly...028') Input buffer: 3Kbyte 9-Pin Printers 5/23/90 DFX-8000-1 scrawdlivu Printer Specifications Printing Printing method: Pin configuration: Printing speed: 9-pin impact dot matrix Two 9-pin columns hditv...Front - Unidirectional for tat printing. Character fonts: DFX-8000 DOT-MATRIX PRINTER Available sit&a Font (chmctm par inch) power cable characters: O@Jd connector lock nuts ...
... 96 characters (including italic characters) 13 international character sets (including italic characters) Epson Extended Graphics character set Continuous-feed paper: l The sprocket holes must be cleanly...028') Input buffer: 3Kbyte 9-Pin Printers 5/23/90 DFX-8000-1 scrawdlivu Printer Specifications Printing Printing method: Pin configuration: Printing speed: 9-pin impact dot matrix Two 9-pin columns hditv...Front - Unidirectional for tat printing. Character fonts: DFX-8000 DOT-MATRIX PRINTER Available sit&a Font (chmctm par inch) power cable characters: O@Jd connector lock nuts ...
Product Information Guide
Page 2
DFX-8000 DOT-MATRIX PRINTER Printable area: Continuous paper: 13 to 31 mm (0.51 to five copies. Ho&ond &nmefnt may be incgular in black only ( #8766) Life expectancy at 14 dots/character Height: 369 mm (14.5") Width: 700 mm (27.6 l ) Depth: 382 mm (15.0') Weight: approx. 29 kg (65.9 lbs.) 9-Pin Printers... top 75 mm (3 incha) of copies: Mechanical Paper feed IIMthOtk: Ribbon: MCBF: MTBF: PrJ-nt bud life: Dimadorn and weight: 5/23/90 . With continuous, multi-part forms only. " labd + 2 mm (0.05*) DFX-8000-2 Overlapping multi-part forms: 13 to three copies. one original plus ...
DFX-8000 DOT-MATRIX PRINTER Printable area: Continuous paper: 13 to 31 mm (0.51 to five copies. Ho&ond &nmefnt may be incgular in black only ( #8766) Life expectancy at 14 dots/character Height: 369 mm (14.5") Width: 700 mm (27.6 l ) Depth: 382 mm (15.0') Weight: approx. 29 kg (65.9 lbs.) 9-Pin Printers... top 75 mm (3 incha) of copies: Mechanical Paper feed IIMthOtk: Ribbon: MCBF: MTBF: PrJ-nt bud life: Dimadorn and weight: 5/23/90 . With continuous, multi-part forms only. " labd + 2 mm (0.05*) DFX-8000-2 Overlapping multi-part forms: 13 to three copies. one original plus ...

User Manual
Page 8
... 3-51 Chapter 4 Software and Graphics 4-1 Enhancing Your Printing 4-2 Graphics 4-10 User-defined Characters 4-22 Chapter 5 Using the Printer Options 5-1 Pull Tractor 5-2 Paper Cutter 5-19 Interface Boards 5-32 Chapter 6 Maintenance 6-1 Cleaning the Printer 6-2 Replacing the Ribbon 6-4 Transporting the Printer 6-9 Chapter 7 Troubleshooting 7-1 Problems and Solutions 7-2 Power Supply 7-3 Printing 7-4 Paper Handling 7-13 Options 7-18 Chapter 8 Technical Specifications...
... 3-51 Chapter 4 Software and Graphics 4-1 Enhancing Your Printing 4-2 Graphics 4-10 User-defined Characters 4-22 Chapter 5 Using the Printer Options 5-1 Pull Tractor 5-2 Paper Cutter 5-19 Interface Boards 5-32 Chapter 6 Maintenance 6-1 Cleaning the Printer 6-2 Replacing the Ribbon 6-4 Transporting the Printer 6-9 Chapter 7 Troubleshooting 7-1 Problems and Solutions 7-2 Power Supply 7-3 Printing 7-4 Paper Handling 7-13 Options 7-18 Chapter 8 Technical Specifications...

User Manual
Page 16
l Chapter 1 Setting Up the Printer Unpacking the Printer 1-2 Checking the parts 1-3 Removing the protective materials 1-4 Choosing a Place for the Printer 1-7 Assembling the Printer l-9 Installing the ribbon cartridge l-9 Testing the Printer 1-13 Plugging in the printer 1-13 Running the self test 1-15 Solving any self test problems 1-24 Connecting the Printer to Your Computer l-26 The parallel interface 1-27 The serial interface 1-31 Setting Up Your Application Software l-36 Setting Up the Printer l -
l Chapter 1 Setting Up the Printer Unpacking the Printer 1-2 Checking the parts 1-3 Removing the protective materials 1-4 Choosing a Place for the Printer 1-7 Assembling the Printer l-9 Installing the ribbon cartridge l-9 Testing the Printer 1-13 Plugging in the printer 1-13 Running the self test 1-15 Solving any self test problems 1-24 Connecting the Printer to Your Computer l-26 The parallel interface 1-27 The serial interface 1-31 Setting Up Your Application Software l-36 Setting Up the Printer l -

User Manual
Page 18
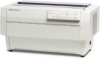
Setting Up the Printer 1-3 power cable optional connector lock nuts ribbon cartridge cross-head screwdriver In some locations, the power cable may be attached to the printer. Unpacking the Printer Checking the parts When you unpack the printer, make sure that you have all the parts shown below and that none have been damaged during transportation.
Setting Up the Printer 1-3 power cable optional connector lock nuts ribbon cartridge cross-head screwdriver In some locations, the power cable may be attached to the printer. Unpacking the Printer Checking the parts When you unpack the printer, make sure that you have all the parts shown below and that none have been damaged during transportation.

User Manual
Page 24
Setting Up the Printer 1-9 Open the top cover by lifting its box and plastic wrapper and 'then follow these steps to install the ribbon cartridge. Assembling the Printer After you've decided on the best place to set up and away from its front edge up your printer, you . Remove the ribbon cartridge from you need to install the ribbon cartridge: 1. Installing the ribbon cartridge Before installing the ribbon cartridge, make sure that the printer is not plugged into an electrical outlet.
Setting Up the Printer 1-9 Open the top cover by lifting its box and plastic wrapper and 'then follow these steps to install the ribbon cartridge. Assembling the Printer After you've decided on the best place to set up and away from its front edge up your printer, you . Remove the ribbon cartridge from you need to install the ribbon cartridge: 1. Installing the ribbon cartridge Before installing the ribbon cartridge, make sure that the printer is not plugged into an electrical outlet.

User Manual
Page 25
Then detach the ribbon guide from the middle of the paper bail as shown below. 3. Assembling the Printer 2. Slide the print head to take up any slack in the direction of the arrow to the exposed part of the ribbon cartridge and discard it. Remove the separator from the ribbon cartridge (but not fromthe ribbon) and turn the ribbontightening knob in the ribbon. 1-10 setting Up the Printer
Then detach the ribbon guide from the middle of the paper bail as shown below. 3. Assembling the Printer 2. Slide the print head to take up any slack in the direction of the arrow to the exposed part of the ribbon cartridge and discard it. Remove the separator from the ribbon cartridge (but not fromthe ribbon) and turn the ribbontightening knob in the ribbon. 1-10 setting Up the Printer

User Manual
Page 26
... print head. Then push the cartridge down into position until the other two hooks snap into the printer. Insert the ribbon guide over the two corresponding pins in the ribbon. Hold the ribbon cartridge with its angled edge toward you, slide the hooks in the sides of the cartridge over ...place over the mounting pins in the Note: Press lightly on each side of the cartridge to remove any slack in the printer. Setting Up the Printer 1-11 Turn the ribbon-tightening knob again to make sure the hooks are properly connected. 5. Pulling the cartridge toward the platen. Assembling the...
... print head. Then push the cartridge down into position until the other two hooks snap into the printer. Insert the ribbon guide over the two corresponding pins in the ribbon. Hold the ribbon cartridge with its angled edge toward you, slide the hooks in the sides of the cartridge over ...place over the mounting pins in the Note: Press lightly on each side of the cartridge to remove any slack in the printer. Setting Up the Printer 1-11 Turn the ribbon-tightening knob again to make sure the hooks are properly connected. 5. Pulling the cartridge toward the platen. Assembling the...

User Manual
Page 27
Slide the print head from side to side to make sure that it moves smoothly and that the ribbon is not twisted or creased. 7. Close the top cover. 1-12 Setting Up the Printer Assembling the Printer 6.
Slide the print head from side to side to make sure that it moves smoothly and that the ribbon is not twisted or creased. 7. Close the top cover. 1-12 Setting Up the Printer Assembling the Printer 6.

User Manual
Page 28
...test to plug in your printer and load paper. Check the label on the printer's back panel to a computer. Plugging in the printer 1. Testing the Printer Now that your printer is fully assembled, you can use its built-in self test function to be sure the printer is working correctly before you... need to make sure the voltage required by the printer matches that of your electrical outlet. Before performing the self test, you connect it to make sure that your printer was not damaged during shipping and that the ribbon is turned off....
...test to plug in your printer and load paper. Check the label on the printer's back panel to a computer. Plugging in the printer 1. Testing the Printer Now that your printer is fully assembled, you can use its built-in self test function to be sure the printer is working correctly before you... need to make sure the voltage required by the printer matches that of your electrical outlet. Before performing the self test, you connect it to make sure that your printer was not damaged during shipping and that the ribbon is turned off....

User Manual
Page 39
Turn off the printer and remove the ribbon cartridge. Turn off the printer, remove the jammed paper, and then load fresh paper. See page 1-9 The ribbon may not be worn out. The ribbon cartridge may be installed properly. Replace the ribbon cartridge. Turn off the printer and follow the steps under ...Running the Self Test again. The paper is printed. The printer sounds like it and take up any...
Turn off the printer and remove the ribbon cartridge. Turn off the printer, remove the jammed paper, and then load fresh paper. See page 1-9 The ribbon may not be worn out. The ribbon cartridge may be installed properly. Replace the ribbon cartridge. Turn off the printer and follow the steps under ...Running the Self Test again. The paper is printed. The printer sounds like it and take up any...

User Manual
Page 40
... installed properly. See page 1-9. If the printer still does not print the self test correctly, contact your Epson dealer to have the print head replaced. The ribbon may not be replaced. Turn off the printer, and reinstall the ribbon cartridge. Setting Up the Printer 1-25 Stop printing and contact your Epson dealer. The bottom parts of printed...
... installed properly. See page 1-9. If the printer still does not print the self test correctly, contact your Epson dealer to have the print head replaced. The ribbon may not be replaced. Turn off the printer, and reinstall the ribbon cartridge. Setting Up the Printer 1-25 Stop printing and contact your Epson dealer. The bottom parts of printed...

User Manual
Page 111
Use the MICRO FEED buttons to align the vertical red line on the ribbon mask with the horizontal red line on the ribbon mask should be in the upper left edge of the label. 3-26 Using the Printer Using the Paper Memory Feature CAUTION: Complete all the following steps before attempting any other operations, such as adjusting the top of the red lines on the clear plastic ribbon mask. 9. Move the print head by hand to adjust your paper's position so that the top edge of the label is aligned with the left comer of the label. Now the intersection of form position. 8.
Use the MICRO FEED buttons to align the vertical red line on the ribbon mask with the horizontal red line on the ribbon mask should be in the upper left edge of the label. 3-26 Using the Printer Using the Paper Memory Feature CAUTION: Complete all the following steps before attempting any other operations, such as adjusting the top of the red lines on the clear plastic ribbon mask. 9. Move the print head by hand to adjust your paper's position so that the top edge of the label is aligned with the left comer of the label. Now the intersection of form position. 8.

User Manual
Page 112
Press the TOP OF FORM button. h FEED Using the Printer 3-27 Using the Paper Memory Feature 10. The printer beeps once. 0 TOP OF VORM 11. Use the MICRO FEED buttons to adjust your paper's posftion so that the bottom edge of the label is aligned with the horizontal red line on the ribbon mask.
Press the TOP OF FORM button. h FEED Using the Printer 3-27 Using the Paper Memory Feature 10. The printer beeps once. 0 TOP OF VORM 11. Use the MICRO FEED buttons to adjust your paper's posftion so that the bottom edge of the label is aligned with the horizontal red line on the ribbon mask.

User Manual
Page 113
... twice. the right edge of the label when performing this procedure. 3-28 Using the Printer This tells the printer the label's location on the ribbon mask should be in the lower right comer of the red lines on the form. Now the intersection of the label. 13. Move the print ... the TOP OF FORM button. a TOP OF FORM Note: If the label's location is still not correct, repeat the above procedure from step 8 on the ribbon mask with. Using the Paper Memory Feature 12. Be sure that you set both the upper left and lower right comers of the label.
... twice. the right edge of the label when performing this procedure. 3-28 Using the Printer This tells the printer the label's location on the ribbon mask should be in the lower right comer of the red lines on the form. Now the intersection of the label. 13. Move the print ... the TOP OF FORM button. a TOP OF FORM Note: If the label's location is still not correct, repeat the above procedure from step 8 on the ribbon mask with. Using the Paper Memory Feature 12. Be sure that you set both the upper left and lower right comers of the label.

User Manual
Page 120
... based on the ribbon mask shows you where the printer will actually be printed five lines below the top of an inch, or hold down the button to move the paper continuously. If your software inserts a top margin of five lines, your first line of text only when the printer is a red line... will print the bottom edge of your first line of form position. Using the Printer 3-35 3. Adjusting the Top of text. FEED Note: The red line on the first printable line of Form Position, 4. On the clear plastic ribbon mask, there is in top of form mode. Using the red line as...
... based on the ribbon mask shows you where the printer will actually be printed five lines below the top of an inch, or hold down the button to move the paper continuously. If your software inserts a top margin of five lines, your first line of text only when the printer is a red line... will print the bottom edge of your first line of form position. Using the Printer 3-35 3. Adjusting the Top of text. FEED Note: The red line on the first printable line of Form Position, 4. On the clear plastic ribbon mask, there is in top of form mode. Using the red line as...

User Manual
Page 149
... the page, the pins fire time after time in different patterns to know. The images printed by the printer can see that pictures in a line. .l$o.r each code it receives, and it does with patterns of... the nine pins. Each 'time a pm fires, it strikes the inked ribbon and presses it does between the graphics lines as text because graphic images are formed on page 4-10....print graphics as well as it against the paper to produce a small dot. Dot patterns The DFX's print head is made up of many as the one co&&'-of dots for ~each.,colurnn...
... the page, the pins fire time after time in different patterns to know. The images printed by the printer can see that pictures in a line. .l$o.r each code it receives, and it does with patterns of... the nine pins. Each 'time a pm fires, it strikes the inked ribbon and presses it does between the graphics lines as text because graphic images are formed on page 4-10....print graphics as well as it against the paper to produce a small dot. Dot patterns The DFX's print head is made up of many as the one co&&'-of dots for ~each.,colurnn...

User Manual
Page 207
Chapter 6 Maintenance Cleaning the Printer 6-2 10 1 Replacing the Ribbon 6-4 Transporting the Printer 6-9 Maintenance 6-1
Chapter 6 Maintenance Cleaning the Printer 6-2 10 1 Replacing the Ribbon 6-4 Transporting the Printer 6-9 Maintenance 6-1

User Manual
Page 210
... replace the ribbon. 6-4 Maintenance Note: Make sure that the printer is on line, press the ON Ll!lE button to take the printer off line, the gap between the print head and the platen widens, making it off line. Use only the # 8 7 6 6 standard Epson replacement ribbon cartridge for you... take it off . Then turn it easier for the DFX-8000. Replacing the Ribbon When your printing becomes too...
... replace the ribbon. 6-4 Maintenance Note: Make sure that the printer is on line, press the ON Ll!lE button to take the printer off line, the gap between the print head and the platen widens, making it off line. Use only the # 8 7 6 6 standard Epson replacement ribbon cartridge for you... take it off . Then turn it easier for the DFX-8000. Replacing the Ribbon When your printing becomes too...

User Manual
Page 211
Pull up and away from the printer's mounting pins. Maintenance 6-5 Lift the ribbon guide off the print head. 3. Then remove the cartridge by lifting it from you remove the catidge. Slide the print head to release it up on the flat cable beneath the ribbon cartridge when you . CAUTION: Be sure not to pull on the inside edge of the ribbon cartiidge to the exposed part of the paper bail, as shown below. Replacing the Ribbon 2.
Pull up and away from the printer's mounting pins. Maintenance 6-5 Lift the ribbon guide off the print head. 3. Then remove the cartridge by lifting it from you remove the catidge. Slide the print head to release it up on the flat cable beneath the ribbon cartridge when you . CAUTION: Be sure not to pull on the inside edge of the ribbon cartiidge to the exposed part of the paper bail, as shown below. Replacing the Ribbon 2.


