
User Manual
Page 2
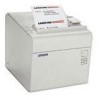
Printer Parts 3 power switch 2 cutter cover 4 cover open lever 1 paper roll cover 5 control panel DIP Switch Tables Serial SW Function ON 1-1 Power switch function Disabled 1-2 Interface condition selection by DIP switch OFF Enabled by memory switch 1-3 Handshaking XON/XOFF DTR/DSR 1-4 Data word length 7 bits 8 bits 1-5 Parity check Enabled Disabled 1-6 Parity selection Even Odd 1-7 Transmission speed (See table below.) 1-8 2-1 Reserved Fixed to Off. Transmission speed (bps)-bits per second 2400 4800 9600 19200 1-7 1-8 ON ON OFF...
Printer Parts 3 power switch 2 cutter cover 4 cover open lever 1 paper roll cover 5 control panel DIP Switch Tables Serial SW Function ON 1-1 Power switch function Disabled 1-2 Interface condition selection by DIP switch OFF Enabled by memory switch 1-3 Handshaking XON/XOFF DTR/DSR 1-4 Data word length 7 bits 8 bits 1-5 Parity check Enabled Disabled 1-6 Parity selection Even Odd 1-7 Transmission speed (See table below.) 1-8 2-1 Reserved Fixed to Off. Transmission speed (bps)-bits per second 2400 4800 9600 19200 1-7 1-8 ON ON OFF...
User Manual
Page 3
... Applied Product Name: TM-L90 Model Name: M165B The following Directives and Norms: Directive 89/336/EEC EN 55022 Class B EN 55024 IEC 61000-4-2 IEC 61000-4-3 IEC 61000-4-4 IEC 61000-4-5 IEC 61000-4-6 IEC 61000-4-11 FCC Compliance Statement For American Users This equipment has been tested and found to comply with Seiko Epson Corporation's operating and maintenance instructions. You are cautioned...
... Applied Product Name: TM-L90 Model Name: M165B The following Directives and Norms: Directive 89/336/EEC EN 55022 Class B EN 55024 IEC 61000-4-2 IEC 61000-4-3 IEC 61000-4-4 IEC 61000-4-5 IEC 61000-4-6 IEC 61000-4-11 FCC Compliance Statement For American Users This equipment has been tested and found to comply with Seiko Epson Corporation's operating and maintenance instructions. You are cautioned...

User Manual
Page 4
... WARNING: Do not connect a telephone line to fire. Continued use the specified power source. Never disassemble or modify this product yourself. Excessive humidity and dust may be dangerous. otherwise, the printer and the telephone line may cause equipment damage or fire. CAUTION: The thermal head is hot. 2 TM-L90 User's Manual Be sure to repair this product. Never attempt to set this equipment on...
... WARNING: Do not connect a telephone line to fire. Continued use the specified power source. Never disassemble or modify this product yourself. Excessive humidity and dust may be dangerous. otherwise, the printer and the telephone line may cause equipment damage or fire. CAUTION: The thermal head is hot. 2 TM-L90 User's Manual Be sure to repair this product. Never attempt to set this equipment on...
User Manual
Page 5
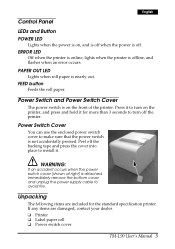
... specification printer. Power Switch Cover You can use the enclosed power switch cover to make sure that the power switch is attached, immediately remove the bottom cover and unplug the power supply cable to turn off the printer. WARNING: If an accident occurs when the power switch cover (shown at right) is not accidentally pressed. FEED button Feeds the roll paper. Unpacking The following items are damaged, contact your dealer. ❏ Printer ❏ Label paper roll ❏ Power switch cover TM-L90 User's Manual...
... specification printer. Power Switch Cover You can use the enclosed power switch cover to make sure that the power switch is attached, immediately remove the bottom cover and unplug the power supply cable to turn off the printer. WARNING: If an accident occurs when the power switch cover (shown at right) is not accidentally pressed. FEED button Feeds the roll paper. Unpacking The following items are damaged, contact your dealer. ❏ Printer ❏ Label paper roll ❏ Power switch cover TM-L90 User's Manual...
User Manual
Page 6
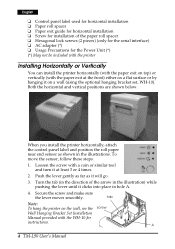
... not be included with the printer Installing Horizontally or Vertically You can install the printer horizontally (with the paper exit on top) or vertically (with a coin or similar tool and turn it at the front) either on a wall (using the optional hanging bracket set, WH-10). To move the sensor, follow these steps. 1. Turn the tab (in the illustrations. A 4 TM-L90 User's Manual
... not be included with the printer Installing Horizontally or Vertically You can install the printer horizontally (with the paper exit on top) or vertically (with a coin or similar tool and turn it at the front) either on a wall (using the optional hanging bracket set, WH-10). To move the sensor, follow these steps. 1. Turn the tab (in the illustrations. A 4 TM-L90 User's Manual

User Manual
Page 7
TM-L90 User's Manual 5 Note: If you use the printer horizontally, peel off the roll paper. Otherwise a paper jam might occur. Close the paper roll cover; paper exit guide Be sure to use paper rolls that is smaller than the specifications (inside the printer after paper is cut paper from falling inside diameter of at least 25.4 mm and outside diameter of the cover. Note: Be sure to close the cover completely...
TM-L90 User's Manual 5 Note: If you use the printer horizontally, peel off the roll paper. Otherwise a paper jam might occur. Close the paper roll cover; paper exit guide Be sure to use paper rolls that is smaller than the specifications (inside the printer after paper is cut paper from falling inside diameter of at least 25.4 mm and outside diameter of the cover. Note: Be sure to close the cover completely...
User Manual
Page 8
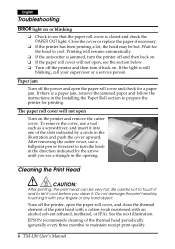
Paper jam Turn off the power and open Turn on the printer and remove the cutter cover. To remove the cover, use a ballpoint pen or tweezers to cool. Cleaning the Print Head CAUTION: After printing, the print head can be hot. See the next illustration. Printing will resume automatically. ❏ If the autocutter is a paper jam, remove the jammed paper and follow the instructions in the Installing the Paper Roll section to maintain receipt print quality. 6 TM-L90 User's Manual EPSON recommends cleaning of the...
Paper jam Turn off the power and open Turn on the printer and remove the cutter cover. To remove the cover, use a ballpoint pen or tweezers to cool. Cleaning the Print Head CAUTION: After printing, the print head can be hot. See the next illustration. Printing will resume automatically. ❏ If the autocutter is a paper jam, remove the jammed paper and follow the instructions in the Installing the Paper Roll section to maintain receipt print quality. 6 TM-L90 User's Manual EPSON recommends cleaning of the...
User Manual
Page 9
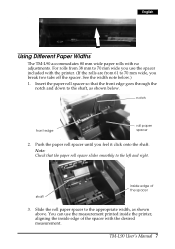
... from 38 mm to 70 mm wide you use the measurement printed inside the printer, aligning the inside edge of the spacer with no adjustments. TM-L90 User's Manual 7 For rolls from 61 to the shaft, as shown above. notch front edge roll paper spacer 2. Insert the paper roll spacer so that the paper roll spacer slides smoothly to the appropriate width...
... from 38 mm to 70 mm wide you use the measurement printed inside the printer, aligning the inside edge of the spacer with no adjustments. TM-L90 User's Manual 7 For rolls from 61 to the shaft, as shown above. notch front edge roll paper spacer 2. Insert the paper roll spacer so that the paper roll spacer slides smoothly to the appropriate width...
User Manual
Page 10
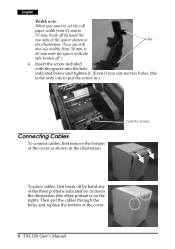
... in.) Connecting Cables To connect cables, first remove the bottom of the cover as shown in tabs the illustration. (You can see two holes, this is on the right). hole for screw To place cables, first break...also use widths from 38 mm to 60 mm with the spacer with the spacer into the hole indicated below and tighten it. (Even if you want to set the roll paper width ...from 61 mm to 70 mm, break off by circles in the illustration (the other portion is the only one to put the cables through the holes and replace the bottom of the cover. 8 TM-L90 User's Manual...
... in.) Connecting Cables To connect cables, first remove the bottom of the cover as shown in tabs the illustration. (You can see two holes, this is on the right). hole for screw To place cables, first break...also use widths from 38 mm to 60 mm with the spacer with the spacer into the hole indicated below and tighten it. (Even if you want to set the roll paper width ...from 61 mm to 70 mm, break off by circles in the illustration (the other portion is the only one to put the cables through the holes and replace the bottom of the cover. 8 TM-L90 User's Manual...
User Manual
Page 11
... per inch) TM-L90 User's Manual 9 English TM-L9. 0 Specifications Print method Thermal line, 8 dots/mm × 8 dots/mm (203 dpi × 203 dpi) Print font 12 × 24/9 × 17 Columns 48 (Normal, 12 × 24) Print width 72 mm {2.84"}, 576 dot positions (when paper roll width [receipt] is 80 mm) Character size (W × H) 12 × 24: Normal/double-high/double-width/quadruple...
... per inch) TM-L90 User's Manual 9 English TM-L9. 0 Specifications Print method Thermal line, 8 dots/mm × 8 dots/mm (203 dpi × 203 dpi) Print font 12 × 24/9 × 17 Columns 48 (Normal, 12 × 24) Print width 72 mm {2.84"}, 576 dot positions (when paper roll width [receipt] is 80 mm) Character size (W × H) 12 × 24: Normal/double-high/double-width/quadruple...

User Manual
Page 64
Printed in China 2000.12
Printed in China 2000.12


