Basics
Page 74
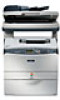
...and d buttons, or numeric keypad. Stops printing and clears the current job. Reset Menu This menu lets you have replaced the fuser unit. 74 Using the Control Panel Restarts the printer. Moves the selected toner cartridge into position so that appear on the LCD ... Clear Warning Clear All Warnings Reset Restart Unit Factory Settings Change toner C/M/Y/K Reset Fuser Counter Description Clears every warning message, except for the Time Setting. Item LCD Contrast Time Setting (CX11NF only) Date Format (CX11NF only) Settings 0 to set the contrast between 0 (lowest contrast) and 15...
...and d buttons, or numeric keypad. Stops printing and clears the current job. Reset Menu This menu lets you have replaced the fuser unit. 74 Using the Control Panel Restarts the printer. Moves the selected toner cartridge into position so that appear on the LCD ... Clear Warning Clear All Warnings Reset Restart Unit Factory Settings Change toner C/M/Y/K Reset Fuser Counter Description Clears every warning message, except for the Time Setting. Item LCD Contrast Time Setting (CX11NF only) Date Format (CX11NF only) Settings 0 to set the contrast between 0 (lowest contrast) and 15...

Basics
Page 80
Cover F Handle Cleaner cover Cover E Telephone interface connectors (CX11NF only) USB connector Network interface connector AC inlet Fuser Paper guides (MP tray) Photoconductor access lever Photoconductor Cleaning knob access lever Toner cartridge 80 Maintenance
Cover F Handle Cleaner cover Cover E Telephone interface connectors (CX11NF only) USB connector Network interface connector AC inlet Fuser Paper guides (MP tray) Photoconductor access lever Photoconductor Cleaning knob access lever Toner cartridge 80 Maintenance
Basics
Page 81
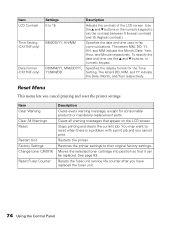
...a short time by pressing the x B&W Start or x Color Start button on the control panel. Worn Fuser The fuser has reached the end of its service life. Contact Epson as described on the LCD screen or in the LCD screen, you can continue printing for other parts. ... message Description Worn Photoconductor The photoconductor is empty. Worn uuuu Dev Unit The developer has reached the end of your product. Contact Epson as described on the control panel, select Reset from Replace Photocondctr to continue. You must replace the consumable product to Worn Photoconductor....
...a short time by pressing the x B&W Start or x Color Start button on the control panel. Worn Fuser The fuser has reached the end of its service life. Contact Epson as described on the LCD screen or in the LCD screen, you can continue printing for other parts. ... message Description Worn Photoconductor The photoconductor is empty. Worn uuuu Dev Unit The developer has reached the end of your product. Contact Epson as described on the control panel, select Reset from Replace Photocondctr to continue. You must replace the consumable product to Worn Photoconductor....
Basics
Page 112
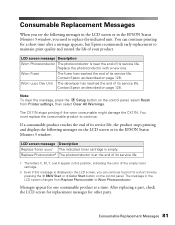
... be difficult to remove and may cause other paper jams. Pull it is marked CAUTION HIGH TEMPERATURE, or the surrounding areas. The LCD panel and EPSON Status Monitor 3 display error messages that indicate the cover area affecting the paper jam. Warning: Be careful not to avoid tearing it. ■... paper remains in the product, or if it gently to avoid tearing. ■ Always remove jammed paper with both hands to touch the fuser, which is jammed in an area not mentioned in the printer driver. See the corresponding sections here for Clearing Jammed Paper Follow these precautions when...
... be difficult to remove and may cause other paper jams. Pull it is marked CAUTION HIGH TEMPERATURE, or the surrounding areas. The LCD panel and EPSON Status Monitor 3 display error messages that indicate the cover area affecting the paper jam. Warning: Be careful not to avoid tearing it. ■... paper remains in the product, or if it gently to avoid tearing. ■ Always remove jammed paper with both hands to touch the fuser, which is jammed in an area not mentioned in the printer driver. See the corresponding sections here for Clearing Jammed Paper Follow these precautions when...
Basics
Page 114
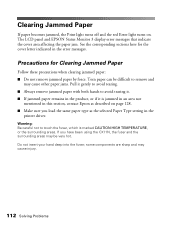
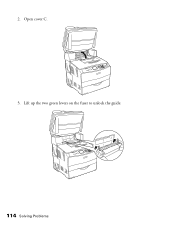
2. Open cover C. 3. Lift up the two green levers on the fuser to unlock the guide. 114 Solving Problems
2. Open cover C. 3. Lift up the two green levers on the fuser to unlock the guide. 114 Solving Problems

Basics
Page 115
Push down . 6. Be careful not to lock it. 7. Clearing Jammed Paper 115 Close cover C, then return the scanner to touch the fuser, which is marked CAUTION HIGH TEMPERATURE, or the surrounding areas. Flip up the guide using the CX11N, the fuser and surrounding areas may be very hot. 5. Gently lay the guide down the two green levers on the fuser to tear the jammed paper. If you have been using the green tab and gently pull out any sheets of paper. Warning: Be careful not to the original position. 4.
Push down . 6. Be careful not to lock it. 7. Clearing Jammed Paper 115 Close cover C, then return the scanner to touch the fuser, which is marked CAUTION HIGH TEMPERATURE, or the surrounding areas. Flip up the guide using the CX11N, the fuser and surrounding areas may be very hot. 5. Gently lay the guide down the two green levers on the fuser to tear the jammed paper. If you have been using the green tab and gently pull out any sheets of paper. Warning: Be careful not to the original position. 4.

Basics
Page 118
Open cover E on the fuser to unlock the guide. 3. 2. Open cover C, then pull up the two green levers on the back, then open cover F. 118 Solving Problems
Open cover E on the fuser to unlock the guide. 3. 2. Open cover C, then pull up the two green levers on the back, then open cover F. 118 Solving Problems

Basics
Page 119
Gently pull out paper with both hands. Push down the two green levers on the fuser, then close cover C. 7. Be careful not to its original position. Lower the scanner to tear the jammed paper. 5. Clearing Jammed Paper 119 4. Close cover F and cover E. 6.
Gently pull out paper with both hands. Push down the two green levers on the fuser, then close cover C. 7. Be careful not to its original position. Lower the scanner to tear the jammed paper. 5. Clearing Jammed Paper 119 4. Close cover F and cover E. 6.
Basics
Page 130
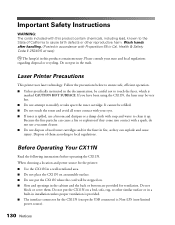
...the fine particles can cause a fire or explosion if they can explode and cause injury. Do not block or cover them according to touch the fuser, which is marked CAUTION HOT SURFACE. Follow the precautions below to ensure safe, efficient operation. ■ Unless specifically instructed in fire, as ...of California to cause birth defects or other similar surface or in a built-in the trash. If you have been using the CX11N, the fuser may be stepped on an unstable surface. ■ Do not put in installation unless proper ventilation is provided. ■ The interface connector for ...
...the fine particles can cause a fire or explosion if they can explode and cause injury. Do not block or cover them according to touch the fuser, which is marked CAUTION HOT SURFACE. Follow the precautions below to ensure safe, efficient operation. ■ Unless specifically instructed in fire, as ...of California to cause birth defects or other similar surface or in a built-in the trash. If you have been using the CX11N, the fuser may be stepped on an unstable surface. ■ Do not put in installation unless proper ventilation is provided. ■ The interface connector for ...

Product Information Guide
Page 1
...) 463-7766 for color printing3 8/05 Epson AcuLaser CX11N/CX11NF - 1 sales only). Epson AcuLaser CX11N/CX11NF AcuLaser CX11N Parts Cover (CX11NF only) Auto Document Feeder (CX11NF only) Paper stopper (CX11NF only) Cover C Cover B Option cover Power switch Cover F USB connector Output tray Extension tray Control panel Cover A MP tray Telephone interface connectors (CX11NF only) Handle Fuser Cover E AC inlet Network interface connector...
...) 463-7766 for color printing3 8/05 Epson AcuLaser CX11N/CX11NF - 1 sales only). Epson AcuLaser CX11N/CX11NF AcuLaser CX11N Parts Cover (CX11NF only) Auto Document Feeder (CX11NF only) Paper stopper (CX11NF only) Cover C Cover B Option cover Power switch Cover F USB connector Output tray Extension tray Control panel Cover A MP tray Telephone interface connectors (CX11NF only) Handle Fuser Cover E AC inlet Network interface connector...
Product Information Guide
Page 2
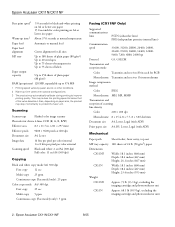
...seconds for color printing on paper size, the product may reduce the printing speed to protect the fuser unit. This may stop momentarily to below that of 24 lb (90 g/m2) paper Dimensions CX11NF Width: 18.1 inches (460 mm) Depth: 18.4 inches (467 mm) Height: 26.1 ... excluding the imaging cartridge and photoconductor uni CX11N Approx. 68.1 lb (30.9 kg), excluding the imaging cartridge and photoconductor unit 2 - Epson AcuLaser CX11N/CX11NF First print speed1 Warm-up time varies with ADF) Mechanical Paper path Sheet feeder, front entry, top out MP tray capacity 180 sheets of...
...seconds for color printing on paper size, the product may reduce the printing speed to protect the fuser unit. This may stop momentarily to below that of 24 lb (90 g/m2) paper Dimensions CX11NF Width: 18.1 inches (460 mm) Depth: 18.4 inches (467 mm) Height: 26.1 ... excluding the imaging cartridge and photoconductor uni CX11N Approx. 68.1 lb (30.9 kg), excluding the imaging cartridge and photoconductor unit 2 - Epson AcuLaser CX11N/CX11NF First print speed1 Warm-up time varies with ADF) Mechanical Paper path Sheet feeder, front entry, top out MP tray capacity 180 sheets of...
Product Information Guide
Page 11
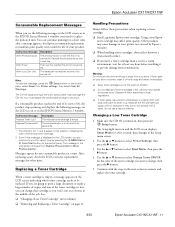
...to print a large document or make a large number of its service life. Use the u or d button to continue. Epson AcuLaser CX11N/CX11NF Consumable Replacement Messages When you see the following messages on the LCD screen indicating which toner cartridge needs to be replaced. LCD screen... message Worn Photoconductor Worn Fuser Worn uuuu Dev Unit Description The photoconductor is turned on page 12 Handling Precautions Always follow these precautions when replacing a toner cartridge: ❏ Install a genuine Epson toner cartridge. The developer has reached the...
...to print a large document or make a large number of its service life. Use the u or d button to continue. Epson AcuLaser CX11N/CX11NF Consumable Replacement Messages When you see the following messages on the LCD screen indicating which toner cartridge needs to be replaced. LCD screen... message Worn Photoconductor Worn Fuser Worn uuuu Dev Unit Description The photoconductor is turned on page 12 Handling Precautions Always follow these precautions when replacing a toner cartridge: ❏ Install a genuine Epson toner cartridge. The developer has reached the...
Product Information Guide
Page 14
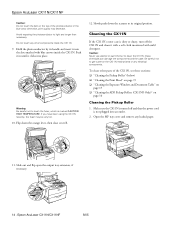
...Slowly push down the orange lever, then close cover B. 12. Caution: Never use alcohol or paint thinner to touch the fuser, which is marked CAUTION HIGH TEMPERATURE. Epson AcuLaser CX11N/CX11NF 8/05 Do not touch any longer than necessary. these sections: ❏ "Cleaning the Pickup Roller" (below) ❏...the Exposure Window and Document Table" on page 15 ❏ "Cleaning the ADF Pickup Rollers (CX11NF Only)" on the CX11N mechanisms or any loaded paper. 11. Epson AcuLaser CX11N/CX11NF Caution: Do not touch the belt on the top of the CX11N, see these chemicals can ...
...Slowly push down the orange lever, then close cover B. 12. Caution: Never use alcohol or paint thinner to touch the fuser, which is marked CAUTION HIGH TEMPERATURE. Epson AcuLaser CX11N/CX11NF 8/05 Do not touch any longer than necessary. these sections: ❏ "Cleaning the Pickup Roller" (below) ❏...the Exposure Window and Document Table" on page 15 ❏ "Cleaning the ADF Pickup Rollers (CX11NF Only)" on the CX11N mechanisms or any loaded paper. 11. Epson AcuLaser CX11N/CX11NF Caution: Do not touch the belt on the top of the CX11N, see these chemicals can ...
