Basics
Page 4
... Accessing the Setup Menu 70 Printing a Status Sheet 76 Canceling Printing, Scanning, or Copying 77 7 Maintenance Identifying the Product Parts 79 Consumable Replacement Messages 81 Replacing a Toner Cartridge 82 Replacing the Photoconductor 86 Cleaning the CX11N 91 Ordering Parts Online 97 8 Solving Problems Status and Error Messages 99 Printing Problems 102 Scanning Problems 105...Where To Get Help 128 9 Notices System Requirements 129 Important Safety Instructions 130 Restrictions on Copying 134 FCC Compliance Statement 135 Declaration of Conformity 136 Epson America, Inc.
... Accessing the Setup Menu 70 Printing a Status Sheet 76 Canceling Printing, Scanning, or Copying 77 7 Maintenance Identifying the Product Parts 79 Consumable Replacement Messages 81 Replacing a Toner Cartridge 82 Replacing the Photoconductor 86 Cleaning the CX11N 91 Ordering Parts Online 97 8 Solving Problems Status and Error Messages 99 Printing Problems 102 Scanning Problems 105...Where To Get Help 128 9 Notices System Requirements 129 Important Safety Instructions 130 Restrictions on Copying 134 FCC Compliance Statement 135 Declaration of Conformity 136 Epson America, Inc.
Basics
Page 79
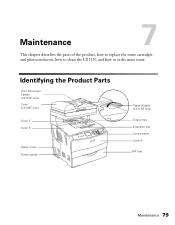
Maintenance 7 This chapter describes the parts of the product, how to replace the toner cartridges and photoconductor, how to clean the CX11N, and how to order more toner. Identifying the Product Parts Auto Document Feeder (CX11NF only) Cover (CX11NF only) Cover C Cover B Option cover Power switch Paper stopper (CX11NF only) Output tray Extension tray Control panel Cover A MP tray Maintenance 79
Maintenance 7 This chapter describes the parts of the product, how to replace the toner cartridges and photoconductor, how to clean the CX11N, and how to order more toner. Identifying the Product Parts Auto Document Feeder (CX11NF only) Cover (CX11NF only) Cover C Cover B Option cover Power switch Paper stopper (CX11NF only) Output tray Extension tray Control panel Cover A MP tray Maintenance 79
Basics
Page 81
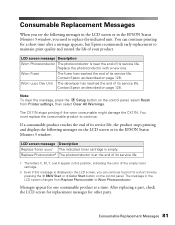
Note: To clear the message, press the Setup button on the LCD screen or in the EPSON Status Monitor 3 window. If a consumable product reaches the end of its service life. Replace the photoconductor with a new one consumable product at the end of its service life, the product stops printing and displays the following messages...
Note: To clear the message, press the Setup button on the LCD screen or in the EPSON Status Monitor 3 window. If a consumable product reaches the end of its service life. Replace the photoconductor with a new one consumable product at the end of its service life, the product stops printing and displays the following messages...

Basics
Page 86
.... oil from your skin may explode and cause injury. Do not dispose of a used photoconductor in temperature or humidity. ■ Do not tilt the photoconductor. Close cover A. 10. Replacing the Photoconductor Handling Precautions Always follow these precautions when replacing the photoconductor: ■ The photoconductor weighs 6.16 lb (2.8 kg). Also, avoid touching the drum; Avoid locations subject to...
.... oil from your skin may explode and cause injury. Do not dispose of a used photoconductor in temperature or humidity. ■ Do not tilt the photoconductor. Close cover A. 10. Replacing the Photoconductor Handling Precautions Always follow these precautions when replacing the photoconductor: ■ The photoconductor weighs 6.16 lb (2.8 kg). Also, avoid touching the drum; Avoid locations subject to...

Basics
Page 87
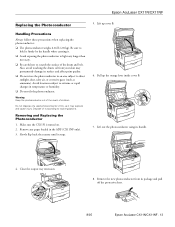
Close the output tray extension. Make sure the CX11N is turned on. 2. Remove any paper loaded in the ADF (CX11NF only). 3. Replacing the Photoconductor 87 Removing and Replacing the Photoconductor 1. Slowly flip back the scanner until it stops. 4.
Close the output tray extension. Make sure the CX11N is turned on. 2. Remove any paper loaded in the ADF (CX11NF only). 3. Replacing the Photoconductor 87 Removing and Replacing the Photoconductor 1. Slowly flip back the scanner until it stops. 4.

Basics
Page 89
Remove the new photoconductor from its handle. 8. Caution: Do not touch the belt on the top of the photoconductor or the blue area; Avoid exposing the photoconductor to light any other components inside the CX11N. otherwise, print quality may decrease. 7. Do not touch any longer than necessary. Replacing the Photoconductor 89 Lift out the photoconductor using its package and pull off the protective sheet.
Remove the new photoconductor from its handle. 8. Caution: Do not touch the belt on the top of the photoconductor or the blue area; Avoid exposing the photoconductor to light any other components inside the CX11N. otherwise, print quality may decrease. 7. Do not touch any longer than necessary. Replacing the Photoconductor 89 Lift out the photoconductor using its package and pull off the protective sheet.

Basics
Page 103
... pages containing only one character per page to clean the internal components. • There may be a problem with the photoconductor. For best results, use Epson special paper, or smooth, high-quality copier paper. Print three pages containing only one character per page to clean the internal... components. • Clean the print head as described on page 128. Replace the photoconductor as described on page 93. Print Quality...
... pages containing only one character per page to clean the internal components. • There may be a problem with the photoconductor. For best results, use Epson special paper, or smooth, high-quality copier paper. Print three pages containing only one character per page to clean the internal... components. • Clean the print head as described on page 128. Replace the photoconductor as described on page 93. Print Quality...

Basics
Page 139
... pickup roller 92 print head 93 Color Balance 57 copy setting 38 EPSON Scan 56 to 58 Image Type setting 49 Management (Macintosh) ...... 25 Management (Windows) ........22 matching problems 108 Restoration 56 ColorSync 25 Consumables ordering 97 replacement messages 81 replacing photoconductor .......86 replacing toner 82 Contrast 38 Control panel Cancel button 77 Copy mode...
... pickup roller 92 print head 93 Color Balance 57 copy setting 38 EPSON Scan 56 to 58 Image Type setting 49 Management (Macintosh) ...... 25 Management (Windows) ........22 matching problems 108 Restoration 56 ColorSync 25 Consumables ordering 97 replacement messages 81 replacing photoconductor .......86 replacing toner 82 Contrast 38 Control panel Cancel button 77 Copy mode...
Basics
Page 142
... .....33 to 34 problems 102 settings (Macintosh 26 settings (Windows 21 142 Index Problems color matching 108 copy quality 109 copying 109 EPSON Scan 106 paper handling 111 print quality 103 printing 102 scan quality 106 scanning 105 Product cleaning 91 parts 79 Professional Mode color, ...image settings 56 to 58 marquee, adjusting 54 previewing 51 resolution 50 scan area 51 scan size 59 selecting settings 46 to 61 R Replacing photoconductor 86 to 91 toner cartridges 82 to 86 Reset copy settings 41, 76 menu 74, 77 Resolution, selecting 50 Restrictions on copying ...
... .....33 to 34 problems 102 settings (Macintosh 26 settings (Windows 21 142 Index Problems color matching 108 copy quality 109 copying 109 EPSON Scan 106 paper handling 111 print quality 103 printing 102 scan quality 106 scanning 105 Product cleaning 91 parts 79 Professional Mode color, ...image settings 56 to 58 marquee, adjusting 54 previewing 51 resolution 50 scan area 51 scan size 59 selecting settings 46 to 61 R Replacing photoconductor 86 to 91 toner cartridges 82 to 86 Reset copy settings 41, 76 menu 74, 77 Resolution, selecting 50 Restrictions on copying ...

Product Information Guide
Page 1
... S050188 S050189 S050190 S050191 S050192 S050193 User Replacable Parts Part Photoconductor Fuser Power cord Part number S051104 2090470 2093853 You can purchase genuine Epson® toner and paper from an authorized Epson reseller. To find the nearest reseller, please call (800) 463-7766 for color printing3 8/05 Epson AcuLaser CX11N/CX11NF - 1 To purchase online, visit www.epsonstore...
... S050188 S050189 S050190 S050191 S050192 S050193 User Replacable Parts Part Photoconductor Fuser Power cord Part number S051104 2090470 2093853 You can purchase genuine Epson® toner and paper from an authorized Epson reseller. To find the nearest reseller, please call (800) 463-7766 for color printing3 8/05 Epson AcuLaser CX11N/CX11NF - 1 To purchase online, visit www.epsonstore...
Product Information Guide
Page 11
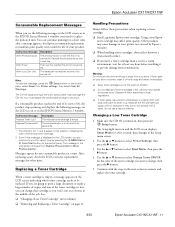
...on and the LCD screen displays Setup Mode for the color of the job. Changing a Low Toner Cartridge 1. Epson AcuLaser CX11N/CX11NF Consumable Replacement Messages When you see the following messages on the control panel. You can continue to the Setup menu screen. 2. After...button on the LCD screen or in the EPSON Status Monitor 3 window. Use the u or d button to remove and replace the toner cartridge. 8/05 Epson AcuLaser CX11N/CX11NF - 11 LCD screen message Worn Photoconductor Worn Fuser Worn uuuu Dev Unit Description The photoconductor is low, you are going to prevent ...
...on and the LCD screen displays Setup Mode for the color of the job. Changing a Low Toner Cartridge 1. Epson AcuLaser CX11N/CX11NF Consumable Replacement Messages When you see the following messages on the control panel. You can continue to the Setup menu screen. 2. After...button on the LCD screen or in the EPSON Status Monitor 3 window. Use the u or d button to remove and replace the toner cartridge. 8/05 Epson AcuLaser CX11N/CX11NF - 11 LCD screen message Worn Photoconductor Worn Fuser Worn uuuu Dev Unit Description The photoconductor is low, you are going to prevent ...
Product Information Guide
Page 13
... corrosive gases (such as it according to hold it firmly by the handle when carrying it stops. 5. Do not dispose of the drum and belt. Epson AcuLaser CX11N/CX11NF Replacing the Photoconductor Handling Precautions Always follow these precautions when replacing the photoconductor: ❏ The photoconductor weighs 6.16 lb (2.8 kg). Close the output tray extension. 8. Dispose of children.
... corrosive gases (such as it according to hold it firmly by the handle when carrying it stops. 5. Do not dispose of the drum and belt. Epson AcuLaser CX11N/CX11NF Replacing the Photoconductor Handling Precautions Always follow these precautions when replacing the photoconductor: ❏ The photoconductor weighs 6.16 lb (2.8 kg). Close the output tray extension. 8. Dispose of children.


