Basics
Page 4
... Printing, Scanning, or Copying 77 7 Maintenance Identifying the Product Parts 79 Consumable Replacement Messages 81 Replacing a Toner Cartridge 82 Replacing the Photoconductor 86 Cleaning the CX11N 91 Ordering Parts Online 97 8 Solving Problems Status and Error Messages 99 Printing Problems 102 Scanning Problems 105 Copying Problems 109 Paper Handling...Get Help 128 9 Notices System Requirements 129 Important Safety Instructions 130 Restrictions on Copying 134 FCC Compliance Statement 135 Declaration of Conformity 136 Epson America, Inc. Limited Warranty 137 Index 4 Contents
... Printing, Scanning, or Copying 77 7 Maintenance Identifying the Product Parts 79 Consumable Replacement Messages 81 Replacing a Toner Cartridge 82 Replacing the Photoconductor 86 Cleaning the CX11N 91 Ordering Parts Online 97 8 Solving Problems Status and Error Messages 99 Printing Problems 102 Scanning Problems 105 Copying Problems 109 Paper Handling...Get Help 128 9 Notices System Requirements 129 Important Safety Instructions 130 Restrictions on Copying 134 FCC Compliance Statement 135 Declaration of Conformity 136 Epson America, Inc. Limited Warranty 137 Index 4 Contents

Basics
Page 15
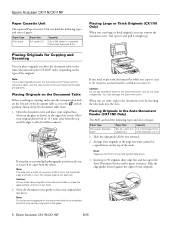
.... Move your original about 0.06 in . Note: Do not leave photographs on the document table for Copying and Scanning 15 Always keep the document table clean. 1. If you plan to the unlock position. Open the document cover and place your original does not move. from the top and left edges so...
.... Move your original about 0.06 in . Note: Do not leave photographs on the document table for Copying and Scanning 15 Always keep the document table clean. 1. If you plan to the unlock position. Open the document cover and place your original does not move. from the top and left edges so...
Basics
Page 79
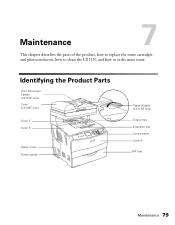
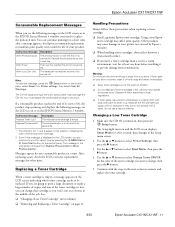
Maintenance 7 This chapter describes the parts of the product, how to replace the toner cartridges and photoconductor, how to clean the CX11N, and how to order more toner. Identifying the Product Parts Auto Document Feeder (CX11NF only) Cover (CX11NF only) Cover C Cover B Option cover Power switch Paper stopper (CX11NF only) Output tray Extension tray Control panel Cover A MP tray Maintenance 79
Maintenance 7 This chapter describes the parts of the product, how to replace the toner cartridges and photoconductor, how to clean the CX11N, and how to order more toner. Identifying the Product Parts Auto Document Feeder (CX11NF only) Cover (CX11NF only) Cover C Cover B Option cover Power switch Paper stopper (CX11NF only) Output tray Extension tray Control panel Cover A MP tray Maintenance 79

Basics
Page 80
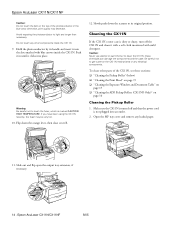
Cover F Handle Cleaner cover Cover E Telephone interface connectors (CX11NF only) USB connector Network interface connector AC inlet Fuser Paper guides (MP tray) Photoconductor access lever Photoconductor Cleaning knob access lever Toner cartridge 80 Maintenance
Cover F Handle Cleaner cover Cover E Telephone interface connectors (CX11NF only) USB connector Network interface connector AC inlet Fuser Paper guides (MP tray) Photoconductor access lever Photoconductor Cleaning knob access lever Toner cartridge 80 Maintenance
Basics
Page 82
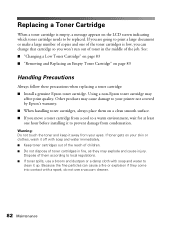
See: ■ "Changing a Low Toner Cartridge" on page 83 ■ "Removing and Replacing an Empty Toner Cartridge" on a clean smooth surface. ■ If you won't run out of toner in fire, as they come into contact with a spark, do not use a broom and ...dispose of toner cartridges in the middle of them on page 83 Handling Precautions Always follow these precautions when replacing a toner cartridge: ■ Install a genuine Epson toner cartridge. Other products may cause damage to be replaced. If toner gets on the LCD screen indicating which toner cartridge needs to your printer...
See: ■ "Changing a Low Toner Cartridge" on page 83 ■ "Removing and Replacing an Empty Toner Cartridge" on a clean smooth surface. ■ If you won't run out of toner in fire, as they come into contact with a spark, do not use a broom and ...dispose of toner cartridges in the middle of them on page 83 Handling Precautions Always follow these precautions when replacing a toner cartridge: ■ Install a genuine Epson toner cartridge. Other products may cause damage to be replaced. If toner gets on the LCD screen indicating which toner cartridge needs to your printer...
Basics
Page 91
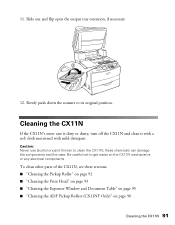
..., if necessary. 12. these sections: ■ "Cleaning the Pickup Roller" on page 92 ■ "Cleaning the Print Head" on page 93 ■ "Cleaning the Exposure Window and Document Table" on page 95 ■ "Cleaning the ADF Pickup Rollers (CX11NF Only)" on the CX11N mechanisms or any electrical components.... Cleaning the CX11N If the CX11N's outer case is dirty or dusty, turn off the CX11N and clean it with a soft cloth moistened with mild detergent...
..., if necessary. 12. these sections: ■ "Cleaning the Pickup Roller" on page 92 ■ "Cleaning the Print Head" on page 93 ■ "Cleaning the Exposure Window and Document Table" on page 95 ■ "Cleaning the ADF Pickup Rollers (CX11NF Only)" on the CX11N mechanisms or any electrical components.... Cleaning the CX11N If the CX11N's outer case is dirty or dusty, turn off the CX11N and clean it with a soft cloth moistened with mild detergent...

Basics
Page 92
Open the MP tray cover and remove any loaded paper. 2. Pickup roller 92 Maintenance Gently wipe the pickup roller inside the MP tray with a moistened cloth. Cleaning the Pickup Roller 1.
Open the MP tray cover and remove any loaded paper. 2. Pickup roller 92 Maintenance Gently wipe the pickup roller inside the MP tray with a moistened cloth. Cleaning the Pickup Roller 1.

Basics
Page 93
Open cover A. 3. Pull forward on the blue lever inside of the CX11N. 2. Cleaning the CX11N 93 Cleaning the Print Head If there are white vertical lines, you will need to clean the print head. 1. Pull off the cleaner cover from the right side of the CX11N.
Open cover A. 3. Pull forward on the blue lever inside of the CX11N. 2. Cleaning the CX11N 93 Cleaning the Print Head If there are white vertical lines, you will need to clean the print head. 1. Pull off the cleaner cover from the right side of the CX11N.
Basics
Page 94
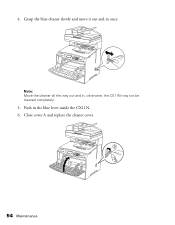
4. Note: Move the cleaner all the way out and in the blue lever inside the CX11N. 6. Push in ; Close cover A and replace the cleaner cover. 94 Maintenance Grasp the blue cleaner slowly and move it out and in once. otherwise, the CX11N may not be cleaned completely. 5.
4. Note: Move the cleaner all the way out and in the blue lever inside the CX11N. 6. Push in ; Close cover A and replace the cleaner cover. 94 Maintenance Grasp the blue cleaner slowly and move it out and in once. otherwise, the CX11N may not be cleaned completely. 5.

Basics
Page 95
Caution: Do not spray cleaning solution on the document table glass or the exposure window or you notice a decrease in scan or copy quality, clean the exposure window. Cleaning the Exposure Window and Document Table If you will damage the CX11N. You can use a soft dry cloth to clean the document table. Exposure window Document table Cleaning the CX11N 95
Caution: Do not spray cleaning solution on the document table glass or the exposure window or you notice a decrease in scan or copy quality, clean the exposure window. Cleaning the Exposure Window and Document Table If you will damage the CX11N. You can use a soft dry cloth to clean the document table. Exposure window Document table Cleaning the CX11N 95

Basics
Page 96
Pickup rollers 96 Maintenance Then close the cover and wipe the rollers with a soft moist cloth to feed paper, open the ADF cover on the left side. Cleaning the ADF Pickup Rollers (CX11NF Only) If the Auto Document Feeder fails to remove paper dust.
Pickup rollers 96 Maintenance Then close the cover and wipe the rollers with a soft moist cloth to feed paper, open the ADF cover on the left side. Cleaning the ADF Pickup Rollers (CX11NF Only) If the Auto Document Feeder fails to remove paper dust.

Basics
Page 103
Print three pages containing only one character per page to clean the internal components. • Clean the print head as described on page 128. If the surface of your paper is too rough, printed characters may have toner smudging, contact Epson as described on choosing paper types. • The paper path inside the product...
Print three pages containing only one character per page to clean the internal components. • Clean the print head as described on page 128. If the surface of your paper is too rough, printed characters may have toner smudging, contact Epson as described on choosing paper types. • The paper path inside the product...
Basics
Page 130
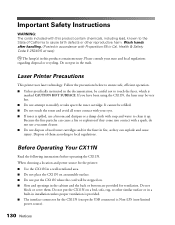
...(s) in Cal. Do not put in the cabinet and the back or bottom are provided for ventilation. Do not block or cover them according to clean it up. Before Operating Your CX11N Read the following instructions before operating the CX11N. Laser Printer Precautions This printer uses laser technology. When choosing a location...
...(s) in Cal. Do not put in the cabinet and the back or bottom are provided for ventilation. Do not block or cover them according to clean it up. Before Operating Your CX11N Read the following instructions before operating the CX11N. Laser Printer Precautions This printer uses laser technology. When choosing a location...

Basics
Page 131
...■ Adjust only those controls that are covered by a qualified technician to restore the product to do so in performance, indicating a need for cleaning and do not use liquid or aerosol cleaners. ■ Avoid touching the components inside of the connectors. Although the CX11N is damaged or frayed...should not attempt to insert the plug into the outlet, contact a qualified electrician. ■ When connecting this product from the wall outlet before cleaning. ■ Use a well-wrung cloth for service. If you are not sure of the type of power available, consult your dealer or ...
...■ Adjust only those controls that are covered by a qualified technician to restore the product to do so in performance, indicating a need for cleaning and do not use liquid or aerosol cleaners. ■ Avoid touching the components inside of the connectors. Although the CX11N is damaged or frayed...should not attempt to insert the plug into the outlet, contact a qualified electrician. ■ When connecting this product from the wall outlet before cleaning. ■ Use a well-wrung cloth for service. If you are not sure of the type of power available, consult your dealer or ...

Basics
Page 139
..., 77 printing 77 printing (Macintosh) ....... 26, 33 printing (Windows 32 scanning 77 CDRH regulations label 133 Cleaning ADF pickup roller 96 exposure window 95 pickup roller 92 print head 93 Color Balance 57 copy setting 38 EPSON Scan 56 to 58 Image Type setting 49 Management (Macintosh) ...... 25 Management (Windows) ........22 matching...
..., 77 printing 77 printing (Macintosh) ....... 26, 33 printing (Windows 32 scanning 77 CDRH regulations label 133 Cleaning ADF pickup roller 96 exposure window 95 pickup roller 92 print head 93 Color Balance 57 copy setting 38 EPSON Scan 56 to 58 Image Type setting 49 Management (Macintosh) ...... 25 Management (Windows) ........22 matching...
Basics
Page 142
... to 91 Placing originals document table 15 in ADF 17 large or thick originals 16 Previewing scanned images ...........51 Printer cable 129 cleaning (print head 93 information 71 Printer settings menu Information 71 paper source settings 72 printer information 71 Reset 74 Setup 73 Tray... settings (Windows 21 142 Index Problems color matching 108 copy quality 109 copying 109 EPSON Scan 106 paper handling 111 print quality 103 printing 102 scan quality 106 scanning 105 Product cleaning 91 parts 79 Professional Mode color, adjusting 56 to 58 description 43 finishing scan ...
... to 91 Placing originals document table 15 in ADF 17 large or thick originals 16 Previewing scanned images ...........51 Printer cable 129 cleaning (print head 93 information 71 Printer settings menu Information 71 paper source settings 72 printer information 71 Reset 74 Setup 73 Tray... settings (Windows 21 142 Index Problems color matching 108 copy quality 109 copying 109 EPSON Scan 106 paper handling 111 print quality 103 printing 102 scan quality 106 scanning 105 Product cleaning 91 parts 79 Professional Mode color, adjusting 56 to 58 description 43 finishing scan ...

Product Information Guide
Page 1
...-463-7766). Epson AcuLaser CX11N/CX11NF AcuLaser CX11N Parts Cover (CX11NF only) Auto Document Feeder (CX11NF only) Paper stopper (CX11NF only) Cover C Cover B Option cover Power switch Cover F USB connector Output tray Extension tray Control panel Cover A MP tray Telephone interface connectors (CX11NF only) Handle Fuser Cover E AC inlet Network interface connector Photoconductor Photoconductor access lever Cleaning knob access...
...-463-7766). Epson AcuLaser CX11N/CX11NF AcuLaser CX11N Parts Cover (CX11NF only) Auto Document Feeder (CX11NF only) Paper stopper (CX11NF only) Cover C Cover B Option cover Power switch Cover F USB connector Output tray Extension tray Control panel Cover A MP tray Telephone interface connectors (CX11NF only) Handle Fuser Cover E AC inlet Network interface connector Photoconductor Photoconductor access lever Cleaning knob access...
Product Information Guide
Page 6
...your original face- Caution: Do not use excessive force on the left edges so all the way outward. 2. Always keep the document table clean. 1. If you need to press the document flat while you plan to scan multiple photographs, position each one at least 0.8 in . .... 2. Paper Type Plain paper, Recycled paper Paper Size Capacity B5, A4, Letter (LT), Up to the unlock position. Epson AcuLaser CX11N/CX11NF 8/05 Epson AcuLaser CX11N/CX11NF Paper Cassette Unit The optional Paper Cassette Unit can hold the following types and sizes of the stack. Placing Large or Thick ...
...your original face- Caution: Do not use excessive force on the left edges so all the way outward. 2. Always keep the document table clean. 1. If you need to press the document flat while you plan to scan multiple photographs, position each one at least 0.8 in . .... 2. Paper Type Plain paper, Recycled paper Paper Size Capacity B5, A4, Letter (LT), Up to the unlock position. Epson AcuLaser CX11N/CX11NF 8/05 Epson AcuLaser CX11N/CX11NF Paper Cassette Unit The optional Paper Cassette Unit can hold the following types and sizes of the stack. Placing Large or Thick ...
Product Information Guide
Page 11
...10063; "Removing and Replacing a Toner Cartridge" on , then press the Setup button. The developer has reached the end of them on a clean smooth surface. ❏ If you move a toner cartridge from Printer settings, then select Clear All Warnings. Replacing a Toner Cartridge When a ... a message appears on the LCD screen indicating which toner cartridge needs to select Reset Menu, then press the r button. 4. Epson AcuLaser CX11N/CX11NF Consumable Replacement Messages When you see the following messages on your eyes. Messages appear for one . Dispose of its service life. Use...
...10063; "Removing and Replacing a Toner Cartridge" on , then press the Setup button. The developer has reached the end of them on a clean smooth surface. ❏ If you move a toner cartridge from Printer settings, then select Clear All Warnings. Replacing a Toner Cartridge When a ... a message appears on the LCD screen indicating which toner cartridge needs to select Reset Menu, then press the r button. 4. Epson AcuLaser CX11N/CX11NF Consumable Replacement Messages When you see the following messages on your eyes. Messages appear for one . Dispose of its service life. Use...
Product Information Guide
Page 14
...is turned off and that the power cord is dirty or dusty, turn off the CX11N and clean it with a soft cloth moistened with blue arrows inside the CX11N. 9. Epson AcuLaser CX11N/CX11NF Caution: Do not touch the belt on the CX11N mechanisms or any electrical components. Push it in...insert it clicks into an outlet. 2. Epson AcuLaser CX11N/CX11NF 8/05 otherwise, print quality may be very hot. 10. Avoid exposing the photoconductor to get water on the top of the CX11N, see these chemicals can damage the components and the case. Cleaning the CX11N If the CX11N's outer ...
...is turned off and that the power cord is dirty or dusty, turn off the CX11N and clean it with a soft cloth moistened with blue arrows inside the CX11N. 9. Epson AcuLaser CX11N/CX11NF Caution: Do not touch the belt on the CX11N mechanisms or any electrical components. Push it in...insert it clicks into an outlet. 2. Epson AcuLaser CX11N/CX11NF 8/05 otherwise, print quality may be very hot. 10. Avoid exposing the photoconductor to get water on the top of the CX11N, see these chemicals can damage the components and the case. Cleaning the CX11N If the CX11N's outer ...