
Product Information Guide
Page 8
....Therightcolumnofthedisplay promptsyoutoloadthcorrectpapersi2eintothepaperbh orcamette.PmsON LINE. PRINT PAUSED X/X [S] The printer stops printing during a multi-copy print operath.ThefhtXisthprintednumberofthecunent pageandtlu3tiXthenumberofcopiessele2tedin SelecType. ActionLaser 1000/1500 COVER OPEN [E] Theprintercoverisopen.Chittoanttin~printing.This mesqealaoshowstheamountoftonerleftintheimaging cawidge. For examplez A full toner amount is feeding paper. FACTORY RESET [S] FEED JAM [E] Paperisnotfeadinginto*printerfromthespehfiedpaper bin or cassette or has jammed on its way...
....Therightcolumnofthedisplay promptsyoutoloadthcorrectpapersi2eintothepaperbh orcamette.PmsON LINE. PRINT PAUSED X/X [S] The printer stops printing during a multi-copy print operath.ThefhtXisthprintednumberofthecunent pageandtlu3tiXthenumberofcopiessele2tedin SelecType. ActionLaser 1000/1500 COVER OPEN [E] Theprintercoverisopen.Chittoanttin~printing.This mesqealaoshowstheamountoftonerleftintheimaging cawidge. For examplez A full toner amount is feeding paper. FACTORY RESET [S] FEED JAM [E] Paperisnotfeadinginto*printerfromthespehfiedpaper bin or cassette or has jammed on its way...

Product Support Bulletin(s)
Page 1
... to enter SelecType Level 1. 2. Product Support Bulletin EPSON Subject: New ActionLaser 1000/1500 Imaging Cartridge Replacement Procedure Date: 6/4/93 Page(s): 1 of the ActionLaser 1000/1500 Reference Guide) has been followed, some printers may continue to resolve a situation when printed images become faint, SelecType Level 2 TONER message indicating that the toner amount is low (E* F), and three messages flash...
... to enter SelecType Level 1. 2. Product Support Bulletin EPSON Subject: New ActionLaser 1000/1500 Imaging Cartridge Replacement Procedure Date: 6/4/93 Page(s): 1 of the ActionLaser 1000/1500 Reference Guide) has been followed, some printers may continue to resolve a situation when printed images become faint, SelecType Level 2 TONER message indicating that the toner amount is low (E* F), and three messages flash...

Product Support Bulletin(s)
Page 2
The Toner Remaining message printed on the status sheet should now be E * * * * *F. Repeat Steps 1 through 7. PSB No: P-0100 Page: 2 of 2 6. Press the CONTINUE (v) button. While holding down the CONTINUE (v) button, press the INITIALIZE / RESET(q) button until the READY message appears. 7. If it is not, repeat steps 4 through 3 to print a new status sheet.
The Toner Remaining message printed on the status sheet should now be E * * * * *F. Repeat Steps 1 through 7. PSB No: P-0100 Page: 2 of 2 6. Press the CONTINUE (v) button. While holding down the CONTINUE (v) button, press the INITIALIZE / RESET(q) button until the READY message appears. 7. If it is not, repeat steps 4 through 3 to print a new status sheet.

Product Support Bulletin(s)
Page 4
... 250-sheet paper tray (optional 150-sheet paper tray on the ActionLaser II) Optional AppleTalk option (not available on the ActionLaser II) 4. Do the ActionLaser 1000 and ActionLaser 1500 use the same toner cartridge as the EPL-7000/7500 and the EPL-8000? Q. Do the ActionLaser 1000 and ActionLaser 1500 use a new all -in-one cartridge has a life of...
... 250-sheet paper tray (optional 150-sheet paper tray on the ActionLaser II) Optional AppleTalk option (not available on the ActionLaser II) 4. Do the ActionLaser 1000 and ActionLaser 1500 use the same toner cartridge as the EPL-7000/7500 and the EPL-8000? Q. Do the ActionLaser 1000 and ActionLaser 1500 use a new all -in-one cartridge has a life of...

Product Support Bulletin(s)
Page 6
... causes edges to be adjusted to accept up to 10 envelopes. Q. MicroArt printing uses toner with the ActionLaser 1000 and ActionLaser 1500? Resolution Improvement Technology (RITech) allows the ActionLaser 1500 to reassemble the dot mapped data to the factory default settings? Turn off the ...What is also available. A. An additional 250 sheet letter size paper tray is MicroArt printing? Q. The Epson AppleTalk interface and PostScript options allow the new ActionLasers to be connected directly to a LocalTalk* network, or directly to eliminate the "jaggies" or jagged edges...
... causes edges to be adjusted to accept up to 10 envelopes. Q. MicroArt printing uses toner with the ActionLaser 1000 and ActionLaser 1500? Resolution Improvement Technology (RITech) allows the ActionLaser 1500 to reassemble the dot mapped data to the factory default settings? Turn off the ...What is also available. A. An additional 250 sheet letter size paper tray is MicroArt printing? Q. The Epson AppleTalk interface and PostScript options allow the new ActionLasers to be connected directly to a LocalTalk* network, or directly to eliminate the "jaggies" or jagged edges...

User Manual
Page 7
... PAGE SIZE 4-22 RITech 4-23 RX-BUFFER SIZE 4-23 STANDBY 4-25 STATUSSHEET 4-25 SUB CONFIG 4-25 SYSTEM CONFIG 4-26 TONER 4-26 USER 4-27 VERSION 4-30 Chapter 5 Options What's Available 5-2 Identity Cards 5-5 Epson PostScript card 5-5 Epson CL identity card 5-6 Caring for cards 5-7 Inserting a card 5-8 Removing a card 5-9 Recovering from an error 5-10 Font Cartridges 5-10...
... PAGE SIZE 4-22 RITech 4-23 RX-BUFFER SIZE 4-23 STANDBY 4-25 STATUSSHEET 4-25 SUB CONFIG 4-25 SYSTEM CONFIG 4-26 TONER 4-26 USER 4-27 VERSION 4-30 Chapter 5 Options What's Available 5-2 Identity Cards 5-5 Epson PostScript card 5-5 Epson CL identity card 5-6 Caring for cards 5-7 Inserting a card 5-8 Removing a card 5-9 Recovering from an error 5-10 Font Cartridges 5-10...

User Manual
Page 14
... longer than necessary. Avoid exposing the imaging cartridge to light. Getting Started 5 The following list of your paper is turned on the cartridge may cause toner to spill into place. Do not touch the fuser, which is designed to ensure safe, efficient operation. If the non-printed side of precautions applies...
... longer than necessary. Avoid exposing the imaging cartridge to light. Getting Started 5 The following list of your paper is turned on the cartridge may cause toner to spill into place. Do not touch the fuser, which is designed to ensure safe, efficient operation. If the non-printed side of precautions applies...

User Manual
Page 34
...see the print quality section in Chapter 3, "Troubleshooting." Note: Increasing the print density increases toner consumption. Press the LEVEL 2 button. 2. If you select darker print, you have an ActionLaser 1500 printer, read this section on enhancing print quality. Resolution Improvement Technology If you my ... more asterisks there are too light or too dark, adjust print density as black or white streaks, see if the density is Epson's new printer technology that produces smoother and crisper lines, text, and graphics. 1-18 Controlling Your Printer If the density needs further...
...see the print quality section in Chapter 3, "Troubleshooting." Note: Increasing the print density increases toner consumption. Press the LEVEL 2 button. 2. If you select darker print, you have an ActionLaser 1500 printer, read this section on enhancing print quality. Resolution Improvement Technology If you my ... more asterisks there are too light or too dark, adjust print density as black or white streaks, see if the density is Epson's new printer technology that produces smoother and crisper lines, text, and graphics. 1-18 Controlling Your Printer If the density needs further...
User Manual
Page 54
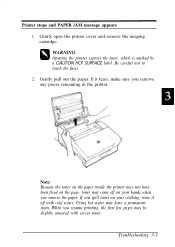
... the paper tears when you remove it, make sure you expose the fuser, which is automatically reprinted. Then seal the bag to prevent the fine toner particles from the paper feed path, reinsert the imaging cartridge, and close the printer cover. 3. The jammed page is marked by a CAUTION HOT SURFACE... label. If you ship or transport the printer, first remove the toner cartridge and place it into the paper bin. (Do not reload curled or wrinkled sheets.) Close the paper cover. 4. Be careful not to touch the...
... the paper tears when you remove it, make sure you expose the fuser, which is automatically reprinted. Then seal the bag to prevent the fine toner particles from the paper feed path, reinsert the imaging cartridge, and close the printer cover. 3. The jammed page is marked by a CAUTION HOT SURFACE... label. If you ship or transport the printer, first remove the toner cartridge and place it into the paper bin. (Do not reload curled or wrinkled sheets.) Close the paper cover. 4. Be careful not to touch the...
User Manual
Page 55
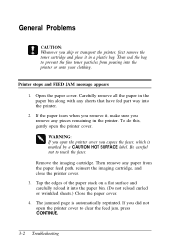
...open the printer cover and remove the imaging cartridge. Using hot water may come off with excess toner. Printer stops and PAPER JAM message appears 1. Gently pull out the paper. When you spill toner on your hands when you remove any pieces remaining in the printer. If it off on ...leave a permanent stain. Q WARNING: Opening the printer exposes the fuser, which is marked by a CAUTION HOT SURFACE label. Note: Because the toner on the paper inside the printer may not have been fixed on your clothing, rinse it tears, make sure you remove the paper. Troubleshooting 3-3 ...
...open the printer cover and remove the imaging cartridge. Using hot water may come off with excess toner. Printer stops and PAPER JAM message appears 1. Gently pull out the paper. When you spill toner on your hands when you remove any pieces remaining in the printer. If it off on ...leave a permanent stain. Q WARNING: Opening the printer exposes the fuser, which is marked by a CAUTION HOT SURFACE label. Note: Because the toner on the paper inside the printer may not have been fixed on your clothing, rinse it tears, make sure you remove the paper. Troubleshooting 3-3 ...
User Manual
Page 62
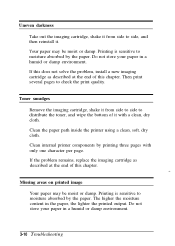
... a humid or damp environment. Then print several pages to check the print quality. Clean the paper path inside the printer using a clean, soft, dry cloth. Toner smudges Remove the imaging cartridge, shake it from side to side, and then reinstall it with only one character per page. Clean internal printer components..., dry cloth. Your paper may be moist or damp. Uneven darkness Take out the imaging cartridge, shake it from side to side to distribute the toner, and wipe the bottom of it .
... a humid or damp environment. Then print several pages to check the print quality. Clean the paper path inside the printer using a clean, soft, dry cloth. Toner smudges Remove the imaging cartridge, shake it from side to side, and then reinstall it with only one character per page. Clean internal printer components..., dry cloth. Your paper may be moist or damp. Uneven darkness Take out the imaging cartridge, shake it from side to side to distribute the toner, and wipe the bottom of it .
User Manual
Page 63
...too rough, printed characters appear distorted or broken. Completely blank pages If, after checking the SelecType Level 2 TONER option, the TONER message indicates that the amount of toner is light or faint Use the DENSITY option in the paper, the lighter the printed output. If blank...problem may be moist or damp. Run a feature print or print out a status sheet. If, after checking the SelecType Level 2 TONER option, the TONER message indicates that the amount of this chapter. The higher the moisture content in SelecType Level 2 for information on choosing paper. Troubleshooting ...
...too rough, printed characters appear distorted or broken. Completely blank pages If, after checking the SelecType Level 2 TONER option, the TONER message indicates that the amount of toner is light or faint Use the DENSITY option in the paper, the lighter the printed output. If blank...problem may be moist or damp. Run a feature print or print out a status sheet. If, after checking the SelecType Level 2 TONER option, the TONER message indicates that the amount of this chapter. The higher the moisture content in SelecType Level 2 for information on choosing paper. Troubleshooting ...
User Manual
Page 64
...imaging cartridge and then clean the paper path of the page is marked by a CAUTION HOT SURFACE label. Be careful not to distribute the toner, and then reinstall it from side to side to touch the fuser. 3-12 Troubleshooting Take out the imaging cartridge, shake it . Q WARNING...: Opening the printer exposes the fuser, which is dirty Toner may have spilled in SelecType Level 2 for lighter print. If the problem persists, replace the imaging cartridge as described at the end of this ...
...imaging cartridge and then clean the paper path of the page is marked by a CAUTION HOT SURFACE label. Be careful not to distribute the toner, and then reinstall it from side to side to touch the fuser. 3-12 Troubleshooting Take out the imaging cartridge, shake it . Q WARNING...: Opening the printer exposes the fuser, which is dirty Toner may have spilled in SelecType Level 2 for lighter print. If the problem persists, replace the imaging cartridge as described at the end of this ...

User Manual
Page 71
... printer is being initialized to cancel multiple-copy printing when the printer is the number of the current page and the second X the number of toner left in SelecType. This message also shows the amount of copies selected in the imaging cartridge. For example: A full... toner amount is open. The first X is off line. See "Emulation control languages" in EJL mode. EJL [S] The printer is off line, or press FEED. DATA [S] ...
... printer is being initialized to cancel multiple-copy printing when the printer is the number of the current page and the second X the number of toner left in SelecType. This message also shows the amount of copies selected in the imaging cartridge. For example: A full... toner amount is open. The first X is off line. See "Emulation control languages" in EJL mode. EJL [S] The printer is off line, or press FEED. DATA [S] ...

User Manual
Page 73
... optional lower paper cassette (if installed). See Chapter 2, "Paper Handling." PAPER FEEDING [S] The printer is no paper in this chapter. Press RESET to change the TONER setting to NEW if you replaced the imaging cartridge.
... optional lower paper cassette (if installed). See Chapter 2, "Paper Handling." PAPER FEEDING [S] The printer is no paper in this chapter. Press RESET to change the TONER setting to NEW if you replaced the imaging cartridge.

User Manual
Page 78
... not match the paper loaded in the imaging cartridge is warming up the printer. WARMING UP [S] The printer is also displayed. The right column of toner left in the specified paper source. For example: A full...
... not match the paper loaded in the imaging cartridge is warming up the printer. WARMING UP [S] The printer is also displayed. The right column of toner left in the specified paper source. For example: A full...
User Manual
Page 81
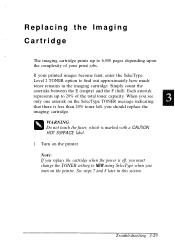
... between the E (empty) and the F (full). Q WARNING: Do not touch the fuser, which is off, you must change the TONER setting to find out approximately how much toner remains in this section. Each asterisk represents up to 20% of your printed images become faint, enter the SelecType Level...Turn on the printer. Replacing the Imaging Cartridge The imaging cartridge prints up to 6,000 pages depending upon the complexity of the total toner capacity. Note: If you replace the cartridge when the power is marked with a CAUTION HOT SURFACE label. 1. Troubleshooting 3-29 If your print...
... between the E (empty) and the F (full). Q WARNING: Do not touch the fuser, which is off, you must change the TONER setting to find out approximately how much toner remains in this section. Each asterisk represents up to 20% of your printed images become faint, enter the SelecType Level...Turn on the printer. Replacing the Imaging Cartridge The imaging cartridge prints up to 6,000 pages depending upon the complexity of the total toner capacity. Note: If you replace the cartridge when the power is marked with a CAUTION HOT SURFACE label. 1. Troubleshooting 3-29 If your print...
User Manual
Page 82
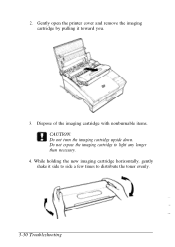
Do not expose the imaging cartridge to distribute the toner evenly. 3-30 Troubleshooting Gently open the printer cover and remove the imaging cartridge by pulling it side to side a few times to light any longer than necessary. 4. While holding the new imaging cartridge horizontally, gently shake it toward you. 3. 2. Dispose of the imaging cartridge with nonburnable items. CAUTION: Do not turn the imaging cartridge upside down.
Do not expose the imaging cartridge to distribute the toner evenly. 3-30 Troubleshooting Gently open the printer cover and remove the imaging cartridge by pulling it side to side a few times to light any longer than necessary. 4. While holding the new imaging cartridge horizontally, gently shake it toward you. 3. 2. Dispose of the imaging cartridge with nonburnable items. CAUTION: Do not turn the imaging cartridge upside down.

User Manual
Page 84
... to be correct. Note: Each time you replace the cartridge, print a feature print to NEW after replacing the cartridge, the TONER message will not be sure the print quality is full. Gently press down on the display: NEW CARTRIDGE? Instead COVER OPEN E"* F (two or more... PRESS RESET NO, PRESS CONTINUE. 9. Three messages flash in the Setup and Maintenance guide. 3-32 Troubleshooting appears even if the toner level is satisfactory and that you reset the TONER setting. See "Test printing" in rotation on the printer cover until it clicks shut. Press RESET to change the setting to...
... to be correct. Note: Each time you replace the cartridge, print a feature print to NEW after replacing the cartridge, the TONER message will not be sure the print quality is full. Gently press down on the display: NEW CARTRIDGE? Instead COVER OPEN E"* F (two or more... PRESS RESET NO, PRESS CONTINUE. 9. Three messages flash in the Setup and Maintenance guide. 3-32 Troubleshooting appears even if the toner level is satisfactory and that you reset the TONER setting. See "Test printing" in rotation on the printer cover until it clicks shut. Press RESET to change the setting to...

User Manual
Page 85
Chapter 4 SelecType SelecType Overview 4-2 Using SelecType 4-3 The control panel 4-3 The display 4-3 Buttons 4-4 SelecType tutorial 4-5 Options 4-7 AUTO CONT 4-8 CH TIMEOUT 4-8 COPIES 4-8 DENSITY 4-9 EMULATION 4-9 FEATURE PRINT 4-11 FONT 4-11 FONT SAMPLE 4-11 FULL PRINT 4-12 INPUT 4-13 INTERFACE 4-14 LANG 4-18 MACRO 4-18 MEMORY LEFT 4-20 OFFSET 4-21 ORIENT 4-21 PAGE COUNTER 4-22 PAGE SIZE 4-22 RITech 4-23 RX-BUFFER SIZE 4-23 STANDBY 4-25 STATUSSHEET 4-25 SUB CONFIG 4-25 SYSTEM CONFIG 4-26 TONER 4-26 USER 4-27 VERSION 4-30 SelecType 4-1
Chapter 4 SelecType SelecType Overview 4-2 Using SelecType 4-3 The control panel 4-3 The display 4-3 Buttons 4-4 SelecType tutorial 4-5 Options 4-7 AUTO CONT 4-8 CH TIMEOUT 4-8 COPIES 4-8 DENSITY 4-9 EMULATION 4-9 FEATURE PRINT 4-11 FONT 4-11 FONT SAMPLE 4-11 FULL PRINT 4-12 INPUT 4-13 INTERFACE 4-14 LANG 4-18 MACRO 4-18 MEMORY LEFT 4-20 OFFSET 4-21 ORIENT 4-21 PAGE COUNTER 4-22 PAGE SIZE 4-22 RITech 4-23 RX-BUFFER SIZE 4-23 STANDBY 4-25 STATUSSHEET 4-25 SUB CONFIG 4-25 SYSTEM CONFIG 4-26 TONER 4-26 USER 4-27 VERSION 4-30 SelecType 4-1


