Technical Brief (Multimedia Projectors)
Page 2
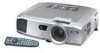
... pixels blocks the light leakage. EPSON projectors produce vs. EPSON PowerLite Projectors EPSON Powerlite Projectors ➤ Awardwinning projectors ➤ Awardwinning projectors EPSON Sales Training EPSON and EPSON Stylus are registered trademarks of Seiko Epson Corporation. 3/01 Other trademarks are more lifelike the images appear. EPSON produces the highest aperture LCD's, which allows more uniform the brightness. 2. Each pixel has a dedicated lens that focuses and maximizes the throughput...
... pixels blocks the light leakage. EPSON projectors produce vs. EPSON PowerLite Projectors EPSON Powerlite Projectors ➤ Awardwinning projectors ➤ Awardwinning projectors EPSON Sales Training EPSON and EPSON Stylus are registered trademarks of Seiko Epson Corporation. 3/01 Other trademarks are more lifelike the images appear. EPSON produces the highest aperture LCD's, which allows more uniform the brightness. 2. Each pixel has a dedicated lens that focuses and maximizes the throughput...
Technical Brief (Multimedia Projectors)
Page 3
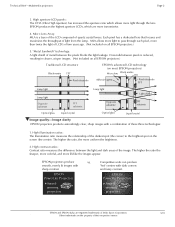
...correct the misalignment. Panel on Prism (POP): This technology allows little or no shift between the LCD panels and the prism, which allows you can't set the projector up aligned with the bottom of their respective owners. Without keystone correction Set up to a &#...200 tilt while maintaining the correct aspect ratio. With keystone correction If you to correct up your projector so the lens is a lig n m e n t Image quality-Keystone correction Many EPSON projectors provide keystone correction, which keeps the pixel alignment precise and the image sharp and clear. Technical Brief...
...correct the misalignment. Panel on Prism (POP): This technology allows little or no shift between the LCD panels and the prism, which allows you can't set the projector up aligned with the bottom of their respective owners. Without keystone correction Set up to a &#...200 tilt while maintaining the correct aspect ratio. With keystone correction If you to correct up your projector so the lens is a lig n m e n t Image quality-Keystone correction Many EPSON projectors provide keystone correction, which keeps the pixel alignment precise and the image sharp and clear. Technical Brief...
Product Information Guide
Page 1
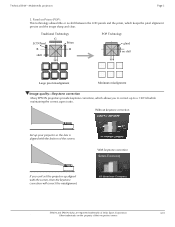
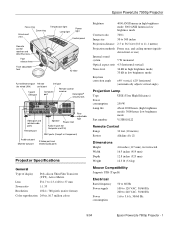
Epson PowerLite 7900p Projector Focus ring Zoom ring Air exhaust vent Temperature light Lamp light Power light Control panel Remote control receiver and Wall Shot lens Foot release lever Front adjustable foot Air filter RJ-45 Ethernet port ...Component) Audio-out port Monitor-out port S-Video port and related audio ports Projector Specifications General Type of display Poly-silicon Thin Film Transistor (TFT), Active Matrix Lens F=1.7 to 2.3, f=28 to 37 mm Zoom ratio 1:1.35 Resolution 1024 ×... 240 VAC, 50/60 Hz 1.6 to 3.6 A, 50/60 Hz 9/04 Epson PowerLite 7900p Projector - 1
Epson PowerLite 7900p Projector Focus ring Zoom ring Air exhaust vent Temperature light Lamp light Power light Control panel Remote control receiver and Wall Shot lens Foot release lever Front adjustable foot Air filter RJ-45 Ethernet port ...Component) Audio-out port Monitor-out port S-Video port and related audio ports Projector Specifications General Type of display Poly-silicon Thin Film Transistor (TFT), Active Matrix Lens F=1.7 to 2.3, f=28 to 37 mm Zoom ratio 1:1.35 Resolution 1024 ×... 240 VAC, 50/60 Hz 1.6 to 3.6 A, 50/60 Hz 9/04 Epson PowerLite 7900p Projector - 1
Product Information Guide
Page 3
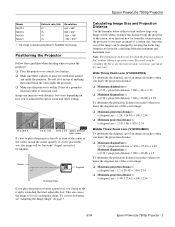
....84) × 100 / 2.54 ❏ Minimum projection distance = (((diagonal size - 2.13) / 36) × 100 / 2.54 Middle Throw Zoom Lens (V12H004M03) To determine the diagonal size of a grounded electrical outlet or extension cord. Epson PowerLite 7900p Projector Mode MAC13 MAC16 MAC19 MAC21 Refresh rate (Hz) 67 75 75 75 Resolution 640 × 480* 832 × 624...
....84) × 100 / 2.54 ❏ Minimum projection distance = (((diagonal size - 2.13) / 36) × 100 / 2.54 Middle Throw Zoom Lens (V12H004M03) To determine the diagonal size of a grounded electrical outlet or extension cord. Epson PowerLite 7900p Projector Mode MAC13 MAC16 MAC19 MAC21 Refresh rate (Hz) 67 75 75 75 Resolution 640 × 480* 832 × 624...
Product Information Guide
Page 4
... all the sources at a glance, so you can attach an external speaker system. Note: Some LCD monitors may not be able to the correct source by connecting a USB cable to both the projector and your equipment is connected to the Video or S-Video port, or to the BNC ports, ...USB port running Windows XP, 98, 2000, or Me; Types of Connections The following types of connections are set to 65 Hz or greater. Epson PowerLite 7900p Projector Long Throw Zoom Lens (V12H004L05) To determine the diagonal size of an image (in inches) when you know the diagonal size of the screen image: ❏ ...
... all the sources at a glance, so you can attach an external speaker system. Note: Some LCD monitors may not be able to the correct source by connecting a USB cable to both the projector and your equipment is connected to the Video or S-Video port, or to the BNC ports, ...USB port running Windows XP, 98, 2000, or Me; Types of Connections The following types of connections are set to 65 Hz or greater. Epson PowerLite 7900p Projector Long Throw Zoom Lens (V12H004L05) To determine the diagonal size of an image (in inches) when you know the diagonal size of the screen image: ❏ ...

Product Information Guide
Page 5
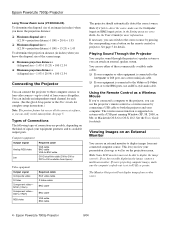
...BNC Input options in the Advanced1 menu. Previewing Image Sources You can damage your eyes. 5. Preview 9/04 Epson PowerLite 7900p Projector - 5 Epson PowerLite 7900p Projector To use an external monitor, connect it to the projector's Monitor Out port, as shown: Note: If you're using an external monitor: ❏ The ...the A/V Mute button. ❏ You can also view images on the monitor while the projector is in standby mode (plugged in the projector. 3. Warning: Never look into the lens when the lamp is turned on ). Selecting the Image Source If multiple devices are installed ...
...BNC Input options in the Advanced1 menu. Previewing Image Sources You can damage your eyes. 5. Preview 9/04 Epson PowerLite 7900p Projector - 5 Epson PowerLite 7900p Projector To use an external monitor, connect it to the projector's Monitor Out port, as shown: Note: If you're using an external monitor: ❏ The ...the A/V Mute button. ❏ You can also view images on the monitor while the projector is in standby mode (plugged in the projector. 3. Warning: Never look into the lens when the lamp is turned on ). Selecting the Image Source If multiple devices are installed ...
Product Information Guide
Page 6
... systems, there's a function key that lets you may have to sync up your keyboard that source appears blank. Epson PowerLite 7900p Projector 9/04 Press the corresponding Source buttons on both the LCD screen and the external monitor port are connected correctly. ❏ Make sure the P power light is green and ...not flashing and the lens cap is off. ❏ If you see a blank screen or a blue screen with an icon...
... systems, there's a function key that lets you may have to sync up your keyboard that source appears blank. Epson PowerLite 7900p Projector 9/04 Press the corresponding Source buttons on both the LCD screen and the external monitor port are connected correctly. ❏ Make sure the P power light is green and ...not flashing and the lens cap is off. ❏ If you see a blank screen or a blue screen with an icon...
Product Information Guide
Page 7
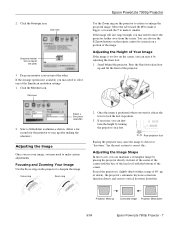
... distortion. If the image still isn't large enough, you want it smaller. Press the blue foot release lever up or down 9/04 Epson PowerLite 7900p Projector - 7 Select a Simulscan resolution 2. Rear projector foot Raising the projector may need to zoom in on the remote control to select one of the... in front of the center of the screen with the base of the lens level with the bottom of the image. Stand behind the projector. Adjusting the Image Shape In most cases, you may need to move the projector farther away from the screen. Drag one monitor icon on the...
... distortion. If the image still isn't large enough, you want it smaller. Press the blue foot release lever up or down 9/04 Epson PowerLite 7900p Projector - 7 Select a Simulscan resolution 2. Rear projector foot Raising the projector may need to zoom in on the remote control to select one of the... in front of the center of the screen with the base of the lens level with the bottom of the image. Stand behind the projector. Adjusting the Image Shape In most cases, you may need to move the projector farther away from the screen. Drag one monitor icon on the...
Product Information Guide
Page 10
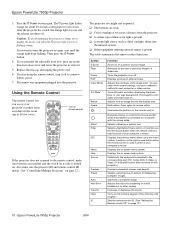
... as direct sunlight) shines into the infrared receiver ❏ Other equipment emitting infrared energy is used in -picture image. Epson PowerLite 7900p Projector 3. Replace the lens cap and unplug the power cord. 6. Halts action. Then press the PPower button. 4. If you extended the adjustable ...Preview Preset Auto Wall Shot Volume Num ID Function Zooms in a slideshow. Adjusts how an image fits into the projector. Epson PowerLite 7900p Projector 9/04 After the projector has cooled, the orange light stays on a portion of your image. Displays the previous menu when using the ...
... as direct sunlight) shines into the infrared receiver ❏ Other equipment emitting infrared energy is used in -picture image. Epson PowerLite 7900p Projector 3. Replace the lens cap and unplug the power cord. 6. Halts action. Then press the PPower button. 4. If you extended the adjustable ...Preview Preset Auto Wall Shot Volume Num ID Function Zooms in a slideshow. Adjusts how an image fits into the projector. Epson PowerLite 7900p Projector 9/04 After the projector has cooled, the orange light stays on a portion of your image. Displays the previous menu when using the ...

Product Information Guide
Page 20
... is plenty of space around and under the projector for ventilation. Replace it as described on page 21. Cleaning the Lens Clean the lens whenever you clean the case, first turn it as possible (see page 21). Epson PowerLite 7900p Projector 9/04 Verify that the air filter is not...mild detergent. Caution: Do not use lens-cleaning paper. These can continue running it as soon as described on after replacing the lamp, make sure the lamp is fully inserted and the lamp cover is operating normally. Epson PowerLite 7900p Projector Light Green Description and solution When the...
... is plenty of space around and under the projector for ventilation. Replace it as described on page 21. Cleaning the Lens Clean the lens whenever you clean the case, first turn it as possible (see page 21). Epson PowerLite 7900p Projector 9/04 Verify that the air filter is not...mild detergent. Caution: Do not use lens-cleaning paper. These can continue running it as soon as described on after replacing the lamp, make sure the lamp is fully inserted and the lamp cover is operating normally. Epson PowerLite 7900p Projector Light Green Description and solution When the...
Product Information Guide
Page 23
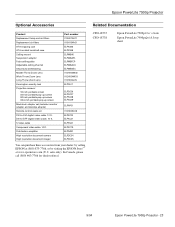
... digital video cable, 10 ft. Epson PowerLite 7900p Projector Optional Accessories Product Replacement lamp and air filters Replacement air filters ATA shipping case ATA molded hardshell case Ceiling mount Suspension adapter False ceiling plate Adjustable ceiling channel Security bracket/cabling Middle Throw Zoom Lens Wide Throw Zoom Lens Long Throw Zoom Lens Kensington security lock Projection screens...
... digital video cable, 10 ft. Epson PowerLite 7900p Projector Optional Accessories Product Replacement lamp and air filters Replacement air filters ATA shipping case ATA molded hardshell case Ceiling mount Suspension adapter False ceiling plate Adjustable ceiling channel Security bracket/cabling Middle Throw Zoom Lens Wide Throw Zoom Lens Long Throw Zoom Lens Kensington security lock Projection screens...
Quick Start
Page 1
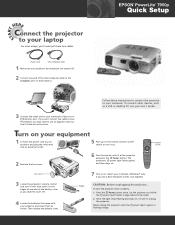
EPSON® PowerLite® 7900p Quick Setup Connect the projector to your laptop For most setups, you'll need to unplug the projector. Press the Power button twice. If you can't connect the cable to the Computer port on the projector. On/off . 2 Connect one end of the VGA computer cable to ...down properly: 1. To connect other end into an electrical outlet. 5 Push up on the remote control's on . To shut the projector down on . 2 Remove the lens cover. 6 Aim the remote control at one end of the battery cover as you may need just these instructions to connect the...
EPSON® PowerLite® 7900p Quick Setup Connect the projector to your laptop For most setups, you'll need to unplug the projector. Press the Power button twice. If you can't connect the cable to the Computer port on the projector. On/off . 2 Connect one end of the VGA computer cable to ...down properly: 1. To connect other end into an electrical outlet. 5 Push up on the remote control's on . To shut the projector down on . 2 Remove the lens cover. 6 Aim the remote control at one end of the battery cover as you may need just these instructions to connect the...
Quick Start
Page 2
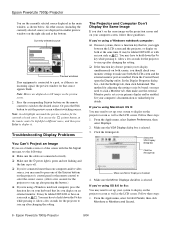
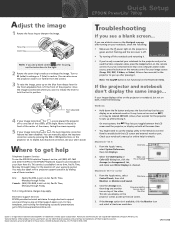
...in your image displays either on the projector or notebook, but not on both at the same time. Select the VGA Display or Color LCD dialog box, click the Make sure ... power light on the remote control for the projector to sharpen the image. Epson disclaims any and all rights in position. Quick Setup EPSON® PowerLite® 7900p Adjust the image 1 Rotate the focus ring ... and/or video source, press the button on the projector is green and not flashing and the lens cover is checked. You can also move the projector closer to 6 PM, Pacific Time, Monday through Friday...
...in your image displays either on the projector or notebook, but not on both at the same time. Select the VGA Display or Color LCD dialog box, click the Make sure ... power light on the remote control for the projector to sharpen the image. Epson disclaims any and all rights in position. Quick Setup EPSON® PowerLite® 7900p Adjust the image 1 Rotate the focus ring ... and/or video source, press the button on the projector is green and not flashing and the lens cover is checked. You can also move the projector closer to 6 PM, Pacific Time, Monday through Friday...
Supplemental / Late Breaking Information
Page 1
EPSON® Lens Installation Installing an optional lens in the no-lens model of your PowerLite® projector CPD-18790
EPSON® Lens Installation Installing an optional lens in the no-lens model of your PowerLite® projector CPD-18790

Supplemental / Late Breaking Information
Page 2
Follow these instructions to remove the lens cover. 3. Remove the protective seal from the lens mount inside the projector. 2 Turn the projector over and use a screwdriver to install an optional lens in the no-lens model of your projector. Warning: To avoid electric shock, disconnect the power cord before starting. 1. Remove the four screws from the projector. 2.
Follow these instructions to remove the lens cover. 3. Remove the protective seal from the lens mount inside the projector. 2 Turn the projector over and use a screwdriver to install an optional lens in the no-lens model of your projector. Warning: To avoid electric shock, disconnect the power cord before starting. 1. Remove the four screws from the projector. 2.

Supplemental / Late Breaking Information
Page 3
Lower the lens into the projector, making sure the focus and zoom knobs face downward so they fit through the slot in step 3. 3 Secure the lens with a soft, lint-free cloth. Also, use care not to support the front of the lens. Make sure focus and zoom knobs face downward. Guide pin 6. If you do, clean the lens with the four mounting screws you could damage the guide pins. 4. Remove the front and rear caps from the new lens. 5. Caution: Make sure to touch the front or back of the lens and keep it level, or you removed in the projector's case.
Lower the lens into the projector, making sure the focus and zoom knobs face downward so they fit through the slot in step 3. 3 Secure the lens with a soft, lint-free cloth. Also, use care not to support the front of the lens. Make sure focus and zoom knobs face downward. Guide pin 6. If you do, clean the lens with the four mounting screws you could damage the guide pins. 4. Remove the front and rear caps from the new lens. 5. Caution: Make sure to touch the front or back of the lens and keep it level, or you removed in the projector's case.
Supplemental / Late Breaking Information
Page 4
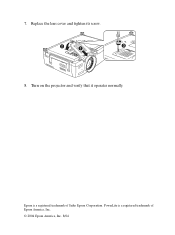
Epson is a registered trademark of Seiko Epson Corporation. Turn on the projector and verify that it operates normally. PowerLite is a registered trademark of Epson America, Inc. © 2004 Epson America, Inc. 8/04 4 7. Replace the lens cover and tighten its screw. 8.
Epson is a registered trademark of Seiko Epson Corporation. Turn on the projector and verify that it operates normally. PowerLite is a registered trademark of Epson America, Inc. © 2004 Epson America, Inc. 8/04 4 7. Replace the lens cover and tighten its screw. 8.
Supplemental / Late Breaking Information
Page 5
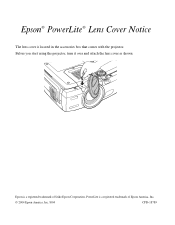
Epson® PowerLite® Lens Cover Notice The lens cover is a registered trademark of Seiko Epson Corporation. PowerLite is located in the accessories box that comes with the projector. Before you start using the projector, turn it over and attach the lens cover as shown: Epson is a registered trademark of Epson America, Inc. © 2004 Epson America, Inc. 8/04 CPD-18789
Epson® PowerLite® Lens Cover Notice The lens cover is a registered trademark of Seiko Epson Corporation. PowerLite is located in the accessories box that comes with the projector. Before you start using the projector, turn it over and attach the lens cover as shown: Epson is a registered trademark of Epson America, Inc. © 2004 Epson America, Inc. 8/04 CPD-18789
User Manual
Page 2
... and maintenance instructions. PowerLite, PrivateLine, and Presenters Club are registered trademarks and Epson Connection, Epson Store, and Extra Care are trademarks of Epson America, Inc. No part of this product yourself. Pixelworks, DNX, and the DNX logo are service marks of Pixelworks, Inc. Important Safety Information WARNING: Never look into the projector lens when the lamp...
... and maintenance instructions. PowerLite, PrivateLine, and Presenters Club are registered trademarks and Epson Connection, Epson Store, and Extra Care are trademarks of Epson America, Inc. No part of this product yourself. Pixelworks, DNX, and the DNX logo are service marks of Pixelworks, Inc. Important Safety Information WARNING: Never look into the projector lens when the lamp...
User Manual
Page 6
6 7 Using EMP NetworkManager 96 Selecting the Projectors to Monitor 96 Setting a Password 97 Creating the E-Mail Settings 97 Understanding the Notification Messages 99 Maintaining the Projector 101 Cleaning the Lens 102 Cleaning the Projector Case 102 Cleaning the Air Filters and Vents 103 Replacing ...the Lamp and Air Filters 104 Resetting the Lamp Timer 107 Transporting the Projector 108 Solving Problems 109 Using On...
6 7 Using EMP NetworkManager 96 Selecting the Projectors to Monitor 96 Setting a Password 97 Creating the E-Mail Settings 97 Understanding the Notification Messages 99 Maintaining the Projector 101 Cleaning the Lens 102 Cleaning the Projector Case 102 Cleaning the Air Filters and Vents 103 Replacing ...the Lamp and Air Filters 104 Resetting the Lamp Timer 107 Transporting the Projector 108 Solving Problems 109 Using On...
