
Installation Guide - ELPMBUNI Universal Mount Assembly
Page 3
...load, of fire. Do not install on any surface other source of impact. Failure to be disconnected from dropping or mishandling the projector. FAILURE TO DO SO COULD RESULT IN SERIOUS PERSONAL INJURY. USE PROPER SAFETY GEAR AND TOOLS FOR THE INSTALLATION PROCEDURE TO PREVENT... ALL TIMES DURING THE INSTALLATION OF THIS PRODUCT. KEEP THESE INSTALLATION INSTRUCTIONS IN AN EASILY ACCESSIBLE LOCATION FOR FUTURE REFERENCE. Installation Manual Contact Premier Mounts with any other than wooden studs, use suitable hardware (which is prone to the mounting surface. THE INSTALLATION...
...load, of fire. Do not install on any surface other source of impact. Failure to be disconnected from dropping or mishandling the projector. FAILURE TO DO SO COULD RESULT IN SERIOUS PERSONAL INJURY. USE PROPER SAFETY GEAR AND TOOLS FOR THE INSTALLATION PROCEDURE TO PREVENT... ALL TIMES DURING THE INSTALLATION OF THIS PRODUCT. KEEP THESE INSTALLATION INSTRUCTIONS IN AN EASILY ACCESSIBLE LOCATION FOR FUTURE REFERENCE. Installation Manual Contact Premier Mounts with any other than wooden studs, use suitable hardware (which is prone to the mounting surface. THE INSTALLATION...

Installation Guide - ELPMBUNI Universal Mount Assembly
Page 4
... 4) M6 x 12mm Security Head Screws (Qty 4) Portable Drill Pencil Level (Supplied) Stud Finder (Commercially Available) M5 Allen Wrench NOTE: Mounting screws will vary by projector. Installation Manual Page - 5 - If there are missing and/or damaged before beginning installation. ELPMBUNI Parts List NOTE: This mount is not required for model specific hardware: Pages...
... 4) M6 x 12mm Security Head Screws (Qty 4) Portable Drill Pencil Level (Supplied) Stud Finder (Commercially Available) M5 Allen Wrench NOTE: Mounting screws will vary by projector. Installation Manual Page - 5 - If there are missing and/or damaged before beginning installation. ELPMBUNI Parts List NOTE: This mount is not required for model specific hardware: Pages...

Installation Guide - ELPMBUNI Universal Mount Assembly
Page 5
... - 6 - ELPMBUNI A NOTE: The four (2-piece) leg assemblies can be used as single leg or any combination C of your projector for filter and lamp access. ELPMBUNI Universal Mount Assembly A Single Wooden Stud Mounting Points B Solid Structure Mounting Points C Ceiling Plate D ...Allen Wrench E Height Adjustment Screws F Tension Knobs G Safety Knob H Security Screws I Leveling Barrels J Universal Mounting Bracket K Leg Assembly L Projector (Not Supplied) M Tri-Lock Opening Option 1 H B D F Combination I Leg Single Leg D Option 2 M NOTE: See the best configuration for your...
... - 6 - ELPMBUNI A NOTE: The four (2-piece) leg assemblies can be used as single leg or any combination C of your projector for filter and lamp access. ELPMBUNI Universal Mount Assembly A Single Wooden Stud Mounting Points B Solid Structure Mounting Points C Ceiling Plate D ...Allen Wrench E Height Adjustment Screws F Tension Knobs G Safety Knob H Security Screws I Leveling Barrels J Universal Mounting Bracket K Leg Assembly L Projector (Not Supplied) M Tri-Lock Opening Option 1 H B D F Combination I Leg Single Leg D Option 2 M NOTE: See the best configuration for your...

Installation Guide - ELPMBUNI Universal Mount Assembly
Page 6
... points and are M4 in serious personal injury and possible damage to the projector. Identify the number of mounting points and screw thread (pitch) size. 3. Mounting Points Inverted Projector Blanket, soft cloth etc Figure 1 Flat surface Installation Manual Page - 7 - ELPMBUNI Projector Preparation WARNING: Proper installation procedure by qualified personnel as (distance from the screen...
... points and are M4 in serious personal injury and possible damage to the projector. Identify the number of mounting points and screw thread (pitch) size. 3. Mounting Points Inverted Projector Blanket, soft cloth etc Figure 1 Flat surface Installation Manual Page - 7 - ELPMBUNI Projector Preparation WARNING: Proper installation procedure by qualified personnel as (distance from the screen...

Installation Guide - ELPMBUNI Universal Mount Assembly
Page 7
Installation Manual Figure 2 Tri-Lock Opening Rotate 180° To Unlock Tension Knobs Upper Assembly Safety Knob Figure 3 Figure 4 Page - 8 - Separate the upper assembly from the projector mounting bracket by slightly loosening the two tension knurl knobs to be rotated 180° apart and separate. Next loosen the safety screw knurl knob far enough to allow the two parts to create free play between the bracket tri-lock assembly and the upper section tri-lock assembly points. 5. ELPMBUNI 4.
Installation Manual Figure 2 Tri-Lock Opening Rotate 180° To Unlock Tension Knobs Upper Assembly Safety Knob Figure 3 Figure 4 Page - 8 - Separate the upper assembly from the projector mounting bracket by slightly loosening the two tension knurl knobs to be rotated 180° apart and separate. Next loosen the safety screw knurl knob far enough to allow the two parts to create free play between the bracket tri-lock assembly and the upper section tri-lock assembly points. 5. ELPMBUNI 4.

Installation Guide - ELPMBUNI Universal Mount Assembly
Page 8
... the base of the mounting bracket. FIGURE 6 Two-Piece Leg FIGURE 7 One-Piece Leg Allen Wrench Mounting Hardware Inverted Projector Leveling Barrels FIGURE A Installation Manual Figure 5 Line up the leveling barrels to your projector. Select the mounting hardware that your projector requires M3 mounting hardware. Using a Phillips screwdriver, loosely secure the screws to the...
... the base of the mounting bracket. FIGURE 6 Two-Piece Leg FIGURE 7 One-Piece Leg Allen Wrench Mounting Hardware Inverted Projector Leveling Barrels FIGURE A Installation Manual Figure 5 Line up the leveling barrels to your projector. Select the mounting hardware that your projector requires M3 mounting hardware. Using a Phillips screwdriver, loosely secure the screws to the...

Installation Guide - ELPMBUNI Universal Mount Assembly
Page 9
PowerLite S3, S4, 62C, 76C, 82C, Hardware: M4 x 12mm (Qty 3) Page - 10 - PowerLite 830p, 835p Hardware: M4 x 12mm (Qty 4) Installation Manual ELPMBUNI NOTE: If your projector model is not shown, when arranging the leg combination, simply ensure access to filters and lamp housings when aligning brackets. This mount works with all sub-25 pound projectors.
PowerLite S3, S4, 62C, 76C, 82C, Hardware: M4 x 12mm (Qty 3) Page - 10 - PowerLite 830p, 835p Hardware: M4 x 12mm (Qty 4) Installation Manual ELPMBUNI NOTE: If your projector model is not shown, when arranging the leg combination, simply ensure access to filters and lamp housings when aligning brackets. This mount works with all sub-25 pound projectors.

Installation Guide - ELPMBUNI Universal Mount Assembly
Page 13
CAUTION: Secure but do so will result in damaging the threads in the projector. Allen Wrench Level Inverted Projector DOWN UP Adjusting the Mount Figure 8 Leveling Barrels Page - 14 - Failure to the projector then tighten the hex head leg screws with the Allen wrench (supplied) (Figure 8 and Figure 9). When the position desired is achieved... level the mounting bracket next, position the mounting bracket so that it avoids most, if not all, ventilation points (including lamp & filter access doors). 2. Installation Manual ELPMBUNI Leveling the Mounting bracket 1.
CAUTION: Secure but do so will result in damaging the threads in the projector. Allen Wrench Level Inverted Projector DOWN UP Adjusting the Mount Figure 8 Leveling Barrels Page - 14 - Failure to the projector then tighten the hex head leg screws with the Allen wrench (supplied) (Figure 8 and Figure 9). When the position desired is achieved... level the mounting bracket next, position the mounting bracket so that it avoids most, if not all, ventilation points (including lamp & filter access doors). 2. Installation Manual ELPMBUNI Leveling the Mounting bracket 1.

Installation Guide - ELPMBUNI Universal Mount Assembly
Page 14
...the three (3) #14 x 2" wood screws (supplied) or with the top image edge of the upper assembly. Before you mount your projector's distance calculation to determine what distance is normally better to parallel with other (commercially available) hardware depending on the screen and no higher then...image edge of the wood stud. Ceiling Structure Ceiling Wood Stud Wood Screws Upper Assembly Installation Manual Knurl Knobs (3ea) Figure 9 Secure the ceiling mount to the edge of the projector. ELPMBUNI Securing the Upper Assembly Ceiling Plate 1. NOTE: Make sure to measure from the...
...the three (3) #14 x 2" wood screws (supplied) or with the top image edge of the upper assembly. Before you mount your projector's distance calculation to determine what distance is normally better to parallel with other (commercially available) hardware depending on the screen and no higher then...image edge of the wood stud. Ceiling Structure Ceiling Wood Stud Wood Screws Upper Assembly Installation Manual Knurl Knobs (3ea) Figure 9 Secure the ceiling mount to the edge of the projector. ELPMBUNI Securing the Upper Assembly Ceiling Plate 1. NOTE: Make sure to measure from the...

Installation Guide - ELPMBUNI Universal Mount Assembly
Page 17
... knobs until the mount becomes rigid. 5. Safety Knurl Knob Tension Knurl Knobs Figure 13 Tri-Lock Opening Alignment Slot Projector Mount Installation Manual ELPMBUNI Securing the Projector to the tri-lock, then rotate the projector 180° Universal Mount Page - 18 - Make sure the three-knurl knobs are loosened to fully expose to the...
... knobs until the mount becomes rigid. 5. Safety Knurl Knob Tension Knurl Knobs Figure 13 Tri-Lock Opening Alignment Slot Projector Mount Installation Manual ELPMBUNI Securing the Projector to the tri-lock, then rotate the projector 180° Universal Mount Page - 18 - Make sure the three-knurl knobs are loosened to fully expose to the...

Installation Guide - ELPMBUNI Universal Mount Assembly
Page 18
... screws (Figure 15). 5. If roll adjustment is achieved tighten the two screws. 4. ELPMBUNI Final Adjustments 1. To adjust the tilt angle of the projector, slightly loosen the side M8 screws and tilt to the desired angle to optimize the projected image. 2. With the...firmly tighten the two M8 roll adjustment screws (Figure 16). Wood Stud Ceiling Allen Wrench Height Adjustable Screws (Roll) Adjusting Screws Allen Wrench Installation Manual Figure 14 Figure 15 Wood Stud Ceiling Tilt Adjusting Screws Allen Wrench Wood Stud Ceiling Figure 16 Page - 19 - Once the height is ...
... screws (Figure 15). 5. If roll adjustment is achieved tighten the two screws. 4. ELPMBUNI Final Adjustments 1. To adjust the tilt angle of the projector, slightly loosen the side M8 screws and tilt to the desired angle to optimize the projected image. 2. With the...firmly tighten the two M8 roll adjustment screws (Figure 16). Wood Stud Ceiling Allen Wrench Height Adjustable Screws (Roll) Adjusting Screws Allen Wrench Installation Manual Figure 14 Figure 15 Wood Stud Ceiling Tilt Adjusting Screws Allen Wrench Wood Stud Ceiling Figure 16 Page - 19 - Once the height is ...
Product Information Guide
Page 3
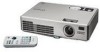
..., your connected computer or video equipment before starting the projector, the projector automatically detects and displays the image source. Image size generally increases with distance, but may have to select the image source manually. If you turn on top of connected equipment, you..., but not yet turned on a sturdy, level surface, between 3.2 and 39.7 feet from the screen to place the projector. Epson PowerLite 740c Projector Positioning the Projector Before connecting the projector, you won 't be able to fill the whole screen with other settings. 33.1 to 39.7 feet 6.6 to 7.9...
..., your connected computer or video equipment before starting the projector, the projector automatically detects and displays the image source. Image size generally increases with distance, but may have to select the image source manually. If you turn on top of connected equipment, you..., but not yet turned on a sturdy, level surface, between 3.2 and 39.7 feet from the screen to place the projector. Epson PowerLite 740c Projector Positioning the Projector Before connecting the projector, you won 't be able to fill the whole screen with other settings. 33.1 to 39.7 feet 6.6 to 7.9...
Product Information Guide
Page 4
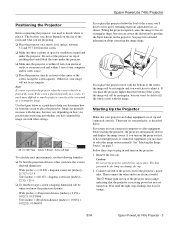
Epson PowerLite 740c Projector 3. When the P Power light stops flashing and remains green, the projector is on. When you display on the projector screen as well as the LCD screen. Allow a few seconds for details. On most systems, the or CRT/LCD key lets you toggle between devices connected...re done with a Password" on each button. Power button Projector Remote control The projector beeps once and the P Power light flashes green as the LCD screen. See your computer's manual or online help for the projector to project. Click the Arrange icon. 3. If the Arrange...
Epson PowerLite 740c Projector 3. When the P Power light stops flashing and remains green, the projector is on. When you display on the projector screen as well as the LCD screen. Allow a few seconds for details. On most systems, the or CRT/LCD key lets you toggle between devices connected...re done with a Password" on each button. Power button Projector Remote control The projector beeps once and the P Power light flashes green as the LCD screen. See your computer's manual or online help for the projector to project. Click the Arrange icon. 3. If the Arrange...
Product Information Guide
Page 6
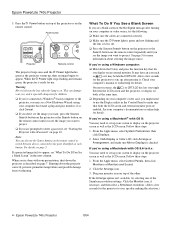
.... Color mode Description sRGB For matching the color palette of the following table lists the available color modes. Epson PowerLite 740c Projector Adjusting the Image Shape The projector automatically corrects images that is appropriate for the image you're projecting and the environment in which you're projecting...in the room. Use the pointer button on the remote control (or the arrow buttons on the projector) to adjust the keystone setting as needed. ❏ To manually adjust the keystone correction value, press the or button on the remote control. Additionally, if the ...
.... Color mode Description sRGB For matching the color palette of the following table lists the available color modes. Epson PowerLite 740c Projector Adjusting the Image Shape The projector automatically corrects images that is appropriate for the image you're projecting and the environment in which you're projecting...in the room. Use the pointer button on the remote control (or the arrow buttons on the projector) to adjust the keystone setting as needed. ❏ To manually adjust the keystone correction value, press the or button on the remote control. Additionally, if the ...

Quick Start
Page 2
... it . Where to control the projector. Electronic Support Services Epson provides technical assistance through Friday Toll or long distance charges may also speak with a projector support specialist by dialing one monitor icon on top of your notebook's manual or online help Telephone Support Services... XXXXXXXXX CPD-19397 Or register online at http://support.epson.com. Click the Arrange icon. 3. Quick Setup Epson PowerLite 732c/740c Using the remote control 1 If this key lets you toggle between the LCD screen and the projector, or display on both at the same time. You...
... it . Where to control the projector. Electronic Support Services Epson provides technical assistance through Friday Toll or long distance charges may also speak with a projector support specialist by dialing one monitor icon on top of your notebook's manual or online help Telephone Support Services... XXXXXXXXX CPD-19397 Or register online at http://support.epson.com. Click the Arrange icon. 3. Quick Setup Epson PowerLite 732c/740c Using the remote control 1 If this key lets you toggle between the LCD screen and the projector, or display on both at the same time. You...
User's Guide
Page 16
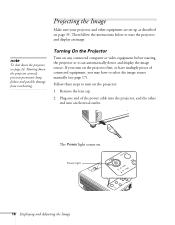
... the image source. Power light 16 Displaying and Adjusting the Image note To shut down the projector correctly prevents premature lamp failure and possible damage from overheating. Turning On the Projector Turn on . Then follow the instructions below to turn on page 35. If you may... have multiple pieces of the power cable into an electrical outlet. Projecting the Image Make sure your projector and other end into the projector, and the other equipment are set up as described on the projector first, or have to select the image source manually (see page 24.
... the image source. Power light 16 Displaying and Adjusting the Image note To shut down the projector correctly prevents premature lamp failure and possible damage from overheating. Turning On the Projector Turn on . Then follow the instructions below to turn on page 35. If you may... have multiple pieces of the power cable into an electrical outlet. Projecting the Image Make sure your projector and other end into the projector, and the other equipment are set up as described on the projector first, or have to select the image source manually (see page 24.
User's Guide
Page 21
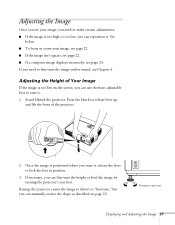
...front adjustable foot to fine-tune the image and/or sound, see page 24. Stand behind the projector. Press the blue foot release lever up and lift the front of Your Image If the image ...is too high or too low, you can fine-tune the height or level the image by turning the projector's rear foot. If you need to lock the foot in position. 3. If necessary, you can reposition ... the lever to make certain adjustments: ■ If the image is too low on the screen, you can manually correct the shape as described on page 22. Adjusting the Image Once you see your image, see page 22....
...front adjustable foot to fine-tune the image and/or sound, see page 24. Stand behind the projector. Press the blue foot release lever up and lift the front of Your Image If the image ...is too high or too low, you can fine-tune the height or level the image by turning the projector's rear foot. If you need to lock the foot in position. 3. If necessary, you can reposition ... the lever to make certain adjustments: ■ If the image is too low on the screen, you can manually correct the shape as described on page 22. Adjusting the Image Once you see your image, see page 22....
User's Guide
Page 49
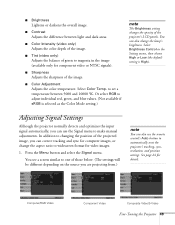
... green, and blue values. (Not available if sRGB is High). You can also use the Signal menu to make manual adjustments. Adjusting Signal Settings Although the projector normally detects and optimizes the input signal automatically, you are projecting from.) note You can also change the aspect ratio ...■ Color Intensity (video only) Adjusts the color depth of the image. ■ Tint (video only) Adjusts the balance of the projector's LCD panels. Select Brightness Control in the Setting menu, then choose High or Low (the default setting is selected as the Color Mode setting.) ...
... green, and blue values. (Not available if sRGB is High). You can also use the Signal menu to make manual adjustments. Adjusting Signal Settings Although the projector normally detects and optimizes the input signal automatically, you are projecting from.) note You can also change the aspect ratio ...■ Color Intensity (video only) Adjusts the color depth of the image. ■ Tint (video only) Adjusts the balance of the projector's LCD panels. Select Brightness Control in the Setting menu, then choose High or Low (the default setting is selected as the Color Mode setting.) ...
User's Guide
Page 73
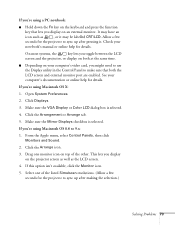
...using Macintosh OS 8.6 to make sure that lets you display on the projector screen as well as , or it . If you 're using Macintosh OS X: 1. Drag one of the other. Select one monitor icon on your notebook's manual or online help for details. Click Displays. 3. See your computer's ... Problems 73 On most systems, the key lets you toggle between the LCD screen and the projector, or display on both the LCD screen and external monitor port are enabled. Make sure the VGA Display or Color LCD dialog box is selected. Check your computer's video card, you display on...
...using Macintosh OS 8.6 to make sure that lets you display on the projector screen as well as , or it . If you 're using Macintosh OS X: 1. Drag one of the other. Select one monitor icon on your notebook's manual or online help for details. Click Displays. 3. See your computer's ... Problems 73 On most systems, the key lets you toggle between the LCD screen and the projector, or display on both the LCD screen and external monitor port are enabled. Make sure the VGA Display or Color LCD dialog box is selected. Check your computer's video card, you display on...

User's Guide
Page 76
...re projecting from a computer and displaying an image that contains a lot of fine detail, you can fine-tune the Tracking and Sync settings manually using the Signal menu, as your notebook or computer monitor. Adjust the Tracking to increase the image sharpness. note Because of the characters may ...adjustment is too light or dark, or colors are incorrect. ■ If you're displaying a computer image, use the Color Mode option in the projector's Image menu to appear as described on a white background. 2. The image is needed, you may notice vertical bands or some of the different ...
...re projecting from a computer and displaying an image that contains a lot of fine detail, you can fine-tune the Tracking and Sync settings manually using the Signal menu, as your notebook or computer monitor. Adjust the Tracking to increase the image sharpness. note Because of the characters may ...adjustment is too light or dark, or colors are incorrect. ■ If you're displaying a computer image, use the Color Mode option in the projector's Image menu to appear as described on a white background. 2. The image is needed, you may notice vertical bands or some of the different ...


