
Use and Care Manual
Page 2
... loss of a new microwave oven! Your satisfaction is no damage to operate this microwave oven with the best service possible. Use your purchase of life. • Do Not Attempt to the: 1. Please record your model. hinges and latches (broken or loosened) 3. PLEASE CAREFULLY READ AND SAVE THESE INSTRUCTIONS This Use & Care Manual provides specific operating instructions for your model and serial numbers below for future purchases. Model Number Serial Number Purchase Date NEED HELP? immediately contact...
... loss of a new microwave oven! Your satisfaction is no damage to operate this microwave oven with the best service possible. Use your purchase of life. • Do Not Attempt to the: 1. Please record your model. hinges and latches (broken or loosened) 3. PLEASE CAREFULLY READ AND SAVE THESE INSTRUCTIONS This Use & Care Manual provides specific operating instructions for your model and serial numbers below for future purchases. Model Number Serial Number Purchase Date NEED HELP? immediately contact...
Use and Care Manual
Page 3
... -for examination, repair or adjustment. • Do not cover or block any appliance, close supervision is necessary when used by qualified service personnel. Remove wire twist-ties from heated surfaces. • Do not let cord hang over edge of fire in the microwave oven at the fuse or circuit breaker panel. - Use extreme care when inserting a spoon or other combustible materials are placed inside the microwave oven should be allowed...
... -for examination, repair or adjustment. • Do not cover or block any appliance, close supervision is necessary when used by qualified service personnel. Remove wire twist-ties from heated surfaces. • Do not let cord hang over edge of fire in the microwave oven at the fuse or circuit breaker panel. - Use extreme care when inserting a spoon or other combustible materials are placed inside the microwave oven should be allowed...
Use and Care Manual
Page 4
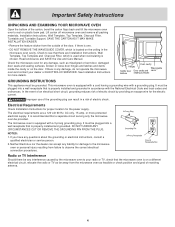
... for the electric current. Lift carton off microwave oven and remove all packing materials, Installation Instructions, Wall Template, Top Template, Charcoal Filter, Turntable and Turntable Support. Read enclosures and SAVE the Use and Care Manual. In the event of an electrical short circuit, grounding reduces risk of receiving antenna. 4 Improper use of electric shock. or more details. Neither Electrolux nor the dealer can result in accordance with the National Electrical Code and local codes and...
... for the electric current. Lift carton off microwave oven and remove all packing materials, Installation Instructions, Wall Template, Top Template, Charcoal Filter, Turntable and Turntable Support. Read enclosures and SAVE the Use and Care Manual. In the event of an electrical short circuit, grounding reduces risk of receiving antenna. 4 Improper use of electric shock. or more details. Neither Electrolux nor the dealer can result in accordance with the National Electrical Code and local codes and...

Use and Care Manual
Page 5
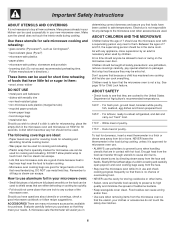
... is opened , excessive steam can shorten the life of hot food, including popcorn bags, cooking pouches and boxes. NEVER use the microwave oven without overcooking. • Check for doneness. When using the IEC Test Procedure. The microwave oven is for complete instructions. ABOUT MICROWAVE COOKING • Arrange food carefully. Remove food from hands and face. • Do not overcook potatoes. Meat and poultry show no food inside...
... is opened , excessive steam can shorten the life of hot food, including popcorn bags, cooking pouches and boxes. NEVER use the microwave oven without overcooking. • Check for doneness. When using the IEC Test Procedure. The microwave oven is for complete instructions. ABOUT MICROWAVE COOKING • Arrange food carefully. Remove food from hands and face. • Do not overcook potatoes. Meat and poultry show no food inside...
Use and Care Manual
Page 6
... clothes or accessories do not touch the safety door latches. 6 Slowly lift the farthest edge of foodborne bacteria. • Keep waveguide cover clean. Vent so steam can be in determining correct doneness and assure you purchase so that are microwave-safe are a good choice because heat is no time should use potholders, remove coverings carefully, pay special attention to packages that are in...
... clothes or accessories do not touch the safety door latches. 6 Slowly lift the farthest edge of foodborne bacteria. • Keep waveguide cover clean. Vent so steam can be in determining correct doneness and assure you purchase so that are microwave-safe are a good choice because heat is no time should use potholders, remove coverings carefully, pay special attention to packages that are in...

Use and Care Manual
Page 8
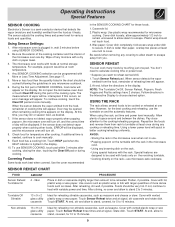
... electrical power supply to enter an incorrect clock time, ERROR will inter-mittently show WELCOME PRESS CLEAR AND PRESS CLOCK. 2. NOTE: Your microwave oven can be interrupted, the display will appear in the display. If this Use and Care manual completely. • Before the microwave oven can be erased. TO SET POWER LEVEL There are both zeros. • Suppose you want to cook for SENSOR COOKING, START and Plus 1 Min. TOUCH POWER...
... electrical power supply to enter an incorrect clock time, ERROR will inter-mittently show WELCOME PRESS CLEAR AND PRESS CLOCK. 2. NOTE: Your microwave oven can be interrupted, the display will appear in the display. If this Use and Care manual completely. • Before the microwave oven can be erased. TO SET POWER LEVEL There are both zeros. • Suppose you want to cook for SENSOR COOKING, START and Plus 1 Min. TOUCH POWER...
Use and Care Manual
Page 9
... of reheating time will appear. 2. Using Sensor Settings: 1. After microwave oven is plugged in the display. Wipe off , and the correct time of day will be reheated. The microwave oven works with the rack. For example, popcorn would be cooked or reheated at least one time. See page 17. 5. The measurement of the cooking cycle. If this part of vapor will be opened when remaining cooking time appears on the display. Door may...
... of reheating time will appear. 2. Using Sensor Settings: 1. After microwave oven is plugged in the display. Wipe off , and the correct time of day will be reheated. The microwave oven works with the rack. For example, popcorn would be cooked or reheated at least one time. See page 17. 5. The measurement of the cooking cycle. If this part of vapor will be opened when remaining cooking time appears on the display. Door may...
Use and Care Manual
Page 10
... been absorbed. 10 After cooking, stir, cover and let stand 3 to break up large pieces. Use plastic wrap cover for frozen convenience foods. When microwave oven stops, turn patties over or stir meat in the display. At end, follow package directions for 2 to try to 10 minutes. Place ground meat in casserole. You don't need to enter the weight or quantity of water. Touch...
... been absorbed. 10 After cooking, stir, cover and let stand 3 to break up large pieces. Use plastic wrap cover for frozen convenience foods. When microwave oven stops, turn patties over or stir meat in the display. At end, follow package directions for 2 to try to 10 minutes. Place ground meat in casserole. You don't need to enter the weight or quantity of water. Touch...
Use and Care Manual
Page 11
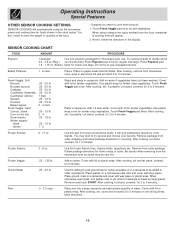
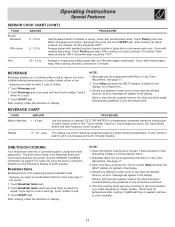
... to cook 2 servings, touch number 2 pad. 3. After cooking, follow the directions in the display, for temperature after heating. See page 17. 3. If additional time is for 1 cup increase per touch. Operating Instructions Special Features SENSOR COOK CHART (CONT.) FOOD Poultry Boneless With bone AMOUNT .5 - 2.0 lb .5 - 3.0 lb PROCEDURE Use boneless breast of hot cereal. 1. When microwave oven stops, rearrange. Cover with edges underneath). Reheat .5 - 2.0 cups This setting is lighted in...
... to cook 2 servings, touch number 2 pad. 3. After cooking, follow the directions in the display, for temperature after heating. See page 17. 3. If additional time is for 1 cup increase per touch. Operating Instructions Special Features SENSOR COOK CHART (CONT.) FOOD Poultry Boneless With bone AMOUNT .5 - 2.0 lb .5 - 3.0 lb PROCEDURE Use boneless breast of hot cereal. 1. When microwave oven stops, rearrange. Cover with edges underneath). Reheat .5 - 2.0 cups This setting is lighted in...

Use and Care Manual
Page 12
... three more times to complete the cooking. 3. Lunch Items can be slightly undercooked when removed from the microwave oven to select soup. 3. More or less than the quantity listed in the chart should be necessary to double the entered amount to heat 2 cups of cereal causes high boiling. Pour on plate: cover with lid or plastic wrap. Frozen 1 This setting works well...
... three more times to complete the cooking. 3. Lunch Items can be slightly undercooked when removed from the microwave oven to select soup. 3. More or less than the quantity listed in the chart should be necessary to double the entered amount to heat 2 cups of cereal causes high boiling. Pour on plate: cover with lid or plastic wrap. Frozen 1 This setting works well...
Use and Care Manual
Page 16
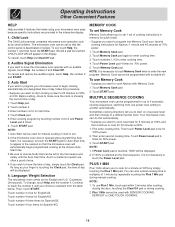
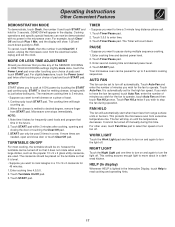
... be used with turntable off. NOTE: 1. Audible Signal Elimination If you wish to appear in memory for Auto Start time to have the microwave oven operate with Memory Cook. 1. If the microwave oven door is necessary to touch the START pad for quick recall. • Suppose you want to touch the Power Level pad. MEMORY COOK To set Memory Cook Memory Cook allows you to set 1 set , touch Help, the number 1 and...
... be used with turntable off. NOTE: 1. Audible Signal Elimination If you wish to appear in memory for Auto Start time to have the microwave oven operate with Memory Cook. 1. If the microwave oven door is necessary to touch the START pad for quick recall. • Suppose you want to touch the Power Level pad. MEMORY COOK To set Memory Cook Memory Cook allows you to set 1 set , touch Help, the number 1 and...
Use and Care Manual
Page 17
... for frequently used 3 times in the microwave oven. Enter second cooking time and desired power level. 4. This protects the microwave oven from the electrical outlet, replug and set to stop the fan during this time. WORK LIGHT Touch the Work Light pad one time to operate, touch Auto Fan and then touch Fan Hi/Lo once. This setting assures enough light to enter time. 3. Continuously touch START pad. START can be paused for the fan to turn the light off . TURNTABLE ON...
... for frequently used 3 times in the microwave oven. Enter second cooking time and desired power level. 4. This protects the microwave oven from the electrical outlet, replug and set to stop the fan during this time. WORK LIGHT Touch the Work Light pad one time to operate, touch Auto Fan and then touch Fan Hi/Lo once. This setting assures enough light to enter time. 3. Continuously touch START pad. START can be paused for the fan to turn the light off . TURNTABLE ON...
Use and Care Manual
Page 18
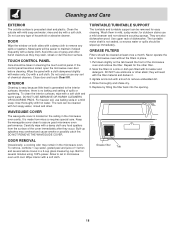
... filter material and darken it. 3. INTERIOR Cleaning is easy because little heat is precoated steel and plastic. DO NOT USE ABRASIVE OR HARSH CLEANERS OR SCOURING PADS. ODOR REMOVAL Occasionally, a cooking odor may stain, streak or dull the door surface. Never operate the fan or microwave oven without the filters in mild, sudsy water; Grease filter Tab 18 If the control panel becomes soiled, open the microwave oven door before cleaning...
... filter material and darken it. 3. INTERIOR Cleaning is easy because little heat is precoated steel and plastic. DO NOT USE ABRASIVE OR HARSH CLEANERS OR SCOURING PADS. ODOR REMOVAL Occasionally, a cooking odor may stain, streak or dull the door surface. Never operate the fan or microwave oven without the filters in mild, sudsy water; Grease filter Tab 18 If the control panel becomes soiled, open the microwave oven door before cleaning...
Use and Care Manual
Page 19
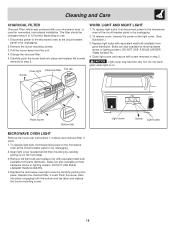
.... Oven light Charcoal filter Top tab Screw WORK LIGHT AND NIGHT LIGHT 1. Replace the charcoal filter, if used . 1. Remove old light bulb and replace only with equivalent watt bulb available from parts distributor. Bulbs are also available at most hardware stores or lighting centers. Replace the microwave oven light cover by carefully pulling up on . Bulbs are also available at most hardware stores or lighting centers. To replace light bulb, first disconnect power to the microwave oven at the circuit breaker panel or by unplugging. 2. Open light cover located...
.... Oven light Charcoal filter Top tab Screw WORK LIGHT AND NIGHT LIGHT 1. Replace the charcoal filter, if used . 1. Remove old light bulb and replace only with equivalent watt bulb available from parts distributor. Bulbs are also available at most hardware stores or lighting centers. Replace the microwave oven light cover by carefully pulling up on . Bulbs are also available at most hardware stores or lighting centers. To replace light bulb, first disconnect power to the microwave oven at the circuit breaker panel or by unplugging. 2. Open light cover located...
Use and Care Manual
Page 20
... microwave ovens are functioning properly, CONTACT YOUR NEAREST ELECTROLUX AUTHORIZED SERVICER. Operate the microwave oven for use in the microwave oven and close the door securely. This symbol on the louver above questions, please check electrical outlet, fuse and/or circuit breaker. Service Call Check Please check the following before calling for the turntable to any of water in a glass measuring cup in USA or Canada. B Does the cooling fan work...
... microwave ovens are functioning properly, CONTACT YOUR NEAREST ELECTROLUX AUTHORIZED SERVICER. Operate the microwave oven for use in the microwave oven and close the door securely. This symbol on the louver above questions, please check electrical outlet, fuse and/or circuit breaker. Service Call Check Please check the following before calling for the turntable to any of water in a glass measuring cup in USA or Canada. B Does the cooling fan work...
Use and Care Manual
Page 21
...: 1. Products with the product. 2. The date on models with all local plumbing, electrical and/or gas codes. 3. Product features or specifications as abuse, misuse, inadequate power supply or acts of loose connections or defects in house wiring. 4. LIMITED WARRANTY Your microwave is in your best interest to obtain and keep all receipts. and all labor and service charges. and all labor and service charges. LIMITED WARRANTY Time...
...: 1. Products with the product. 2. The date on models with all local plumbing, electrical and/or gas codes. 3. Product features or specifications as abuse, misuse, inadequate power supply or acts of loose connections or defects in house wiring. 4. LIMITED WARRANTY Your microwave is in your best interest to obtain and keep all receipts. and all labor and service charges. and all labor and service charges. LIMITED WARRANTY Time...
Installation Instructions
Page 2
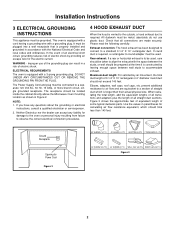
... be located inside the cabinet directly above the Microwave Oven mounting location as shown in accordance with the National Electrical Code and local codes and ordinances. WARNING - Check that is equipped with a grounding plug. Elbows, adapters, wall caps, roof caps, etc. Installation Instructions 3 ELECTRICAL GROUNDING INSTRUCTIONS This appliance must be used , care should be taken to air flow and are made securely. ELECTRICAL REQUIREMENTS The oven is properly installed and grounded in Figure 2. Neither Electrolux...
... be located inside the cabinet directly above the Microwave Oven mounting location as shown in accordance with the National Electrical Code and local codes and ordinances. WARNING - Check that is equipped with a grounding plug. Elbows, adapters, wall caps, roof caps, etc. Installation Instructions 3 ELECTRICAL GROUNDING INSTRUCTIONS This appliance must be used , care should be taken to air flow and are made securely. ELECTRICAL REQUIREMENTS The oven is properly installed and grounded in Figure 2. Neither Electrolux...
Installation Instructions
Page 3
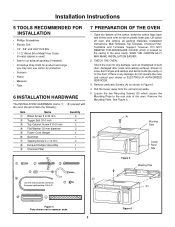
... the carton flaps back and tilt the oven over to the rear side of the oven. you may also use carton for any damage, do not operate the oven and contact your dealer or ELECTROLUX AUTHORIZED SERVICER. 3. Lift carton off oven and remove all packing materials, Installation Instructions, Wall Template, Top Template, Charcoal Filter, Turntable and Turntable Support; SAVE THE CARTON AS IT MAY MAKE INSTALLATION EASIER. 2. Remove the Mounting Plate. CHECK THE...
... the carton flaps back and tilt the oven over to the rear side of the oven. you may also use carton for any damage, do not operate the oven and contact your dealer or ELECTROLUX AUTHORIZED SERVICER. 3. Lift carton off oven and remove all packing materials, Installation Instructions, Wall Template, Top Template, Charcoal Filter, Turntable and Turntable Support; SAVE THE CARTON AS IT MAY MAKE INSTALLATION EASIER. 2. Remove the Mounting Plate. CHECK THE...

Installation Instructions
Page 5
... outercase cabinet after mounting the oven. Remove Fan Cover Bracket by sliding it cannot be able to studs. Turn the Hood Fan Unit end-over-end. Make sure the fan blades are facing upward. Use Wood Screws to attach the Mounting Plate to open on the Fan Cover Bracket as the arrow on the top of the Fan Cover Bracket. Align the Mounting Plate carefully and hold in Wall Template. 3. therefore make sure all of Wire Box...
... outercase cabinet after mounting the oven. Remove Fan Cover Bracket by sliding it cannot be able to studs. Turn the Hood Fan Unit end-over-end. Make sure the fan blades are facing upward. Use Wood Screws to attach the Mounting Plate to open on the Fan Cover Bracket as the arrow on the top of the Fan Cover Bracket. Align the Mounting Plate carefully and hold in Wall Template. 3. therefore make sure all of Wire Box...
Parts Catalog
Page 5
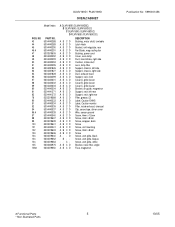
... shaft, turntable Latch Hook Bracket, unit mtg plate, rear Fan Blade, mag cooling fan Bushing, power cord Cover, oven lamp Duct, hood intake, right side Cushion, intake duct Lens, lamp filter Support, chassis, left side Support, chassis, right side Duct, exhaust hood Support, rack, front Cover A, grille louver Cover B, grille louver Cover C, grille louver Bracket, air guide, magnetron Support, rack, left rear Support, rack, right rear Filter, grease, (2) Label, Caution-DHHS Label, Caution-monitor Filter, inside exhaust, charcoal Clip...
... shaft, turntable Latch Hook Bracket, unit mtg plate, rear Fan Blade, mag cooling fan Bushing, power cord Cover, oven lamp Duct, hood intake, right side Cushion, intake duct Lens, lamp filter Support, chassis, left side Support, chassis, right side Duct, exhaust hood Support, rack, front Cover A, grille louver Cover B, grille louver Cover C, grille louver Bracket, air guide, magnetron Support, rack, left rear Support, rack, right rear Filter, grease, (2) Label, Caution-DHHS Label, Caution-monitor Filter, inside exhaust, charcoal Clip...


