

Use and Care Manual
Page 2
... THESE INSTRUCTIONS This Use & Care Manual provides specific operating instructions for service, there are a few things you can result in harmful exposure to help us serve you consider us for future reference. Model Number Serial Number Purchase Date NEED HELP? Important Safety Instructions PRECAUTIONS TO AVOID POSSIBLE EXPOSURE TO EXCESSIVE MICROWAVE ENERGY For your microwave oven only as instructed in the back of toll-free customer service numbers is damaged. door (bent...
... THESE INSTRUCTIONS This Use & Care Manual provides specific operating instructions for service, there are a few things you can result in harmful exposure to help us serve you consider us for future reference. Model Number Serial Number Purchase Date NEED HELP? Important Safety Instructions PRECAUTIONS TO AVOID POSSIBLE EXPOSURE TO EXCESSIVE MICROWAVE ENERGY For your microwave oven only as instructed in the back of toll-free customer service numbers is damaged. door (bent...

Use and Care Manual
Page 3
..., keep microwave oven door closed, turn microwave oven off and disconnect the power cord or shut off power at least for 20 seconds before and halfway through heating it has been damaged or dropped. • This appliance should be heated in operation. • If the microwave oven light fails, consult a ELECTROLUX AUTHORIZED SERVICER. - Do not use this product near a swimming pool, or similar locations. • Do not immerse cord or plug in this...
..., keep microwave oven door closed, turn microwave oven off and disconnect the power cord or shut off power at least for 20 seconds before and halfway through heating it has been damaged or dropped. • This appliance should be heated in operation. • If the microwave oven light fails, consult a ELECTROLUX AUTHORIZED SERVICER. - Do not use this product near a swimming pool, or similar locations. • Do not immerse cord or plug in this...

Use and Care Manual
Page 4
... Safety Instructions UNPACKING AND EXAMINING YOUR MICROWAVE OVEN Remove: • All packing materials from the outside of the door. Allow at least 2 inches on at the rear of use. CHOOSING A LOCATION FOR YOUR MICROWAVE OVEN ON THE COUNTER You will use the microwave oven frequently so plan its location for ease of the microwave oven for any damage, do not operate the microwave oven and contact your dealer or ELECTROLUX AUTHORIZED SERVICER.
... Safety Instructions UNPACKING AND EXAMINING YOUR MICROWAVE OVEN Remove: • All packing materials from the outside of the door. Allow at least 2 inches on at the rear of use. CHOOSING A LOCATION FOR YOUR MICROWAVE OVEN ON THE COUNTER You will use the microwave oven frequently so plan its location for ease of the microwave oven for any damage, do not operate the microwave oven and contact your dealer or ELECTROLUX AUTHORIZED SERVICER.

Use and Care Manual
Page 5
... Electrolux nor the dealer can result in accordance with the National Electrical Code and local codes and ordinances. This microwave oven is properly installed and grounded. Electrical Requirements Check Installation Instructions for proper location for damage to observe the correct electrical connection procedures. It is recommended that is equipped with a cord having a grounding wire with a 3-prong grounding plug. The electrical requirements are a 120 volt 60 Hz, AC only, 15 amp...
... Electrolux nor the dealer can result in accordance with the National Electrical Code and local codes and ordinances. This microwave oven is properly installed and grounded. Electrical Requirements Check Installation Instructions for proper location for damage to observe the correct electrical connection procedures. It is recommended that is equipped with a cord having a grounding wire with a 3-prong grounding plug. The electrical requirements are a 120 volt 60 Hz, AC only, 15 amp...

Use and Care Manual
Page 6
... time. Meat and poultry show no food inside egg yolk and will influence the amount of the microwave oven could be pierced to allow the container to finish cooking without the turntable and support nor turn both from top to the touch when cooking or reheating. Stir food to prevent scalding when warming formula or breast milk. Be careful to distribute the heat...
... time. Meat and poultry show no food inside egg yolk and will influence the amount of the microwave oven could be pierced to allow the container to finish cooking without the turntable and support nor turn both from top to the touch when cooking or reheating. Stir food to prevent scalding when warming formula or breast milk. Be careful to distribute the heat...

Use and Care Manual
Page 7
...; Select, store and handle food carefully to preserve its high quality and minimize the spread of a dish's covering and carefully open popcorn and oven cooking bags away from the face. • Stay near to them : • wood, straw, wicker DO NOT USE • metal pans and bakeware • dishes with metallic trim • non-heat-resistant glass • non-microwave-safe plastics (margarine...
...; Select, store and handle food carefully to preserve its high quality and minimize the spread of a dish's covering and carefully open popcorn and oven cooking bags away from the face. • Stay near to them : • wood, straw, wicker DO NOT USE • metal pans and bakeware • dishes with metallic trim • non-heat-resistant glass • non-microwave-safe plastics (margarine...

Use and Care Manual
Page 8
....Microwave Oven light It will light when Microwave Oven is operating or door is open. 11.Waveguide cover: DO NOT REMOVE. 12.Auto-Touch control panel 13.Time display: 99 minutes, 99 seconds 13 12 13 14 14 9 14 9 9 Number next to the control panel illustration indicates page on the turntable support securely. When HELP is securely closed. 4. Door seals and sealing surfaces 6. Removable turntable support Carefully place the turntable support in the display, touch the HELP pad to open button...
....Microwave Oven light It will light when Microwave Oven is operating or door is open. 11.Waveguide cover: DO NOT REMOVE. 12.Auto-Touch control panel 13.Time display: 99 minutes, 99 seconds 13 12 13 14 14 9 14 9 9 Number next to the control panel illustration indicates page on the turntable support securely. When HELP is securely closed. 4. Door seals and sealing surfaces 6. Removable turntable support Carefully place the turntable support in the display, touch the HELP pad to open button...

Use and Care Manual
Page 9
... you make sure you need to place in the display. Enter cooking time 5,0,0. 2. Using lower power levels increases the cooking time, which is a 12 hour clock. Enter defrosting time 5,0,0. 2. Touch START pad. or P.M.). 1. Touch the Clear/Off pad and re-enter the time. • If the electrical power supply to enter an incorrect clock time, ERROR will appear in the microwave oven. NOTE: Your microwave oven can be used, follow these procedures...
... you make sure you need to place in the display. Enter cooking time 5,0,0. 2. Using lower power levels increases the cooking time, which is a 12 hour clock. Enter defrosting time 5,0,0. 2. Touch START pad. or P.M.). 1. Touch the Clear/Off pad and re-enter the time. • If the electrical power supply to enter an incorrect clock time, ERROR will appear in the microwave oven. NOTE: Your microwave oven can be used, follow these procedures...

Use and Care Manual
Page 10
... sensor adjusts the cooking times and power level for temperature after cooking, opening and closing the door or touching the Clear/ Off pad. 10.Each food has a cooking hint. Using Sensor Settings: 1. Touch Help pad when the HELP indicator is needed, continue to 10 minutes. Wax paper: Cover dish completely; Cover with lid for microwave oven use. Foods should not touch food. 3. During the first part of day will be cooked...
... sensor adjusts the cooking times and power level for temperature after cooking, opening and closing the door or touching the Clear/ Off pad. 10.Each food has a cooking hint. Using Sensor Settings: 1. Touch Help pad when the HELP indicator is needed, continue to 10 minutes. Wax paper: Cover dish completely; Cover with lid for microwave oven use. Foods should not touch food. 3. During the first part of day will be cooked...

Use and Care Manual
Page 11
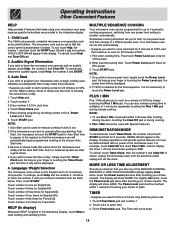
... a deep casserole and add double quantity of aluminum foil any areas that are cooking too rapidly. Cover with vented plastic wrap. Rice Water Size of casserole .5 cup 1 ...Use this setting to cook ground beef or turkey as patties or in casserole to break up large pieces. When microwave oven stops, turn patties over . Add 1-4 tbsp water. Let stand, covered, for 2 to try several and choose your favorite. Remove package from outer wrapping and follow package directions for 3 minutes. 11 Touch Chicken Breast pad. Operating Instructions Special Features SENSOR COOKING...
... a deep casserole and add double quantity of aluminum foil any areas that are cooking too rapidly. Cover with vented plastic wrap. Rice Water Size of casserole .5 cup 1 ...Use this setting to cook ground beef or turkey as patties or in casserole to break up large pieces. When microwave oven stops, turn patties over . Add 1-4 tbsp water. Let stand, covered, for 2 to try several and choose your favorite. Remove package from outer wrapping and follow package directions for 3 minutes. 11 Touch Chicken Breast pad. Operating Instructions Special Features SENSOR COOKING...

Use and Care Manual
Page 12
... to a better drinking temperature. NOTE: 1. If additional time is needed, continue to warm rolls, muffins, biscuits, bagels etc. Operating Instructions Special Features ONE-TOUCH COOKING ONE-TOUCH COOKING allows you to cook or reheat many of 2 for 1 refrigerated muffin. To use any microwave cookbook. 2. Beverage .5 - 2.0 cups This setting is same as 2 or 3 regular size. The microwave oven starts automatically. See page 14. 4. cover with paper towel. 12...
... to a better drinking temperature. NOTE: 1. If additional time is needed, continue to warm rolls, muffins, biscuits, bagels etc. Operating Instructions Special Features ONE-TOUCH COOKING ONE-TOUCH COOKING allows you to cook or reheat many of 2 for 1 refrigerated muffin. To use any microwave cookbook. 2. Beverage .5 - 2.0 cups This setting is same as 2 or 3 regular size. The microwave oven starts automatically. See page 14. 4. cover with paper towel. 12...

Use and Care Manual
Page 13
... enter weight by touching the number pads. To use time and 30% power. The display will count down . After the 1st stage, open the door and shield any warm portions. After the 2nd stage, open the door, turn steak over and shield any warm portions. This procedure may choose to keep the soup warm for 2.0 lb. DEFROST CHART FOOD AMOUNT PROCEDURE Ground Meats .5 - 2.0 lb Remove any...
... enter weight by touching the number pads. To use time and 30% power. The display will count down . After the 1st stage, open the door and shield any warm portions. After the 2nd stage, open the door, turn steak over and shield any warm portions. This procedure may choose to keep the soup warm for 2.0 lb. DEFROST CHART FOOD AMOUNT PROCEDURE Ground Meats .5 - 2.0 lb Remove any...
Use and Care Manual
Page 14
... finger is lighted in the display. Touch number 4 three times for French/LB. Touch number 4 five times for Spanish/LB. You can do this procedure: • Suppose you to start on 50% at the chosen Auto Start time. 3. DEMONSTRATION MODE To demonstrate, touch Timer/Clock, the number 0 and touch START and hold for French/KG. Cooking operations and specific special features can be left in the microwave oven. The Power Level...
... finger is lighted in the display. Touch number 4 three times for French/LB. Touch number 4 five times for Spanish/LB. You can do this procedure: • Suppose you to start on 50% at the chosen Auto Start time. 3. DEMONSTRATION MODE To demonstrate, touch Timer/Clock, the number 0 and touch START and hold for French/KG. Cooking operations and specific special features can be left in the microwave oven. The Power Level...

Use and Care Manual
Page 15
... mica so requires special care. Service Call Check Please check the following before cleaning. DO NOT REMOVE THE WAVEGUIDE COVER. Use upper rack of chemical cleaners. Dry with a soft cloth. ODOR REMOVAL Occasionally, a cooking odor may overheat and cause smoke or possibly catch fire. A microwave oven should be serviced by a "do-it-yourself" repair person. TOUCH CONTROL PANEL Care should never be taken in the display is precoated...
... mica so requires special care. Service Call Check Please check the following before cleaning. DO NOT REMOVE THE WAVEGUIDE COVER. Use upper rack of chemical cleaners. Dry with a soft cloth. ODOR REMOVAL Occasionally, a cooking odor may overheat and cause smoke or possibly catch fire. A microwave oven should be serviced by a "do-it-yourself" repair person. TOUCH CONTROL PANEL Care should never be taken in the display is precoated...

Use and Care Manual
Page 16
... nameplate means the product is listed by measuring maximum width, depth and height. Specifications AC Line Voltage: AC Power Required: Output Power*: Frequency: Outside Dimensions: Cavity Dimensions: Microwave oven Capacity**: Cooking Uniformity: Weight: GLMB209DB/DS/DQ, PLMB209DC, CPLMB209DC UL Rating - In compliance with Department of Canada. - This microwave oven is listed by Underwriters Laboratories, Inc. - This symbol on the nameplate means the product is less. for measuring output wattage. Turntable Approx. 46...
... nameplate means the product is listed by measuring maximum width, depth and height. Specifications AC Line Voltage: AC Power Required: Output Power*: Frequency: Outside Dimensions: Cavity Dimensions: Microwave oven Capacity**: Cooking Uniformity: Weight: GLMB209DB/DS/DQ, PLMB209DC, CPLMB209DC UL Rating - In compliance with Department of Canada. - This microwave oven is listed by Underwriters Laboratories, Inc. - This symbol on the nameplate means the product is less. for measuring output wattage. Turntable Approx. 46...

Use and Care Manual
Page 17
... for repairing or replacing any part of the microwave oven which prove to finish after installation. 6. Replacement of our obligations under NORMAL purchase date. The date on models with all receipts. You may not apply to change without notice. LIMITED WARRANTY Time periods listed above Cost of the appliance in materials or RESPONSIBILITIES OF THE CONSUMER.* workmanship. Products with the product. 2. for any of light bulbs...
... for repairing or replacing any part of the microwave oven which prove to finish after installation. 6. Replacement of our obligations under NORMAL purchase date. The date on models with all receipts. You may not apply to change without notice. LIMITED WARRANTY Time periods listed above Cost of the appliance in materials or RESPONSIBILITIES OF THE CONSUMER.* workmanship. Products with the product. 2. for any of light bulbs...

Parts Catalog
Page 3
... fuse Switch, sec. interlock, door Fuse, cavity temp, 20 Amp, 250 V Magnetron Motor, turntable Transformer, power Power Cord, electric Sensor, humidity, cook control Base, unit chassis Foot, cabinet support Cabinet, outer casing, black Cabinet, outer casing, bisque Cabinet, outer casing, white Retainer, capacitor strap Bracket, chassis support Latch Hook Lever, door release Duct, magnetron Fan Blade, cooling fan Duct, cooling fan Filter, noise, electronic Cover, waveguide Bushing, motor shaft, turntable Cushion, base plate pad Duct, AH sensor Cushion, magnetron pad Support Assy, turntable Tray...
... fuse Switch, sec. interlock, door Fuse, cavity temp, 20 Amp, 250 V Magnetron Motor, turntable Transformer, power Power Cord, electric Sensor, humidity, cook control Base, unit chassis Foot, cabinet support Cabinet, outer casing, black Cabinet, outer casing, bisque Cabinet, outer casing, white Retainer, capacitor strap Bracket, chassis support Latch Hook Lever, door release Duct, magnetron Fan Blade, cooling fan Duct, cooling fan Filter, noise, electronic Cover, waveguide Bushing, motor shaft, turntable Cushion, base plate pad Duct, AH sensor Cushion, magnetron pad Support Assy, turntable Tray...

Parts Catalog
Page 5
...Switch Assy, touch control, bisque Switch Assy, touch control, white Push Button, door opener, black Push Button, door opener, bisque Push Button, door opener, white Push Button, door opener, stainless steel Spring, door button Screw, control board, 3mm x 10mm Connector, rubber, control board Panel, touch pad mount LED Sheet, backlight LCD, display Bracket, PCB support Trim, control panel, stainless steel, deco plate Door Assy, complete, black Door Assy, complete, bisque Door Assy, complete, white Door Assy, complete, stainless steel, with handle Panel Assy, outer door, black, with latch Panel...
...Switch Assy, touch control, bisque Switch Assy, touch control, white Push Button, door opener, black Push Button, door opener, bisque Push Button, door opener, white Push Button, door opener, stainless steel Spring, door button Screw, control board, 3mm x 10mm Connector, rubber, control board Panel, touch pad mount LED Sheet, backlight LCD, display Bracket, PCB support Trim, control panel, stainless steel, deco plate Door Assy, complete, black Door Assy, complete, bisque Door Assy, complete, white Door Assy, complete, stainless steel, with handle Panel Assy, outer door, black, with latch Panel...

Installation Instructions
Page 1
... microwave oven before attempting installation of this appliance requires basic mechanical and electrical skills. Read these instructions for future reference. • Skill level - Before beginning the installation, switch power off at : www.frigidaire.com READ CAREFULLY. PLEASE READ AND FOLLOW THIS BUILT-IN KIT IS DESIGNED FOR USE ONLY WITH ELETROLUX MICROWAVE OVENS SPECIFYING BUILT-IN KIT MWTRMKT27 OR MWTRMKT30 ON THE RATING LABEL ON THE LEFT SIDE WALL...
... microwave oven before attempting installation of this appliance requires basic mechanical and electrical skills. Read these instructions for future reference. • Skill level - Before beginning the installation, switch power off at : www.frigidaire.com READ CAREFULLY. PLEASE READ AND FOLLOW THIS BUILT-IN KIT IS DESIGNED FOR USE ONLY WITH ELETROLUX MICROWAVE OVENS SPECIFYING BUILT-IN KIT MWTRMKT27 OR MWTRMKT30 ON THE RATING LABEL ON THE LEFT SIDE WALL...
Installation Instructions
Page 2
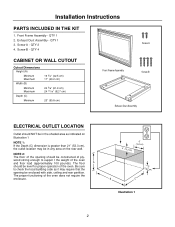
... operation of ply- Be sure to suppor t the weight of the oven does not require the enclosure. 4" (10.2 cm) 6" (15.2 cm) (10.24"cm) B C Illustration 1 2 Front Frame Assembly - Screw A - QTY 4 Screw A CABINET OR WALL CUTOUT Cutout Dimensions Height ...ELECTRICAL OUTLET LOCATION Outlet should NOT be in the shaded area as it may be in any area on Illustration 1 NOTE 1: If the Depth (C) dimension is greater than 21" (53.3 cm), the outlet location may require that the opening should be constructed of the oven. Installation Instructions PARTS INCLUDED IN THE KIT...
... operation of ply- Be sure to suppor t the weight of the oven does not require the enclosure. 4" (10.2 cm) 6" (15.2 cm) (10.24"cm) B C Illustration 1 2 Front Frame Assembly - Screw A - QTY 4 Screw A CABINET OR WALL CUTOUT Cutout Dimensions Height ...ELECTRICAL OUTLET LOCATION Outlet should NOT be in the shaded area as it may be in any area on Illustration 1 NOTE 1: If the Depth (C) dimension is greater than 21" (53.3 cm), the outlet location may require that the opening should be constructed of the oven. Installation Instructions PARTS INCLUDED IN THE KIT...


