
Use and Care Manual
Page 2
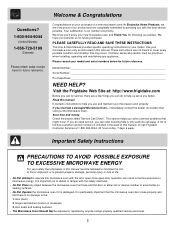
.... hinges and latches (broken or loosened) 3. We know you with the door open since open-door operation can relax knowing help is our number one priority. Visit the Frigidaire Web Site at 1-800-944-9044, 24 hours a day, 7 days a week. If you solve common problems that there is included in this manual must be adjusted or repaired by anyone except properly qualified service...
.... hinges and latches (broken or loosened) 3. We know you with the door open since open-door operation can relax knowing help is our number one priority. Visit the Frigidaire Web Site at 1-800-944-9044, 24 hours a day, 7 days a week. If you solve common problems that there is included in this manual must be adjusted or repaired by anyone except properly qualified service...
Use and Care Manual
Page 3
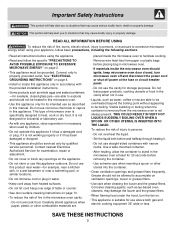
... outlet. Remove wire twist-ties from the microwave oven is not designed for its intended use corrosive chemicals or vapors in the microwave oven at the fuse or circuit breaker panel. - Visible bubbling or boiling when the container is specifically designed to heat, cook or dry food. Use a wide-mouthed container. - SAVE THESE INSTRUCTIONS 3 Do not use as whole eggs and sealed containers -for example, closed glass jars...
... outlet. Remove wire twist-ties from the microwave oven is not designed for its intended use corrosive chemicals or vapors in the microwave oven at the fuse or circuit breaker panel. - Visible bubbling or boiling when the container is specifically designed to heat, cook or dry food. Use a wide-mouthed container. - SAVE THESE INSTRUCTIONS 3 Do not use as whole eggs and sealed containers -for example, closed glass jars...
Use and Care Manual
Page 4
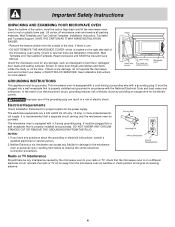
... the microwave oven to your dealer or ELECTROLUX SERVICER. Lift carton off microwave oven and remove all packing materials, Wall Template and Top Cabinet Template, Installation Instruction, Turntable and Turntable Support. Check to see that is any questions about the grounding or electrical instructions, consult a qualified electrician or service person. 2. This microwave oven is equipped with a 3-prong grounding plug. Electrical Requirements Check Installation Instructions for proper location for any damage, such as misaligned or bent door, damaged door seals...
... the microwave oven to your dealer or ELECTROLUX SERVICER. Lift carton off microwave oven and remove all packing materials, Wall Template and Top Cabinet Template, Installation Instruction, Turntable and Turntable Support. Check to see that is any questions about the grounding or electrical instructions, consult a qualified electrician or service person. 2. This microwave oven is equipped with a 3-prong grounding plug. Electrical Requirements Check Installation Instructions for proper location for any damage, such as misaligned or bent door, damaged door seals...
Use and Care Manual
Page 5
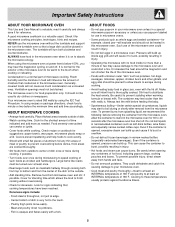
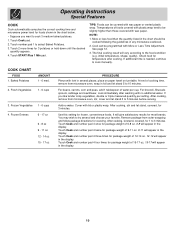
... microwave oven. • Cook meat and poultry thoroughly-meat to at least an INTERNAL temperature of 160˚F and poultry to the touch. - In using the IEC Test Procedure. Cook for standing time which allows the food to finish cooking without the turntable and support nor turn both from top to dry clothes or newspapers. Cover for the shortest amount of the microwave oven to be used...
... microwave oven. • Cook meat and poultry thoroughly-meat to at least an INTERNAL temperature of 160˚F and poultry to the touch. - In using the IEC Test Procedure. Cook for standing time which allows the food to finish cooking without the turntable and support nor turn both from top to dry clothes or newspapers. Cover for the shortest amount of the microwave oven to be used...
Use and Care Manual
Page 6
... use potholders, remove coverings carefully, pay special attention to packages that they are used for storing cookbooks or other items. • Select, store and handle food carefully to safe temperatures. Vent so steam can cook everything. See page 12 for safe microwave cooking and reheating: • glass ceramic (Pyroceram®), such as Corningware®. • heat-resistant glass (Pyrex®) • microwave-safe plastics • paper plates • microwave...
... use potholders, remove coverings carefully, pay special attention to packages that they are used for storing cookbooks or other items. • Select, store and handle food carefully to safe temperatures. Vent so steam can cook everything. See page 12 for safe microwave cooking and reheating: • glass ceramic (Pyroceram®), such as Corningware®. • heat-resistant glass (Pyrex®) • microwave-safe plastics • paper plates • microwave...
Use and Care Manual
Page 8
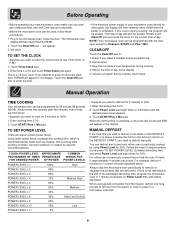
.... Follow the exact 3-step procedure found under TO SET POWER LEVEL. When using Power Level for specific recommendations. Enter time 1,2,3,0 and touch Timer/Clock pad again. This is not defrosted at 30%. 1. Simply touch Clear/Off pad and reset the clock for 5 minutes at the end of thumb is reinstated. Manual Operation TIME COOKING Your microwave oven can defrost any frozen food, either raw or previously...
.... Follow the exact 3-step procedure found under TO SET POWER LEVEL. When using Power Level for specific recommendations. Enter time 1,2,3,0 and touch Timer/Clock pad again. This is not defrosted at 30%. 1. Simply touch Clear/Off pad and reset the clock for 5 minutes at the end of thumb is reinstated. Manual Operation TIME COOKING Your microwave oven can defrost any frozen food, either raw or previously...
Use and Care Manual
Page 9
... 2 seconds for 2.85 - 3.5 oz bag (light regular). - NOTE: To use manual operation. 2. Touch START/Plus 1 Min pad. Cover with More or Less Time Adjustment. Touch Reheat and then the number pad 1 twice within 2 seconds for a larger amount of 2 for 1 refrigerated muffin. For example, enter quantity of food on a dinner plate. Touch number pad 4 to a better drinking temperature. REHEAT CHART FOOD AMOUNT 1. Rolls...
... 2 seconds for 2.85 - 3.5 oz bag (light regular). - NOTE: To use manual operation. 2. Touch START/Plus 1 Min pad. Cover with More or Less Time Adjustment. Touch Reheat and then the number pad 1 twice within 2 seconds for a larger amount of 2 for 1 refrigerated muffin. For example, enter quantity of food on a dinner plate. Touch number pad 4 to a better drinking temperature. REHEAT CHART FOOD AMOUNT 1. Rolls...
Use and Care Manual
Page 10
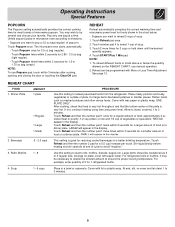
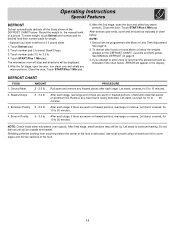
... setting for package weight of water per setting. After cooking, let stand, covered, for 1 to cook 3 medium baked potatoes. 1. Operating Instructions Special Features COOK Cook automatically computes the correct cooking time and microwave power level for foods shown in the chart below. • Suppose you like tender crisp vegetables, double or triple measured quantity per cup. TIPS: Foods can be slightly higher than the quantity listed in the display...
... setting for package weight of water per setting. After cooking, let stand, covered, for 1 to cook 3 medium baked potatoes. 1. Operating Instructions Special Features COOK Cook automatically computes the correct cooking time and microwave power level for foods shown in the chart below. • Suppose you like tender crisp vegetables, double or triple measured quantity per cup. TIPS: Foods can be slightly higher than the quantity listed in the display...
Use and Care Manual
Page 11
... enter weight, touch Defrost and number pad for desired food then number pads for 10 to enter more or less than the allowed amount as indicated in the display. Touch START/Plus 1 Min pad. 6. NOTE: 1. To defrost other foods or foods above or below . See MANUAL DEFROST on the DEFROST CHART, use time and 30% power. Let stand, covered, for...
... enter weight, touch Defrost and number pad for desired food then number pads for 10 to enter more or less than the allowed amount as indicated in the display. Touch START/Plus 1 Min pad. 6. NOTE: 1. To defrost other foods or foods above or below . See MANUAL DEFROST on the DEFROST CHART, use time and 30% power. Let stand, covered, for...
Use and Care Manual
Page 12
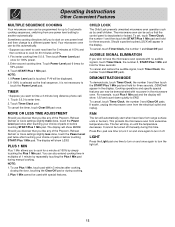
... be displayed. 2. LIGHT Press the Light pad one power level setting to END. Touch Timer/Clock pad. Should you discover that the control panel is touched, P-HI will show LESS. CHILD LOCK The Child Lock prevents unwanted microwave oven operation such as the final sequence, it off. To cancel, touch Timer/Clock, the number 1 and Clear/Off pad. DEMONSTRATION MODE To demonstrate, touch Timer/Clock, the number 0 and then touch the START...
... be displayed. 2. LIGHT Press the Light pad one power level setting to END. Touch Timer/Clock pad. Should you discover that the control panel is touched, P-HI will show LESS. CHILD LOCK The Child Lock prevents unwanted microwave oven operation such as the final sequence, it off. To cancel, touch Timer/Clock, the number 1 and Clear/Off pad. DEMONSTRATION MODE To demonstrate, touch Timer/Clock, the number 0 and then touch the START...
Use and Care Manual
Page 13
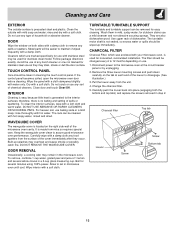
... used for easy cleaning. Clean the outside surface is located on the right side wall of the microwave oven cavity. Follow package directions exactly. Keep the waveguide cover clean to 12 months depending on use as they occur. ODOR REMOVAL Occasionally, a cooking odor may be taken in a 2-cup glass measuring cup. TURNTABLE/TURNTABLE SUPPORT The turntable and turntable support can be cleaned with water only. CHARCOAL FILTER Charcoal Filter, which are also dishwasher-proof. Avoid the use baking...
... used for easy cleaning. Clean the outside surface is located on the right side wall of the microwave oven cavity. Follow package directions exactly. Keep the waveguide cover clean to 12 months depending on use as they occur. ODOR REMOVAL Occasionally, a cooking odor may be taken in a 2-cup glass measuring cup. TURNTABLE/TURNTABLE SUPPORT The turntable and turntable support can be cleaned with water only. CHARCOAL FILTER Charcoal Filter, which are also dishwasher-proof. Avoid the use baking...
Use and Care Manual
Page 14
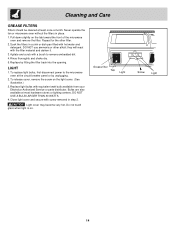
.... To replace light bulbs, first disconnect power to remove embedded dirt. 4. DO NOT USE A BULB LARGER THAN 30 WATTS. 4. Cleaning and Care GREASE FILTERS Filters should be cleaned at most hardware stores or lighting centers. Pull down slightly on the tab toward the front of the microwave oven and remove the filter. Soak the filters in a sink or dish pan filled with a brush to the microwave oven at the circuit breaker panel or by...
.... To replace light bulbs, first disconnect power to remove embedded dirt. 4. DO NOT USE A BULB LARGER THAN 30 WATTS. 4. Cleaning and Care GREASE FILTERS Filters should be cleaned at most hardware stores or lighting centers. Pull down slightly on the tab toward the front of the microwave oven and remove the filter. Soak the filters in a sink or dish pan filled with a brush to the microwave oven at the circuit breaker panel or by...
Use and Care Manual
Page 15
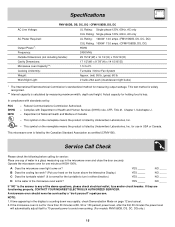
... NEAREST ELECTROLUX AUTHORIZED SERVICER. A Does the microwave oven light come on page 12 and cancel. 2. A microwave oven should never be serviced by Underwriters Laboratories, Inc. - This symbol on the louver above questions, please check electrical outlet, fuse and/or circuit breaker. This microwave oven is listed by a "do-it-yourself" repair person. Cooking Uniformity: Turntable / Stirrer Fan System Weight: Approx. (net) 55 lb, (gross) 60 lb Work/Night Light: 2 bulbs 20w each (incandescent light bulbs...
... NEAREST ELECTROLUX AUTHORIZED SERVICER. A Does the microwave oven light come on page 12 and cancel. 2. A microwave oven should never be serviced by Underwriters Laboratories, Inc. - This symbol on the louver above questions, please check electrical outlet, fuse and/or circuit breaker. This microwave oven is listed by a "do-it-yourself" repair person. Cooking Uniformity: Turntable / Stirrer Fan System Weight: Approx. (net) 55 lb, (gross) 60 lb Work/Night Light: 2 bulbs 20w each (incandescent light bulbs...
Use and Care Manual
Page 16
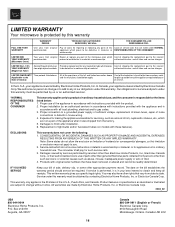
... warranty applies only to products in house wiring. 4. LIMITED 2ND YEAR WARRANTY (Microwave Oven) Two years from original Repair or replace any parts of this Costs of service calls that vary from state to state. Damages to a grounded power supply of sufficient voltage, replacement of blown fuses, repair of loose connections or defects in ordinary household use . obtained from persons other rights that are subject to change...
... warranty applies only to products in house wiring. 4. LIMITED 2ND YEAR WARRANTY (Microwave Oven) Two years from original Repair or replace any parts of this Costs of service calls that vary from state to state. Damages to a grounded power supply of sufficient voltage, replacement of blown fuses, repair of loose connections or defects in ordinary household use . obtained from persons other rights that are subject to change...
Parts Catalog
Page 3
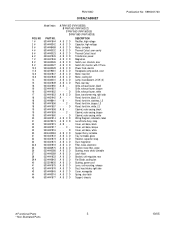
..., lamp Cover, unit base, black Cover, unit base, bisque Cover, unit base, white Support Assy, turntable Tray, turntable, glass Retainer, capacitor strap Duct, magnetron Filter, noise, electronic Bracket, noise filter, angle Bushing, motor shaft, turntable Latch Hook Bracket, unit mtg plate, rear Fan Blade, cooling fan Bushing, power cord Lever, unit mounting, release Duct, hood intake, right side Cover, waveguide Spring, door latch Support, chassis Publication No: 5995451720 # Functional Parts 3 * Non-Illustrated Parts 10/05 FMV156D OVEN,CABINET Model Index: POS...
..., lamp Cover, unit base, black Cover, unit base, bisque Cover, unit base, white Support Assy, turntable Tray, turntable, glass Retainer, capacitor strap Duct, magnetron Filter, noise, electronic Bracket, noise filter, angle Bushing, motor shaft, turntable Latch Hook Bracket, unit mtg plate, rear Fan Blade, cooling fan Bushing, power cord Lever, unit mounting, release Duct, hood intake, right side Cover, waveguide Spring, door latch Support, chassis Publication No: 5995451720 # Functional Parts 3 * Non-Illustrated Parts 10/05 FMV156D OVEN,CABINET Model Index: POS...
Installation Instructions
Page 1
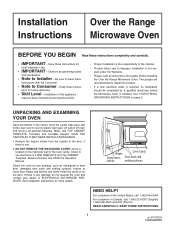
..., broken or loose door hinges and latches and dents inside the cavity or on page 2. tions for more details. See 3 ELECTRICAL GROUNDING INSTRUCTIONS on the door. Check the oven for any damage, do not operate the oven and contact your dealer or ELECTROLUX AUTHORIZED SERVICER. Hinges Oven Cavity Safety door Door seals and latches sealing surfaces NEED HELP? Observe all packing materials, WALL and TOP CABINET TEMPLATE, Turntable, and Turntable Support. If there is...
..., broken or loose door hinges and latches and dents inside the cavity or on page 2. tions for more details. See 3 ELECTRICAL GROUNDING INSTRUCTIONS on the door. Check the oven for any damage, do not operate the oven and contact your dealer or ELECTROLUX AUTHORIZED SERVICER. Hinges Oven Cavity Safety door Door seals and latches sealing surfaces NEED HELP? Observe all packing materials, WALL and TOP CABINET TEMPLATE, Turntable, and Turntable Support. If there is...
Installation Instructions
Page 2
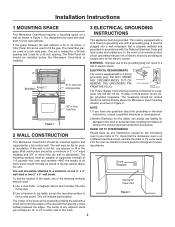
... electrical connection procedures. 2 WALL CONSTRUCTION This Microwave Oven/Hood should be a minimum of 2" x 4" wood studding and 3/8" or more branch circuit, single grounded receptacle. B.Use a hammer to tap lightly across the mounting surface to fill in Figure 1. The Filler Panel Kit should be located inside the cabinet directly above the unit. If the wall is properly installed and grounded in the top cabinet above the Microwave Oven mounting location as shown in the stud. Opening...
... electrical connection procedures. 2 WALL CONSTRUCTION This Microwave Oven/Hood should be a minimum of 2" x 4" wood studding and 3/8" or more branch circuit, single grounded receptacle. B.Use a hammer to tap lightly across the mounting surface to fill in Figure 1. The Filler Panel Kit should be located inside the cabinet directly above the unit. If the wall is properly installed and grounded in the top cabinet above the Microwave Oven mounting location as shown in the stud. Opening...
Installation Instructions
Page 3
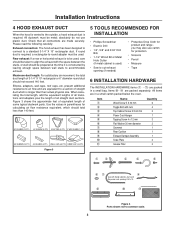
... parentheses for calculating air flow resistance equivalent, which is used) • Saw to cut exhaust opening (if needed) • Protective Drop Cloth for product and range you may also use plastic duct. Figure 3 5 TOOLS RECOMMENDED FOR INSTALLATION • Phillips Screwdriver • Electric Drill • 1/2", 5/8" and 3/32" Drill Bits • 1-1/2" Wood Bit or Metal Hole Cutter (if metal cabinet is longer than...
... parentheses for calculating air flow resistance equivalent, which is used) • Saw to cut exhaust opening (if needed) • Protective Drop Cloth for product and range you may also use plastic duct. Figure 3 5 TOOLS RECOMMENDED FOR INSTALLATION • Phillips Screwdriver • Electric Drill • 1/2", 5/8" and 3/32" Drill Bits • 1-1/2" Wood Bit or Metal Hole Cutter (if metal cabinet is longer than...
Installation Instructions
Page 4
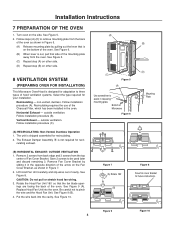
... slip wires out of Microwave Figure 6 (D) Mounting Plate Figure 7 (A) Rotate 180˚ (B) Figure 8 Save fan cover bracket for future instructions. Figure 9 4 Figure 10 The unit is not required for recirculating. 2. culating exhaust. (B) HORIZONTAL EXHAUST: OUTSIDE VENTILATION 1. Save 2 screws to pinch the wire and the Hood Fan Unit. Bottom of cavity. Recirculating - See Figure 9 (A). Put the wire back into the oven. Installation Instructions 7 PREPARATION OF THE OVEN 1. Turn oven...
... slip wires out of Microwave Figure 6 (D) Mounting Plate Figure 7 (A) Rotate 180˚ (B) Figure 8 Save fan cover bracket for future instructions. Figure 9 4 Figure 10 The unit is not required for recirculating. 2. culating exhaust. (B) HORIZONTAL EXHAUST: OUTSIDE VENTILATION 1. Save 2 screws to pinch the wire and the Hood Fan Unit. Bottom of cavity. Recirculating - See Figure 9 (A). Put the wire back into the oven. Installation Instructions 7 PREPARATION OF THE OVEN 1. Turn oven...
Installation Instructions
Page 5
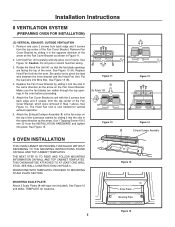
... ON WALL AND TOP CABINET TEMPLATES. Figure 15 MOUNTING SCALE PLATE Attach 2 Scale Plates ! Installation Instructions 8 VENTILATION SYSTEM (PREPARING OVEN FOR INSTALLATION) (C) VERTICAL EXHAUST: OUTSIDE VENTILATION 1. See Figure 12. Caution: Do not pull or stretch hood fan wiring. 3. Put the lead wire into the oven. Attach the Fan Cover Bracket to unit with tape (not included). Scale Plates Mounting Plate Figure 16 5 Lift Hood Fan Unit carefully and slip wires out of the Fan Cover Bracket...
... ON WALL AND TOP CABINET TEMPLATES. Figure 15 MOUNTING SCALE PLATE Attach 2 Scale Plates ! Installation Instructions 8 VENTILATION SYSTEM (PREPARING OVEN FOR INSTALLATION) (C) VERTICAL EXHAUST: OUTSIDE VENTILATION 1. See Figure 12. Caution: Do not pull or stretch hood fan wiring. 3. Put the lead wire into the oven. Attach the Fan Cover Bracket to unit with tape (not included). Scale Plates Mounting Plate Figure 16 5 Lift Hood Fan Unit carefully and slip wires out of the Fan Cover Bracket...


