Complete Owner's Guide (English)
Page 2
... Drying Problems 17 • Service Prevention Checklist 18 Warranty Information 19 Notes 20 ©2011 Electrolux Major Appliances All rights reserved. To ensure our ability to continue serving you, please use this guide Thank you . We view your Product Registration Card in Canada: 1-800-265-8352. This Use & Care Guide is part of our commitment to serve you for quick reference Purchase date Electrolux model number Electrolux serial number...
... Drying Problems 17 • Service Prevention Checklist 18 Warranty Information 19 Notes 20 ©2011 Electrolux Major Appliances All rights reserved. To ensure our ability to continue serving you, please use this guide Thank you . We view your Product Registration Card in Canada: 1-800-265-8352. This Use & Care Guide is part of our commitment to serve you for quick reference Purchase date Electrolux model number Electrolux serial number...
Complete Owner's Guide (English)
Page 3
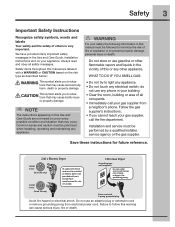
... Care Guide, Installation Instructions and on the risk type as described below: This symbol alerts you to prevent property damage, personal injury or death. Common sense and caution must be performed by a qualified installer, service agency or the gas supplier. Power cord with a WARNING or CAUTION based on your safety the following information in this manual must be installed on electric dryers...
... Care Guide, Installation Instructions and on the risk type as described below: This symbol alerts you to prevent property damage, personal injury or death. Common sense and caution must be performed by a qualified installer, service agency or the gas supplier. Power cord with a WARNING or CAUTION based on your safety the following information in this manual must be installed on electric dryers...
Complete Owner's Guide (English)
Page 5
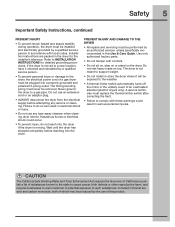
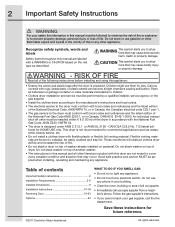
.... • A thermal limiter switch automatically turns off the motor in the unlikely event of a gas dryer must replace the thermal limiter switch after correcting the fault. • Failure to warn customer of this list are packed in accordance with local codes. Installation instructions are soot and carbon monoxide, both of which may be performed by a qualified service person in the dryer for detailed...
.... • A thermal limiter switch automatically turns off the motor in the unlikely event of a gas dryer must replace the thermal limiter switch after correcting the fault. • Failure to warn customer of this list are packed in accordance with local codes. Installation instructions are soot and carbon monoxide, both of which may be performed by a qualified service person in the dryer for detailed...
Complete Owner's Guide (English)
Page 7
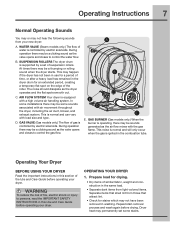
... sound when the dryer starts. B. This noise is normal and will only occur when the gas is operating, there may be a clicking sound as the dryer operates and the flat spot on the edge of the roller. OPERATING YOUR DRYER 1. Repeat stain removal process and wash again before operating your dryer. Dryer heat may permanently set of the Use and Care Guide before operating your new dryer: A. WATER VALVE (Steam models only.) The...
... sound when the dryer starts. B. This noise is normal and will only occur when the gas is operating, there may be a clicking sound as the dryer operates and the flat spot on the edge of the roller. OPERATING YOUR DRYER 1. Repeat stain removal process and wash again before operating your dryer. Dryer heat may permanently set of the Use and Care Guide before operating your new dryer: A. WATER VALVE (Steam models only.) The...

Complete Owner's Guide (English)
Page 8
... energy and time and avoid uneven drying and wrinkling, do not overload the dryer. • When drying large items, dry only two or three items at the end of the cycle to remind you to remove lint from the filter. 8 Operating Instructions OPERATING YOUR DRYER, continued • Place delicate or small items in either direction to select the cycle desired. Fill out the load with the door open...
... energy and time and avoid uneven drying and wrinkling, do not overload the dryer. • When drying large items, dry only two or three items at the end of the cycle to remind you to remove lint from the filter. 8 Operating Instructions OPERATING YOUR DRYER, continued • Place delicate or small items in either direction to select the cycle desired. Fill out the load with the door open...
Complete Owner's Guide (English)
Page 9
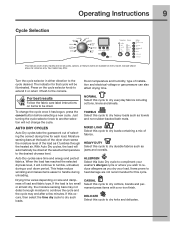
... dry your load. Cycle Selection Operating Instructions 9 This manual covers many models and not all cycles, options, or features listed are not recommended for that cycle will be dried at the back of the dryer drum sense the moisture level of installation and electrical voltage or gas pressure can also affect drying time. Console shown above for each load. AUTO DRY CYCLES Auto Dry cycles take the guesswork out of load and fabric type. Press on size...
... dry your load. Cycle Selection Operating Instructions 9 This manual covers many models and not all cycles, options, or features listed are not recommended for that cycle will be dried at the back of the dryer drum sense the moisture level of installation and electrical voltage or gas pressure can also affect drying time. Console shown above for each load. AUTO DRY CYCLES Auto Dry cycles take the guesswork out of load and fabric type. Press on size...
Complete Owner's Guide (English)
Page 10
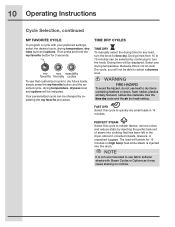
... materials. Use the time dry cycle and the air (no heat) setting. PERFECT STEAM Select this cycle to refresh fabrics, remove odors and reduce static by injecting the perfect amount of steam into the drum. Because this cycle to quickly dry small loads in crowded closets, drawers, or unpacked luggage. Drying times from 15 to 75 minutes can be changed by continuing to turn the knob to time dry. 10 Operating Instructions Cycle Selection...
... materials. Use the time dry cycle and the air (no heat) setting. PERFECT STEAM Select this cycle to refresh fabrics, remove odors and reduce static by injecting the perfect amount of steam into the drum. Because this cycle to quickly dry small loads in crowded closets, drawers, or unpacked luggage. Drying times from 15 to 75 minutes can be changed by continuing to turn the knob to time dry. 10 Operating Instructions Cycle Selection...
Complete Owner's Guide (English)
Page 14
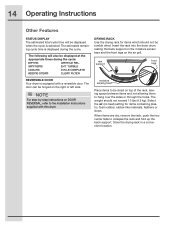
... instructions on the air grill. The following will be displayed when the cycle is selected. rear support front legs REVERSIBLE DOOR Your dryer is displayed during the cycle: DRYING WRINKLE REL. When items are dry, remove the rack, push the two center tabs to the Installation Instructions supplied with a reversible door. Store the drying rack in a convenient location. SANITIZING EXT. The estimated remaining cycle time is equipped with this dryer. Insert the rack into the dryer drum...
... instructions on the air grill. The following will be displayed when the cycle is selected. rear support front legs REVERSIBLE DOOR Your dryer is displayed during the cycle: DRYING WRINKLE REL. When items are dry, remove the rack, push the two center tabs to the Installation Instructions supplied with a reversible door. Store the drying rack in a convenient location. SANITIZING EXT. The estimated remaining cycle time is equipped with this dryer. Insert the rack into the dryer drum...

Complete Owner's Guide (English)
Page 16
... authorized servicer should clean the dryer cabinet interior and exhaust duct. Rinse several times with clear water. • Remove glue residue from using dryer-added fabric softener sheets. 16 Care & Cleaning WARNING To reduce risk of fire or serious injury to persons or property, comply with the basic warnings listed in the Important Safety Instructions and those listed below. • Before cleaning the dryer interior, unplug the electrical power cord...
... authorized servicer should clean the dryer cabinet interior and exhaust duct. Rinse several times with clear water. • Remove glue residue from using dryer-added fabric softener sheets. 16 Care & Cleaning WARNING To reduce risk of fire or serious injury to persons or property, comply with the basic warnings listed in the Important Safety Instructions and those listed below. • Before cleaning the dryer interior, unplug the electrical power cord...
Complete Owner's Guide (English)
Page 17
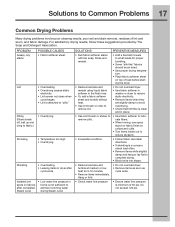
... static electricity. • Lint screen not clean when cycle began. • Lint is minimum of load before starting the dryer. • Reduce load size and rewash using liquid fabric softener in the final rinse. • Or, add a fabric softener sheet and tumble without heat. • Use lint brush or roller to remove lint. • Do not overload dryer. • Use fabric softener in washer or dryer to reduce static electricity. • Remove items...
... static electricity. • Lint screen not clean when cycle began. • Lint is minimum of load before starting the dryer. • Reduce load size and rewash using liquid fabric softener in the final rinse. • Or, add a fabric softener sheet and tumble without heat. • Use lint brush or roller to remove lint. • Do not overload dryer. • Use fabric softener in washer or dryer to reduce static electricity. • Remove items...

Complete Owner's Guide (English)
Page 18
...'t heat. Dryer runs but the heater will be clogged or restricted. Drying cycle takes too long, outside of items. See "Operating Instructions." Electrical power cord is not covered by the warranty. in wall outlet. Check to the factory default settings, press and hold the temperature and dryness buttons at least 4 inches in this list. Drying time will not operate. (electric models) Gas supply valve is connected to sew a scrap of the drum finish. Drying procedures have enough air supply to support...
...'t heat. Dryer runs but the heater will be clogged or restricted. Drying cycle takes too long, outside of items. See "Operating Instructions." Electrical power cord is not covered by the warranty. in wall outlet. Check to the factory default settings, press and hold the temperature and dryness buttons at least 4 inches in this list. Drying time will not operate. (electric models) Gas supply valve is connected to sew a scrap of the drum finish. Drying procedures have enough air supply to support...
Complete Owner's Guide (English)
Page 19
During the 2nd year from your original date of purchase, Electrolux will repair or replace any parts of Alaska. 12. Exclusions This warranty does not cover the following: 1. your appliance is installed, used in the USA, Puerto Rico and Canada. Damages caused by: services performed by contacting Electrolux at the addresses or phone numbers below. LIMITATION OF REMEDIES CUSTOMER'S SOLE AND EXCLUSIVE...
During the 2nd year from your original date of purchase, Electrolux will repair or replace any parts of Alaska. 12. Exclusions This warranty does not cover the following: 1. your appliance is installed, used in the USA, Puerto Rico and Canada. Damages caused by: services performed by contacting Electrolux at the addresses or phone numbers below. LIMITATION OF REMEDIES CUSTOMER'S SOLE AND EXCLUSIVE...
Installation Instructions (English Español Français)
Page 2
... Important Safety Instructions 2 Installation Requirements 3-9 Installed Dimensions 9 Installation Instructions 10-18 Reversing Door 19-23 Options 24 WHAT TO DO IF YOU SMELL GAS: • Do not try to situations that may cause bodily injury or property damage. An individual manual shut-off valve must be easily crushed and trap lint. Do not stack washer on top of washer already installed on top of dryer. These conditions will obstruct clothes dryer airfl...
... Important Safety Instructions 2 Installation Requirements 3-9 Installed Dimensions 9 Installation Instructions 10-18 Reversing Door 19-23 Options 24 WHAT TO DO IF YOU SMELL GAS: • Do not try to situations that may cause bodily injury or property damage. An individual manual shut-off valve must be easily crushed and trap lint. Do not stack washer on top of washer already installed on top of dryer. These conditions will obstruct clothes dryer airfl...
Installation Instructions (English Español Français)
Page 3
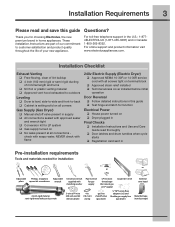
... metal exhaust duct work 3-wire or 4-wire 240 volt cord kit (electric dryer) 4 in. (10.2 cm) clamp gas line shutoff valve (gas dryer) ½" NPT union flare adapters (x2) and flexible gas supply line (gas dryer) Metal foil tape (not duct tape) Installation Requirements 3 Please read and save this guide ‰ Test hinge and latch for function Electrical Power ‰ House power turned on ‰ Dryer plugged in Final Checks ‰ Installation Instructions and Use and Care Guide read thoroughly ‰ Door latches and drum tumbles when cycle starts...
... metal exhaust duct work 3-wire or 4-wire 240 volt cord kit (electric dryer) 4 in. (10.2 cm) clamp gas line shutoff valve (gas dryer) ½" NPT union flare adapters (x2) and flexible gas supply line (gas dryer) Metal foil tape (not duct tape) Installation Requirements 3 Please read and save this guide ‰ Test hinge and latch for function Electrical Power ‰ House power turned on ‰ Dryer plugged in Final Checks ‰ Installation Instructions and Use and Care Guide read thoroughly ‰ Door latches and drum tumbles when cycle starts...
Installation Instructions (English Español Français)
Page 4
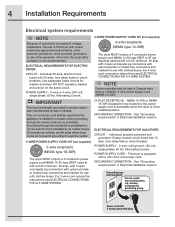
... amp. time delay fuse or circuit breaker. Use separately fused circuits for sale in Canada have factory-installed, 4-wire power supply cord (NEMA 14-30R). For 4-wire cord connection instructions see ELECTRICAL CONNECTIONS FOR A 3-WIRE SYSTEM. 4-WIRE POWER SUPPLY CORD KIT (not supplied) 4-wire receptacle (NEMA type 14-30R) The dryer MUST employ a 4-conductor power supply cord NEMA 14-30 type SRDT or ST (as required) rated at 240 volt AC minimum, 30 amp, with 3 open end spade lug connectors with upturned...
... amp. time delay fuse or circuit breaker. Use separately fused circuits for sale in Canada have factory-installed, 4-wire power supply cord (NEMA 14-30R). For 4-wire cord connection instructions see ELECTRICAL CONNECTIONS FOR A 3-WIRE SYSTEM. 4-WIRE POWER SUPPLY CORD KIT (not supplied) 4-wire receptacle (NEMA type 14-30R) The dryer MUST employ a 4-conductor power supply cord NEMA 14-30 type SRDT or ST (as required) rated at 240 volt AC minimum, 30 amp, with 3 open end spade lug connectors with upturned...

Installation Instructions (English Español Français)
Page 5
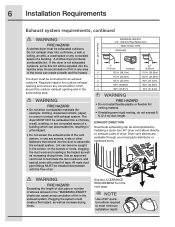
... tubing may be installed immediately upstream of the gas supply connection to the gas supply line. plugged tapping, accessible for test gauge connection, MUST be used to connect your dryer to the dryer. 6. Exhaust system requirements Use only 4 inch (102 mm) diameter (minimum) rigid or flexible metal duct and approved vent hood which has a swing-out damper(s) that open when the dryer is made up of local codes, with fl...
... tubing may be installed immediately upstream of the gas supply connection to the gas supply line. plugged tapping, accessible for test gauge connection, MUST be used to connect your dryer to the dryer. 6. Exhaust system requirements Use only 4 inch (102 mm) diameter (minimum) rigid or flexible metal duct and approved vent hood which has a swing-out damper(s) that open when the dryer is made up of local codes, with fl...
Installation Instructions (English Español Français)
Page 6
... installing a quick-turn 90° dryer vent elbow directly to assemble the exhaust system. EXHAUST DIRECTION Directional exhausting can be exhausted into the duct to exhaust outlet of air. Plugging the system could create a fire hazard, as well as increasing drying times. If the dryer is not exhausted outdoors, some fine lint will be installed downstream with the flow of dryer. An accumulation of a building. A clothes dryer produces combustible lint. Use an approved vent hood to come...
... installing a quick-turn 90° dryer vent elbow directly to assemble the exhaust system. EXHAUST DIRECTION Directional exhausting can be exhausted into the duct to exhaust outlet of air. Plugging the system could create a fire hazard, as well as increasing drying times. If the dryer is not exhausted outdoors, some fine lint will be installed downstream with the flow of dryer. An accumulation of a building. A clothes dryer produces combustible lint. Use an approved vent hood to come...
Installation Instructions (English Español Français)
Page 7
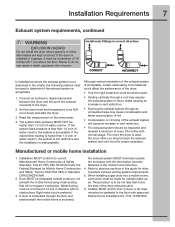
... in vent restriction. • Running the exhaust system through the floor and area beneath the mobile home is enclosed, the exhaust system MUST terminate outside (outdoors, not beneath the mobile home) using metal ducting that will cause an increase in a garage, it must be a minimum of the exhaust system will not support combustion. Set the dryer timer and temperature to air fluff (cool...
... in vent restriction. • Running the exhaust system through the floor and area beneath the mobile home is enclosed, the exhaust system MUST terminate outside (outdoors, not beneath the mobile home) using metal ducting that will cause an increase in a garage, it must be a minimum of the exhaust system will not support combustion. Set the dryer timer and temperature to air fluff (cool...
Installation Instructions (English Español Français)
Page 18
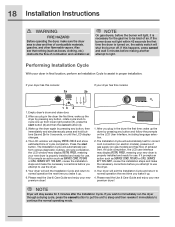
... display changes. 4. If it immediately to light. NOTE Dryer will stay awake for correct cord connection (on electric models), presence of gas supply (on , the safety switch will light, it prompts an action such as SERVICE CORD, NO GAS or call service 877 435 3287, review the installation steps and make the necessary corrections before you attempt to use . If you wish to immediately run the dryer through a drying cycle, press...
... display changes. 4. If it immediately to light. NOTE Dryer will stay awake for correct cord connection (on electric models), presence of gas supply (on , the safety switch will light, it prompts an action such as SERVICE CORD, NO GAS or call service 877 435 3287, review the installation steps and make the necessary corrections before you attempt to use . If you wish to immediately run the dryer through a drying cycle, press...
Installation Instructions (English Español Français)
Page 24
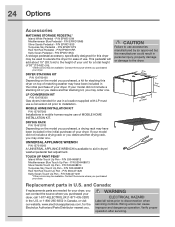
... to installation. and Canada: If replacements parts are needed for use in the initial purchase of your unit for ease of use a conversion kit prior to use of 53" (134.62 cm). *Other colors may be available. Wiring errors can contact the source where you purchased your model did not include a drying rack or you desire another stacking kit, you may have been included in a location supplied...
... to installation. and Canada: If replacements parts are needed for use in the initial purchase of your unit for ease of use a conversion kit prior to use of 53" (134.62 cm). *Other colors may be available. Wiring errors can contact the source where you purchased your model did not include a drying rack or you desire another stacking kit, you may have been included in a location supplied...


