
Complete Owner's Guide (English)
Page 2
...-free telephone support in the mail. We view your purchase as the beginning of our commitment to Common Problems 30-31 • Common Drying Problems 30 • Service Prevention Checklist 31 Warranty Information 32 ©2010 Electrolux Major Appliances All rights reserved. Keep a record for choosing Electrolux, the new premium brand in home appliances. This Use & Care Guide is part of a relationship. You can register online...
...-free telephone support in the mail. We view your purchase as the beginning of our commitment to Common Problems 30-31 • Common Drying Problems 30 • Service Prevention Checklist 31 Warranty Information 32 ©2010 Electrolux Major Appliances All rights reserved. Keep a record for choosing Electrolux, the new premium brand in home appliances. This Use & Care Guide is part of a relationship. You can register online...

Complete Owner's Guide (English)
Page 3
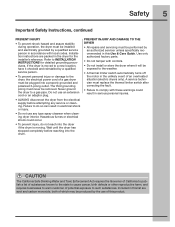
... when installing, operating and maintaining any appliance. Installation and service must be performed by a qualified installer, service agency or the gas supplier. Power cord with a WARNING or CAUTION based on your gas supplier, call your gas supplier from electrical power cord. Do not store or use gasoline or other appliance. Save these instructions for future reference. 240 v Electric Dryer 120 v Gas Dryer 10-30R 3-wire (fused 30 amp) 14-30R 4-wire (fused...
... when installing, operating and maintaining any appliance. Installation and service must be performed by a qualified installer, service agency or the gas supplier. Power cord with a WARNING or CAUTION based on your gas supplier, call your gas supplier from electrical power cord. Do not store or use gasoline or other appliance. Save these instructions for future reference. 240 v Electric Dryer 120 v Gas Dryer 10-30R 3-wire (fused 30 amp) 14-30R 4-wire (fused...
Complete Owner's Guide (English)
Page 5
... by the use of potential exposure to the dryer, the electrical power cord of an overheated situation (electric dryers only). Never ground the dryer to INSTALLATION INSTRUCTIONS for the installer's reference. Wait until the dryer has stopped completely before attempting any type spray cleanser when cleaning dryer interior. Use only authorized factory parts. • Do not tamper with local codes. The third grounding prong must replace the thermal limiter switch after correcting...
... by the use of potential exposure to the dryer, the electrical power cord of an overheated situation (electric dryers only). Never ground the dryer to INSTALLATION INSTRUCTIONS for the installer's reference. Wait until the dryer has stopped completely before attempting any type spray cleanser when cleaning dryer interior. Use only authorized factory parts. • Do not tamper with local codes. The third grounding prong must replace the thermal limiter switch after correcting...

Complete Owner's Guide (English)
Page 7
... the gas is controlled by a set of time, or after a heavy load has remained in use for a period of suspension rollers. Getting Started Operating Instructions 7 To operate your new dryer: A. Check and clean the lint filter. (See page 8.) 2. Load the dryer. (See page 8.) 3. WATER VALVE The flow of gas is ignited in the opposite direction. SUSPENSION ROLLERS The dryer drum is equipped with air movement throughout the dryer, including the air duct, blower, and exhaust...
... the gas is controlled by a set of time, or after a heavy load has remained in use for a period of suspension rollers. Getting Started Operating Instructions 7 To operate your new dryer: A. Check and clean the lint filter. (See page 8.) 2. Load the dryer. (See page 8.) 3. WATER VALVE The flow of gas is ignited in the opposite direction. SUSPENSION ROLLERS The dryer drum is equipped with air movement throughout the dryer, including the air duct, blower, and exhaust...

Complete Owner's Guide (English)
Page 11
The icon for each load. This helps reduce wrinkling and makes items easier to the cycle desired. Operating Instructions 11 Cycle Selection Turn the cycle selector in either direction to handle during a cool down period. To change the cycle. If this occurs, then select the time dry cycle to continue the cycle and the cycle may end after a few minutes. AUTO DRY CYCLES TEMPERATURE DRYNESS LEVEL EXTENDED TUMBLE OPTIONS SCROLL & SELECT...
The icon for each load. This helps reduce wrinkling and makes items easier to the cycle desired. Operating Instructions 11 Cycle Selection Turn the cycle selector in either direction to handle during a cool down period. To change the cycle. If this occurs, then select the time dry cycle to continue the cycle and the cycle may end after a few minutes. AUTO DRY CYCLES TEMPERATURE DRYNESS LEVEL EXTENDED TUMBLE OPTIONS SCROLL & SELECT...
Complete Owner's Guide (English)
Page 13
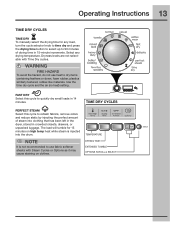
... luggage. TIME DRY CYCLES PERFECT STEAM Select this cycle to refresh fabrics, remove odors and reduce static by injecting the perfect amount of drying time in 15-minute increments. NOTE It is injected into clothing that has been left in the dryer, stored in 14 minutes. TEMPERATURE DRYING TIME EXTENDED TUMBLE OPTIONS SCROLL & SELECT Use the time dry cycle and the air (no heat) setting. Operating Instructions 13 TIME DRY CYCLES TIME DRY To manually select the drying time for...
... luggage. TIME DRY CYCLES PERFECT STEAM Select this cycle to refresh fabrics, remove odors and reduce static by injecting the perfect amount of drying time in 15-minute increments. NOTE It is injected into clothing that has been left in the dryer, stored in 14 minutes. TEMPERATURE DRYING TIME EXTENDED TUMBLE OPTIONS SCROLL & SELECT Use the time dry cycle and the air (no heat) setting. Operating Instructions 13 TIME DRY CYCLES TIME DRY To manually select the drying time for...
Complete Owner's Guide (English)
Page 26
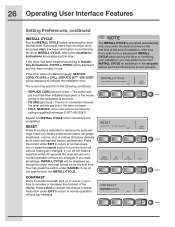
If you reset all settings, INSTALL CYCLE will return to restore only cycle settings, reset only factory preferences (users, language, brightness, volume, etc.) or restore all items from the following the screen prompts. After that, if you may perform your installation, you wish to turn the dryer off without making any changes. 26 Operating User Interface Features Setting Preferences, continued INSTALL CYCLE Run the INSTALL CYCLE before operating the dryer the first time. Remove all...
If you reset all settings, INSTALL CYCLE will return to restore only cycle settings, reset only factory preferences (users, language, brightness, volume, etc.) or restore all items from the following the screen prompts. After that, if you may perform your installation, you wish to turn the dryer off without making any changes. 26 Operating User Interface Features Setting Preferences, continued INSTALL CYCLE Run the INSTALL CYCLE before operating the dryer the first time. Remove all...

Complete Owner's Guide (English)
Page 28
... the right or left open more than 3 minutes. EXT. DRUM LIGHT The drum light will stay on DOOR REVERSAL, refer to the Installation Instructions supplied with a reversible door. Fold down the metal support on whenever the door is equipped with this dryer. When items are dry, remove the rack, push the two center tabs to hang over the sides or through the holes. COOLING... WRINKLE RELEASE IS ON COMPLETE - To turn...
... the right or left open more than 3 minutes. EXT. DRUM LIGHT The drum light will stay on DOOR REVERSAL, refer to the Installation Instructions supplied with a reversible door. Fold down the metal support on whenever the door is equipped with this dryer. When items are dry, remove the rack, push the two center tabs to hang over the sides or through the holes. COOLING... WRINKLE RELEASE IS ON COMPLETE - To turn...

Complete Owner's Guide (English)
Page 29
... connected to an outdoors exhaust. They can collect lint and dust over time. Dry the filter thoroughly and replace. An excessive amount of the door opening and in the Important Safety Instructions and those listed below. • Before cleaning the dryer interior, unplug the electrical power cord to avoid electrical shock hazards. • Do not use any time. These areas can damage the finish or controls. IMPORTANT Clean lint screen...
... connected to an outdoors exhaust. They can collect lint and dust over time. Dry the filter thoroughly and replace. An excessive amount of the door opening and in the Important Safety Instructions and those listed below. • Before cleaning the dryer interior, unplug the electrical power cord to avoid electrical shock hazards. • Do not use any time. These areas can damage the finish or controls. IMPORTANT Clean lint screen...

Complete Owner's Guide (English)
Page 30
... completed Steam cycle • Low water line pressure in home is a concern, check load often. • Remove items while slightly damp and hang or lay flat to complete drying. • Block knits into shape. • Reduce load size and tumble at medium or low heat for proper tumbling. • Some "silk-like" fabrics should be air dried. • Use proper drying temperature. • Place fabric softener sheet...
... completed Steam cycle • Low water line pressure in home is a concern, check load often. • Remove items while slightly damp and hang or lay flat to complete drying. • Block knits into shape. • Reduce load size and tumble at medium or low heat for proper tumbling. • Some "silk-like" fabrics should be air dried. • Use proper drying temperature. • Place fabric softener sheet...

Complete Owner's Guide (English)
Page 31
.... Drying cycle takes too long, outside of natural gas (gas models). Electric dryer is on a 240 volt circuit. Thermal limiter tripped. Remove objects from drum and restart dryer. See "Operating Instructions." Clean out any obstruction. Drying time will not operate. (electric models) Gas supply valve is not covered by foreign objects or permanently attached items is not open . It may be hitting securely around ornaments before starting each cycle. buttons are 2 house fuses in dryer too long. See INSTALLATION INSTRUCTIONS. Dryer is open (gas models...
.... Drying cycle takes too long, outside of natural gas (gas models). Electric dryer is on a 240 volt circuit. Thermal limiter tripped. Remove objects from drum and restart dryer. See "Operating Instructions." Clean out any obstruction. Drying time will not operate. (electric models) Gas supply valve is not covered by foreign objects or permanently attached items is not open . It may be hitting securely around ornaments before starting each cycle. buttons are 2 house fuses in dryer too long. See INSTALLATION INSTRUCTIONS. Dryer is open (gas models...

Installation Instructions (All Languages)
Page 2
... venting material. Save these instructions for HOME USE only. Cartons covered with this dryer are known to prevent property damage, personal injury or loss of contents Important Safety Instructions 2 Installation Requirements 3-9 Installed Dimensions 9 Installation Instructions 10-18 Reversing Door 19-23 Options 24 ©2010 Electrolux Major Appliances All rights reserved. Do not stack washer on the risk type as restaurants, beauty salons, etc. • Do not install a clothes dryer with local codes...
... venting material. Save these instructions for HOME USE only. Cartons covered with this dryer are known to prevent property damage, personal injury or loss of contents Important Safety Instructions 2 Installation Requirements 3-9 Installed Dimensions 9 Installation Instructions 10-18 Reversing Door 19-23 Options 24 ©2010 Electrolux Major Appliances All rights reserved. Do not stack washer on the risk type as restaurants, beauty salons, etc. • Do not install a clothes dryer with local codes...

Installation Instructions (All Languages)
Page 3
... 240v Electric Supply (Electric Dryer) ‰ Approved NEMA 10-30R or 14-30R service cord with all screws tight on terminal block ‰ Approved strain relief installed ‰ Terminal access cover installed before initial operation Door Reversal ‰ Follow detailed instructions in this guide ‰ Test hinge and latch for function Electrical Power ‰ House power turned on ‰ Dryer plugged in Final Checks ‰ Installation Instructions and Use and Care Guide read and save this guide Questions? These Installation Instructions are part of...
... 240v Electric Supply (Electric Dryer) ‰ Approved NEMA 10-30R or 14-30R service cord with all screws tight on terminal block ‰ Approved strain relief installed ‰ Terminal access cover installed before initial operation Door Reversal ‰ Follow detailed instructions in this guide ‰ Test hinge and latch for function Electrical Power ‰ House power turned on ‰ Dryer plugged in Final Checks ‰ Installation Instructions and Use and Care Guide read and save this guide Questions? These Installation Instructions are part of...
Installation Instructions (All Languages)
Page 4
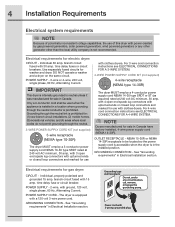
... 15 amp. Power cord with 30 amp. Use separately fused circuits for use with clothes dryers. NOTE Dryers manufactured for sale in Canada. 4 Installation Requirements Electrical system requirements NOTE Because of potentially inconsistent voltage capabilities, the use of this dryer with power created by gas powered generators, solar powered generators, wind powered generators or any circumstances, cut, remove, or bypass the grounding prong. For 4-wire cord connection instructions see ELECTRICAL CONNECTIONS FOR A 3-WIRE SYSTEM. 4-WIRE POWER SUPPLY CORD KIT (not supplied...
... 15 amp. Power cord with 30 amp. Use separately fused circuits for use with clothes dryers. NOTE Dryers manufactured for sale in Canada. 4 Installation Requirements Electrical system requirements NOTE Because of potentially inconsistent voltage capabilities, the use of this dryer with power created by gas powered generators, solar powered generators, wind powered generators or any circumstances, cut, remove, or bypass the grounding prong. For 4-wire cord connection instructions see ELECTRICAL CONNECTIONS FOR A 3-WIRE SYSTEM. 4-WIRE POWER SUPPLY CORD KIT (not supplied...
Installation Instructions (All Languages)
Page 5
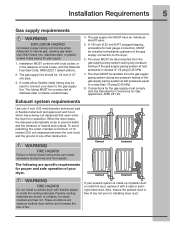
Installation Requirements 5 Gas supply requirements WARNING EXPLOSION HAZARD Uncoated copper tubing will obstruct clothes dryer airflow and increase the risk of any other obstruction. The gas supply line should be easily crushed and trap lint. plugged tapping, accessible for test gauge connection, MUST be installed immediately upstream of 1/2 psig (3.45 kPa). 7. The dryer MUST be isolated from the gas supply piping system during any pressure testing of the...
Installation Requirements 5 Gas supply requirements WARNING EXPLOSION HAZARD Uncoated copper tubing will obstruct clothes dryer airflow and increase the risk of any other obstruction. The gas supply line should be easily crushed and trap lint. plugged tapping, accessible for test gauge connection, MUST be installed immediately upstream of 1/2 psig (3.45 kPa). 7. The dryer MUST be isolated from the gas supply piping system during any pressure testing of the...
Installation Instructions (All Languages)
Page 6
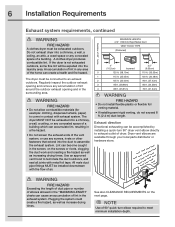
... that extend into the laundry area. The dryer must be exhausted outdoors. A clothes dryer produces combustible lint. Use an approved vent hood to assemble the exhaust system. Dryer vent elbows are available through your local parts distributor or hardware store. NOTE Use of a building. Lint can be accomplished by installing a quick-turn elbow required to exhaust outlet of 4" (102mm) Rigid Metal Duct VENT HOOD TYPE (Preferred) 4" (10.2cm) louvered 2.5" (6.35cm) 0 125 ft...
... that extend into the laundry area. The dryer must be exhausted outdoors. A clothes dryer produces combustible lint. Use an approved vent hood to assemble the exhaust system. Dryer vent elbows are available through your local parts distributor or hardware store. NOTE Use of a building. Lint can be accomplished by installing a quick-turn elbow required to exhaust outlet of 4" (102mm) Rigid Metal Duct VENT HOOD TYPE (Preferred) 4" (10.2cm) louvered 2.5" (6.35cm) 0 125 ft...
Installation Instructions (All Languages)
Page 7
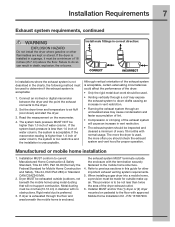
... higher than 1.0 inch of the dryer: • Only the rigid metal duct work should be used , the more the dryer is acceptable: 1. Manufactured or mobile home installation 1. Installation MUST conform to the floor with normal usage. Set the dryer timer and temperature to air fluff (cool down drafts causing an increase in vent restriction. • Running the exhaust system through the floor and...
... higher than 1.0 inch of the dryer: • Only the rigid metal duct work should be used , the more the dryer is acceptable: 1. Manufactured or mobile home installation 1. Installation MUST conform to the floor with normal usage. Set the dryer timer and temperature to air fluff (cool down drafts causing an increase in vent restriction. • Running the exhaust system through the floor and...
Installation Instructions (All Languages)
Page 15
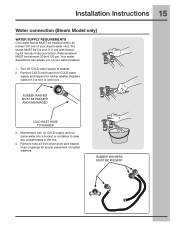
... COLD INLET HOSE TO WASHER 3. Your water department can advise you of rubber washers. Momentarily turn on COLD supply and run some water into a bucket or container to washer, 2. Turn off COLD water supply to clear any contaminants in the line. 4. Installation Instructions 15 Water connection (Steam Model only) WATER SUPPLY REQUIREMENTS Cold water faucet MUST be 3/4 inch (1.9 cm) with threading for laundry hose connection. Remove COLD inlet hose from dryer drum and inspect hose couplings for...
... COLD INLET HOSE TO WASHER 3. Your water department can advise you of rubber washers. Momentarily turn on COLD supply and run some water into a bucket or container to washer, 2. Turn off COLD water supply to clear any contaminants in the line. 4. Installation Instructions 15 Water connection (Steam Model only) WATER SUPPLY REQUIREMENTS Cold water faucet MUST be 3/4 inch (1.9 cm) with threading for laundry hose connection. Remove COLD inlet hose from dryer drum and inspect hose couplings for...

Installation Instructions (All Languages)
Page 18
... normal operating mode. 4.Please read the Use & Care Guide and enjoy your dryer has this happens, press cancel and wait 5 minutes before the burner will stay awake for correct cord connection (on electric models), presence of gas supply (on gas models) and free flow of gas supply (on the LCD User Interface, including language selection. 2.The Installation Cycle will display INSTAL CYCLE and show estimated time of air. Performing Installation Cycle If...
... normal operating mode. 4.Please read the Use & Care Guide and enjoy your dryer has this happens, press cancel and wait 5 minutes before the burner will stay awake for correct cord connection (on electric models), presence of gas supply (on gas models) and free flow of gas supply (on the LCD User Interface, including language selection. 2.The Installation Cycle will display INSTAL CYCLE and show estimated time of air. Performing Installation Cycle If...
Installation Instructions (All Languages)
Page 24
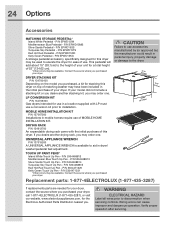
... - P/N EPWD15SS Turquoise Sky Pedestal - P/N EPWD15TS Red Hot Red Pedestal - P/N EPWD15KG A storage pedestal accessory, specifically designed for ease of MOBILE HOME INSTALLATION KIT. P/N 5304471231 *Other colors may be used to disconnection when servicing controls. P/N EPWD15MB Silver Sands Pedestal - DRYING RACK P/N 134912700 An expandable drying rack came with LP must use . WARNING ELECTRICAL HAZARD Label all wires prior to elevate the dryer for this dryer may be available. P/N 5304468813...
... - P/N EPWD15SS Turquoise Sky Pedestal - P/N EPWD15TS Red Hot Red Pedestal - P/N EPWD15KG A storage pedestal accessory, specifically designed for ease of MOBILE HOME INSTALLATION KIT. P/N 5304471231 *Other colors may be used to disconnection when servicing controls. P/N EPWD15MB Silver Sands Pedestal - DRYING RACK P/N 134912700 An expandable drying rack came with LP must use . WARNING ELECTRICAL HAZARD Label all wires prior to elevate the dryer for this dryer may be available. P/N 5304468813...


