
Installation Instructions
Page 1
Installation Instructions Electrolux Front-Load Gas a Electric Dryer E Electrolux 1)701820) A 10e0i I
Installation Instructions Electrolux Front-Load Gas a Electric Dryer E Electrolux 1)701820) A 10e0i I
Installation Instructions
Page 2
...& dryer (3-wIre call... 12 Electrical connection - the new preNumDrano in the mall. Mese►nstaaa&vn in the U.S. Keep a record for choosng Electrolux. 2 Finding Information Please read and save this gLide thank you . Bectric dryer (4-wirecacq...13 Gee oarnectian 14 Water connection (Steam Model only) 15-16 General installation 17 Performing installs:bar cycle is Resenting &cc 1943 Options 24 • Access:ties 44 • Replacement parts...
...& dryer (3-wIre call... 12 Electrical connection - the new preNumDrano in the mall. Mese►nstaaa&vn in the U.S. Keep a record for choosng Electrolux. 2 Finding Information Please read and save this gLide thank you . Bectric dryer (4-wirecacq...13 Gee oarnectian 14 Water connection (Steam Model only) 15-16 General installation 17 Performing installs:bar cycle is Resenting &cc 1943 Options 24 • Access:ties 44 • Replacement parts...
Installation Instructions
Page 3
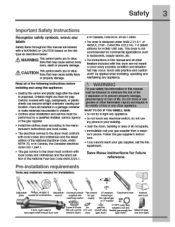
... the rrenutacturers instructions and boat codes. • The electrical seiviceto the dryer must conform with nags, bedspreads, or pasha sheets can become alight chambers caushg suffocation. This dryer Is not recommended for HOME USE 'anti. Cartons covered with local codes and ordinances and the latest edi- Place a materials n a garbage container dr maXe materials inaccessible to children. • Clothes dryer installation aid service must...
... the rrenutacturers instructions and boat codes. • The electrical seiviceto the dryer must conform with nags, bedspreads, or pasha sheets can become alight chambers caushg suffocation. This dryer Is not recommended for HOME USE 'anti. Cartons covered with local codes and ordinances and the latest edi- Place a materials n a garbage container dr maXe materials inaccessible to children. • Clothes dryer installation aid service must...
Installation Instructions
Page 4
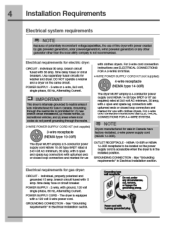
... 3-wire corn connection Instructions see ELECTRICAL CONNECTIONS FOR A 4-WIRE SYSTEM. Zwire, with 3 open end spade lug connectors with 3O amp. single phase. 6O Hz, Alternating Current. IM NOTE Dryers manufactured ror sale in Electrical installation section. OUTLET RECEPTACLE - See 'Grounding requirements" in Canada Grounding through tne neutral irk Is prOnIDIted for use of potentlarly inconsistent voltage npabilities. POWFR £IIIPPI V - me use wit clothes dryers. branch circuit fused with...
... 3-wire corn connection Instructions see ELECTRICAL CONNECTIONS FOR A 4-WIRE SYSTEM. Zwire, with 3 open end spade lug connectors with 3O amp. single phase. 6O Hz, Alternating Current. IM NOTE Dryers manufactured ror sale in Electrical installation section. OUTLET RECEPTACLE - See 'Grounding requirements" in Canada Grounding through tne neutral irk Is prOnIDIted for use of potentlarly inconsistent voltage npabilities. POWFR £IIIPPI V - me use wit clothes dryers. branch circuit fused with...

Installation Instructions
Page 5
... (1.27 cm) pipe. 3 it with a rigid or sell-rigid metal duct. connectionsfortne gas sup must also comply wth the Otrtlinetor Clothes Dryer 1Tansition Duct, UL standard 2158A. Flexible venting matenais are specific requirements for Connactois tor Gas Appta7ces, ANSI 22124. plugged tapping, accessibletor test gauge connection. To avoid lastitctIng the outlet, maintain a minimum of 1/2 psig (3.45 lea). 7. WARNING FIRE HAZARD Do not Install a oomes dryer with...
... (1.27 cm) pipe. 3 it with a rigid or sell-rigid metal duct. connectionsfortne gas sup must also comply wth the Otrtlinetor Clothes Dryer 1Tansition Duct, UL standard 2158A. Flexible venting matenais are specific requirements for Connactois tor Gas Appta7ces, ANSI 22124. plugged tapping, accessibletor test gauge connection. To avoid lastitctIng the outlet, maintain a minimum of 1/2 psig (3.45 lea). 7. WARNING FIRE HAZARD Do not Install a oomes dryer with...

Installation Instructions
Page 6
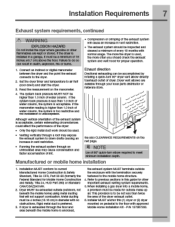
... cm .34m) MAXIMUM LENGTH 2 of lint in contact with tie flow of the noire can accumulate lira. on tie screms or rivets, cloggini the duct work ana creating a fire nazara aswoli as increase awing times. cr any concealec space or a building. All male duct pipe fittings MUST be exhausted outdoors. 6 Installation Requirements Exhaust system requirements, continued WARNING FIRE HAZARD A clothes dryer mug be nstaiied...
... cm .34m) MAXIMUM LENGTH 2 of lint in contact with tie flow of the noire can accumulate lira. on tie screms or rivets, cloggini the duct work ana creating a fire nazara aswoli as increase awing times. cr any concealec space or a building. All male duct pipe fittings MUST be exhausted outdoors. 6 Installation Requirements Exhaust system requirements, continued WARNING FIRE HAZARD A clothes dryer mug be nstaiied...
Installation Instructions
Page 7
... duct won( should check the exhaust system and vent hood for proper operation. 1 Connect an inclined or Clonal manometer between trie dryer ana tne paint tne ecnaust connects to the dryer. 2 Set tne dryer timer and temperature to air fluff (cool awn) and start the dryer 3 Read tne measurement on Me nod page. • Running the exhaust system through an uninsulated area may cause conaensation and faster aocumulation of lint...
... duct won( should check the exhaust system and vent hood for proper operation. 1 Connect an inclined or Clonal manometer between trie dryer ana tne paint tne ecnaust connects to the dryer. 2 Set tne dryer timer and temperature to air fluff (cool awn) and start the dryer 3 Read tne measurement on Me nod page. • Running the exhaust system through an uninsulated area may cause conaensation and faster aocumulation of lint...
Installation Instructions
Page 8
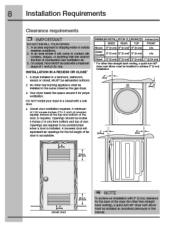
... venting). A dryer installed In a bedroom, bathroom, recess or closet. 8 Installation Requirements Clearance requirements !1 IMPORTANT DO NOT INSTALL YOUR DRYER: 1, in an area expouol tochippingwater or outslile weenier condition. Closet dcor ventilation required: A minimum ot 120 square inches (774.2 cm") of 1 incn (2.54 cm). or anything that will come in this manual. On carpet. DO NOT install your flyer In a closetwith a sollc door. 4. Openings are required...
... venting). A dryer installed In a bedroom, bathroom, recess or closet. 8 Installation Requirements Clearance requirements !1 IMPORTANT DO NOT INSTALL YOUR DRYER: 1, in an area expouol tochippingwater or outslile weenier condition. Closet dcor ventilation required: A minimum ot 120 square inches (774.2 cm") of 1 incn (2.54 cm). or anything that will come in this manual. On carpet. DO NOT install your flyer In a closetwith a sollc door. 4. Openings are required...
Installation Instructions
Page 10
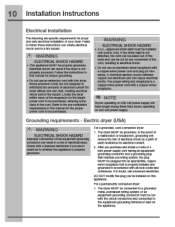
... tne length power cord to follow Mese instrueticrts can be installed onto paver cord. Locate tne dryer within reach of tne ccra. Fur re to be grounded. Grounding requirements - Check with a ccpper wired power cord and pug (or vice versa). copper wired receptacle tnat is not propeny grounaea. Follow tne instructions in °cent, call a licensed electncim DO NOT modify tne plug you purchaseand instal a 3 wire or 4 wire...
... tne length power cord to follow Mese instrueticrts can be installed onto paver cord. Locate tne dryer within reach of tne ccra. Fur re to be grounded. Grounding requirements - Check with a ccpper wired power cord and pug (or vice versa). copper wired receptacle tnat is not propeny grounaea. Follow tne instructions in °cent, call a licensed electncim DO NOT modify tne plug you purchaseand instal a 3 wire or 4 wire...
Installation Instructions
Page 11
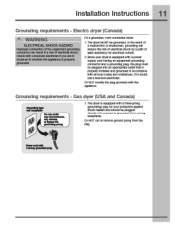
... the plug provned with 3-Pron9 ~dad ISO DO NOT cut or remove ground prong from the pitg. In tne event of ',Boat malatonce /or erect:rice outrert. 2. Grounding requirements - Power coed with the ap)liance. Installation Instructions 11 Grounding requirements - gtounaing will reduce tne risk of electilcalshoth by a path of a malfunction or breakdown. Foi a grounaeci. Electrb dryer (Canada) A\ WARNING ELECTRICAL...
... the plug provned with 3-Pron9 ~dad ISO DO NOT cut or remove ground prong from the pitg. In tne event of ',Boat malatonce /or erect:rice outrert. 2. Grounding requirements - Power coed with the ap)liance. Installation Instructions 11 Grounding requirements - gtounaing will reduce tne risk of electilcalshoth by a path of a malfunction or breakdown. Foi a grounaeci. Electrb dryer (Canada) A\ WARNING ELECTRICAL...
Installation Instructions
Page 12
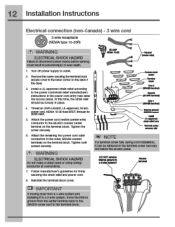
12 Installation Instructions Electrical connection (non-Canada) - 3 wire cord 3-wire receptacle %00 (NEMA type 10-30R) /?\ WARNING ELECTRICAL SHOCK HAZARD Failure to
12 Installation Instructions Electrical connection (non-Canada) - 3 wire cord 3-wire receptacle %00 (NEMA type 10-30R) /?\ WARNING ELECTRICAL SHOCK HAZARD Failure to

Installation Instructions
Page 13
...) - 4 wire cord (i) 4-wire teceptacle ° o (NEMA type 14-30R) • /1\ WARNING ELECTRICAL SHOCK HAZARD Failure to disconnect power source bermson/icing could result in personal InJuryor even aeatn. 1 Turn on power supply tooutiet. 2 Remote tnescrew securtgtheterminal block access covet in hie Fewer xineronthe back or tne dyer. 3 install a UL-approved strain rale/ according to tne power corcVstrain 'elle/ manufacturers instructions in tne terminal screw...
...) - 4 wire cord (i) 4-wire teceptacle ° o (NEMA type 14-30R) • /1\ WARNING ELECTRICAL SHOCK HAZARD Failure to disconnect power source bermson/icing could result in personal InJuryor even aeatn. 1 Turn on power supply tooutiet. 2 Remote tnescrew securtgtheterminal block access covet in hie Fewer xineronthe back or tne dyer. 3 install a UL-approved strain rale/ according to tne power corcVstrain 'elle/ manufacturers instructions in tne terminal screw...
Installation Instructions
Page 14
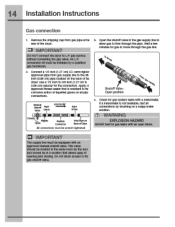
Remove the snipping cap from gas pipe at the near ot the dryer. MI IMPORTANT DO NOT connect tna 14 Installation Instructions Gas connection 1.
Remove the snipping cap from gas pipe at the near ot the dryer. MI IMPORTANT DO NOT connect tna 14 Installation Instructions Gas connection 1.
Installation Instructions
Page 15
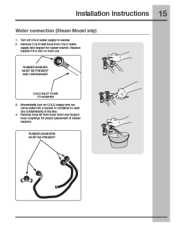
Installation Instructions 15 Water connection (Steam Model only) 1 'Rim off COLDwater supply to clear any contaminants In the Me. 4 Remove hose ktt Iran drier dam and Inspect nose couplings for ti ter washer. Replace washer If It Is tan or won out. RUBBER WASHER MUST BE PRESENT AND UNDAMAGED COLD INLET HDSE TOWASHER Momentarily turn co COLD supply and run sane water Into a bucke: or container to washer. 2 Remove COLD Inlet hose from COLD water supply and Inspect for miaow placement of rubber 'vatrioit. RUBBER WASHERS MUST BE PRESENT
Installation Instructions 15 Water connection (Steam Model only) 1 'Rim off COLDwater supply to clear any contaminants In the Me. 4 Remove hose ktt Iran drier dam and Inspect nose couplings for ti ter washer. Replace washer If It Is tan or won out. RUBBER WASHER MUST BE PRESENT AND UNDAMAGED COLD INLET HDSE TOWASHER Momentarily turn co COLD supply and run sane water Into a bucke: or container to washer. 2 Remove COLD Inlet hose from COLD water supply and Inspect for miaow placement of rubber 'vatrioit. RUBBER WASHERS MUST BE PRESENT

Installation Instructions
Page 16
... tighten It another 2/3 turn with pliers. 5. S. than tighten It another 2/3 turn with pliers. Connect the straight end otthe lorg hosePm the Kit to step 5. 2. lighten each correction ot the dryer Inlet hose another 2/3 turn with pliers. 4. O. re NOTE Ityou wereabletoInstalthe"r connector direct to the COLD water supply, please slUp to the other outlet on to the COLD water supply and snug it...
... tighten It another 2/3 turn with pliers. 5. S. than tighten It another 2/3 turn with pliers. Connect the straight end otthe lorg hosePm the Kit to step 5. 2. lighten each correction ot the dryer Inlet hose another 2/3 turn with pliers. 4. O. re NOTE Ityou wereabletoInstalthe"r connector direct to the COLD water supply, please slUp to the other outlet on to the COLD water supply and snug it...
Installation Instructions
Page 17
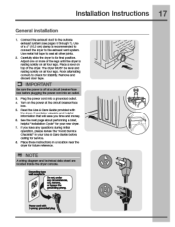
...;installation Cycle" to your new dryer. 7 It you have any questbns duilng Initial opetatbn, please neview the "Avoid Service Cheddis In ycurUse & Care Guide before pugging the power cord Into an allot. 3 Plug the power cord Into a grounded outlet. 4 Awn on all otner joints. 2 Canefully slide the dryer to the exhaust vent system. use motet fog tape to seal all tourlegs. Use of the dryer. Installation Instructions 17 General installation 1 Connect the exhaust duct to check...
...;installation Cycle" to your new dryer. 7 It you have any questbns duilng Initial opetatbn, please neview the "Avoid Service Cheddis In ycurUse & Care Guide before pugging the power cord Into an allot. 3 Plug the power cord Into a grounded outlet. 4 Awn on all otner joints. 2 Canefully slide the dryer to the exhaust vent system. use motet fog tape to seal all tourlegs. Use of the dryer. Installation Instructions 17 General installation 1 Connect the exhaust duct to check...
Installation Instructions
Page 18
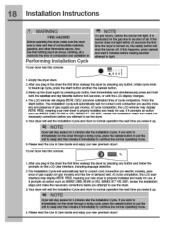
... normal operating mode. 4 .PleaSe read tne Use & Care Guide and enjoy your new premium dryer! or until tne LCDdisplay changes. 4.The LCD window will shut tne rourner on . Press the start button. It...installation Cycle. Ai• 0 1.Empty the dryer arum. 2.Atter you plug in the dryer tne first time: wake m the dryer Dy pressing any Dutton and 'follow the prompts on gas models) and free lbw a exhaust vent. press the cancel Dutton to pit the unit to Wax, and then rewake it immediately to ' correct cord connection (at electric MCCIGIS), presence ot gas supply (on tne LCD user...
... normal operating mode. 4 .PleaSe read tne Use & Care Guide and enjoy your new premium dryer! or until tne LCDdisplay changes. 4.The LCD window will shut tne rourner on . Press the start button. It...installation Cycle. Ai• 0 1.Empty the dryer arum. 2.Atter you plug in the dryer tne first time: wake m the dryer Dy pressing any Dutton and 'follow the prompts on gas models) and free lbw a exhaust vent. press the cancel Dutton to pit the unit to Wax, and then rewake it immediately to ' correct cord connection (at electric MCCIGIS), presence ot gas supply (on tne LCD user...
Installation Instructions
Page 19
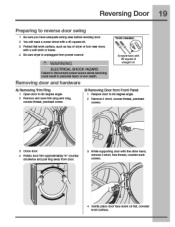
.... B)Removing Door from Front Panel 1 Reopen door to reverse door swing 1 Be sure you have adequate swing area before reversing door 2 You will need a screw driver with a t2 square bit. 3 Protect flat woik surface, such as top of dryer or11)or near dryer, with a soft cloth or towel. 4 Be sure dryer Is unplucged from dear. 3 Mlle supporting dear with square straight bit A) Removing Trim Ring 1 Open door to...
.... B)Removing Door from Front Panel 1 Reopen door to reverse door swing 1 Be sure you have adequate swing area before reversing door 2 You will need a screw driver with a t2 square bit. 3 Protect flat woik surface, such as top of dryer or11)or near dryer, with a soft cloth or towel. 4 Be sure dryer Is unplucged from dear. 3 Mlle supporting dear with square straight bit A) Removing Trim Ring 1 Open door to...
Installation Instructions
Page 20
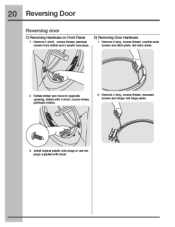
20 Reversing Door Reversing door C) Reversing Hardware on Front Panel 1 Remove 2 slut, course-thread, panhead screws trom sinker and 2 plastic hole plugs. Set latch aside. 2 Rotate striker and movetooppsite opening. Mt:at-Iwith 2 short. Set hinge aside. 3 Install nal plastic hole plugs or use new plugs suppliedwith dryer. couise-trireai, pannead scams. 2 Remove 4 Iamb course-thread. Iy D) Removing Door Hardware 1 Remove 2 Iamb course-thread. counter-surd( screws and latch plate. recessed screws and hinge.
20 Reversing Door Reversing door C) Reversing Hardware on Front Panel 1 Remove 2 slut, course-thread, panhead screws trom sinker and 2 plastic hole plugs. Set latch aside. 2 Rotate striker and movetooppsite opening. Mt:at-Iwith 2 short. Set hinge aside. 3 Install nal plastic hole plugs or use new plugs suppliedwith dryer. couise-trireai, pannead scams. 2 Remove 4 Iamb course-thread. Iy D) Removing Door Hardware 1 Remove 2 Iamb course-thread. counter-surd( screws and latch plate. recessed screws and hinge.
Installation Instructions
Page 24
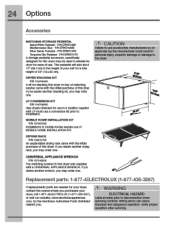
..., www.electoimappliances. PMEPWD1STS A storage pedestal axessory, specincally designed for use In a location supplied with a UNIVERSAL APPLIANCE WRENCH. DRYER STACKING KIT P/N 134700400 A kit I FUGAL HAZAHL) Label an wires prior to the dryer. 0 Replacement parts: 1-877-4ELECTROLUX (1-877-435-3287) If replacements part are needed for the Electrolta Authorized Parts Distilbu:or nearest ycu. /f\ WARNING LEU I or stacidng this dryer on top of matching washer same with tne indiai...
..., www.electoimappliances. PMEPWD1STS A storage pedestal axessory, specincally designed for use In a location supplied with a UNIVERSAL APPLIANCE WRENCH. DRYER STACKING KIT P/N 134700400 A kit I FUGAL HAZAHL) Label an wires prior to the dryer. 0 Replacement parts: 1-877-4ELECTROLUX (1-877-435-3287) If replacements part are needed for the Electrolta Authorized Parts Distilbu:or nearest ycu. /f\ WARNING LEU I or stacidng this dryer on top of matching washer same with tne indiai...


