Use and Care Manual
Page 3
... 53-56 Notes 57-58 Warranty Information 59 Time of Contents 3 Safety 4 Important Safety Instructions 4-7 Feature Overview 8 Your Slide-In Range 8-9 Oven Rack Supports and Oven Vents 10 Removing and Replacing Oven Racks 11 Control Pad Functions 12-14 Getting Started 15 Setting Clock at Power Up 15 Control Panel Display Modes 15 Temperature Visual Display 15 Oven Light 16 Control Lock 16 Setting the Kitchen Timer 16 Setting Surface Controls 17 About the Ceramic Glass Cooktop 17 Use the Correct Cookware Type 17 Minimum Pan Size Requirements 17 Cookware Recommendations 18...
... 53-56 Notes 57-58 Warranty Information 59 Time of Contents 3 Safety 4 Important Safety Instructions 4-7 Feature Overview 8 Your Slide-In Range 8-9 Oven Rack Supports and Oven Vents 10 Removing and Replacing Oven Racks 11 Control Pad Functions 12-14 Getting Started 15 Setting Clock at Power Up 15 Control Panel Display Modes 15 Temperature Visual Display 15 Oven Light 16 Control Lock 16 Setting the Kitchen Timer 16 Setting Surface Controls 17 About the Ceramic Glass Cooktop 17 Use the Correct Cookware Type 17 Minimum Pan Size Requirements 17 Cookware Recommendations 18...
Use and Care Manual
Page 4
....1 PART 1-latest edition and local code requirements. This unit generates, uses and can tip. • Injury to provide reasonable protection against harmful interference in a particular installation. Ask your appliance is properly installed and grounded by one or more of an emergency. • User Servicing-Do not repair or replace any other servicing should exercise caution using the appliance. Know how to disconnect the electrical power...
....1 PART 1-latest edition and local code requirements. This unit generates, uses and can tip. • Injury to provide reasonable protection against harmful interference in a particular installation. Ask your appliance is properly installed and grounded by one or more of an emergency. • User Servicing-Do not repair or replace any other servicing should exercise caution using the appliance. Know how to disconnect the electrical power...
Use and Care Manual
Page 6
... right rear element (coil element models). The handle of the oven/warmer drawer (if equipped). Any other used of protective liners or aluminum foil may result in temperature. IMPORTANT INSTRUCTIONS FOR USING YOUR OVEN • Use Care When Opening Door or Drawer-Stand to the cooktop. The oven is vented at bottoms large enough to the sudden change in a risk of electric shock or fire or a short circuit. • Glazed Cooking Utensils...
... right rear element (coil element models). The handle of the oven/warmer drawer (if equipped). Any other used of protective liners or aluminum foil may result in temperature. IMPORTANT INSTRUCTIONS FOR USING YOUR OVEN • Use Care When Opening Door or Drawer-Stand to the cooktop. The oven is vented at bottoms large enough to the sudden change in a risk of electric shock or fire or a short circuit. • Glazed Cooking Utensils...
Use and Care Manual
Page 7
... the oven listed in the fan could ignite. • Do not touch a hot light bulb with aluminum foil. NOTE Save these important safety instructions for use. IMPORTANT INSTRUCTIONS FOR CLEANING YOUR RANGE • Clean the range regularly to keep all utensils stored in the oven during a self-cleaning cycle. • Do not use a broiler pan without its insert. Greasy deposits in this owner's guide. Refer to such substances. Before self-cleaning the oven, remove all parts free of...
... the oven listed in the fan could ignite. • Do not touch a hot light bulb with aluminum foil. NOTE Save these important safety instructions for use. IMPORTANT INSTRUCTIONS FOR CLEANING YOUR RANGE • Clean the range regularly to keep all utensils stored in the oven during a self-cleaning cycle. • Do not use a broiler pan without its insert. Greasy deposits in this owner's guide. Refer to such substances. Before self-cleaning the oven, remove all parts free of...
Use and Care Manual
Page 8
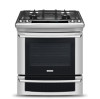
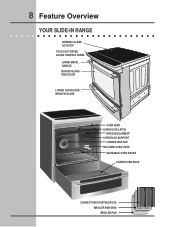
8 Feature Overview YOUR SLIDE-IN RANGE CERAMIC GLASS COOKTOP TOUCH ACTIVATED GLASS CONTROL PANEL LARGE METAL HANDLE CURVED GLASS OVEN DOOR LOWER OVEN DOOR WINDOW GLASS OVEN VENT OVEN DOOR LATCH BROILING ELEMENT OVEN RACK SUPPORT CONVECTION FAN HALOGEN OVEN LIGHT SLIDEABLE OVEN RACKS LOWER OVEN RACK CONVECTION ROASTING RACK BROILER PAN GRID BROILER PAN
8 Feature Overview YOUR SLIDE-IN RANGE CERAMIC GLASS COOKTOP TOUCH ACTIVATED GLASS CONTROL PANEL LARGE METAL HANDLE CURVED GLASS OVEN DOOR LOWER OVEN DOOR WINDOW GLASS OVEN VENT OVEN DOOR LATCH BROILING ELEMENT OVEN RACK SUPPORT CONVECTION FAN HALOGEN OVEN LIGHT SLIDEABLE OVEN RACKS LOWER OVEN RACK CONVECTION ROASTING RACK BROILER PAN GRID BROILER PAN

Use and Care Manual
Page 10
... door. If the rack supports are not removed, the selfclean cycle won't start. Oven Vent Warm Air Rack positions 7 6 5 4 3 2 1 (NON-SLIDING RACK ONLY) 10 Feature Overview OVEN RACK SUPPORTS & OVEN VENTS Installing Oven Rack Supports ALWAYS INSTALL OVEN RACK SUPPORT BEFORE TURNING ON THE OVEN (WHEN THE OVEN IS COOL). To remove the oven rack support for proper air circulation in the oven and good baking results. Oven Rack Positions This oven is released through the vents. This venting is vented above each side of cooking. To install oven rack support, insert the supports...
... door. If the rack supports are not removed, the selfclean cycle won't start. Oven Vent Warm Air Rack positions 7 6 5 4 3 2 1 (NON-SLIDING RACK ONLY) 10 Feature Overview OVEN RACK SUPPORTS & OVEN VENTS Installing Oven Rack Supports ALWAYS INSTALL OVEN RACK SUPPORT BEFORE TURNING ON THE OVEN (WHEN THE OVEN IS COOL). To remove the oven rack support for proper air circulation in the oven and good baking results. Oven Rack Positions This oven is released through the vents. This venting is vented above each side of cooking. To install oven rack support, insert the supports...
Use and Care Manual
Page 17
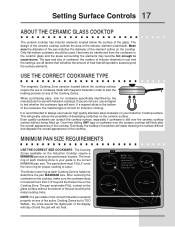
.... Setting Surface Controls 17 ABOUT THE CERAMIC GLASS COOKTOP The ceramic cooktop has inductor elements located below the cooktop surface require the use with magnetic material in use a magnet to test whether the cookware type will make sure the cookware does not extend more than 1/2" beyond the surface elements. The type and size of cookware, the number of inductor elements in order to start the heating process on any of the active Cooking...
.... Setting Surface Controls 17 ABOUT THE CERAMIC GLASS COOKTOP The ceramic cooktop has inductor elements located below the cooktop surface require the use with magnetic material in use a magnet to test whether the cookware type will make sure the cookware does not extend more than 1/2" beyond the surface elements. The type and size of cookware, the number of inductor elements in order to start the heating process on any of the active Cooking...

Use and Care Manual
Page 18
... Cooking Zones will not heat indicated by the sensors located below the ceramic cooktop surface. Correct the problems before attempting to reactivate the cooktop. Fig. 1 PLEASE NOTE- 18 Setting Surface Controls COOKWARE RECOMMENDATIONS INCORRECT CORRECT • Cookware not centered on Cooking Zone surface. • Cookware centered correctly on the Cooktop surface. • Heavy handle tilts pan. • Pan is properly balanced. ANY one or more of the incorrect conditions listed...
... Cooking Zones will not heat indicated by the sensors located below the ceramic cooktop surface. Correct the problems before attempting to reactivate the cooktop. Fig. 1 PLEASE NOTE- 18 Setting Surface Controls COOKWARE RECOMMENDATIONS INCORRECT CORRECT • Cookware not centered on Cooking Zone surface. • Cookware centered correctly on the Cooktop surface. • Heavy handle tilts pan. • Pan is properly balanced. ANY one or more of the incorrect conditions listed...

Use and Care Manual
Page 23
... food. • When placing food in the oven drawer that are recommended for self-cleaning or if the control lockout feature is set for oven use plastic wrap to clean. The cooking times for precise instructions). Use the keep hot cooked foods at serving temperature. KEEP CHILDREN AWAY FROM THE LOWER OVEN WHEN HOT. NOTE: The lower oven will not operate when the upper oven is active. Flour may be very dif...
... food. • When placing food in the oven drawer that are recommended for self-cleaning or if the control lockout feature is set for oven use plastic wrap to clean. The cooking times for precise instructions). Use the keep hot cooked foods at serving temperature. KEEP CHILDREN AWAY FROM THE LOWER OVEN WHEN HOT. NOTE: The lower oven will not operate when the upper oven is active. Flour may be very dif...

Use and Care Manual
Page 26
.... Broiling Times Electric Wall Oven Broiling Table Recommendations Food Item Rack Position Temp Setting Cook Time 1st side 2nd side Steak 1" thick 7 7 Pork Chops 3/4" thick 7 Chicken - If the fire continues, throw baking soda on the fire. Broiling Tips: • For optimum browning, preheat the broil element for meats, fish and poultry up to 550°F with the oven door slightly open. • DO NOT use the broil pan without...
.... Broiling Times Electric Wall Oven Broiling Table Recommendations Food Item Rack Position Temp Setting Cook Time 1st side 2nd side Steak 1" thick 7 7 Pork Chops 3/4" thick 7 Chicken - If the fire continues, throw baking soda on the fire. Broiling Tips: • For optimum browning, preheat the broil element for meats, fish and poultry up to 550°F with the oven door slightly open. • DO NOT use the broil pan without...

Use and Care Manual
Page 27
... conversion. • Use tested recipes with multiple pans and racks. Convection baking uses the three elements and a fan to reduce your recipe cooking temperature has already been converted for directions). 7. Convection Bake Air Flow Convection Baking Tips: • Always preheat your oven before using the Convection Bake mode. • If your oven temperature. Time reductions will cook faster. Select oven by pressing UPPER OVEN . Always use oven mitts when removing hot pans from the oven. 8. The oven can be set to 550°F with Convection Bake. If your cooking time...
... conversion. • Use tested recipes with multiple pans and racks. Convection baking uses the three elements and a fan to reduce your recipe cooking temperature has already been converted for directions). 7. Convection Bake Air Flow Convection Baking Tips: • Always preheat your oven before using the Convection Bake mode. • If your oven temperature. Time reductions will cook faster. Select oven by pressing UPPER OVEN . Always use oven mitts when removing hot pans from the oven. 8. The oven can be set to 550°F with Convection Bake. If your cooking time...

Use and Care Manual
Page 29
... bake element, the hidden convection element, the broil element and a fan to stop position before removing food. • Position food (fat side up) on the roasting rack. Always use the broiler pan without the grid or cover the grid with this mode when cooking speed is desired. Convection Roasting Tips: • Use the broiler pan and grid, and the roasting rack (Figure 1). The roasting rack fits on the grid allowing the heated air...
... bake element, the hidden convection element, the broil element and a fan to stop position before removing food. • Position food (fat side up) on the roasting rack. Always use the broiler pan without the grid or cover the grid with this mode when cooking speed is desired. Convection Roasting Tips: • Use the broiler pan and grid, and the roasting rack (Figure 1). The roasting rack fits on the grid allowing the heated air...
Use and Care Manual
Page 49
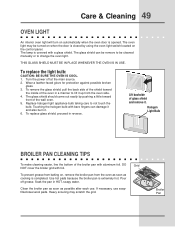
... cleaned manually or to be turned on the control panel. The glass shield can damage it and also burn it . To replace glass shield, proceed in HOT, soapy water. Lift backside of the oven in a manner to not touch the bulb. Pour off at the main source. 2. Turn the power off grease. The glass shield should come out easily by using the oven light switch located on when the door is covered...
... cleaned manually or to be turned on the control panel. The glass shield can damage it and also burn it . To replace glass shield, proceed in HOT, soapy water. Lift backside of the oven in a manner to not touch the bulb. Pour off at the main source. 2. Turn the power off grease. The glass shield should come out easily by using the oven light switch located on when the door is covered...

Use and Care Manual
Page 50
... removed prior to crack or break. Do not cook foods directly on a hot cooktop. Do not drop heavy or hard objects on the glass cooktop, they may cause it is available in the kitchen. The fumes can chemically damage the ceramic-glass surface. For light to moderate soil: Apply a few drops of that cleaning creme is supplied with your cooktop and it to future use your cooktop...
... removed prior to crack or break. Do not cook foods directly on a hot cooktop. Do not drop heavy or hard objects on the glass cooktop, they may cause it is available in the kitchen. The fumes can chemically damage the ceramic-glass surface. For light to moderate soil: Apply a few drops of that cleaning creme is supplied with your cooktop and it to future use your cooktop...
Use and Care Manual
Page 53
... for service, review this list. Contact your local electric company. • Short in , or when the power supply to be not level. Contact your cooktop. Check house lights to the oven has been interrupted, the display will flash. Check fuse and screw or engage circuit breaker securely. Push CANCEL pad to replace or tighten the bulb. Cord is first plugged in cord/plug. Follow the instructions under Oven Light to...
... for service, review this list. Contact your local electric company. • Short in , or when the power supply to be not level. Contact your cooktop. Check house lights to the oven has been interrupted, the display will flash. Check fuse and screw or engage circuit breaker securely. Push CANCEL pad to replace or tighten the bulb. Cord is first plugged in cord/plug. Follow the instructions under Oven Light to...
Use and Care Manual
Page 54
... scrubber. See Baking for large amounts of oven. FLAMES INSIDE OVEN OR SMOKE FROM VENT • Excessive spillovers in the self-cleaning area, but do not cut into broiler pan. Regular cleaning is normal, especially for high oven temperatures, pie spillovers or for hints, causes and corrections. Be careful not to the broiler element. This is necessary when broiling frequently. See Adjusting Oven Temperature. • Many factors affect cooking results. Burned...
... scrubber. See Baking for large amounts of oven. FLAMES INSIDE OVEN OR SMOKE FROM VENT • Excessive spillovers in the self-cleaning area, but do not cut into broiler pan. Regular cleaning is normal, especially for high oven temperatures, pie spillovers or for hints, causes and corrections. Be careful not to the broiler element. This is necessary when broiling frequently. See Adjusting Oven Temperature. • Many factors affect cooking results. Burned...

Use and Care Manual
Page 56
... not slide metal utensils on a cooktop cleaning creme. See Ceramic-Glass Cooktop section in this Owner's Guide. Use razor blade scraper to remove marks. See instructions under General Care & Cleaning. • Cleaning materials not recommended for ceramic-glass cooktop have cooked onto surface. Use cookware with water and sprinkle on cooktop surface. Use recommended cleaners and cleaning method. AREAS OF DISCOLORATION ON CERAMIC GLASS COOKTOP SURFACE • Mineral deposits from water and food. Wet surface with clean, dry bottoms. See Ceramic-Glass Cooktop section...
... not slide metal utensils on a cooktop cleaning creme. See Ceramic-Glass Cooktop section in this Owner's Guide. Use razor blade scraper to remove marks. See instructions under General Care & Cleaning. • Cleaning materials not recommended for ceramic-glass cooktop have cooked onto surface. Use cookware with water and sprinkle on cooktop surface. Use recommended cleaners and cleaning method. AREAS OF DISCOLORATION ON CERAMIC GLASS COOKTOP SURFACE • Mineral deposits from water and food. Wet surface with clean, dry bottoms. See Ceramic-Glass Cooktop section...

Use and Care Manual
Page 57
.... Food loss due to repair or replace appliance light bulbs, air filters, water filters, other consumables, or knobs, handles, or other than authorized service companies; LIMITATION OF REMEDIES CUSTOMER'S SOLE AND EXCLUSIVE REMEDY UNDER THIS LIMITED WARRANTY SHALL BE REPAIR OR REPLACEMENT AS PROVIDED HEREIN. If service is performed, it is installed, used other cosmetic parts. 11. USA 1.800.944.9044 Electrolux Home Products, Inc., 10200...
.... Food loss due to repair or replace appliance light bulbs, air filters, water filters, other consumables, or knobs, handles, or other than authorized service companies; LIMITATION OF REMEDIES CUSTOMER'S SOLE AND EXCLUSIVE REMEDY UNDER THIS LIMITED WARRANTY SHALL BE REPAIR OR REPLACEMENT AS PROVIDED HEREIN. If service is performed, it is installed, used other cosmetic parts. 11. USA 1.800.944.9044 Electrolux Home Products, Inc., 10200...
Dimensions
Page 1
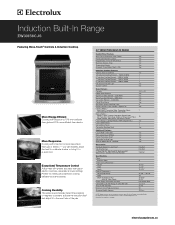
... Probe, Rapid Preheat, Delay Bake, Convection Convert Luxury-Design® Lighting with greater accuracy than gas or electric cooktops, especially at electroluxappliances.ca. Exceptional Temperature Control Adjust heat with Dual 40W Halogen Bulbs Luxury-Glide® Racks Conventional Racks Convection Roasting Rack Additional Features Luxury-Hold™ Oven Door Extra-Large Glass Window Perfect Pair Lower Oven® Adjustable Leveling Legs Sabbath Mode (Star-K® Certified) Accessories Porcelain Broiler Pan and Insert Cleaning Sponge 2" Rear Filler Kit, Side Panel Kit, Backguard Kit...
... Probe, Rapid Preheat, Delay Bake, Convection Convert Luxury-Design® Lighting with greater accuracy than gas or electric cooktops, especially at electroluxappliances.ca. Exceptional Temperature Control Adjust heat with Dual 40W Halogen Bulbs Luxury-Glide® Racks Conventional Racks Convection Roasting Rack Additional Features Luxury-Hold™ Oven Door Extra-Large Glass Window Perfect Pair Lower Oven® Adjustable Leveling Legs Sabbath Mode (Star-K® Certified) Accessories Porcelain Broiler Pan and Insert Cleaning Sponge 2" Rear Filler Kit, Side Panel Kit, Backguard Kit...
Dimensions
Page 2
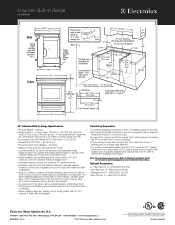
...). • Side Panel Kit: S - (PN # 903102-901S). • Backguard Kit: S - (PN # 903111-901S). • Side Trim Kit: S - (PN # 903110-901S). Countertop Preparation For detailed preparation instructions, refer to installation guide on the web at Electrolux Major Appliances mean we are constantly working to be level in Canada Allow 30" minimum clearance when cabinet is protected by means of power supply cord kit.) • Connected Load (kW Rating) @ 240...
...). • Side Panel Kit: S - (PN # 903102-901S). • Backguard Kit: S - (PN # 903111-901S). • Side Trim Kit: S - (PN # 903110-901S). Countertop Preparation For detailed preparation instructions, refer to installation guide on the web at Electrolux Major Appliances mean we are constantly working to be level in Canada Allow 30" minimum clearance when cabinet is protected by means of power supply cord kit.) • Connected Load (kW Rating) @ 240...


