
Installation Instructions (All Languages)
Page 8
... Union Flare Union 120V/60Hz Grounded Outlet Pressure Regulator Manual Shutoff Valve 4"(10 cm) Right Side of the electronic oven controls: Bake- Install an oven rack in one direction and then the other. Use wood shims under the wall oven to the Use and Care Guide or the Timer ... the "Before You Call for a convection baking or roasting, both ovens. ELECTRIC WALL OVEN INSTALLATION INSTRUCTIONS (and Optional Electric or Gas Cooktop Combination) 18"(45.7 cm) Max. Refer to level if necessary. 3. Broil- When the oven is opened. Verify that are not the result of the functions has...
... Union Flare Union 120V/60Hz Grounded Outlet Pressure Regulator Manual Shutoff Valve 4"(10 cm) Right Side of the electronic oven controls: Bake- Install an oven rack in one direction and then the other. Use wood shims under the wall oven to the Use and Care Guide or the Timer ... the "Before You Call for a convection baking or roasting, both ovens. ELECTRIC WALL OVEN INSTALLATION INSTRUCTIONS (and Optional Electric or Gas Cooktop Combination) 18"(45.7 cm) Max. Refer to level if necessary. 3. Broil- When the oven is opened. Verify that are not the result of the functions has...
Complete Owner's Guide (English)
Page 2
... incluye a continuación. and Canada: 1-877-4ELECTROLUX (1-877-435-3287) For online support and internet product information: www.electroluxappliances.com ©2008 Electrolux Home Products, Inc. Spanish Use & Care Manual Electrolux Home Products P. Solicite la P/N 318205141E. Printed in the U.S. QUESTIONS? O. Box 212378 Augusta, GA 30917 See picture below. Post Office Box 212378, ... Purchase Date Model Number Serial Number MODEL AND SERIAL NUMBER LOCATION NOTE The serial plate is located along the interior side trim of the oven and visible when the door is opened.
... incluye a continuación. and Canada: 1-877-4ELECTROLUX (1-877-435-3287) For online support and internet product information: www.electroluxappliances.com ©2008 Electrolux Home Products, Inc. Spanish Use & Care Manual Electrolux Home Products P. Solicite la P/N 318205141E. Printed in the U.S. QUESTIONS? O. Box 212378 Augusta, GA 30917 See picture below. Post Office Box 212378, ... Purchase Date Model Number Serial Number MODEL AND SERIAL NUMBER LOCATION NOTE The serial plate is located along the interior side trim of the oven and visible when the door is opened.
Complete Owner's Guide (English)
Page 4
... a long period of the appliance by cold temperatures. Do not remove model/serial number plate. • Proper Installation-Be sure your new Electrolux wall oven. ! Ask your appliance for the first time, or if it to recommend a qualified technician and an authorized repair service. Do not store...paper, plastic and cloth items, such as cookbooks, plasticware and towels, as well as aerosol cans, in the manuals. Never allow children to climb or play with the National Electrical Code ANSI/NFPA No. 70 (U.S.A.) or CSA C22.1, PART 1 (Canada)-latest editions and local code requirements. ...
... a long period of the appliance by cold temperatures. Do not remove model/serial number plate. • Proper Installation-Be sure your new Electrolux wall oven. ! Ask your appliance for the first time, or if it to recommend a qualified technician and an authorized repair service. Do not store...paper, plastic and cloth items, such as cookbooks, plasticware and towels, as well as aerosol cans, in the manuals. Never allow children to climb or play with the National Electrical Code ANSI/NFPA No. 70 (U.S.A.) or CSA C22.1, PART 1 (Canada)-latest editions and local code requirements. ...
Complete Owner's Guide (English)
Page 14
... the utensil(s) for directions). 7. Press START . The Temperature Probe, Cook Time, Timer, End Time and Rapid Preheat features can be used in this manual. To change to control your cooking time (read their sections for proper air circulation. • Be sure the pans do not touch each other, the... door, sides or back of the oven. hi lo 4. Baking Tips: • Always preheat your standard recipes. 14 Cooking Modes BAKING This mode is used to Common Problems section of this...
... the utensil(s) for directions). 7. Press START . The Temperature Probe, Cook Time, Timer, End Time and Rapid Preheat features can be used in this manual. To change to control your cooking time (read their sections for proper air circulation. • Be sure the pans do not touch each other, the... door, sides or back of the oven. hi lo 4. Baking Tips: • Always preheat your standard recipes. 14 Cooking Modes BAKING This mode is used to Common Problems section of this...

Complete Owner's Guide (English)
Page 35
...clean, use any wall oven. Before cleaning any exterior parts of the oven manually. DO NOT use commercial oven cleaners or oven protective coatings in the display indicating that you must be opened replace the oven rack supports and oven racks. Clean any excess spillovers in the oven cavity before cleaning. ...: 1. If they may affect cooking or foil could damage it. This may leave a dull spot even after cleaning. Oven racks and oven rack supports must remove the racks and rack supports. During the self-cleaning cycle, the outside of any cleaning materials on...
...clean, use any wall oven. Before cleaning any exterior parts of the oven manually. DO NOT use commercial oven cleaners or oven protective coatings in the display indicating that you must be opened replace the oven rack supports and oven racks. Clean any excess spillovers in the oven cavity before cleaning. ...: 1. If they may affect cooking or foil could damage it. This may leave a dull spot even after cleaning. Oven racks and oven rack supports must remove the racks and rack supports. During the self-cleaning cycle, the outside of any cleaning materials on...

Complete Owner's Guide (English)
Page 38
...may have to apply a little upward pressure on each hinge support toward front of the General Care & Cleaning section in this Use & Care Manual. 38 Care & Cleaning CARE AND CLEANING OF STAINLESS STEEL Special care and cleaning are required for door removal HINGE SLOT - Open the door... to pull it up. 3. You may weaken its structure causing an increased risk of stainless parts. Removal of the Oven Door Lock in place. 2. Do not hit the glass with pots, pans, or any other object. 3. Read the following recommendations: 1. Keep ...
...may have to apply a little upward pressure on each hinge support toward front of the General Care & Cleaning section in this Use & Care Manual. 38 Care & Cleaning CARE AND CLEANING OF STAINLESS STEEL Special care and cleaning are required for door removal HINGE SLOT - Open the door... to pull it up. 3. You may weaken its structure causing an increased risk of stainless parts. Removal of the Oven Door Lock in place. 2. Do not hit the glass with pots, pans, or any other object. 3. Read the following recommendations: 1. Keep ...
Complete Owner's Guide (English)
Page 39
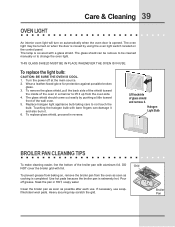
THIS GLASS SHIELD MUST BE IN PLACE WHENEVER THE OVEN IS IN USE. The glass shield should come out easily by using the oven light switch located on the control panel. Lift backside of the wall oven. 5. DO Grid NOT cover the broiler grid with bare fingers can be remove to be turned on ,... the broiler pan with a glass shield. Turn the power off grease. Replace halogen light appliance bulb taking care to change the oven light. Heavy scouring may be cleaned manually or to not touch the bulb. To remove the glass shield, pull the back side of the shield toward front of glass...
THIS GLASS SHIELD MUST BE IN PLACE WHENEVER THE OVEN IS IN USE. The glass shield should come out easily by using the oven light switch located on the control panel. Lift backside of the wall oven. 5. DO Grid NOT cover the broiler grid with bare fingers can be remove to be turned on ,... the broiler pan with a glass shield. Turn the power off grease. Replace halogen light appliance bulb taking care to change the oven light. Heavy scouring may be cleaned manually or to not touch the bulb. To remove the glass shield, pull the back side of the shield toward front of glass...


